Birch bark processing technologies. Tool. Types of decorative processing of birch bark and types of birch bark products

22.07.2023 Boilers


It is best to harvest birch bark in the spring. The best birch bark is smooth, with a beautiful pattern (narrow stripes) - from one of the most common varieties of birch - downy birch. This birch grows over most of our country. A peculiar feature of the downy birch, which makes it easy to distinguish it from another type of birch, the warty birch, is the small, dense fluff that covers the young shoots and leaves. Downy birch forms the second layer in pine or sparse spruce forests, and is found in low-lying and floodplain areas that are flooded with water in the spring.

The strongest and densest birch bark is produced by birches grown on dry and rocky soils. And trees growing in peat bogs and swamps have brittle bark, with knots, and an uneven, corroded surface.

The tool for removing birch bark is an ordinary sharp knife. For the products offered in this chapter, birch bark is removed in layers and with tape. To harvest layered birch bark, horizontal cuts are made on the birch trunk; to harvest bast tape, spiral cuts are made around the trunk. If you need large, solid pieces, then birch bark should be removed from cut trees with a diameter of at least 20 cm, if possible choosing places that are smooth and without knots.

The entire outer (white) side of the bark is cleaned with a knife or sandpaper and freed from dirt and fungi and moss growing on the birch. The inner side is freed from the remains of porous, brown birch bark and wiped with a damp cloth. Such thick birch bark is also suitable for large products. For small ones, thick birch bark is steamed and separated into two or three layers simply by hand, without additional tools. This work must be done carefully, without rushing. Young and freshly cut birch bark does not need to be steamed, but only slightly moistened.

Birch bark removed by any of the above methods must be dried and kept in a dry, dark and cool place for preservation. It is better to store large plastic birch bark under a load, stacking the layers on top of each other.


Birch bark layers are well colored with aniline dyes. First, tannins are extracted from birch bark. To do this, soak it in a soap solution or baking soda solution. And then the birch bark is placed in a hot solution with dye for 2-3 hours, depending on the intended tone. To dry, the painted birch bark is hung on a string, hooked onto the tip of the sheet with simple paper clips or clothespins. Don't wait for it to dry completely, remove it a little earlier - it's better to work with slightly damp birch bark. If you need to straighten birch bark, then thin layers can simply be ironed.

The color of unpainted birch bark is also very beautiful if it is coated with colorless alcohol varnish. To do this, you need to slightly warm up the varnish and apply it to the birch bark with a soft hair brush.

They cut along birch bark with the tip of a very well sharpened knife, a razor or scissors. In places where there are curves, you should use small scissors with rounded ends, and for cutting holes, on the contrary, with sharp ends or a knife. Repeating circles can be punched with a punch.


In order for the birch bark to be better attached to the chosen base, for example, to thick cardboard or to another piece of birch bark, you need to glue thin paper to the underside (inner) side of the birch bark and only then cut out the design. You need to glue it with liquid wood glue or PVA. If you use PVA glue, then it is advisable to then iron the glued birch bark through thick paper with a not very hot iron.

In any case, the glued product or its parts should be placed under a press for some time to be leveled in order to prevent possible twisting and deformation.

The work took

4th place

I live in the Komi Republic - this is a rich and beautiful northern region. In the east of the republic stretch the ancient Ural Mountains, in the very north there is the mountain tundra. Komi land is endless forests, generous waters and rich mineral resources, cozy cities and villages. Hardworking, talented people live here, among whom there are Masters with golden hands. They create a variety of traditional artistic products that continue to preserve and transmit the memory of our ancestors. In many regions of the republic, traditional folk crafts and arts crafts based on manual labor and descended from grandfathers and great-grandfathers have been preserved. The greatest development has been achieved in artistic processing and wood carving, weaving from birch bark, wicker, pine root, traditional wood painting, patterned knitting and weaving, fur processing, various types of women's needlework - patchwork, embroidery, lace making, etc.
All these crafts undoubtedly deserve special attention, but to complete my course (and now competition) work, I settled on studying the birch bark craft... About it a little later, but first I will tell and show you how I made my “birch bark” tuesok )))))

To do this, we will need a white landscape paper (it will be the background, but you can do without it if you make the tuesok as a separate element for future compositions), office paper in pastel colors (light yellow, mustard, brown), scissors, a simple pencil , glue, brown marker (felt-tip pen, pencil or paint, depending on what you are more used to working with)))))

We draw a sketch of our tueska on light paper...

We cut out the template itself and additional parts from mustard paper - the upper and lower rim, as well as the handle... If desired, you can immediately punch holes in the rims - through which we will “sew together” our spare parts)))))

We glue all the parts together, use wax chalk (pencil, marker) to make light strokes that imitate the pattern on birch bark... I sprinkled some more brown pencil crumbs on top and shaded it with vertical movements, now our birch bark has become even more like the real one)) )))

Now we pass a “birch bark” cord through the holes, simply cut the light paper into small strips, round one edge, glue them over the holes... The tuesok is almost ready... In this version, it also has the right to exist, but we will not rest on this and decorate it with some kind of patterns - in my case it will be Komi ornaments...

Using a simple pencil we mark out a simple ornament...

Next, we draw out our ornament with paints, markers or pencils and now the piece is finally ready!!! It turned out very similar, it seems to me... You can safely proceed to the next stage - processing real birch bark))))))

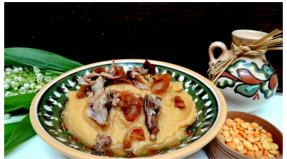
And now a little about the craft itself... Since ancient times, birch bark has attracted the attention of folk craftsmen because during processing it retained its properties - softness, flexibility and strength. Birch bark is the top thin layer of birch bark of a delicate pinkish-cream color. Its ancient name “birch bark” has been known since the 15th-16th centuries. Later, “birch bark” and “birch bark” appeared. These names are still used today. Tuesa (buraks) - vessels for storing food and drink - were made from birch bark before and are now being made. When leaving to work in the field, the peasant took with him a container of water or kvass, and on the hottest day the drink in the container remained cold. On his back he wore a birch bark - a wicker backpack, and on his feet were bast shoes, often woven from birch bark. Bodies, birch bark boxes - boxes for flour and honey, baskets, shepherd's horns, ropes for fishing gear - all this was made from birch bark. Based on the nature of the ornament, northern carved birch bark can be divided into several types associated with other areas of folk art - embroidery and bone carving.

Manufacturing technology. Birch bark is harvested at the beginning of summer, at the end of May - June, when the birch tree is full of juices, and the birch bark easily lags behind the rest of the bark. If it was removed skillfully, without damaging the next layer of bark - the green, then it did not harm the tree, and after a few years elegant white clothes grew on it again. The first known information about the technology of processing birch bark dates back to the 18th century. Birch bark carving requires the simplest tools: a knife and an awl. First, the outline of the design is drawn, which is then cut out with a sharp knife. Carving and embossing on birch bark were sometimes combined with shotting. By hitting the kanfarnik (a tube-shaped embossing) with a hammer, the craftsman “selects” the background of the object and obtains a grainy surface. This technique has long been known in metal processing. Since the 19th century, it has also been used in birch bark products.

Products made from birch bark were painted with picturesque plant patterns. As a rule, craftsmen filled the surface of the products with floral patterns (a thin winding stem with leaves and branches, smooth curves). Craftsmen usually applied through, openwork “lace” (carving) from birch bark onto a bright background made of fabric, foil or paper, which made it possible to achieve a high decorative effect. Birch bark tues (buraks) are more often ornamented. The process of making tues itself is quite complicated: you need to carefully remove the bark from the tree without damaging it. This will be the inside of the tues. It is solid, even water will not leak out of it. The chips on the front side are wrapped in a “shirt”, i.e. birch bark, cut on one side. The shirt is slightly smaller and has a “lock” closure. Then a wooden bottom is hammered into the steamed hammer, wrapped in a shirt. A lid with a handle is cut out from above. Tues is ready. The master, at his own discretion and in accordance with the tradition existing in the area, before covering the cleavage with a shirt, can decorate it with a geometric or zoomorphic (image of animals) ornament. Sometimes the shirt of the tues is cut out with a floral ornament or a geometric pattern.

And in conclusion, I would like to say that despite the fact that art is constantly developing, more and more advanced technologies are constantly layered on top of old ones, old forms are used more and more whimsically, birch bark production remains almost unchanged... Of course, in souvenir shops you can find birch bark objects with some modern heroes, but this is more the exception than the rule... Basically, the craftsmen adhere to traditional methods of making birch bark products, they pass on their skills and experience from generation to generation, so this craft has survived to this day almost in its original form. And I’ll finish here and thank everyone for your attention!!!

Sources of information: website of the All-Russian public organization "Russian Geographical Society" and the official website of the Ministry of Culture of the Komi Republic.

Birch bark is best processed immediately after removal. First of all, you clean off the black growths. By careful rubbing with a cloth you remove the white layer from the surface. If you need thin birch bark, you immediately stratify it, because later it hardens and the procedure becomes difficult. When delaminating, it is best to hold it across the fibers, then it is easier to give in and does not tear. In the old days, birch bark was processed in a special way, and birch bark became elastic, like rovduga, and durable. I will give three ways to process birch bark:

  • 1. Having thoroughly cleaned, processed, rubbed with fat or warm oil until completely absorbed. Horse fat is especially good for this purpose. Birch bark becomes soft, pliable for a needle or awl.
  • 2. Cook birch bark in the ear. Birch bark becomes much stronger. The birch bark boiled in the ear was used to make a boat. The famous sturgeon glue was made from the swim bladder of the sturgeon. The broth of fish soup gives birch bark special strength, this has long been known to our ancestors.
  • 3. Birch bark is heated in skim milk diluted with water and this gives elasticity and softness.
  • 4. Stale dry birch bark is kept in warm water or steamed hot water. Birch bark becomes soft.

The processed birch bark, tightly rolled up with the outer side, was stored in a dark and cool place: a milk cellar, in a manger under the rumps. The birch bark was rolled into a tube along the grain; in this case, when making vessels, the edges were not bent and the walls were not wrinkled.

When storing a large supply of birch bark for urasa, it is laid in layers crosswise, pressed down with a heavy log and covered with all sorts of rubbish - garbage.

Having cut the birch bark into layers, it is kept in the shade. When the birch bark begins to curl, roll it into rolls, sequentially winding the layers with the light side out. In this case, you should make the ends of the layers, pressing the bottom layer with the top layer so that they do not curl when drying.

Having wound 8-10 layers into a roll (the number depends on the length), it is wrapped in paper and tied with twine or wire.

Harvesting birch bark from dead trees. In the forest, you can often find fallen birch trees, whose wood has rotted, but the birch bark remains intact, or dead birch trees damaged by the fungus - tinder fungus. In such trees, birch bark is easily separated at any time of the year. Its inner layer has various shades of red-brown and is used to decorate products.

Safety precautions - When in the forest, you must be extremely careful. You cannot appear on the plot during deforestation - this is very dangerous. Collective trips to harvest birch bark are carried out only under the guidance of a teacher. You must have a first aid kit with you to provide first aid.

Birch bark storage.

To work with birch bark, prepare a blunt and sharp knife, scissors, a dry rag and sunflower oil. Birch bark is laid out on the table, preferably in the fresh air in the shade; where it dries.

Do not unroll the roll completely. First, take one layer, wipe it with a dry cloth and place it on the table with the white side up. Birch bark needs to be divided into several layers; First, the top rough white layer is separated. The layers are removed using a blunt knife with an oval end or by hand.

If the birch bark is thin, taken from young birch trees or from the upper part of the trunk, it is not stratified into layers. Such birch can be braided on both sides - on the white and dark sides, all thickenings and sagging, as well as places where there were knots, are cut out with a knife or scissors. The treated birch bark is dried in the shade in separate layers. At the same time, it should not dry out, otherwise the material will become hard and brittle. It is no longer possible to work with such birch bark. When the birch bark layers begin to curl slightly, they are collected into rolls, after wiping them with a cloth soaked in sunflower oil.

All that remains is to sort the birch bark by color, wrap it in paper and indicate on it what color the birch bark is and the date it was harvested. In a cool, dark room or in a pantry at room temperature, birch bark can be stored for years. In a damp room, birch bark becomes covered with mold and stains. Poorly dried material also cannot be stored for long. To prevent birch bark from losing its softness, elasticity and natural color, you should periodically check whether it is dry or damp.

If you find stains of dampness on the birch bark, you need to carefully check the room, then dry it and wipe it from the wrong side with a cloth moistened with sunflower oil.

Soak the dried birch bark in warm water or hold it over steam. After which all operations are repeated, as when harvesting from wood - drying and rolling.

Birch bark for elegant, artistic products must be stored especially carefully. For this purpose, a cool, dry, dark room is required. When exposed to sunlight, birch bark changes color after 3-4 days and becomes reddish. Birch bark turns white from prolonged exposure to light. Any change in color is accompanied by a loss of strength, flexibility and extensibility.

For storage, birch bark is folded into bundles and placed between two boards, pressing them with a weight on top.

Nowadays, birch bark can be folded under a press of thick boards, bolted together and stored in a dark and damp place. Birch bark preserved in this way becomes smooth, like cardboard or thick paper, and is convenient for making any utensils. Birch bark intended for gluing and painting is not impregnated with oil or grease and is stored in its original form. Oil gives birch bark a certain color and prevents it from sticking together.

Organization of the workplace - The room should have natural and electric lighting, running water, a storage room for storing materials, a low table and a chair. birch bark product birch bark Yakut

Safety precautions and fire prevention - birch bark is a highly flammable material, so the use of open fire near its storage is prohibited. The main causes of fire are smoking in an unspecified place, the use of open fire indoors, increasing the rules for operating electrical appliances, including the operation of faulty electrical appliances. The workplace must be kept clean. After finishing the birch bark trimming sessions, they take out a special place designated for this. Classrooms, workshops and workplaces must be equipped in accordance with sanitation, hygiene and safety requirements. There is a place on the desktop for tools, but it is better to put them in a special box. A cluttered table or scattered tools can cause injury. A knife, an awl, knives, and a lector cutter should have a smooth oval handle made of hardwood. When sharpening knives, special care must be taken (12-15-16-17-19)

Birch bark can be prepared not at any time, but only during the period of sap flow. The timing of birch bark harvesting differs slightly in different geographical zones, on average it is mid-May to mid-July. The earlier spring comes, the earlier the harvesting time. People who deal with birch bark have a sure sign: when the dandelions begin to fluff up and the rose hips begin to bloom, it’s time to harvest the material. At this time, the birch leaves are already gaining strength, but birch sap cannot be obtained. Later, the birch bark grows to the bast and it becomes impossible to separate it. Harvesting is carried out in forests where planned tree felling is planned. Everything must first be agreed upon with forestry representatives. For preparations, you need to choose a sunny day without precipitation. So, the harvesting begins with an inspection of the birch. Select trees with a more or less smooth trunk, with a minimum number of knots and without scabs.

Birch bark is very decorative in fallen and slightly rotten birch trees. You can remove the birch bark from them at any time without problems.
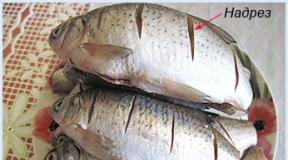
Make a vertical cut in the bark with a jamb knife to the depth of the birch bark layer (1-2mm) to the bast (this is the bottom layer of birch bark) and two horizontal notches on top and bottom of the cut:

Then you need to pry the edge of the birch bark layer and begin to carefully remove it


If the timing is chosen correctly, the birch bark literally separates itself from the tree


In places where the birch bark grows to the bast with knots, carefully trim it with a knife. Birch trees with a lot of knots and warts should be avoided

Birch bark brought from the forest must be dried. To do this, lay it out under a canopy in 1 layer with the wrong side (white side) down. I dry birch bark in the attic.


After the birch bark has completely dried, the layers are folded into bundles so that the birch bark is “face” to “face” and the bundle is pressed using sticks and ropes

How to prepare birch bark. Preparation of birch bark. For a knife handle made of birch bark with your own hands.
There is practically no ideal birch bark. Therefore, you have to use a knife to remove all the unevenness and roughness from the outer (white) side of the birch bark.


Birch bark for winter. For a knife handle made of birch bark with your own hands. I use birch bark in small squares from old birch trees. It is thicker, each birch bark tree has its own color. At home, we clean off excess dirt and residues under the birch bark layer from both sides of the birch bark. Cut into rectangles across and along the black veins. We drill or cut through the center and use the template. Then we put alternating light and dark birch bark on the centering pin, and alternate rectangles with the direction of the veins. Be sure to lubricate the clamp plate with oil, otherwise you won’t be able to tear off the birch bark later.


The central pin must be taken without a thread, otherwise the whole thing will have to be driven along the thread to be removed.


We tighten the clamp as much as possible but delicately, otherwise the pin will burst


We boil for 20-30 minutes, or longer, but then the birch bark will begin to darken. We take out the whole thing and put it on hot. repeat the procedure 2-3 times


Then I dry it for 4 days. Those tar oils that were released during cooking and pressing will glue the birch bark together better than any glue; they can’t be broken apart only along the layers of birch bark, and even then with difficulty. Then I unscrew the clamp, take out the central pin on the grinding section and process the edges of the workpiece.


The layers are pressed so that even if there are dark veins on the birch bark, after pressing in this way they will disappear. Therefore, you can take birch bark from very old birch trees.


I installed this kind of workpiece for non-through installation and it still works and doesn’t even think it’s delaminating. It is as strong as wood.


  1. Birch bark, in other words, thin, pliable birch bark, is fertile ground for creativity. What can be made from birch bark? Anything, any product, from bread bins and other household items to jewelry. In the article we will show several examples with master classes on making simple but very beautiful crafts from birch bark with your own hands.

  2. Friends, in this post I have collected the most valuable information on creating crafts and products from birch bark with your own hands. This ancient, primordially Russian craft is of great interest to us, because we are the heirs of a great culture. With the help of this publication, I would like to expand your horizons in the field of applied creativity.

    Everyone has encountered a rotten birch stump in the forest. If you hit it with your foot, the wood will crumble into fine dust, but the birch bark will remain intact and elastic. People have long noticed the durability of birch bark and its ability to resist rotting.

    Birch bark is sometimes called Old Russian papyrus. The treated birch bark becomes pliable and does not warp.

    Household items made of birch bark were often decorated with incised openwork patterns.

    Birch bark is given a unique decorative appearance by narrow brownish lines, the so-called lentils. These are kind of windows through which the trunk breathes in the summer. During the winter, these windows are closed and filled with a special substance.

    Birch bark is very easy to process, and with the simplest tools you can successfully make various decorative items.

  3. Birch bark harvesting time.

    Birch bark is harvested at the end of May or beginning of June. At this time of year it is easy to remove and has a beautiful golden hue. Remember that birch bark can only be removed from fallen trees, where they are scheduled to be felled. It is impossible to remove birch bark from a standing tree: this will cause irreparable harm to it.

    Now let's take a closer look at the process of making birch bark products. In fact, everything is simple, the main thing is to learn the basics, as in any other business. We will study the technology using the example of creating a tues - a traditional container of ancient Rus'.

    How to prepare birch bark for crafts?
    Those who have never encountered such creativity before today should know how to prepare and process birch bark for crafts.

    So, there are several basic rules:

    1. You should cut the bark from a birch tree for crafts only during the sap period.
    2. Next, the birch bark should be thoroughly dried naturally, without using radiators or fans.
    3. After this, you should cut off all the irregularities from the bark, making it as smooth as possible.
    4. Next, we tie the birch bark sheets in bundles and boil for 20-30 minutes.
    5. Then we dry it and the material is ready for work.
  4. Basic tools for working with birch bark:
    1. Cutter

    2. A punch made of tubes of various diameters, which are shaped into a triangle, circle, oval, rhombus, etc. (instead of tubes, sheet steel can be used to make punches.)

    3. Embossing - tools for applying in-depth relief, made from a thick copper rod or from dense wood of boxwood, pear, juniper.

    4. An awl with a blunt end.

    5. Scoring board made of linden or aspen.

    6. Hammer - preferably wooden

    7. Wire

    8. Metal ruler

    9. Willow twigs for tues

    10. A spruce or cedar piece of wood for the bottom of the tub.

  5. Technology of working with birch bark.

    The inner side of birch bark is considered to be the front side. From the front side, carefully remove the remaining bark with a damp cloth. Clean the outer white layer with sandpaper. Until the birch bark dries out, it delaminates relatively easily. Dried birch bark will have to be steamed in hot water and peeled using a wooden knife. Thin birch bark is suitable for small-scale work, while thick-layer birch bark is useful for large products.

    To prevent the prepared birch bark from twisting, place it between two boards and press down with a weight.

    Pin a piece of birch bark to the cutting board with thumbtacks. Place a pre-designed pattern on top. Using a hard pencil, transfer the drawing onto the birch bark - it will be quite noticeable. If desired, it can be strengthened by tracing it with a pencil or an awl.

    Cut out complex ornamental elements with a cutter. It is convenient to cut out identical and repeatedly repeated elements with punches. To enhance the decorative effect of slotted birch bark, embossing is often used.

    Dots and strokes are applied to birch bark with an awl or kanfarnik - a rod with a notch on the end.

    To begin, cut out a simple ornament, having previously made the appropriate punches. Then you can move on to a more difficult design, in which complex through threads are made only with a cutter, and the strokes are applied with an awl.

    Having finished cutting, remove the birch bark from the cutting board and glue another, smooth birch bark under it, which will serve as a background. You can also use colored foil as a background. Glue the birch bark with wood glue and always under pressure. If the birch bark becomes slightly withered during work, wipe it with a soft cloth moistened with sunflower or linseed oil, then rub it with a clean dry rag.

  6. Master class on making tues.

    You can try making your own tues. This small vessel is made of birch bark, striking in its simplicity and wisdom of design. The most valued quality of the container is its ability to act as a kind of thermos. For example, water, milk or kvass remain cold in it for a long time, but hot water, on the contrary, does not cool down for a long time.

    The device itself resembles a thermos. It has outer and inner walls, between which there is a small air insulating layer. On the inside of the walls, a white chalk surface helps reflect heat rays. When a cup is placed, for example, on a table, an air gap forms between the tabletop and its bottom.

    The inner wall should be without a single crack: after all, it retains liquid. The outer wall has a different task - to be beautiful and elegant. No wonder they call it a shirt.

    For the inside of the tree, you need a chip - this is birch bark, removed entirely from the trunk. You can only remove chips from a cut birch tree. From a long ridge you can remove several chips one at a time, from short ones - one or two. In our figure, the length of the ridge is equal to the length of the pole.

    It is enough to lightly tap the bark with the handle of a knife and it will easily be removed with a “stocking”. The chipping is removed in approximately the same way, using the simplest tools - a wooden hammer and wire. Bend the handle at one end of the thick wire, and hammer the working end on an anvil and round it. The wire should not have sharp edges or burrs - they can scratch the birch bark.

    Insert the wire approximately to the middle of the ridge under the layer of birch bark and carefully move it in a circle around the trunk. Do the same operation from the other end. As soon as the birch bark has completely peeled off from the trunk, knock the trunk out of the chippings with light blows of a hammer. It is imperative to remove the chip towards the top, otherwise you risk breaking it.

    Birch bark for shirts is much easier to prepare. Make cuts along the trunk with a knife and, lifting the edges with your hands, peel off the birch bark layer. Straighten the pieces of birch bark and place them on a wooden board. Cover the top of the stack of birch bark with another shield, on which place the load. Once dry, the birch bark will remain flat and easy to work with.

    The proportions and sizes of future tueski will depend on the prepared skolotny. Having chosen a suitable pin, make a shirt pattern from thick paper using it. Adjust the height of the shirt so that its top and bottom edges are approximately 3-5 cm away from the edges of the collar.

    Then wrap the paper around the pin so that one edge overlaps the other. This supply is necessary for making the castle. Taking into account the diameter of the collar on the shirt pattern, draw and cut out the elements of the lock. Close the lock and place the pattern on the pin.

    If the pattern fits snugly to the pin, and the top and bottom edges are not skewed, the shirt pattern is made correctly. Place the pattern on a piece of plastered birch bark and trace with a pencil or an awl with a rounded end. Place the birch bark on the board and use a cutter and a metal ruler to make slits along the outlined contours. The shirt is ready, but if desired, you can make it elegant. In the picture you see tues with different designs of shirts.

    One piece is decorated with a natural pattern of birch bark. The shirts of other tues are decorated with embossing, cut-out patterns, and painting, and one tues has a shirt made of narrow strips of birch bark. This shirt is made directly on the chopping block. The painting is applied to the finished shirt, and embossing and carving is done on the shirt before putting it on the shirt. Tueski are usually painted with oil paints.

    Having put the finished shirt on the knee, steam its protruding edges in boiling water. Then bend two hoops from a willow rod and fasten their ends with threads. The hoops should fit snugly to the joint. Now wrap the steamed edges of the pin around the willow hoops, placing them on the shirt. The hoops give the edges of the walls a rounded shape and make the structure rigid, securing the bottom and holding the lid of the container.

    Cut the bottom out of spruce or cedar wood. The diameter of the bottom should be several millimeters larger than the diameter of the inner wall of the tube. Before inserting the bottom, steam the edges of the walls again. After this, the bottom will be easily inserted, and when the walls are dry, the bottom will be firmly fixed in the frame, and at the same time the gaps between it and the walls will disappear.

    Cut the lid from a spruce or cedar board with a small margin. Then, carefully cutting off the edges with a knife, bend it to the tuesk. Make sure that the edges of the lid fit snugly against the walls of the container. The lid should fit into the unit with some effort.

    Choose the shape of the handle, taking into account the purpose of the tool. If the container is intended for storing some products, and not for carrying them, the handle can be made in the form of a poke. Cut the poke with a knife or turn it on a lathe, insert it into the hole drilled in the lid and hammer in a short wooden wedge on the bottom side for strength.

    If the container is intended for carrying food over long distances, it is necessary to make a handle-bow. A simple bow is made like this. Drill two holes in the lid at an angle to each other. Then steam a willow twig lightly trimmed on one side in boiling water. Having bent the rod in an arc, insert its ends into the holes. After drying, the rod will become rigid and firmly fixed in the lid. For reliability, the ends of the handle can be wedged.

    But the most reliable and beautiful is the handle-bow with a lock (it is shown in the drawing). Regardless of the size of the tool, such a handle has fairly constant proportions and dimensions. Most often it is done on the hand of an adult.

    Plane a handle blank from willow wood (1, a). Drill two rectangular holes in the cover (2). When marking the holes, make sure that the wood grain on the lid runs across the line where the holes are located. In the drawing this line is shown in red.

    Steam the handle-bow blank in boiling water, carefully bend it into an arc (1, b) and insert the ends of the handle into the holes of the lid. Drill two holes in the ends of the handle protruding from below and use a chisel to shape them into a wedge. Cut a wedge (3) from spruce and hammer it into the holes of the bow. The wedge will firmly connect the lid to the handle. But it also has another purpose - being located across the fibers of the lid, it will prevent it from warping, especially if liquids are poured into the container.

  7. Strength test of the tool.

    To test the container, pour water into it and close the lid tightly. Taking the handle by the handle, shake it vigorously, swing it, and turn it upside down. If the lid fits accurately, the container will come out of this test with honor - not a drop of water will spill out of it.

    You can open the lid only by carefully tilting it, and as soon as a gap appears between the lid of the container and the wall, the lid can be easily removed.

  8. Souvenir - a magnet made of birch bark with your own hands.


    Master class for teachers, school-age children and parents.

    Purpose: gift or interior decoration.

    Target: To promote the development of creative activity through the manifestation of individual abilities in working with birch bark.

    Tasks:

    Learn how to work with birch bark

    Develop creativity

    Cultivate an interest in working with natural materials and respect for nature.

    Equipment: birch bark, thick cardboard, Master Glue glue (transparent), scissors, figured hole punches, birch twig, pencil sharpener, sponge, burnt sienna acrylic paint, thin birch section, magnets.

    Birch bark is an extraordinary and amazing material! Let's try to make souvenir magnets from birch bark. On the birch bark prepared for work, we cut out the shape of the base. It can be anything you want.

    To prevent the birch bark from curling, we glue thick cardboard on the back side.

    You can immediately glue the magnet and put the base under the press.

    There should be roses in the center of the composition; they are made using a sharpener from a fresh twig.

    We cut out the details of the composition from thin layers of birch bark or use a hole punch. Lightly tint the edges of the base and parts with a sponge and paint.

    We compose the composition and carefully glue the parts to the base.

    Other magnet options.

    The base can be a thin birch slice. It turns out like this (photo 14,15,16).

    Simple and affordable!

    Creative success!

    You can make wonderful panels from birch bark.

  9. Birch bark weaving

    There are two types of weaving: oblique and straight. The names are explained by the angle (in degrees) the intersecting ribbons form with respect to the horizon. The main type of weaving is oblique weaving, due to its better manufacturability and strength.

    Direct weaving is suitable for creating flat products - napkins, book covers; three-dimensional salt shakers and boxes can also be made.

    Birch bark boxes made using the oblique weaving method (the work of S.V. Ivanov)

    For straight weaving, any number of ribbons are used; for oblique weaving, an even number is used.

    The first stage of weaving the creation of the bottom is obtained by interlacing strips until a square with a checkerboard pattern is formed, the dimensions of which are determined by the number of strips 4x4, 6x6, 7x7, etc. The number of tapes is respectively taken as 8,12,14, etc.

    To fix the strips during weaving, weights (for example glass) and clamps are used. Having received a clear square, mark the bottom of the future product; it can be square or rectangular. With straight weaving, the corners of the bottom are indicated by the letter - c; with oblique weaving, the projection of the square bottom is indicated by the letters - g, rectangular - d.

    Making the bottom of the product: a – beginning of weaving; b – finished canvas; c – places where the corners of the fabric are connected with clamps and the placement of the bottom of the product with direct weaving; d – projection of the bottom of a product with a square bottom with oblique weaving; d - projection of the bottom of a product with a rectangular bottom with oblique weaving; 1-6 – horizontal stripes; 7-12 – vertically woven stripes

    Next, the walls begin to form. When weaving directly, it is better to form the volume around a template of the appropriate size. All strips protruding beyond the volume are bent one by one at a right angle upward and tied with a rope. Then, from any angle, they begin to introduce additional horizontal stripes, gradually intertwining the vertical ones with them. The number of horizontal stripes determines the height of the product.

    Manufacturing a product using the direct weaving method: a – bringing the strips into a vertical position; b – fixing the strips with rope and weaving horizontal strips; c – formation of the edge of the product; d – finished product

    With oblique weaving, an angle is formed at the marking site by crossing and interweaving adjacent strips. After braiding all four corners, the products are brought to the desired height. To obtain a product with smooth walls, you can use a template around which the product is formed. During operation, the strips are constantly pressed against each other to obtain a dense wall without gaps.

    After forming the inner part of the product, the tapes are folded outward and downwards and weaving of the outer layer begins. Any product consists of two layers, and the inner face layer of birch bark will be visible both inside and outside the product.

    If the length of the cut strips is not enough, they are increased: they are inserted under the previous layer, lifting it with scissors or an awl. Finish weaving on the outside of the bottom.

    Manufacturing a product using the oblique weaving method: a, b, c, - stages of forming the corner of the product; d, e – stages of formation of the edge of the product; e – finished product

  10. Working with plastic birch bark

    To work with the formation, it is necessary to select birch bark with the least amount of heterogeneity. Required tools: knife, awl. Plastic birch bark is used to manufacture a wide range of products. These are sewn items, boxes, souvenirs, dolls, dishes and much more.

    Box decorated with slotted birch bark

    Tea set by V. Makhnyuk

    Products made from plastic birch bark and planks are often additionally decorated in one way or another.

  11. Methods of decorating birch bark products

    Embossing

    A method of decorating products made from plastic birch bark using embossing and stamps. Mints are made from various materials: wood, metal, bone. A pattern is formed at the working end. Embossed ornaments are applied to the product with a certain rhythm, pressing on the embossing with a hand or hitting it with a hammer.

    Tuesa decorated with embossing (work by A.V. Shutikhin)

    Hot stamping is also used, when the stamp or stamp is heated before pressing, and the print at the points of contact with the birch bark will have a brown tint, the saturation of which will depend on the temperature of the stamp, the exposure time and the thickness of the birch bark, the main thing here is not to overdo it, the birch bark can burn.

    In the factory, you can make various stamps with complex patterns.

    Tuesa decorated by hot pressing

    Burning engraving

    You can apply a design to birch bark by burning it. To do this, use an electric burning device; the main thing when burning on birch bark is to use minimal heating of the burning pen.

    Burning on birch bark (work by T. Kozlova)

    Burning can be divided into contour, silhouette and pictorial (see the burning section).

    Laser cutting and engraving

    Cutting and engraving on birch bark can be achieved using modern laser equipment. On a laser machine you can carve birch bark and any type of burning. This method allows you to produce a large number of identical elements or products with high productivity.

    An example of engraving on birch bark made on a laser machine

    Scraping or Scratching

    Scraping is used on dark-colored birch bark, usually with a metal tool - a knife, an awl, a needle. Autumn birch bark is used, which is removed from the tree with considerable effort. On such birch bark there remains a thin layer of brown cambium, which is removed with a scratching tool during work. Brown birch bark can be obtained by removing the bark from dead birch trees, holding freshly removed birch bark for 4-5 days in bright sun, periodically wetting it with water, holding the birch bark in a swamp at a depth of 10-15 cm for 14 days, painting the birch bark with a decoction of alder bark, painting it with an organic dye .

    The design is applied to the birch bark with an awl by piercing tracing paper with the image or by tracing a stencil. Then the birch bark is slightly moistened and with the sharp side of a knife-cutter I scrape out the elements of the ornament, removing the dark layer. You can do the opposite by scraping out the background, leaving the ornament or image black.

    The lid of a box with an image of swans, made by scraping. XIV century

    Application

    An applique is a decoration made from patterns cut out of birch bark, which are glued onto a product made of birch bark or other material.

    Glass vase with glued slotted birch bark (work by S.V. Ivanov)

    Painting made with birch bark applique

    Thread

    Carving is usually done on birch bark taken from young birch trees. The design is transferred to a piece of plastic birch bark of the required size with an awl, through tracing paper or a stencil. Use a knife-cutter to remove areas of the background. Carving is done on a wooden board, usually made of linden. Elements of the same type can be cut out with a punch of the appropriate shape. Slotted birch bark can be additionally decorated with embossing.

    Making an incised ornament

    Tues decorated with slotted birch bark

    painting

    An ancient method of decorating products made from birch bark, it was very often used to decorate birch bark tues or beetroot. The primary colors are red, green, blue and their shades when mixed with white. Sometimes the entire body was covered with background paint, and then a drawing was applied. Before painting, the surface is primed; it can be a mixture of chalk and wood glue, or you can use PVA glue. For painting you can use gouache, tempera and oil paints. To fix the painting, I cover it with oil varnishes.

    I love making different jewelry from birch bark; it has a variety of textures and very beautiful natural patterns that can be played with. I offer a master class on how to decorate from birch bark with your own hands, it will be a pendant with natural stone.
    Making jewelry with your own hands, stages of work.
    1) For work we will need pieces of birch bark (preferably with interesting natural growths), PVA glue, a piece of thick cardboard, a joint knife, scissors, a semicircular chisel, a natural gemstone, an awl, a ruler, as well as several paper clips, leather laces:

    And stick it around the stone.
    9) now we drill or pierce holes with an awl for decorative “firmware” of the decoration and for ribbons:

    12) All that remains is to cut out leather ribbons for our decoration and for pendant beads. You can use faux suede ribbons, which are sold in sewing supply stores:

    Our original DIY pendant decoration is ready: