Make a basket from plastic ribbons. We weave baskets from plastic bottles. Step-by-step instructions with photos. Tools and materials
Recycling plastic is not only useful, but also profitable. Do-it-yourself baskets made from plastic bottles will replace store-bought ones and clear your house of junk. Combining the experience of folk art and modern materials, plastic bottles have become a favorite material for handicrafts. Let us examine in detail what are the methods for weaving boxes and baskets made of plastic.
Bottle baskets - a simple idea
The easiest option is to cut off the neck and melt it on a hot iron. The edges are covered with tape or crocheted. In fact, it turns out not to be a basket, but a handbag. It is suitable for picking berries, storing tools and children's toys.
Important! Choose large water bottles with a volume of 3.5 liters.
Do-it-yourself wicker baskets for laundry and storing things from bottles are made differently.
Wicker baskets made from bottles
For a wicker basket you need to prepare rods.
Preparing the material
For a basket of plastic bottles with your own hands, prepare the material:
- Wash and remove labels.
- Cut off the neck and bottom.
- Cut strips from the middle. Try to make the stripes even and the same width.
Important! There is another way to make long ribbons for weaving. You need to cover the bottle with tape and cut the ribbons in a spiral.
The weaving pattern comes from traditional wicker weaving. There are two ways to make a box.
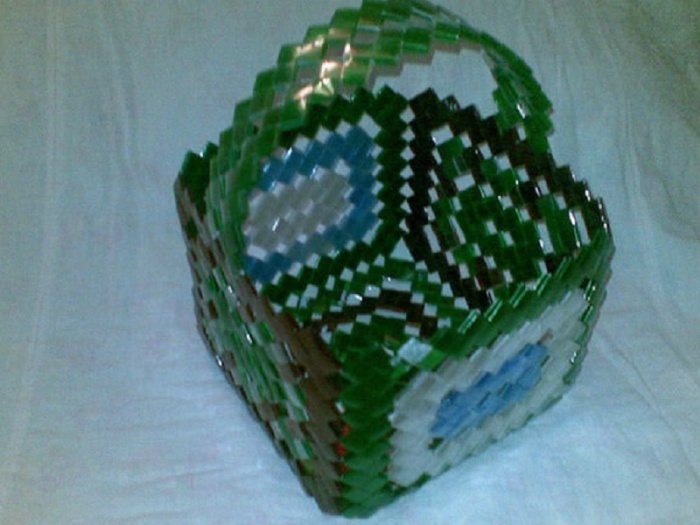
Basket of individual modules
This weaving consists of zigzags connected into one fabric. To arrange it:
- The strips are prepared in a ratio of 1:8, if the width of the strip is 1 cm, then the length is 8 cm.
- Fold the strip in half and fold the ends towards the middle. You will get one triangle element.
- Insert a second, similarly folded piece into the gaps. We repeat, and we get a chain of connected parts.
- Weave in the sides. You will get a base frame for the bottom.
- Fill the interior space by inserting one element into another.
- Weave a few more strips, the length of the base.
- Place the body vertically to the base and connect them with fishing line.
- Weave a handle from double ribbon.
- The entire structure is held together with a strong thread or fishing line stretched between the individual triangles.
- Decorate with flowers cut from the bottom of the bottle.
Important! The finished basket is too heavy for hiking in the forest. It is suitable for home decoration, indoor flowers and outdoor decoration.

Chess method
An easier method to make a basket from a plastic bottle with your own hands is that you do not need to make individual parts. Operating procedure:
- Take a cardboard box as the frame, the size of the finished box.
- Secure the cut long ribbons with an elastic band on top of the box.
- Stretch the strips across, one after the other.
- Having formed the bottom, move on to the walls.
- Finish the edge by folding the ends of the plastic inward and extending the strips along the weave.
Important! This option is good because you can weave a box of any size. Extend short strips by connecting the working strip with another tape. If the tapes fall into the bases, staple them to the cardboard while you work.
Master class: small basket
From two green and brown bottles you can make a decorative basket for artificial flowers:
- Cut off the neck of the brown bottle.
- Without cutting to the end, make longitudinal cuts so that you get a fringe.
- After one, bend the strips inward.
- Cut out hoop strips from the green one and thread them in a checkerboard pattern through the brown rods.
- Fold up the top edge and secure a handle made from leftovers.
- You can make grass from the neck of a green bottle by cutting it into incompletely narrow triangles and putting it in a basket.
Important! Instead of the green bottle, take thread or ribbon from the bag. You will get a soft organizer box.
Master class: laundry basket
Let's move on to making functional items for the home. Make your own wide laundry basket from plastic bottles using this master class.
Prepare:
- wire for the frame,
- cardboard box of suitable size,
- stripes from a bottle.
Operating procedure:
- Make the box body and lid from wire.
- Using the checkerboard weaving method described above, cover the box, pulling the ribbons through the wire frame.
- Separately weave the lid and secure it with clamps to the basket.
- To prevent the basket from getting dirty, insert a bag inside into which the laundry will be folded.
Important! It is convenient to cut the strips with a bottle cutter - a homemade tool made of wood and a fixed blade.
Master class: basket for toys
This DIY transparent basket for toys made from plastic bottles is similar in design to a container with a lid.
Take for work:
- hook and synthetic threads,
- hole punch and awl.
Operating procedure:
- We use the middle part of the bottle. Without cutting, you need to flatten it into a rectangle. One bottle - one wall element for the box.
- Use a hole punch to make holes along the edges of the parts.
- Crochet the modules.
- Sew the plates together.
- Make the lid for the box in the same way.
Important! A toy box can be polygonal in shape - it all depends on your perseverance and imagination.
The active use of plastic bottles by needlewomen has good justification. Material is always at hand in large quantities. The products are waterproof, which is especially important for landscape design. Another interesting hobby could be weaving baskets from plastic bottles. The proposed master class will be an excellent guide for mastering the original technique.
Advantages of plastic and preparation for weaving
Plastic baskets can perform not only a decorative function in landscape design, but also bring practical benefits during gardening work. The strength of the material, resistance to temperature changes and precipitation, accessibility - all these qualities were appreciated by craftsmen.

If the basket is intended to decorate a site, it is designed without a bottom. This is especially convenient for further placement inside the flower bed. Using it as a container for harvest requires you to take care of a durable product with reliable handles. To work you will need:
- Plastic bottles. It is better for novice craftsmen to collect containers of the same color. When the weaving technique is at a high level, you can experiment with combining shades.
- Scissors, electrical tape.
- Nylon thread or fishing line.
- Glue for plastic.
You can decorate a finished wicker basket with flowers made from plastic bottles of a different color. It is convenient to attach the decor using a glue gun. As an option, the finished product is coated with moisture-resistant acrylic paints.
Zigzag basket
A brief algorithm of actions consists of the following steps:
- The bottom and neck of all bottles are removed.
- Plastic cylinders are cut into strips of the required size.
- Prepare preparations.
- The elements are intertwined, forming zigzags.
- The rows of the future basket are connected to each other.
- Add a handle.
- If necessary, attach the bottom.
Now about each stage of basket weaving in more detail.
Advice! Before starting work, plastic bottles need to be thoroughly cleaned of labels and glue. Otherwise, the remaining solution will quickly become a source of contamination and spoil the appearance of the decor.
Plastic cylinders from bottles are cut lengthwise, after which strips are formed. The approximate width of the part is 1-1.5 cm. It is recommended to adhere to the proportions of 1:8 relative to the length of the strip. From a 2 liter plastic bottle, a strip of 15 cm is obtained, that is, its width can reach 1.8 cm. Thus, by increasing the size of the workpiece, the time of weaving the basket will be noticeably reduced. If you do not follow the proposed proportion, the connection of the elements will turn out to be of poor quality.

Each blank for the future basket is folded in half until a fold is formed, the resulting halves are alternately bent inward. As a result, the edges of the plastic bottle part should touch the central fold from the inside. The length of the element is reduced by 4 times compared to the original strip.
Then the plastic blanks from the bottles are connected to each other by two extreme folds. The central fold remains free at first. This is how the first corner for the basket turned out. A third part is attached to it, a fourth, and so on. As a result, a zigzag is formed, the final length of which should correspond to the perimeter or circumference of the basket.

The extreme elements are fixed with fishing line. If you do not plan to use the basket on the farm, you can make handles from plastic bottles in the same way. For practical purposes, it is better to design more convenient details.
When the required number of zigzags from plastic bottles is ready, they are connected to each other with nylon thread or fishing line. The design of the bottom depends on the purpose of the product. The part can be woven or just thick plastic, secured with a glue gun.
Comment! The option with a glued bottom does not require the use of a plastic basket to carry heavy loads.
Using a similar technology, you can weave an original vase from plastic bottles.
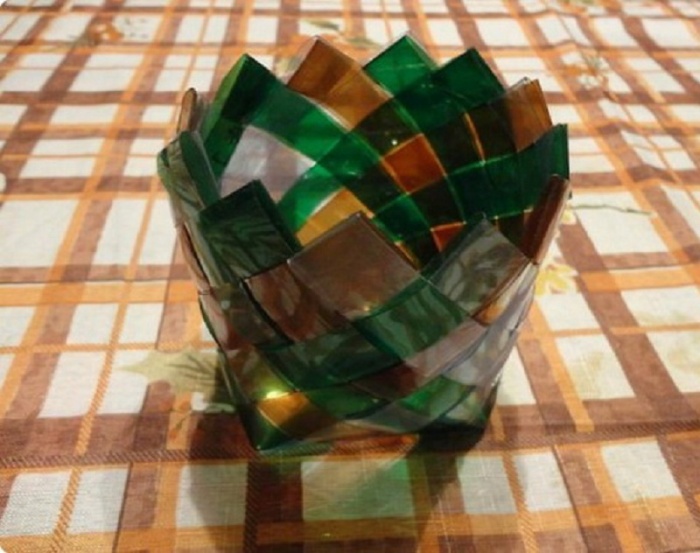
Checkerboard weaving
A basket of plastic bottles can be made using the checkerboard weaving technique. To ensure an even shape of the product, select a suitable frame. Any rigid box will fulfill its role.

The method of cutting strips from a plastic bottle is somewhat different here. Parts for work need maximum length. Therefore, after the standard cutting of the neck and bottom, the cylinder is covered in a spiral with electrical tape so that the layers do not overlap each other. The bottle is cut along the resulting gaps, the electrical tape is removed.

Place a cardboard box of the desired shape on a table or chair upside down. Plastic strips are secured with tape as close as possible to each other between two parallel side edges. After this, they begin to weave the bottom of the basket, threading the loose strips in a checkerboard pattern. When the bottom is ready, the side edges are decorated in the same way.
Recycling plastic bottles is an easy way to take care of nature and create comfortable and beautiful things that can be used in everyday life. In many yards there are now compositions made of plastic flowers and animals, but they often do not look very attractive and spoil the flower beds more than they decorate them. There are options for more practical use of plastic containers: fishing line of various diameters is cut from it, which is used in gardening, as well as for construction and minor repairs of furniture.
Options for using plastic baskets
Having made a special cutting tool, craftsmen make thin fishing line or thick strips of material for weaving baskets and other containers. Durable, wear-resistant containers become indispensable assistants for the gardener. They can be used for harvesting, storing tools, containers for a not-too-attractive flower pot, or as a decoration for a summer cottage. Weaving a basket from plastic bottles with your own hands helps preserve the environment and can become an unusual hobby for the whole family. Plastic is easily painted with acrylic, which allows you to create bright patterns on the surface of the container.
from plastic ropes: advantages and disadvantages
Making items from waste containers saves money that would otherwise be spent on storage containers. One of the main advantages of the art of weaving baskets from plastic bottles is the use of creative resources and the development of imagination. Each product can be made unique by decorating it with various crafts from the same material, for example, flowers. The only drawback of this type of hobby is that it is a very addicting activity and, once you start weaving baskets from plastic bottles, it is difficult to stop. Using various techniques and combining the colors of the stripes, the master is able to make a basket that is indistinguishable in appearance from a container made of wicker or wood. The process of creating a product takes only a few hours if you prepare the tools in advance.

Tools and materials for weaving
To work you should prepare:
- plastic tape;
- scissors;
- thin fishing line;
- blank for the bottom;
- glue gun for attaching decor.
Finding material for making baskets is usually not difficult: unscrupulous vacationers throw a lot of plastic bottles in the forest, on beaches, and in dacha areas. Therefore, you won’t have to spend money on buying tape to create a product. You just need to make a special bottle cutter to speed up the process of preparing plastic yarn.
You can make a tool from a stationery knife and an iron corner, fastening them together. In the corner above the blade, several holes of the required diameter are cut out with a hacksaw, and then a handle is attached to the base on which the bottle can be hung. Having cut off the bottom of the container, you need to separate the beginning of the tape, insert its “tail” into one of the holes and simply pull the edge. In contact with the sharp edge of the knife, the bottle will begin to cut itself, and the diameter of the hole will determine the thickness of the yarn.

Weaving a basket from plastic bottles: master class
If you prepare strips of plastic of different colors, then you can combine them with each other to get different patterns. If desired, if the usual shades of plastic are not attractive, the blanks or finished container can be painted with acrylic paints.
Step-by-step instructions for weaving baskets from plastic bottles look like this:
- Strips of plastic are cut 1 cm wide. For convenience, templates of the required length are used.
- Each workpiece is folded in half, both halves are folded inward along the edge so that they touch the central fold. You need to make a lot of these blanks, depending on the size of the basket.
- Then the two parts are put on top of each other to create a “corner”. This method is called "snake".
- The corners are put on top of each other until you get a strip equal to the circumference of the basket. Zigzag blanks are fastened together with fishing line, forming the walls of the product. The handle is made in the same way. You can use thick cardboard or other material as the bottom.

This is just one option for weaving baskets from plastic bottles. There is also “checkerboard weaving”, which requires a strong frame. In this case, strips of tape are sequentially threaded through adjacent ones in a checkerboard pattern. You can try different ways of weaving baskets from plastic bottles and choose the most suitable one for yourself.

 Weaving from plastic bottles differs little in complexity from what many were taught in kindergarten. The strips are usually cut wide enough, the work is done with a checkerboard pattern, and the shapes for them are selected quite simple. This rather simple “arsenal” allows you to create very beautiful and still unusual bags, baskets, boxes and screens. In southern countries you can see entire furniture sets braided with strips cut from plastic bottles. Despite the simplicity of the work and the availability of material for creativity, weaving from plastic bottles has not acquired even a tenth of the popularity that newspaper rolling has today. The reason for such inattention on the part of folk craftsmen lies in several secrets, without knowledge of which it is difficult to create the intended thing.
 The first secret lies in the method of obtaining tape from a plastic bottle. It is cut crosswise into a spiral. For beginners, it is better to choose simple-shaped bottles for the first experiments, cut off the bottom and neck with them, and use the resulting cylinder as a source of a long plastic strip. Craftsmen can work with bottles of more complex shapes, but this skill does not come immediately.
Typically the width of the strip is approximately 1 - 1.5 cm. Thinner ones are used to make threads (more on this). Large items (screens, tables, benches and even headboards) are woven or braided in strips 2 or more cm wide.
 Cut blanks from plastic bottles usually have the shape of spirals. You should not try to turn them into straight stripes - this is the second secret. The plastic will then need to be helped to take the shape of the intended thing, and its initial state in the form of a spiral does not interfere with this at all.


 According to many craftsmen, the plastic strip in work resembles a vine more than a newspaper tube. This similarity forces us to use various templates as a basis, without which a beautiful and even shape cannot be achieved. Templates should be selected that are durable. Strips of plastic bottles are pulled over them and secured with elastic bands, which help to maintain the desired shape. This is the third secret, which smoothly turns into the fourth: the fastening rubber bands are not removed until the work is completed.

 Warmth will help give weaving from plastic bottles a new shape. It is known that plastic bottles are not used for bottling hot drinks due to their softening. This is precisely the property of PET (more about the properties
Recently, crafts made from plastic bottles have become fashionable. And today the editorial office "So simple!" invites you to familiarize yourself with an unusual way of using plastic bottles.
This weaving from plastic bottles, this way you can make baskets, vases, bags, rugs and much more.
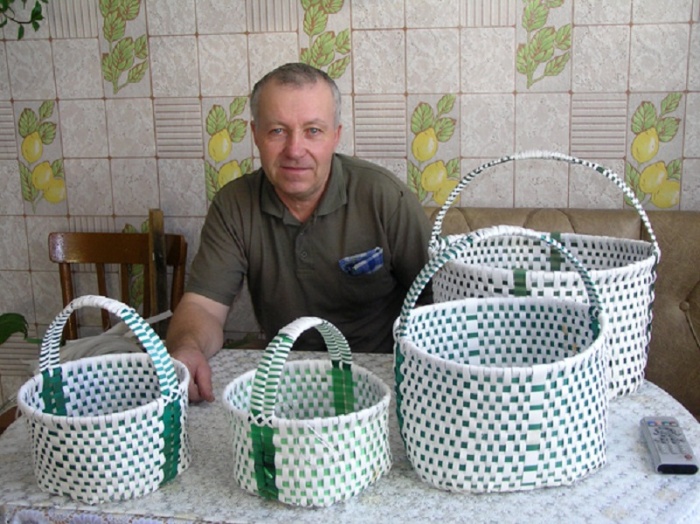
Well, I liked the idea of creating it with my own hands. spacious laundry basket for the bathroom. It turns out to be light, durable and hygienic, since this material is not afraid of moisture and detergents. In addition, when I found out how such a basket is made, I was surprised that everything was so simple! Even I did it in one evening, and I have no experience in weaving.
DIY crafts from plastic bottles

© DepositPhotos

In this case, it is better to adhere to the proportion of 1: 8 relative to the length of the strip. Please note that by increasing the size of the workpiece, the time for weaving the basket will be noticeably reduced.

The aesthetics of the finished product depends on the quality of the strips obtained!
There is a special tool - a bottle cutter, which allows you to cut a plastic bottle into perfectly even strips. However, in its absence, it is quite possible to get by with ordinary scissors and a stationery knife.

When weaving with corners, the resulting cylinder is cut along the seam and a plastic rectangle is obtained, which is cut into thin short strips. To make them even, it is better to outline the material with a marker.

To weave with stripes, the bottle is pasted over in the form of a spiral with electrical tape or an adhesive plaster of the required width. Then the bottle is cut into a spiral using a utility knife along the joints of the electrical tape. Thus, one strip is obtained from one bottle. The cut pieces have the shape of spirals.


To make the weaving process more convenient, secure the strips along the edges of the box with clothespins and elastic bands. Once the bottom is ready, fold the strips over the edges of the box and secure them with an elastic band. And continue weaving in a circle. The first two rows will be the hardest!
After reaching the desired height of the basket, the edges of the plastic strips must be folded inward and secured with glue. Now all that remains is to make and secure the handles. It is more convenient to do this by placing the basket on its side.


If a closet, closet or pantry is at the epicenter of a natural disaster due to things accumulated in them, it’s time for an audit. But don’t rush to throw everything away at once; perhaps some items will be given a new life.
Therefore, I invite you to look at 17 super cool crafts from things that have already had one foot in the trash!

Plastic baskets can be used not only in the bathroom and kitchen, but also perform a decorative function in landscape design and bring practical benefit in gardening work.
The strength of the material, resistance to temperature changes and precipitation, accessibility - all these qualities were appreciated by craftsmen.
Tell your friends on social networks about this unusual way of using plastic bottles, perhaps some of them will really like this weaving method!