Air is coming out of the water boiler. Operation and maintenance of water heaters
Good day. I want to understand the reason for the improper operation of the water supply system in my dacha.
Water is supplied from the well to the house by a pump. In the house there is a return valve in front of the hydraulic tank. After the hydraulic tank there is a filter and after the water heater. Next is the sink. When I open the mixer with cold water, the water comes out with even pressure, but if I open it again hot water, then at first it flows well and a few seconds later it starts to “spit” a little. Somewhere the atmosphere is being sucked in.. At the same time, the pipes are leaking, the pressure in the system does not drop!! As if to solve the problem??
Help with advice, please.. Yuri
Hello, Yuri.
It’s a pity that you didn’t indicate what kind of “hydraulic tank” you have installed - a free-standing membrane one, as part of a water supply station, or an open one. It is also unknown what type of water heater you are using: electric storage, electric instantaneous or gas. And what does “starts to spit a little” mean? “A little” - what is it? Since you decided not to pamper our experts with an abundance of information about the features of your cold and hot water supply system, it is not a fact that our answer, compiled on the basis of fragmentary data, will satisfy you. Let's try to go the logical route:
- If the “hydraulic tank” is closed membrane tank, in an area where there is high pressure, air leaks cannot escape. If there was a leak, it would not be a leak, but an inverted leak. The area where atmosphere can enter the system is the supply hose if you have a shallow pump installed. Theoretically, air can pick up and submersible pump, if the water surface periodically drops to the level of water intake. The automatic safety system turns off the pump before the system becomes airy and the level rises again. It is unlikely that everything coincides exactly like that, but it is impossible to exclude it. However, in the event of a leak, the atmosphere would also enter the cold water. So, this is hardly the fault. Unless there is an air trap installed on the cold water line.
- The atmosphere may enter the pipes if check valve, installed in front of the “hydraulic tank”, does not hold. The water in the hose, under its own weight, flows into the well, negative pressure is formed and somewhere (for example, in open mixer) the atmosphere is captured. The likelihood of this is low, but still.
- Air can enter the hot water supply if you have an open rather than a membrane installed storage tank. The pressure is low, the supply to the water heater is separate and somewhere on the way to it there is a leak in the pipe. The degree can also “jump” in open tank, if the filling valve does not always work.
- If air does not penetrate the system from the outside, it means that it is formed inside. Well water contains dissolved oxygen and other gases. When heated, they release in the form of bubbles. In this case, the liquid does not necessarily have to boil; the transition of oxygen from dissolved to gaseous state occurs even at a temperature slightly above room temperature; the intensive process begins at 50-60 ºС. The higher the temperature, the more active gas formation occurs. If you have a storage water heater installed, atmosphere may accumulate in the upper part of it during the heating process.
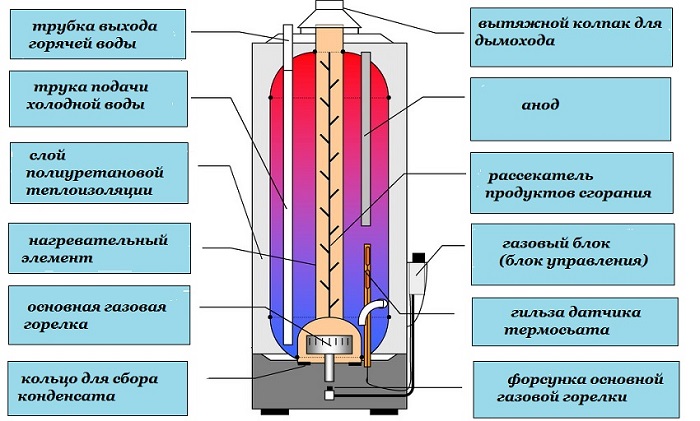
There is a space in the upper part of the water heater where the hot water sampling tube does not reach. Under certain conditions, tens of liters can accumulate there. compressed air, which causes the mixer to “spit” for some time after opening the hot water tap
The air quantity will be greater if the water heater is installed at the highest point of the water supply. Another fault that increases the rate of gas accumulation is incorrect operation of the automatic storage heating system. electric boiler due to a malfunction of the boiler safety valve. It is appropriate that if tap water has high carbonate hardness, after two or three years the valve becomes “overgrown” with salt deposits. There is water in the tube going to the faucet. After opening the hot water valve, it drains, the system captures water, and the faucet “spits.” If this phenomenon occurs after you have not used it for a while hot water and after a couple of minutes the flow is restored - we are on the right track. Another sign is too hot water. Disconnect the boiler from the power supply and try to spill unheated water. The sound of air means that the reason why the faucet is spitting has been established.
What to make? First replace safety valve and reduce the heating temperature. It didn’t help to introduce a deaerator at the top point of the system, placing it nicely on a U-shaped outlet (jumper), where gases can accumulate without blocking the flow.
A self-acting deaerator is more expensive than a regular one, but saves time and nerves
- If the faucet always spits, check the aerator; simply unscrew it from the spout.
- Separate filters, or rather water treatment systems, can aerate the water. The simplest mesh filters are not capable of this, however, if the installation is complicated, try to bypass the water for a while or at least get the cartridges.
- Gases may be released during the electrochemical reaction. This can occur due to direct contact of various metals, such as copper and aluminum. Metal fittings must be connected through rubber gaskets, FUM tape, and tow.

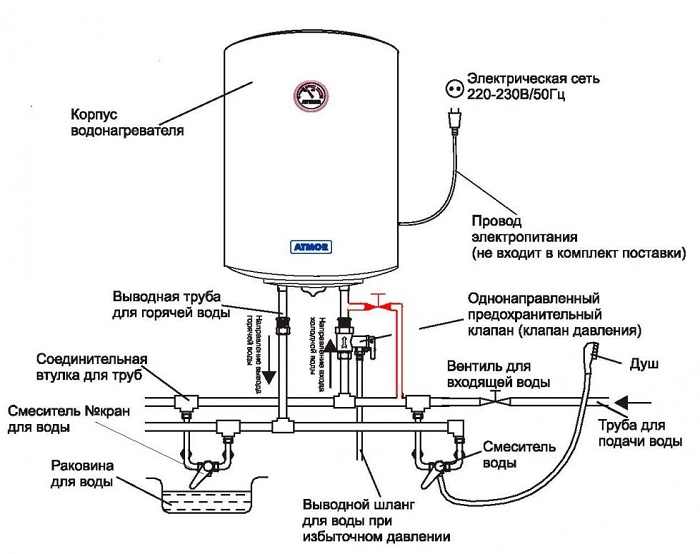
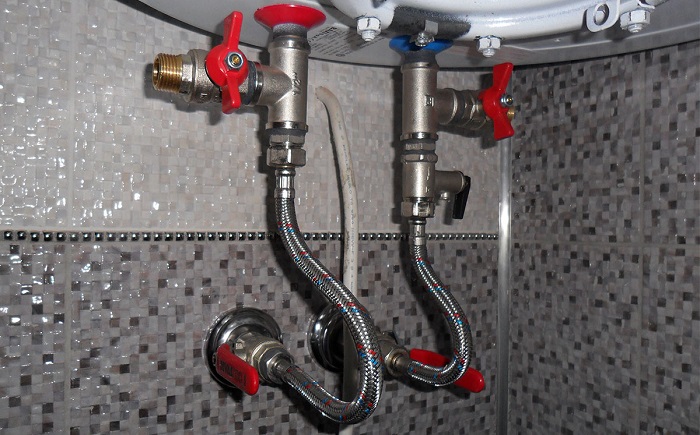
Correct electrical installation diagram storage water heater. Do you have a safety and check valve installed?
Calling a technician or repairing a boiler yourself is a personal matter, but in conditions of widespread savings, as well as the suddenness of breakdowns associated with the possibility of flooding, every owner needs to know some principles.
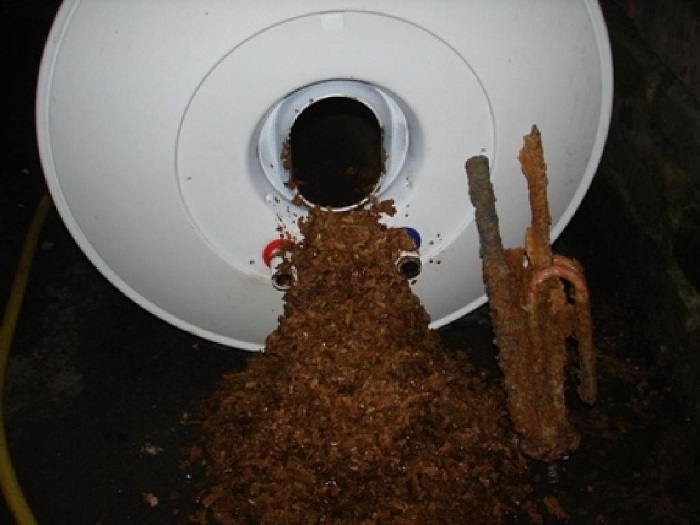
- The fact that it is time to carry out an inspection of the boiler is indicated by the characteristic noise or hissing when heating water, as well as the frequent operation of an RCD (device protective shutdown). All this suggests that the tubular heating element is covered with scale, and a lot of sediment and dirt has collected in the boiler itself. Most manufacturers recommend servicing your water heater at least once a year.
- The boiler is leaking. There may be several reasons for this: broken water connections (remedied by reconnection or tightening); leak in the internal tank. (such a malfunction cannot be repaired, since it occurs as a result of operational violations: wear of the magnesium anode or a malfunction of the safety valve, when water literally boils inside the tank and its deformation occurs); needs replacement heating element; small leaks of the safety valve are quite normal, as excess pressure is released; but its constant flow indicates systematic high blood pressure plumbing or malfunction of the valve itself.
- The socket and plug get hot. Check their good condition, overheating is possible due to the use of a tee or adapter, as well as as a result of a malfunction of the heating element.
- Hot water barely comes out. Weak pressure of hot water with normal pressure of cold water can mean: a blockage in the water supply, faulty wiring valves, broken faucet, faulty safety valve.
- The boiler does not heat the water. The breakdown is analyzed using an algorithm: is the heating indicator on? If the answer is “Yes,” we check the serviceability of the heating element and electrical wiring. If the answer is “No,” we check the voltage in the socket, the integrity and serviceability of the cord, and the operation of the RCD. If all elements are in good condition, we check the operation of the emergency thermostat, temperature thermostat, electric module and signal indicator. Failure of any of them requires repair or replacement with a new one.
How to drain water from a boiler
Besides repairs, cleaning and replacement of elements, when else do you need to drain the water from the boiler?
First of all, when it is used irregularly. Water heaters in country houses, dachas, it is better to empty it during downtime to avoid freezing of water and rupture of the tank. It is unacceptable for the water temperature in the tank to drop below +5°C.
On the other hand, manufacturers recommend not leaving the tank empty for a long time if there is no threat of freezing, this applies to. Stagnant water is released through the tap, and fresh water is used. Do not forget that an empty tank left for a long time is susceptible to corrosion, because what is intended for water must certainly contain it.
The cumulative principle of operation of a water heater involves creating pressure inside the tank, displacing water. Therefore, simply opening the hot one and closing cold tap, you won’t be able to drain the water.
- Like all procedures related to the repair and maintenance of a boiler, draining the water should begin by de-energizing the device.
- First, turn off the cold supply valve leading to the tank.
- To relieve internal pressure, open the hot water tap.
- There is a cold water safety valve near the water heater inlet. Using a screwdriver, disconnect the flag fastener.
- Remove the checkbox and place a container under the drain hole. This is not always necessary, since when professional installation The drain may already be discharged into the sewer system.
- Sometimes it's simple enough atmospheric pressure In order for the hot water supply (DHW) tube to suck in air, in this case you just need to have time to place containers and periodically raise or lower the valve flag. But more often than not, atmospheric pressure alone is not enough.
- If the connections are dismountable (they are located on flexible hoses or plastic fittings), we disassemble the one that is closest to the device along the hot water line.
- If the structure is non-demountable, we will need rubber hose required diameter to attach it to the appropriate tap.
- By blowing out the hose, we free DHW pipe from liquid. You can simply blow into it, or you can use a pump or compressor.
If you often have to flush the boiler, all connections should be removable. It’s even better to install tees with taps on the supply and drain, which will significantly facilitate the whole process.
Note: since the cold water supply pipe has a certain height, out of a hundred liters, about 10-15 liters may still remain in the tank. This should be remembered when draining water for the winter. In this case, only removing the heating element and the natural release of water from the tank will help. Read below about how to do this.
When is it not necessary to drain water?
If the boiler is under warranty and fails, leave everything as is and contact the service department. As a rule, water heaters are repaired at home and without outside intervention the technician will have a better idea of the cause of the breakdown.
Regular cleaning - preventing troubles
Hot water is comfort, and you have to pay for comfort. If you are lazy, save money, or do not consider it necessary to regularly clean the boiler, unpleasant and much more expensive “surprises” await you ahead.
The scale that forms on the heating element plays the role of a heat insulator. The longer the boiler is not cleaned, the greater the layer of lime it becomes covered with, and the less heat transfer from the water heater, since the thermal conductivity of scale is extremely low. Even its 3 mm layer increases heat loss by 15%. Hence a common problem: the boiler does not heat the water. But in fact, the heating element simply heats itself. The efficiency of the device decreases by a quarter, and sooner or later this ends in its irreversible failure.

If you notice that the boiler begins to consume more energy, the water in it heats up weakly and slowly, know: it’s time to clean it.
Let's disassemble the boiler:
- First of all, turn off the power supply to the device.
- Then use one screwdriver to pry up the panel in the area of the thermostat, and the second - from reverse side. The latches that hold the lid in place will pop off.
- Below it is a thermostat to which the power cable and warning light are connected. Remove its handle by pulling it towards you.
- Unscrew the two screws that hold it in place decorative cover water heater.
- Disconnect the contacts of the warning lamp.
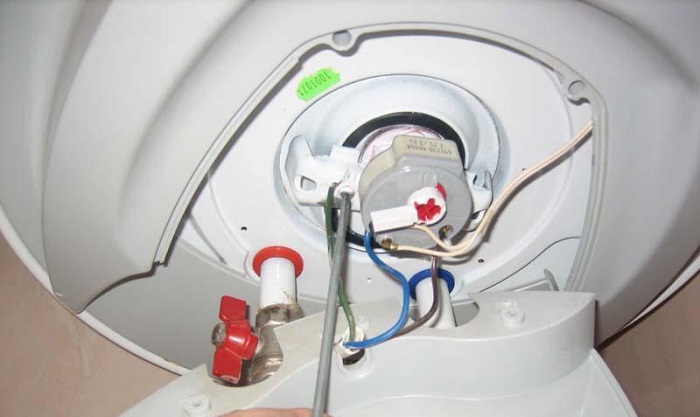
- Unscrew the screws holding the power cable wires. At this stage, it is recommended to take a photo of the connection diagram, so that later you can return all the contacts to their places.
- We disconnect the supply wires by loosening the three bolts on the mounting block and unscrew it. Don't forget to remove the grounding.
- After removing the wires, turn off the taps at the inlet and outlet of the water heater.
- Carefully, using side to side movements, remove the thermostat from the body of the tubular electric heater.
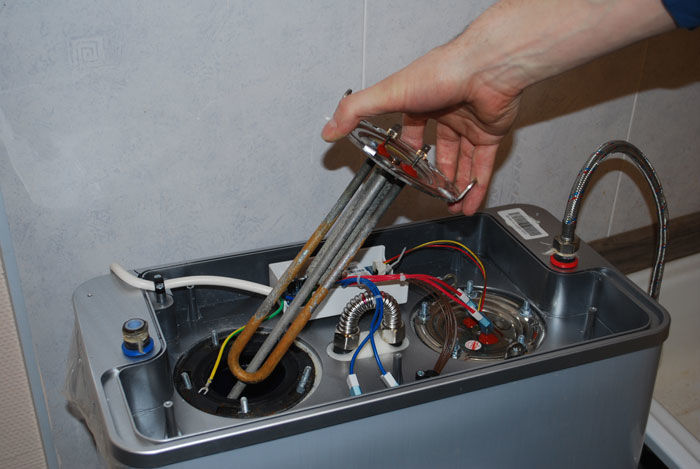
- The flange in the heater can be screwed in or held on by six screws. Using a gas wrench, unscrew the heating element counterclockwise. Do not rush to pull it out immediately, let the water and scale come out (in this case, it is convenient if there is a bathtub under the boiler).
- When the water has subsided, carefully, avoiding sudden movements, so as not to break it, remove the heating element. There may be a lot of scale on it, so we release it with movements left and right.
- Now the heating element needs to be cleaned and made to work again.
Cleaning the heating element:
- We inspect the heater and mechanically remove large pieces of scale using a knife. Care should be taken not to damage the metal itself.
- We take a two-liter bottle and cut off its neck so that the heating element can easily fit into it.
- Now we prepare the cleaning composition: in warm water dissolve a couple of sachets citric acid. As you know, scale is an alkali that is neutralized by acid.
- We lower the heating element into warm solution, shaking a little and leaving it there for about 1 day. To speed up the process, the solution can be changed periodically.
- Under the influence of acetic or citric acid, the scale softens, and where there were calcareous deposits, now shining pure copper flaunts.

Advice: if you clean the heater mechanically, then it is better to perform this procedure immediately after removing it from the tank. When the plaque dries, it hardens. Use a wire brush or a regular knife for these purposes, but remember: the surface is easy to damage. After finishing the work, you can carefully process copper tubes fine-grained sandpaper.
Fortunately, modern household chemicals provides us wide choose funds for any occasion. And boilers are no exception here. You can use a kettle cleaner, or an anti-scale solution specially designed for boilers, by placing a heating element in it. The main thing is to avoid direct contact of liquid with rubber seals heating element.
While the heater is being cleaned, we will rinse the boiler from any remaining scale. To do this, briefly open the cold water tap, helping to remove dirt with your hand. When cleaning the tank, you should absolutely not touch the magnesium rod or use abrasives or sharp tools to pick out scale.

Assembling the boiler:
- We insert the cleaned or new heating element into the body of the water heater and screw it in clockwise, first by hand, and then using a key.
- Replace the thermostat.
- Slowly open the taps at the inlet and outlet of the boiler. We fill the tank and check whether the heating element is installed tightly.
- To allow the air to escape, turn on the hot water in the tap.
- If nothing is leaking anywhere, connect the power cable to the thermostat, installing each wire in its place.
- Now we mount the contacts of the signal light.
- We put it in place and screw on the decorative cover.
- And the last thing - connect the water heater plug and wait for the water to heat up.
Attention! You only need to connect and disconnect the power when the tank is full of water!
How to replace a heating element in a boiler
As the tubular electric heater (TEH) fails, it must be replaced. If you notice that when you turn on the boiler, the automatic protection relay immediately turns it off, most likely your heating element has burned out.
There are two ways to check if this is true:
- remove the heating element, assemble it and the control lamp into a circuit and connect it to the power source: if the lamp is on, the heating element is working;
- using a multimeter. The power (P) of the heating element is indicated in the heater’s passport; in our example, it is 2000 W. Knowing that the network voltage (U) is 220V, we calculate the flowing current I=P/U. Using the formula R=U 2 /P we find the resistance of the heating element, which in this case is equal to 24.2 Ohms. We switch the multimeter to resistance measurement mode and measure it between the heater terminals. If the device is in working order, the readings should be close to the calculations. “Zero” indicates a short circuit inside the heater, and “infinity” indicates a break and malfunction of the heating element.
So, first of all, let's empty the tank.
It is better to supplement a pre-purchased heating element with a new magnesium anode. Designed to protect the tank and heating element from corrosion, it degrades over time. If it is not replaced in time, water ions, when boiling, settle on the internal parts of the tank, which leads to failure of both the heating element and the tank itself. If the boiler leaks, it cannot be repaired.
Pay attention to the condition of the O-ring. In principle, it can be reused if it is in decent condition. If there are breaks or dents, it is better to replace it.
After connecting the device, fill it with cold water, check for leaks, release excess air through the hot water tap, and only then connect the boiler to the network.
Choosing a heating element to replace in the boiler
Heaters with 1"1/4 thread are suitable for all boilers with this connector. They are made with various parameters power, available both with and without anode mounting.
Flange heating elements, 48, 63, 72, 82 mm, are also used by many manufacturers.

The cleaning principle is the same for all water heaters, but difficulties may arise when dismantling a model from a particular manufacturer.
Ariston brand boilers have an unusual way of attaching the flange. To remove it, push it towards you, turn it over while it is in the device, and then pull it out. After finishing cleaning, return the flange to its place, not forgetting to check its tightness. If necessary, replace the gasket. In boilers of this brand, the heating elements are located at the bottom, so there is no need to remove the device.
Gorenje water heaters are distinguished by the fact that, at first glance, it is quite difficult to dismantle the front panel. To do this, you need to press its lower edge and pull it slightly towards you. The panel is held on by a couple of small clips and will pop off easily. A special feature of this brand is that its units have an impressive weight, so only a few people can remove it from the wall, and in addition, you risk getting the contacts wet.
Termex boilers are quite easy to disassemble; their only weak point is the magnesium rod, which you will have to change almost every year.
- First, bleed the water heater by simultaneously opening the cold water tap and one of the hot water taps.
- Check for leaks.
- Apply power supply.
Note: For electronic models, please follow the included instructions
DESCALING THE HEATING ELEMENT
Scale on heating elements affects:
- Increasing the thermal insulation of the thermostat and heating element
- Increased energy consumption
- Overheating of water
Therefore, it is necessary to periodically clean the water heater from scale. The frequency depends on the hardness of the water.
8. Carefully remove scale from the heating element manually or using cleaning agents.
VOLUME OF WATER IN THE WATER HEATER TANK
The name of each water heater indicates the volume or capacity of the tank. For example: 30, 80, 100 liters, etc. This volume is called nominal volume, while the actual volume of hot water is less than the nominal one.
This is explained by the division of water into layers depending on temperature and the fact that hot water accumulates in the upper part of the tank and does not mix with cold water in the lower part of the tank.
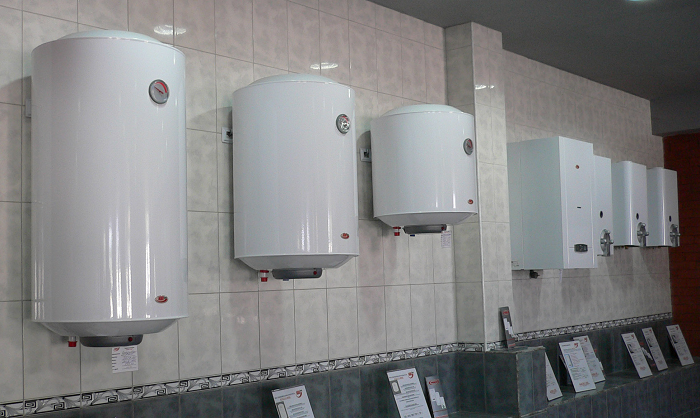
Water stratification is reduced due to the location of the heating element and thermostat at the bottom of the tank, but this mainly depends on the model of the water heater: vertical or horizontal.
Horizontal models
Minimized in vertical dimensions (for rooms with low ceilings ) do not provide good mixing of water layers. In addition, the volume of cold water in these models is larger than in vertical models.
Hot water volume measurement
Wait the required time and drain the hot water through the safety valve or through the drain outlet provided.
ROUTINE CHECK OF ELECTRICAL EQUIPMENT
Thermostat
A heating element
Integrityheating elements
· Checked with an ohmmeter
TROUBLESHOOTING TABLE
PROBLEM | REMEDY |
No hot water (flows cold water) | Poor electrical connection between thermostat and heating element | Check and correctly insert the thermostat into the heating element terminals. |
The overheating thermostat has tripped | Remove scale from the heating element and the inner tube of the thermostat If this is detected when you first turn on the appliance, reset the thermostat by pressing the reset button on the thermostat. In other cases, replace the thermostat |
|
No power supply | Check the power cable and that's it electrical connections, and also whether the switch on the water heater is turned on. |
|
The heating element is faulty. | Replace the heating element and gaskets. |
Long heating time, high energy consumption and water does not heat up to max. temperature | Incorrect connection of the device to the water supply network, which allows water to circulate. | Check and correctly connect the device to the water supply network. |
Faulty shut-off valves(faucets turn on). | Check and, if necessary, replace shut-off valves. |
|
Cold water from the heating system circulates in the water-water heat exchanger of the device (only for thermoelectric models). | Close the taps at the points where the water-to-water heat exchanger of the device is connected to the heating system. |
|
The heating element went to ground | Replace heating element |
When the water heater is turned on for heating, a protective circuit breaker is triggered (it “knocks out the plugs” in the apartment) | Setpoint circuit breaker small | |
The heating element went to ground. | Check the heating element and replace if necessary |
|
The presence of condensation between the thermostat terminals or the output terminals of the heating element. | Sort through and wipe everything dry. |
|
Corrosion or water leakage from inlet or outlet connections | Direct iron/copper connection. | Install dielectric adapters. |
Safety valve leaks all the time | Excessive water pressure in the system. | Install pressure reducer |
Faulty valve. | Replace valve |