Adjusting the closing of plastic windows with your own hands. Adjusting the pressure of plastic windows. Door handle loosening
Do-it-yourself adjustment of plastic windows may be required at any time, despite the guaranteed long service life of PVC structures. This simple operation can be easily performed by any home craftsman if you understand some of its subtleties.
Modern plastic windows are made using massive and truly reliable fittings. It guarantees trouble-free operation of structures for many years. But even highly reliable mechanisms require periodic maintenance and adjustment. It is possible to perform such operations with your own hands. It is enough to stock up on simple working tools and understand the key components of PVC structures.
Adjustment of PVC windows
The plastic window is adjusted using a screwdriver (Phillips) designed for several different sizes, a set of hexagons, star and cross-shaped nozzles marked TX or T, machine oil and pliers. No other devices will be needed. In most cases, it is possible to adjust windows using a hexagon (popularly called a furniture wrench). Such a tool may have the shape of the letter S. But more often it is made in the form of an L-shaped metal rod that can easily handle.
Star-type nozzles are used infrequently. With their help, it is possible to restore the functionality of a plastic window with your own hands using rarely found types of fittings. In other cases, all problems that prevent the window from closing or opening can be solved using an ordinary Phillips screwdriver. There are several points for customizing window designs. They are the same for all PVC products, regardless of which company manufactured them. The adjustment points are located:
- In the area of the upper loop. This point makes it possible to adjust the top of the window sashes horizontally.
- In the bottom loop. A point for restoring normal horizontal operation of the lower corner of the sash, as well as its vertical position.
- In the locking (lower) journal and in the area of the eccentric journal. This point is used to calibrate the pressing force of the window sash.
If the indicated points are deformed, it is prohibited to adjust the windows yourself. In such cases, you need to contact specialists. Sometimes, after long-term use of window structures, they become clogged with dust and small debris, which should be removed and then the planned work should be carried out.
It is advisable to carry out technical inspection of PVC structures regularly. Such an inspection of the condition of the windows will not be superfluous. But they need to be adjusted directly as needed. Note that even in cases where the initial configuration of the structures was carried out to the highest possible quality, certain problems may arise when using them. They are usually associated with violations of the tightness and integrity (structural) of windows, breakage of the fasteners used, and violations of the recommended operating rules for plastic products.

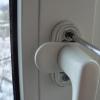
Strengthening the window handle
By independently adjusting PVC window structures, you can solve the following problems:
- Sagging of the sash (its lower part). A common failure. This leads to the fact that the sash clings to the frame when opening. The problem can be easily solved. You need to calibrate the lift of the sash (either vertically or horizontally), and the latter will close perfectly again, without hitting anything in its path.
- Blowing is a noticeable draft from under the heat-insulating layer. In this case, you will need to adjust the sash pressure.
- Loose handle. This kind of malfunction occurs quite often. The situation is corrected by tightening a small plate, which is located under the plug.
- Adhesion to the frame of the middle part of the sash, which is why the window does not close well. In this case, adjusting the sash lift helps. The adjusted element will again function flawlessly.
Another common problem is difficulty turning the window handle. This problem occurs either due to a lack of lubrication or due to improper lowering of the sash. You will either need to lubricate the problematic product with machine oil, or disassemble the handle and adjust the stroke of its roller. Next, we will tell you in more detail how to properly adjust plastic windows in order to solve all the problems described.
First, let's look at how to adjust a window product vertically. Everything here is elementary. Find the location of the hinged bottom hinge, open the plug under which it is hidden. Insert the hexagon into the special hole and begin to carefully rotate it clockwise. This will cause the sash to rise. If you rotate the tool in the opposite direction, the sash will lower. Windows are calibrated horizontally in the same way. This setup allows you to solve various problems with plastic structures.

Plastic window calibration
If you need to fix a slight bevel of a window or a shift in its frame, you will need to remove the cover from the bottom hinge and use a furniture key according to the scheme already described above. Horizontal calibration makes it possible to adjust the window from both the inside and outside. In other words, you can easily adjust the window structure in a closed or open state. In practice, everything looks like this. Insert the hexagon and turn it.
When rotating counterclockwise, the lower section of the window structure will begin to lower. If you turn the adjusting key in the opposite direction, the bottom of the window will begin to rise.
Horizontal adjustments can also be made on the upper hinge of the structure. This need arises if a plastic window does not close well. Here you need to know one nuance. Such calibration is carried out only when the window is open. The principle of setting remains unchanged. Let us add that the shift of the sashes with the described repair methods is carried out by no more than 2 mm.
The seal located around the perimeter of PVC products loses its original volume over time. This causes gaps to appear in the heat and. A similar situation can arise due to temperature changes outside. Some people immediately turn to specialists for help. They advise replacing the seal. As a result, restoring the window structure costs a pretty penny. But the problem can be solved more simply. It is enough to slightly change the clamping force to return the window to its heat and sound insulation characteristics.
At the end of the window sashes there are special oval cylinders. These protruding elements are called eccentrics (or trunnions). You will find them in the slots of the metal plugs. On the window frame there are hooks into which the above pins enter when you turn the window handle. You can change the pressing force of the sash in two ways - by moving the hooks and turning the trunnions. You need to turn the protruding section of the eccentric towards the outer surface of the PVC structure (if you need to reduce the amount of force) or towards the inner surface (when you need to increase the force).

Do-it-yourself PVC window setup
Take into account! The calibration methods for fittings from different manufacturers differ from each other. There are three ways to adjust the clamping force:
- If there is a special slot on the trunnion, insert a flat-head screwdriver into the last one and turn the eccentric slightly.
- If there is no slot, you need to remove the pin with pliers and then turn it.
- Grab the eccentric with pliers, lightly tighten it, and then turn it.
In cases where it is impossible to adjust the trunnions, you can try to calibrate the hooks. They are usually secured with two bolts. You need to loosen these hardware with a hexagon and move the adjustable element (hook) towards the street (if you want to increase the pressure) or towards the room (to reduce the pressure).
Experts do not advise excessively clamping the window frame and its sash. The design in this case will not close and open better. But early wear of the seal is guaranteed. If you want your home to always have an ideal microclimate, readjust the sash pressure twice a year. Tighten them tighter before the onset of cold weather (then in winter the cold air will not penetrate into the room at all) and loosen them in the spring so that a small air flow enters the home.
Handles on plastic products are subject to the greatest load. We constantly open and close windows and do not always do it carefully. The result of such carelessness is the loosening of the handle. Fixing this situation is very simple. Find a rectangular trim under the loose part, pry it up with your fingers (do not use metal tools, as they can damage the edge of the plug or even the profile itself) and turn it 90°. Bolts will open in front of you. Use a Phillips screwdriver to tighten them, then return the trim to its place.

Self-repair of PVC windows
It is more difficult to cope with a handle that does not reach any given position or noticeably jams. First, dismantle the closing mechanism, thoroughly clean its internal parts, and then treat them with oil (machine oil). If this does not solve the problem, try reducing the clamping force on the sash. You will need to adjust the hooks and trunnions. We discussed this technique in detail in the previous section of the article.
Sometimes the handle gets stuck. There is an opinion that such a malfunction definitely requires replacing the device that closes the window. This is wrong. Moreover, you don’t even have to dismantle the handle to wedge it. The problem in this case arises because the locking device on the PVC structure does not work correctly. The problem can be corrected simply - at the end of the sash, find the locking lever (it can be made in the form of a clip or in the form of a small tongue) and carefully move it away. This is all. The functionality of the pen has been restored!
And one last thing. Hinged PVC windows are equipped with two hinges. These elements can be calibrated independently using a screw. A similar operation is performed to improve the functionality of the loops. By turning the screw in different directions, you adjust the degree of their pressure, which means you can choose the optimal ventilation mode for your home. The adjustment range for the hinges is within 2.5 mm. Now you know how to properly adjust a plastic window. Don’t waste your family budget by calling experts to repair PVC structures. After all, you can solve almost all problems with windows yourself.
Immediately after installing the plastic windows, the craftsmen carry out the so-called calibration. It allows you to ensure a position of the sash in which the structure performs its functions most effectively - providing heat and sound insulation. However, during operation, additional adjustment of the plastic window may be necessary. Let's look at how to adjust PVC windows yourself, without calling specialists.
If you have never paid attention to how your window is structured, you should definitely do so before adjusting the fittings. Window fittings are a complex mechanism consisting of many elements. It ensures correct and safe operation of the sashes.
Please note: this mechanism is controlled by a handle only. A certain degree of rotation sets the position of the locking elements and, accordingly, the window opening mode.
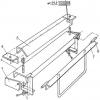
Plastic window device
Main functional parts of the fittings:
- Steel plates (external and internal) located around the perimeter of the sash. In this case, the inner plate - or the so-called “tire” - is moving. It moves relative to the stationary outside one.
- The main lock located on the front side of the opening part of the window.
- Scissor bracket or “scissors”. Holds the sash at the top when opening the window.
- Angular gears. They are installed at the corners of the opening sash and serve to transmit movement from the main lock to the remaining elements of the steel frame.
- Trunnions (eccentric rollers, “eccentrics”) are oval or round elements mounted on the inner tire and protruding outward through slots in a stationary steel plate.
- Counterplates. Fixed elements attached to the window frame, designed to secure the trunnions when closing the window.

PVC window fittings diagram
The principle of operation of the mechanism is quite simple. Turning the handle causes the movement of the transmission bus with trunnions. They slide out of the grooves of the strikers and the window opens. In ventilation mode, all eccentrics are moved aside, except those located in the lower part of the sash. When the handle is lowered, the pins slide into the “responses” and the window closes securely.
When does it become necessary to adjust window fittings?
Adjustment of window fittings may be required in the following cases:
- the design does not retain heat in the room well, drafts appear;
- the handle does not close completely, dangles or, conversely, turns with difficulty;
- the sash sags and touches the frame when moving.
Why do such problems occur? There may be several reasons.
- Deformation of fittings elements. This often happens with low-quality, cheap products.
- Incorrect operation of the structure - turning the handle when the window is open, abruptly closing it all the way, etc.
- Adverse weather conditions. Each product is designed to operate in a certain temperature and humidity conditions, otherwise individual window elements will not function properly.
- Violation of technology for installing structures.
- House shrinkage.

A stiff window handle can cause damage to the entire locking mechanism.
Another reason to adjust the pressure fittings twice a year is the life of the seal. By loosening the pressure in the summer and increasing it in the winter, you protect the seal from drying out, loss of volume and deformation. Adjusting to changing temperatures during these seasons also reduces the internal stress of the window structure.
If you are going to adjust the operation of window fittings yourself, you need to know the specific points of its adjustment. For each problem they vary, but are always associated with the locking mechanism.
- Bottom loop. Adjusting the fittings in this place allows you to adjust the position of the movable sash vertically and its lower edge horizontally.
- Top loop. The setting allows you to straighten the horizontal position of the upper part of the sash.
- Locking pins. With their help, you can set the force of pressing the sash against the window frame.
- Directly window handle. Troubleshooting this area allows for smooth movement of the handle and a tight fit of the locking pin to the strike plate.
By adjusting the window fittings in just four places, you can perform high-quality calibration of the plastic window yourself.

Window hardware adjustment points
Self-adjustment of plastic windows
Self-calibration of a plastic window is a matter of minutes if you know where to look for problems. To do this, place a sheet of thin paper or newspaper between the open sash and the frame, then close the window. If the sheet is not pressed tightly or its clamping line is beveled, then it is necessary to adjust the pressure of the sash in this place or align it along the vertical or horizontal axis.
Required Tools
To work, you should stock up on a set of simple tools. However, it is advisable to have a complete set so that difficulties do not arise in the midst of adjustment. You must have:
- Hex key 4 mm. This is an L- or S-shaped tool, most often used to repair PVC windows.
- Aerosol WD-40.
- Screwdriver set, including star and Phillips bits.
- Pliers.
- Machine oil. Necessary to facilitate the movement of moving parts.
You should also have a pencil on hand for making marks indicating the location of the sash, and a rag for removing dirt from the fittings.

An S-shaped hex key is more convenient than an L-shaped one during work.
Adjusting the sash pressure using trunnions
This is the easiest way to restore normal window operation and eliminate unwanted blowing. Provides tight pressure on the sash in the front part where the handle is installed. Depending on the type of fittings, this is done in different ways:
- Manually. To do this, you need to slightly pull the trunnions towards you and turn them in the desired direction. Please note: some types of eccentrics move to the side when turning.
- Using a hex key.
- Using a screwdriver or pliers.
Important! For some manufacturers, to increase the pressure, the locking pins must be turned clockwise, while for others, counterclockwise. This point can be clarified during installation of the structure or in its technical documentation.

Eccentric adjustment diagram
Some trunnions have marks - marks in the form of short lines and dots. Their location allows you to determine the quality of pressing of the sash to the frame. If the risk “looks” towards the street, then it is weak, towards the room – strong.

Special mark on the locking pin
In some cases, when adjustment of the eccentrics is impossible, the location of the strike plate is changed. To do this, unscrew the screw holding it, move the bar towards the street or room and re-attach it to the frame.
Adjusting the window structure using the bottom hinge
As a rule, pressure adjustment begins with the main constipation. Then they move on to working with loops.
If you remove the decorative plastic plug from the bottom hinge, you will find hex key bolts underneath it. Two of them will be located at the very bottom of the loop (from the inside and outside), the third - in the groove, as if inside it.
You can move the sash along the vertical axis by inserting the hexagon into the groove located in the upper part of the hinge and turning it. Turning it clockwise will lift the sash, and turning it counterclockwise will move it down. In this case, movement (adjustment stroke) is possible within 2 mm.

Working with hinges is carried out only when the window is open
A bolt located at the bottom of the hinge allows you to change the horizontal position of the sash. To move to the right, turn the hex key counterclockwise. To move to the left - in the direction of its movement. In this case, adjustment of the locking mechanism is also possible only within 2 mm.
Note! The more the sash is pulled to the hinge, the greater its pressure in this part of the window.

Aligning the sash along the horizontal axis
Video: window adjustment using the bottom hinge
Adjusting the sash using the top hinge
Similar adjustments can be made in the area of the top hinge. However, in most cases, owners of plastic windows install tilt-and-turn fittings, which allow the structure to be used in ventilation mode. This entails some difficulties.
So, to increase the pressure, it is necessary to change the position of the adjusting bolt on the scissor bracket. To get to it, you need to open the window in both pan and tilt mode at the same time. To do this, perform the following sequence of actions:
- Open a window in rotation mode.
- At the top of the sash, find and release the lock, while simultaneously turning the handle to the ventilation mode. The blocker easily moves away from one of the locking pins, and the sash hangs freely on the “scissors”.
Note! Usually, to adjust the fittings, it is enough to make 3-5 turns with a hex key.

Hold the window when working with the clamping eccentric on the “scissors”
Video: how to adjust the clamping mechanism
To move the upper part of the sash to the right or left, you need to open the window wide, find the groove for the “hexagon” in the end part of the fittings and perform the required number of turns clockwise or counterclockwise.

Adjusting the top of the window
Video: troubleshooting the top hinge of a plastic window
Handle repair and adjustment
Adjusting the window or door handle depends on the type of problem. If it just gets loose, just pull the plastic plug located parallel to the frame towards you and turn it - the elements securing the handle will open. You just need to tighten them a little tighter.

If the handle is stiff or does not turn all the way, you will have to remove it. To do this, also turn the plug, unscrew the fasteners and slightly pull the handle towards you. The resulting hole must be inspected for the presence of foreign objects and contamination. It is also important to assess the integrity of the removed element. If there are deformations, it is better to purchase a new product. If everything is in order, you can simply lubricate the working mechanism of the handle with machine oil and put it back.
Is the handle jammed? This happens if the corresponding lock on the front of the sash gets stuck. It usually looks like a small plate on a spring or a metal tongue. For further normal operation of the handle, this blocker is manually pressed towards the seal. The sash must be positioned strictly vertically.
Detailed video guide
If you have all the necessary tools and proper attention, setting up the fittings will not take much time. In addition, by doing everything yourself, you can save on calling a specialist. It is enough to inspect the locking mechanism once every six months and check its operation to extend the life of the window and avoid costly repairs.
High-quality plastic windows from a trusted manufacturer, installed in compliance with all the subtleties of technology by good craftsmen, can last for many years without causing any trouble to the owners. But suddenly it began to blow from somewhere, the handle broke, the seal cracked, or the handle simply jammed. In such situations, plastic window repairs are needed. Don’t panic and immediately look for a repairman; many breakdowns can be fixed on your own in just a few minutes.
Do-it-yourself adjustment of plastic windows
If the window sash suddenly becomes warped: it sags downwards or is positioned unevenly in the horizontal plane, adjusting its position will not be difficult. You must have a hex key set to “4”.
Adjusting the sash position “up and down”

The position of the sash in the vertical plane is adjusted by the lower hinge. To raise or lower the sash, open the window and remove the decorative trim from the bottom hinge. Then insert the hex key into the adjustment groove, which is located on top. Turn clockwise - the sash rises, counterclockwise - the sash lowers.
Adjusting the sash position “right - left”

The “right - left” position of the lower part of the sash is adjusted using the lower hinge. In the same way, remove the decorative trim and insert the key into the adjustment groove, which is located below. Turn clockwise - the sash moves to the left, counterclockwise - the sash moves to the right.

The “right - left” position of the upper part of the sash is regulated by an element located on the top of the sash itself. To have access to it, we open the sash wide, from above, on the side closest to the hinges, we see the slot in which the element is located. Using a hex key, turn it - the sash moves left or right.
Important! The position of the shutters can only be adjusted when they are open.
Adjusting the sash to press against the frame
Most often, plastic windows do not have vents, so the only way to freshen the air in the room in winter is to put the sash in the “ventilation” mode. For very severe frosts, the gap formed may be too large - all the heat will blow out through it. There is a need to reduce it, at least temporarily. Or another problem arises: there is a lot of blowing coming from under the seal. In this case, adjustment and repair of plastic windows may be necessary.

The pressure of the upper part of the sash to the frame is adjusted by a mechanism on the upper sash. To have access to it, we open the sash in two positions at once: “open” and “ventilation”. If the lock is activated, preventing you from opening two positions at once, press in its tab located on the handle mechanism. When the sash is open, we see scissors from above that support the sash. There is an adjusting element at the top or bottom of them; we turn it using a hexagon. The sash will be pulled closer to the frame. Then we return the sash to its original position.
Blowing from under the seal can be eliminated by pressing the sash against the frame. If this does not help, repair of plastic windows (PVC) will be required. The sash pressure can be adjusted using the locking mechanism. trunnions And strikers, which are used to open and close the window. When the handle is turned, the trunnions engage the strikers. Either one or the other can be adjusted depending on the fittings.

Trunnions are located on the sash and are round or oval elements. If they have a hexagonal groove, then they are controlled by a key, and if not, you need to use pliers. We rotate the trunnions so that they become closer to the seal. We repeat this procedure for all trunnions that are located around the perimeter of the sash. Make sure that the pressure is even.
Do-it-yourself plastic window repair
For new plastic windows, repairs and maintenance are covered under warranty only if the warranty is provided by the manufacturer or installer. The average warranty period is 2 years. If the breakdown occurs after this period, you will have to carry out paid repairs. Below is information that will allow you to save money and not call a plastic window repair specialist for trifles.
Installing a new handle and opening limiter
If the handle suddenly breaks, cracks or becomes loose, or you want to install an opening limiter or a new handle-lock so that a child cannot open the window, you do not have to contact special companies. It is enough to buy a new handle at a hardware store and replace the old one with a new one yourself.

Turn the decorative plate at the base of the handle 90°. We see two screws, top and bottom, that secure the handle. Unscrew them with a regular screwdriver and remove them. We remove the old handle. We install the new handle and fasten it with the same screws. If we want to install an opening limiter, then before installing the new handle, we install the ventilation control plate (“comb”) into the base of the handle. Then we put the handle on, screw it on and turn the plate back to cover the screws.
As you can see, everything is quite simple. If possible, it is better to do this work yourself, since the prices for such repairs of plastic windows are the same as for new handles. Those. the cost of a new handle = the cost of installing it. Why pay more?
The handle is stuck in the “open” position, the window sash does not close: disabling the lock
Don't be alarmed if the handle is stuck in the open position. Most likely, the blocker was activated. It is installed on most fittings for a good purpose - so as not to accidentally break the window. When the handle is turned to the tilt or tilt position, the lock is activated to prevent the handle from turning. But there are times when it works at the wrong time. Most often this happens if the handle is moved too quickly from one position to another. To disable the blocker, you need to determine the brand of the hardware.
Accessories "AUBI": The sash must be in a vertical position. If it’s a tilt-and-turn type, the lock on the top hinge will also prevent the handle from turning. In the area of the handle we find a metal plate with a spring. We press it against the seal with our fingers and turn the handle.

Fittings “Roto”, “GU”, “Winkhaus”, “Maco”: under the handle we find a metal tongue, it should stick out at an angle to the frame. We press on the tongue so that it is in a position parallel to the sash, and turn the handle.

If this does not work, you need to check whether the lock is in contact with the response mechanism on the frame. There are cases of thermal expansion, then the blocker can slip past. To eliminate this, open the window and find a counter element on the frame to which the blocker should cling. Then we unscrew the screws that secure it and place something between the frame and the counter element, for example, a plastic pad. This way we will ensure that the blocker on the sash engages with the counter element on the frame.
The handle turns with difficulty or does not turn completely: hardware repair
Problems with the handle may be caused by sagging sash or dried grease in the fittings. First, we look visually to see if there is sagging. If there is one, adjust the sash in a vertical position, as already described above. If you don’t notice anything like that, then it’s still a matter of lubrication. The fact is that the fittings system for a plastic window is very complex. Control, in fact, using only one handle is ensured by a large number of transmission mechanisms. Their high-quality work is guaranteed by cleanliness and good lubrication. Therefore, we buy either a universal penetrating lubricant or a special lubricant for plastic window fittings and lubricate all moving elements of the fittings. If the handle still doesn’t move well, then you should call a technician.
The sash opened simultaneously in swing and tilt modes

We don’t panic, it’s clear that the sash is heavy, but still... We switch it to the rotary mode, i.e. Place it vertically so that the top loop is pressed.

At the same time, the sash remains open. We move the handle to the horizontal position (“open”). If the blocker does not allow it, disable it, as already described above. Then close the sash and turn the handle down. To check, we slowly turn the knobs to different positions, it works - everything is fine.
Blowing from under the seal: pressing the sash to the frame
First of all, we try to cope on our own, pressing the sash more tightly to the frame. To do this, follow the clamping instructions as described above. We pay attention to the position of the trunnions and strikers, whether they correspond to each other.

Perhaps the trunnions do not extend beyond the mating parts. In this case, it is necessary to rearrange the slats: unscrew the screws securing them and rearrange them a little lower. If nothing helps, everything is still blowing, then the reason is different. Contact a specialist.
Blowing from the hinge side, arched the profile: installation of straightening plates

If it is blowing from the side of the hinges, you can press the sash in this place to the frame. There is a hole on the bottom loop, insert the nozzle into it and turn it.

On the top hinge, the tightening mechanism is located on the scissors, as it is adjusted as described above.
If the profile is bent in an arc, there may be several reasons for such an ailment. The first is poor-quality installation: the frame is stretched by anchors, and the middle clamp does not work. The second is that the straightening plates fell or were not installed at production (defective). They must be installed in the middle of the sash between the double-glazed window and the profile. If your windows are under warranty, do not carry out repairs yourself, contact the company, they are obliged to fix the defect free of charge. If the warranty period has long passed, then we install these plates ourselves. As a material, we use any available plastic, with a width no less than the thickness of the double-glazed window.

We take a metal spatula, place it in the joint between the bead and the profile, lightly hit it and disconnect the bead. Below we see straightening plates installed between the frame and the sash. We cover the metal part of the spatula with a plastic stand so as not to damage the glass unit. Use a spatula to move the glass unit back 3 - 5 mm. We install the plates and return the glass unit to its place.
Important! Plastic plates should not rest against the glass part of the glass unit, otherwise the glass may crack.
Old plastic windows: hardware repair
Over time, the window fittings become clogged with dust and dirt and cease to function normally. And there are cases that during repairs the windows are open, and the whitewash clogs all the transmission mechanisms - the new windows stop working. You will have to completely go through the fittings. You can order this work from professionals. Such repairs of plastic windows in Moscow will cost from 1,200 rubles. for one leaf. Or you can try to do it yourself.
Remove the sash from its hinges. Remove the decorative trims from the top and bottom hinges. We knock out the axle from the top loop: first we hit it from above, and then remove it from below using pliers. Someone else must support the sash at this time, since it is heavy. We remove the sash from the bottom hinge and place it on the table. Remove the handle (see above). Along the perimeter of the entire sash, unscrew all the screws securing the fittings. We take out the mechanism of their special groove. We place the fittings on a table covered with film. We wash the entire mechanism with a brush, dipping it into the rinsing bath.

After thorough washing, dry the mechanism with air. You can use a bicycle pump. We buy a special lubricant for plastic window fittings and lubricate all transmission elements and rubbing parts.
Carefully put the accessories back on. We fasten it with screws. Install the handle. Lubricate the hinges and hang the sash. If everything works well, we've just saved RUB 1,200.
Replacing the seal on plastic windows
The average service life of the seal is 5 - 10 years. If you can see with the naked eye that it is out of order and worn out, it’s time to replace it. First of all, we buy a new one. German will last 10 - 15 years. Turkish - 5 years. When purchasing, we check along the entire length to ensure there are no defects.

We take out the old seal and groove. Clean and rinse the groove thoroughly. Lubricate the groove with glue along the entire perimeter. We insert the seal into it slowly and carefully - we must not allow the cord to stretch or shrink.
Replacing double glazing in a plastic window
A broken double-glazed window is another nuisance. If you are not confident in your abilities, it is better to contact specialists. In any case, we will need to order a new double-glazed window.
We remove the old glass unit. Using a metal spatula and a rubber mallet, remove all the glazing beads. We insert the spatula into the joint between the frame and the glass unit, lightly hit it and remove the glazing beads. When all the glazing beads are removed, we take out the double-glazed window - together, it’s heavy. Carefully lay it on the floor. We measure all parameters: height, width, thickness. We inform the manufacturer of the dimensions and wait for new double-glazed windows.
We install straightening plates at the bottom - if the sash is blind, in the corners with an indentation of 10 cm - if the sash is opening. We insert a new double-glazed window. Let's make sure its geometry is correct. If necessary, add more straightening plates. Then we install the glazing beads. The new window is ready.
Important! Replacing a double-glazed window in a wooden window uses a different technology using more serious tools, so you should not try to do it yourself.
In this article, we examined only those breakdowns that you can try to fix yourself. If something more serious has happened, or you can’t do it yourself, contact special companies.
Repair of plastic windows: video instructions
You will learn:
- About two modes of window adjustment, about their regulation.
- About window settings and basic control methods.
- About repairing handles and other moving mechanisms.
At a minimum, you will need a wrench and a screwdriver for each adjustment. Lubrication and other things - at will and circumstances.
At the end of the article there is a video showing instructions for adjusting plastic windows with your own hands.
Winter and summer mode
The first question that arises is - why is this adjustment of the modes of plastic windows necessary? The main reason is the increased lifespan. If the window is constantly kept in one operating mode, this will damage the seal and lead to blowing. The next advantage follows from this, namely...
Saving. You don't have to buy new seals and waste your time replacing old ones.
The main difference between the modes is the different level of seal fit. In winter it should be pressed closer.

In general, self-adjusting plastic windows in winter and summer is no more difficult than replacing a light bulb yourself.
How to adjust a plastic window with your own hands
There are two types: horizontal and vertical. Plus additional types, for example, it is possible to adjust the hinges and fittings of plastic windows.
Types of adjustments
Horizontal. Used to correct a shifted frame and against blowing. To begin, find a connector that matches the key. Then insert the hexagon there and start turning. To increase the tightening of the sash, rotate to the right, to decrease - to the left. The maximum shift is two mm.

By the way! The bottom loop allows you to adjust both the inside and outside, so you don't have to go outside to make adjustments.
Vertical. To start setting up, find the bottom loop and insert the hexagon into the connector. When rotated to the right, the sash will rise, when rotated to the left, it will lower. The shift range is the same - from 2 to 3 mm.

Important! Be sure to temporarily open the plug, otherwise it will interfere with adjustment. When adjusting horizontally, you do not need to touch it.
The last type is hinge adjustment. It is mainly used to improve the opening of a tilt window. There is a special screw on the lower hinges that allows you to adjust the pressing.
Adjusting the top hinge is a little more complicated - you will need to open the window for a few minutes and constantly hold it while making adjustments. The maximum shift is 2.5 mm.

When should it be adjusted?
Adjustment may be needed if:
- Drafts, blowing. This is especially noticeable in the cold season.
- Touching the frame when opening a window due to sagging sashes.
- Breakage of the opening handle and other moving elements.
- The window simply opens with great difficulty.
Adjusting plastic window fittings
Regulation is divided into 2 parts:
- Repairing the pen.
- Adjustment of other moving elements.
For repairs you will need a screwdriver and possibly some grease, for other items you will need a 6-sided wrench.

Mode Density Adjustment
To regulate the pressure of the sash to the base of the window, find the eccentrics that are located in different parts of the sash. Then insert the key into the socket and twist it either to the right to tighten the pressure, or to the left to loosen it.

To understand how tightly the mechanism is pressed, use the above figure. The shift during adjustment will be less than with other types of adjustments - from 1 to 2 mm.
Attention! The easiest, and actually free way to check whether the seal clamp is working correctly. To do this, you only need one match or candle - light it and bring it to the window - see if the flame deviates. If nothing happens, it means the wind is not passing.

What to do if the plastic window does not close?
It may not close due to:
- Insufficiently lubricated or simply poor-quality fittings. It is better to start the repair by lubricating the mechanisms, then check them for serviceability, and, if necessary, carry out adjustments. The malfunction of the handle can be solved using the same methods.
- Faulty locking mechanism, due to which the handle jams. The first step is to remove the covers from the hinges and pull out the shifters with wire cutters. Then remove the window sash and find a special mechanism that looks like scissors. It is attached at the top.
After this, insert the mechanism back, press the locking mechanism to determine the correct position, and do not forget to turn the handle in any direction. - Unexpected turning of the handle, for example, while trying to repair or close a window. With this problem, the window may even fall out of the frame, since the fittings jam in several operating modes. Then use the instructions below:
- Press the locking mechanism, it is located on the front side of the window base. Important! Press yourself.
- Then press down slightly on the upper right corner, calmly turning the handle to its original position. Continue until you hear a click.
- After clicking, close the window and turn the handle again to check if it is working properly.

Adjustment and repair of handles
Typically, those who buy windows face 3 troubles:
- R the duck is hanging out. To repair, tighten the moving mechanisms located under the handle plate. To find them, rotate the trim plate approximately 90 degrees and then use a screwdriver. Finally, screw the plate back on.
- The handle refuses to turn. Check the sashes, they are common culprits of this problem. Adjustment is carried out by the same tightening. To enhance the effect, lubricate the elements - then the fittings will move even easier.
- The most serious option is receiving mechanical damage, due to which the plastic cracks. The only solution is to replace the faulty handle. It is not worth holding a cracked mechanism - over time, it will break even more.

Adjusting plastic windows video
To consolidate your knowledge, watch this video, which shows the adjustment of plastic windows:
During the initial installation of a plastic window, installers are required to adjust the windows so that in the next 30-40 years (as manufacturers say) they serve their owners faithfully. However, it happens that for one reason or another the windows require additional adjustment. Let us consider in more detail what factors can cause window failure, the main window defects and ways to eliminate them.
Structural components of a window
To understand how to troubleshoot a window, you must first become familiar with the elements that ensure the operation of all the mechanisms of the window unit.
The main elements of a plastic window include the following:
Main types of plastic window faults
The main types of plastic window malfunctions include the following:
In order to independently adjust the window fittings, you may need tools such as a hex screwdriver (0.4 cm), star, flat and Phillips screwdrivers, and pliers.
Let's take a closer look at the technique for eliminating the two most common problems with plastic windows.
Adjusting the plastic window system yourself, a video of which you can watch at the end of the article, requires attention, precision and accuracy in work.
In winter, windows are adjusted to fit the sash more tightly to the frame, and in summer the connection is loosened. In order to adjust the degree of fit of the sash to the frame, you need to work with the upper and lower hinges of the fittings.
To get to the adjusting screw located on the above hinges, you need to press the lock with the window sash open and lock the handle in the ventilation mode, as shown in the figure. Turning the screw clockwise will strengthen the connection of the sash to the frame, and counterclockwise, on the contrary, will weaken the connection.
Sometimes window fittings require actions to tighten and move the sashes away from the frame using a locking pin. The locking pin is located at the end of the sash. You can work with the trunnion using a hexagon, pliers or screwdrivers (it all depends on the type of trunnion). In order to loosen the connection of the sash to the frame, it is necessary to turn the pin towards the apartment, and to tighten the sash - towards the street.
The main thing to remember when adjusting the trunnion is that it cannot be turned even ¼ of a turn. The trunnion is adjustable by a small range of movement in one direction or another.
Adjusting plastic window fittings, video tutorial
Adjusting the fittings of a plastic window may be necessary in case of problems with opening/closing the sashes, fixing the window for ventilation, or poor closing of the sashes.
Let's briefly consider ways to solve various problems with fittings.
If you notice the formation of a gap through which cold air enters the room when the window is closed, then you need to adjust the clamps that are located at the end of the frame.
If adjusting the clamps did not solve the problem with inflation, then the hinges were the cause of the gap. Then, having removed the protective cap from them, using a hexagon you need to press (or press) the sash as far as possible from the frame.
The video below will help you adjust the plastic window fittings yourself.