How to make a beautiful box with your own hands. Original ideas for decorating a box with your own hands. Scotch tape box
Despite the fact that store windows offer a large number of jewelry boxes made from all kinds of materials, the desire to make one with your own hands does not disappear. After all, this is not only a tribute to your talent and skill, but also the desire to have an original thing that no one else can find. In addition, it is of great importance that the box you make yourself will have exactly the size that is so necessary to accommodate all the jewelry.
The box is made with your own hands in two stages:
1) Creating the box itself from scrap materials;
The material for it can be tape rings, wooden blocks or baguette scraps, old newspapers, shoe boxes, and other improvised materials.
Box made from a reel of adhesive tape If a small jewelry box is enough for jewelry, you can make it from a paper spool of tape. The size of the finished product will correspond to its diameter and height. To work you will need: For the bottom and lid of the future box, you need to make blanks from cardboard. It is enough to attach the reel to a sheet of cardboard and trace it with a pencil. We outline the resulting circles with another circle, the diameter of which is 3-4 centimeters larger than the previous one. These are the future rays with which the circles will be glued to the reel. You shouldn't make them very wide. The narrower they are, the more accurately the bottom will stick. The end result looks like this: For the lid you will need to cut a strip slightly longer than the volume of the reel and half its height wide. To ensure that the lid fits well and is not too large, you need to wrap a strip around the future box and glue its edges. When the side of the lid is dry, you need to glue the top to it in the same way as was done with the reel. To increase the rigidity of the bottom and lid, you can glue another layer of cardboard inside, cut along the inner diameter of the reel. The finished box is decorated with your own hands using the decoupage technique; it can be painted with acrylic paints and opened with varnish, or a self-adhesive film with a pattern imitating natural materials: wood, stone can be glued over the entire surface. Making such a box is more labor-intensive than the previous version, but it will also last much longer than a paper one. To work you will need: pencil, ruler; Having decided on the size of the box, you need to cut two blanks from the board, equal to its length and width. At the end of each, you need to make a 45-degree bevel with a knife so that the walls fit together nicely. The depth of the bevel is equal to the width of the board. Before gluing the side parts, you need to make sure that the bevels match tightly, without gaps. Otherwise, they need to be adjusted using coarse sandpaper. The sides are glued together gradually. After each subsequent gluing, it is necessary to check the internal angle between them. It should be equal to 90. Otherwise, the result can be any shape, but not an even rectangle. There are two options for installing the bottom: if the finished product will be pasted over with paper or fabric, then the blank for the bottom is taken equal to the size of the box and glued so that its side parts are visible; Wooden box covered with paper If a DIY jewelry box is covered only with varnish or paint, then it will look more beautiful when the bottom is hidden inside it. To do this, take a blank that is shorter in length and width than the size of the box by two board thicknesses. For example: if the box dimensions are 10x10 cm and the wall thickness is 1 cm, the bottom needs to be 8x8 cm. Varnished wooden box The manufacture of the lid can also be made in two versions: cut the workpiece and install it on the hinges. The best option for attaching the lid is a piece of piano hinge, the length of which is a couple of centimeters shorter than the length of the box. All ends of the boards visible on the finished product must be carefully sanded; Glue the lid to the box and after drying, carefully cut it off with a jigsaw, moving down the body by one and a half to two centimeters. A wooden jewelry box is decorated using all known methods: varnishing, painting, decoupage, oracle, fabric, leather. Luxurious baguette box Boxes made from baguette, a material for picture frames, look chic and rich. It is made of wood or plastic. Plastic is soft and can be cut and processed no worse than wood. You can buy a baguette in art salons, having previously determined how long the blank is needed. The principle of making such boxes is identical to working with wooden blanks. Papier-mâché box We know what papier-mâché is and how to work with it since school. The advantage of this material is the variety of shapes of the finished product. It is enough just to find the original blank of the required shape to create an original box. To work you will need: DIY papier-mâché box The base must be covered with Vaseline or cream so that the papier-mâché can be easily removed later. The first layer of thinly torn paper needs to be wetted and covered the entire surface of the base. The paper for the second and each subsequent layer is carefully lubricated with glue. It is necessary to ensure that there are no missing sections. It is convenient to alternate, for example, layers of newspaper and white paper. The better the paper is impregnated with glue, the stronger the papier-mâché will be. The number of layers is optional. After complete drying, the box blank must be removed from the mold and prepared for decoration. If this is a painting with paints, then it must be coated with an acrylic primer. In addition to painting, the box can be decorated with your own hands with beads, ribbons, buttons, figures made of plastic or salt dough. Chinese papier-mâché box If the basis for papier-mâché was a round object, the lid was created together with the box, then it must be removed carefully, after first drawing a cut line with a pencil. If the model was created without a lid, then after removing it from the base, you need to straighten the edges with scissors. The lid is attached to the box before being primed. Holes for the connecting cord can be made with a paper hole punch. The decorated box is opened with your own hands using varnish. It is better to use acrylic-based varnish purchased at an art salon. Artists coat their canvases with this varnish to avoid contamination and fading of the paint. To work you will need: Cut out the sides of the future box of any shape from cardboard. Sew or glue decorative fabric to them on both sides, leaving small seam allowances. A bamboo napkin can also be decorated with fabric on the side that will be inside the box. The sides can be sewn or glued to the napkin, leaving some part free. The clasp can be made in the form of a loop and button, or you can purchase a magnetic one at a hardware store. To prevent the jewelry box from getting dirty and to have a neat appearance for a long time, it is better to open it with acrylic varnish. Below are photos of jewelry boxes made using different decorating techniques. For lovers of rigor and minimalism in everything, it is enough to make the box a single color, covering it with paint and protective varnish.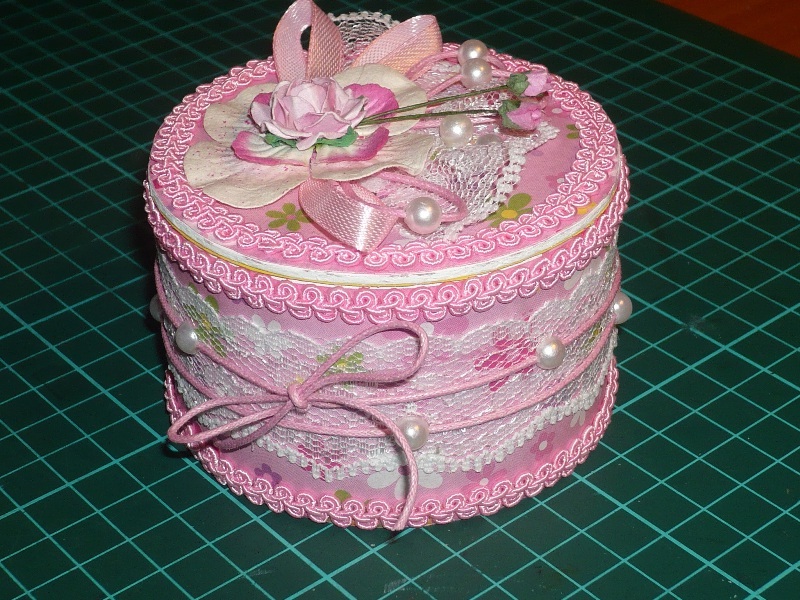
a reel freed from tape;
thick cardboard;
pencil;
scissors;
glue (preferably PVA).
Before gluing the bottom to the bobbin, it is necessary to draw along the fold line with a non-sharp object, perhaps the edge of tweezers or a metal ruler. This will help you bend them neatly. To hide the petals on the side, you need to stick a cardboard tape over them, the length and width corresponding to the side of the reel.DIY wooden jewelry box
a long board 10 millimeters thick, 10 centimeters wide, made of soft wood: pine, alder, linden;
a board for the bottom and lid, its width is equal to the width of the finished product;
hand saw with fine teeth or jigsaw;
knife;
sandpaper;
PVA glue (it’s better to use construction glue) or carpentry glue “Moment”.DIY box made from baguette
DIY papier-mâché jewelry box
newspapers or thin office paper;
Vaseline or any cream;
scissors, brushes;
PVA glue or wallpaper.DIY box made from bamboo napkin
bamboo napkin;
thread and needle, PVA glue;
scissors, cardboard, finishing fabric;
magnetic clasp.Several ways to decorate boxes
A jewelry box is the most versatile and necessary item for women's household items. It is very convenient to store all your jewelry in a box, especially if you can make it yourself. A jewelry box made of cardboard looks very beautiful; it is not difficult to make it yourself from simple and affordable materials. You can also give a jewelry box made by yourself, and this will be the most memorable and dear gift to a person. Handmade products are always more valuable because they are exclusive. You will see below how to make a jewelry box with your own hands.
Materials you will need: binding cardboard (preferably choose 2mm thick), PVA glue, masking tape (4 millimeters wide), Moment-Crystal glue, regular Whatman paper, fabric (preferably cotton), tapes - 2 pieces of 15 cm each
Tools: knife, scissors, self-healing cutting mat. or an unnecessary piece of linoleum, a ruler, a synthetic glue brush, a pencil, a stack for smoothing surfaces and corners, a jar of glue
Start by assembling the base. To do this you must make a drawing.

We glue the walls from above to the bottom, not from the sides. Glue must be applied to the parts along the entire length. We apply a large amount of glue, do not regret it, so that the box is durable.

When applying the part, always level it, the glue dries slowly, so you have the opportunity to place the part straight.
First we glue the long wall, then two short ones, it is better to apply the glue on both sides so that you get a neat corner

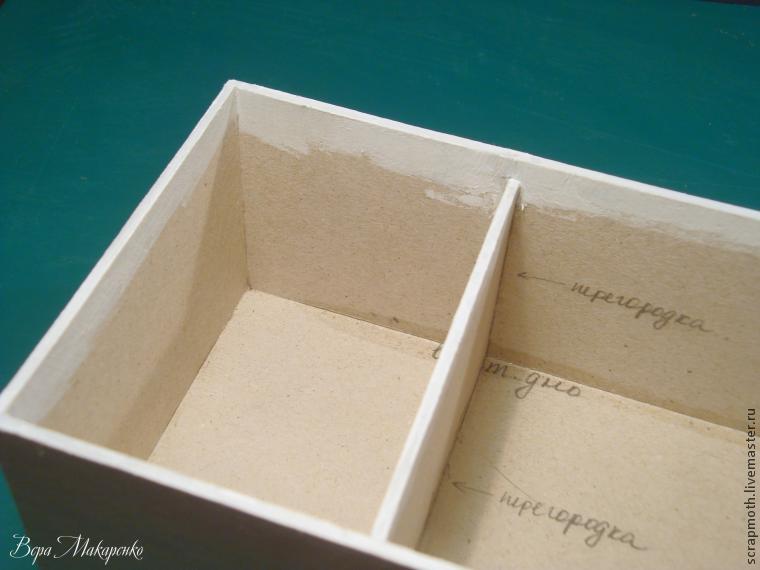
In order to glue a partition between two sections, mark in advance the place where it will stand.
Next, apply glue to the partition and insert it into the place where it will stand. Now you need to take white acrylic paints and paint all the upper sections of the parts so that the color of the fabric on the sides is not distorted.
 To reinforce all corners, take a piece of masking tape and apply it to all corners of your box and smooth it out well. It’s better to spread it out in a stack and then press it tightly.

 Next, you need to tape the inside of your box.
 Here again you need to use the stack, iron the tape from the glued edge towards the corner and along the depression.
 We strengthen all the joints inside.


Finally you have completed the cardboard base of your box. The next step is to decorate.
In order to decorate a box with fabric, you should know a few tips.
- The fabric completely covers the cardboard. There should be no gaps anywhere in the finished box.
- Avoid open cuts.
- Apply the glue in a thin, even layer so that it does not bleed through the fabric to the front side.
Glue the fabric to the cardboard with PVA glue.

Apply glue to the edge and the strip on the inside of the wall.
Apply a thin, even layer of glue to the paper part.
Glue the paper piece to the wrong side of the fabric.
 Before you are going to glue the seam allowances to the back wall, you must make cuts on them and form the corners.
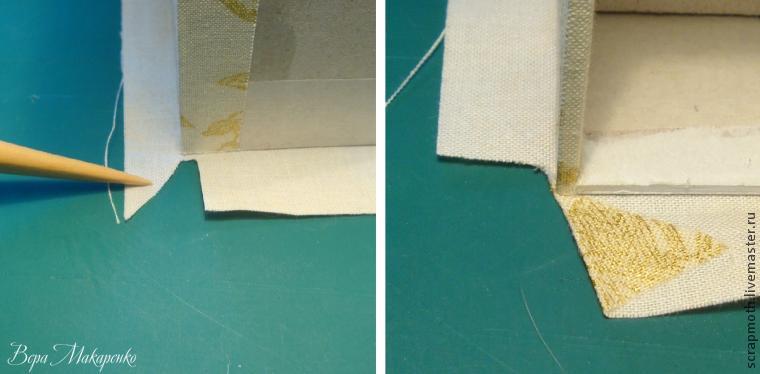 Fold the protruding seams and glue them.


Next we attach the allowances at the bottom.

After gluing, we get flat corners.


First, coat the bottom with glue and place our part there. Then we glue the allowances and corners. We smooth everything out with a stack.

Cover the cut of cardboard with a rectangle of fabric.


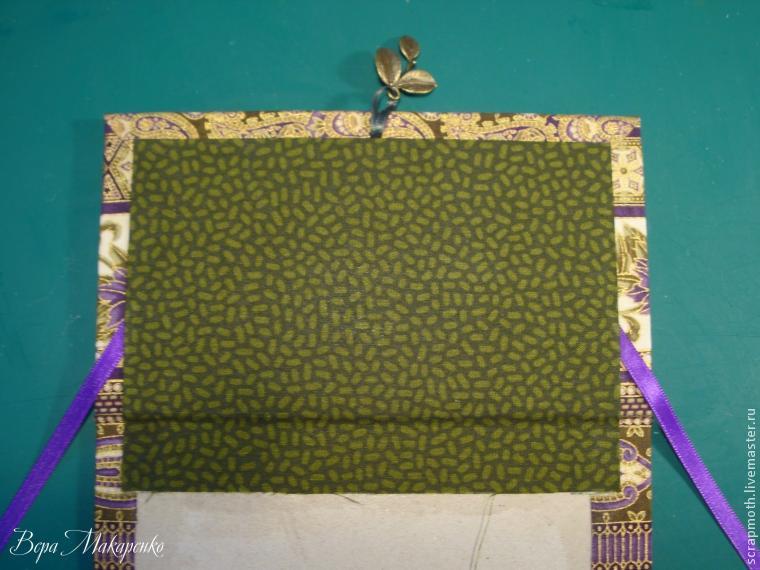
Now let's take on the cover for your box.
The cover should consist of three parts: bottom, cover and spine. The lid will have a layer of synthetic padding. The bottom and spine are lined with white paper. Here you need to first glue the paper to the cardboard, and only then the fabric. We coat the cover with glue and apply it to the padding polyester.

To decorate the lid with a pendant, make a small slit. Along the long side we mark the middle. On the short side - 1cm from the edge. We make a small slot, insert a ribbon there and glue the tails to the cover.

For the cover, cut out the fabric with 2 cm allowances on each side.

Place all three parts on the fabric, leaving a distance of 3-4 mm between them. We immediately glue the flat parts, the part with padding polyester is temporarily attached to the spine with pieces of masking tape so that it does not fidget. And glue the allowances along the long edge.

We make a cut for the pendant.

We make corners with minimal thickening, trim the fabric along the cardboard, not reaching the corner 2mm. After we have formed all four corners, glue the allowances on the short sides.
Now is the time to glue the stopper tapes. Thanks to them, the hinge will last much longer. And it’s more convenient to use a lid with stoppers.
Cut two ribbons 14 cm long and glue them symmetrically at an angle to the cover. They should be free at a distance of 1 cm from the edge. The rest is glued.

Now let's make the endpaper. To do this, cut out a piece from paper that is 2 cm shorter in length than the cover and 1 cm narrower in width. On three sides the allowance is 1.5 cm, on the fourth - 3 cm. This long allowance will then be hidden between the spine and the back wall.

Form the corners on the paper parts as follows: on the long side, cut off the excess fabric flush with the edge of the paper part. On the short side we make a broken line, as in the photo below. We glue the long side first, then the short one.

Glue the resulting part onto the endpaper. It will turn out like this:
It's time to connect the main box of the box and the cover. To do this, coat the bottom with moment-crystal glue. We apply glue to the smaller part, i.e. on the bottom of the box, not on the lid. We do not reach the edge a little and carefully spread the glue so that it is distributed evenly.
Press the bottom of the box to the bottom of the lid. We align the back wall with the edge of the part; the three outer walls will have indentations of 7 mm. In general, cardboard sticks together quickly, the main delay is in the fabric allowances. You need to wait until it all sticks together and the bottom does not lag behind the box.
Then I glue the spine to the back wall. In the same way, you just won’t be able to crush it with books.
After this, you can glue the free ends of the stopper tapes to the box using PVA. This must be done symmetrically on both sides.

We will cover the inner walls of the box. To do this, cut out two long rectangles. For a deep compartment, this rectangle will be 5.2 cm in height, for a shallow one - 2.3 cm.
Glue the paper parts to the fabric, cut them out, and glue the seam allowances. Leave the seam allowance free on one narrow edge.

Carefully glue the part into place. We start from the end where we have a free allowance. We glue the part in stages onto each of the 4 walls. Carefully iron the corners with a stack. If you don't iron it, there will be rounded holes in the corners inside the box.

We make the joint near the front wall.

All that remains is to make rollers for the rings from rolls of white felt.
For your box you will need 6 pieces of felt, 20 cm long and 5.5 cm wide. Roll them into loose rolls and seal them with instant glue. Lay the rolls tightly together and glue them together.


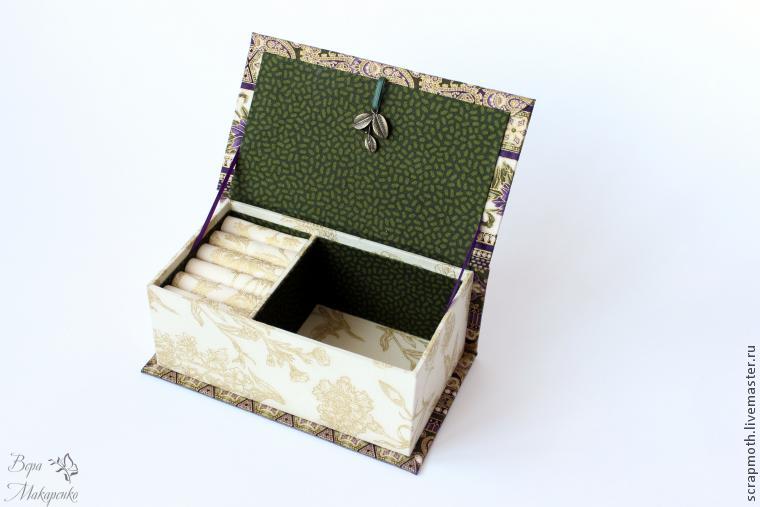


So we have a magnificent handmade cardboard box. You can also show your imagination and design the box the way you want. Below is another DIY box idea in a video tutorial.
Despite the fact that store windows offer a large number of jewelry boxes made from all kinds of materials, the desire to make one with your own hands does not disappear. After all, this is not only a tribute to your talent and skill, but also the desire to have an original thing that no one else can find. In addition, it is of great importance that the box you make yourself will have exactly the size that is so necessary to accommodate all the jewelry.

The box is made with your own hands in two stages:
1) Creating the box itself from scrap materials;
The material for it can be tape rings, wooden blocks or baguette scraps, old newspapers, shoe boxes, and other improvised materials.
Box made from a tape reel
Box made from a reel of adhesive tape
If a small jewelry box is enough for jewelry, you can make it from a paper spool of tape. The size of the finished product will correspond to its diameter and height.
To work you will need:
a reel freed from tape; thick cardboard; pencil; scissors; glue (preferably PVA).
For the bottom and lid of the future box, you need to make blanks from cardboard. It is enough to attach the reel to a sheet of cardboard and trace it with a pencil. We outline the resulting circles with another circle, the diameter of which is 3-4 centimeters larger than the previous one. These are the future rays with which the circles will be glued to the reel. You shouldn't make them very wide. The narrower they are, the more accurately the bottom will stick. The end result looks like this:
Before gluing the bottom to the bobbin, it is necessary to draw along the fold line with a non-sharp object, perhaps the edge of tweezers or a metal ruler. This will help you bend them neatly. To hide the petals on the side, you need to stick a cardboard tape over them, the length and width corresponding to the side of the reel.
For the lid you will need to cut a strip slightly longer than the volume of the reel and half its height wide. To ensure that the lid fits well and is not too large, you need to wrap a strip around the future box and glue its edges. When the side of the lid is dry, you need to glue the top to it in the same way as was done with the reel.
To increase the rigidity of the bottom and lid, you can glue another layer of cardboard inside, cut along the inner diameter of the reel. The finished box is decorated with your own hands using the decoupage technique; it can be painted with acrylic paints and opened with varnish, or a self-adhesive film with a pattern imitating natural materials: wood, stone can be glued over the entire surface.
DIY wooden jewelry box
Making such a box is more labor-intensive than the previous version, but it will also last much longer than a paper one. To work you will need:
pencil, ruler;
a long board 10 millimeters thick, 10 centimeters wide, made of soft wood: pine, alder, linden; a board for the bottom and lid, its width is equal to the width of the finished product; hand saw with fine teeth or jigsaw; knife; sandpaper; PVA glue (it’s better to use construction glue) or carpentry glue “Moment”.
Having decided on the size of the box, you need to cut two blanks from the board, equal to its length and width. At the end of each, you need to make a 45-degree bevel with a knife so that the walls fit together nicely. The depth of the bevel is equal to the width of the board.
Before gluing the side parts, you need to make sure that the bevels match tightly, without gaps. Otherwise, they need to be adjusted using coarse sandpaper. The sides are glued together gradually. After each subsequent gluing, it is necessary to check the internal angle between them. It should be equal to 90. Otherwise, the result can be any shape, but not an even rectangle.
There are two options for installing the bottom:
if the finished product will be pasted over with paper or fabric, then the blank for the bottom is taken equal to the size of the box and glued so that its side parts are visible;
Wooden box covered with paper
If a DIY jewelry box is covered only with varnish or paint, then it will look more beautiful when the bottom is hidden inside it. To do this, take a blank that is shorter in length and width than the size of the box by two board thicknesses. For example: if the box dimensions are 10x10 cm and the wall thickness is 1 cm, the bottom needs to be 8x8 cm.
Varnished wooden box
The manufacture of the lid can also be made in two versions:
cut the workpiece and install it on the hinges. The best option for attaching the lid is a piece of piano hinge, the length of which is a couple of centimeters shorter than the length of the box. All ends of the boards visible on the finished product must be carefully sanded;
Glue the lid to the box and after drying, carefully cut it off with a jigsaw, moving down the body by one and a half to two centimeters.
A wooden jewelry box is decorated using all known methods: varnishing, painting, decoupage, oracle, fabric, leather.
DIY box made from baguette
Luxurious baguette box
Boxes made from baguette, a material for picture frames, look chic and rich. It is made of wood or plastic. Plastic is soft and can be cut and processed no worse than wood. You can buy a baguette in art salons, having previously determined how long the blank is needed. The principle of making such boxes is identical to working with wooden blanks.
DIY papier-mâché jewelry box
Papier-mâché box
We know what papier-mâché is and how to work with it since school. The advantage of this material is the variety of shapes of the finished product. It is enough just to find the original blank of the required shape to create an original box.
To work you will need:
newspapers or thin office paper; Vaseline or any cream; scissors, brushes; PVA glue or wallpaper.
DIY papier-mâché box
The base must be covered with Vaseline or cream so that the papier-mâché can be easily removed later. The first layer of thinly torn paper needs to be wetted and covered the entire surface of the base. The paper for the second and each subsequent layer is carefully lubricated with glue. It is necessary to ensure that there are no missing sections. It is convenient to alternate, for example, layers of newspaper and white paper. The better the paper is impregnated with glue, the stronger the papier-mâché will be. The number of layers is optional. After complete drying, the box blank must be removed from the mold and prepared for decoration. If this is a painting with paints, then it must be coated with an acrylic primer. In addition to painting, the box can be decorated with your own hands with beads, ribbons, buttons, figures made of plastic or salt dough.
Chinese papier-mâché box
If the basis for papier-mâché was a round object, the lid was created together with the box, then it must be removed carefully, after first drawing a cut line with a pencil. If the model was created without a lid, then after removing it from the base, you need to straighten the edges with scissors. The lid is attached to the box before being primed. Holes for the connecting cord can be made with a paper hole punch.
The decorated box is opened with your own hands using varnish. It is better to use acrylic-based varnish purchased at an art salon. Artists coat their canvases with this varnish to avoid contamination and fading of the paint.
DIY box made from bamboo napkin
To work you will need:
bamboo napkin; thread and needle, PVA glue; scissors, cardboard, finishing fabric; magnetic clasp.
Cut out the sides of the future box of any shape from cardboard.
Sew or glue decorative fabric to them on both sides, leaving small seam allowances. A bamboo napkin can also be decorated with fabric on the side that will be inside the box. The sides can be sewn or glued to the napkin, leaving some part free.
The clasp can be made in the form of a loop and button, or you can purchase a magnetic one at a hardware store.

To prevent the jewelry box from getting dirty and to have a neat appearance for a long time, it is better to open it with acrylic varnish.
Several ways to decorate boxes
Below are photos of jewelry boxes made using different decorating techniques.
For lovers of rigor and minimalism in everything, it is enough to make the box a single color, covering it with paint and protective varnish.
Decoupage decoration technique has recently come into fashion, but has already become very popular. A large assortment of illustrations for decoupage, including images of paintings by great artists, is produced on special napkins. You can use regular napkins, magazine illustrations, and even wrapping paper. You will also need sharp scissors, several brushes, PVA glue, paints, and acrylic varnish. Before starting work, the surface must be primed with acrylic paint or glue. Carefully smooth each element of the image with a brush dipped in glue until it is completely glued to the surface and air bubbles come out from under it.
Proportions for salt dough: 1 part flour (the cheapest without additives) to 3 parts salt, mix and add water until the consistency of soft plasticine. Decorative elements made from dough, unlike putty, are first made and then glued to the surface.
After drying, the decor should be covered with two layers of white acrylic paint. It is better to paint with acrylic too. After drying, apply one or two coats of varnish.
Below are photos of jewelry boxes decorated with beads, seashells, fabric and ribbons:
Box decorated with beads
A homemade box will not only decorate your interior, giving it individuality, but can also be an excellent gift for any occasion. And the material for its manufacture will be any household item or gift from nature. The main thing is a little imagination and perseverance.
In shopping centers you can now find entire departments where beautiful boxes with all kinds of designer features are sold. There are various materials there, but you still want to make something so outlandish with your own hands. This is not only because every person has some kind of creative streak, but also simply because a unique and inimitable little thing then appears at your disposal.
Well, I also want to prepare everything according to the sizes that you need. Often, although all these store-bought items are beautiful, it is impossible to cram everything you need into them.


A variety of things can come in handy in such cases, from rings made of adhesive tape or electrical tape to newspaper scraps and wooden blocks. Some crafters like to use shoe boxes and old newspapers.


Kinds
A jewelry box can be very different. Very often, after using adhesive tape, such a strong paper reel remains. It can serve as just the perfect base for your beautiful new and unique piece. Naturally, choose one that matches the height and diameter.

To get the workflow started, you will need a reel, cardboard, pencil, glue and scissors. Cardboard blanks will help you cover the bottom and top. All this is done quite simply - the same reel is applied to the sheet, measurements are taken, and then all the parts are cut out.

It must be remembered that it is better to cut a circle with a diameter several centimeters larger. Then all this will help to conveniently glue all the parts. The result is a large jewelry box with neat edges. The main thing is that you should be pleased with the final result.

It is also not so easy to make a fold line correctly and according to all quality standards. Run along it with tweezers or a ruler made of some metal. Then you will see a neat execution of the folding. When pasted on top, a cardboard ribbon hides the petals located on the side.

Test the cap again to ensure it fits snugly. This is a very important part, without which you won’t really succeed. Carefully glue all edges. If you are not sure that the rigidity is acceptable, then you can additionally glue more layers of cardboard from the bottom and lid, then you can do whatever you want with it.


It was just a master class on how to make a beautiful box using the simplest recipe. Otherwise, it’s best to take acrylic paints so that you can brightly and efficiently decorate it all in your unique style.

Tree
A modern wooden jewelry box is a more difficult and costly process. Here you need not only pencils, rulers, but also specially measured planks of pine or linden, which are suitable as the bottom, lid and sides. A jigsaw, a knife, a small saw, sandpaper and an adhesive element will help you in your work.

Carefully measure everything several times so that all sides fit well together. Everything should be equal in length and width if the pieces are on opposite sides. The walls fit together well when the bevel is approximately 45%.


All this needs to be checked to ensure that the parts fit snugly. If all this is accurately measured, then you can start gluing the elements. Always try to double-check the internal angles, they should be 90 degrees. The result is an even rectangle.

It is best to hide the bottom deeper if everything is covered with varnish or some kind of paint. There are a lot of nuances with sizes, but the main thing is that everything looks elegant. You clean everything with sandpaper so that all sorts of critics don’t dig into anything.

Baguettes
Separately, you can see a photo of the jewelry box. They always stand out against the general pleasant background with some kind of external solidity. They are made from the material used for picture frames. It is easy to cut. Even wood doesn't give in that easily.

Purchases can be made at any store that sells art products. There are no special nuances here - all processes are identical to how craftsmen work with wood.

Flowers, beads and more
Decorating boxes with flowers is very common. Moreover, the basis may differ significantly. Your imagination should show itself to the proper extent when decorating the external sides.


Among the rarer works there are also beaded versions. This is a painstaking task, but sometimes the result is a very cute and pleasant to the touch thing.


There are also those who create original work. For example, a stylized product to resemble broken CDs, bamboo napkins, decorative fabrics, plain and laconic types.

There are simply no limits here. It all depends on your capabilities and the breadth of your idea. People have a lot more ways than they think.

Photos of DIY jewelry boxes


A box is a very useful thing, because you can store all kinds of household items in it: jewelry, threads, needles, buttons, keys, business cards, etc. Probably, every home has such a product. A beautifully designed stylish box can also successfully highlight the style of a room, living room or bedroom and become an integral part of the interior.
A personally decorated box will be a wonderful gift for a friend, colleague or relatives for a birthday or wedding, and the decorating process itself can later turn into an exciting hobby.
It is also worth noting that such a hobby perfectly develops imagination, memory and has a positive effect on the nervous system. If you have an old wooden box at home that has long lost its former appeal, do not rush to throw it in the trash, because even a person who has never decorated before can stylishly decorate the thing with their own hands.
Preparation
Before you start decorating a wooden box, you need to prepare it for this. So, if there are remnants of paint, varnish, glue or paints on the outside walls, clean them so that the surface of the material is as even and smooth as possible. If the surface is not too smooth, it can be sanded.
After this, the outer surface should be degreased so that the applied new material remains firmly in place. This can be done by wiping the chest with a napkin soaked in alcohol or vodka. After this, let the product dry for 10-12 hours or dry it with a hairdryer.
Decoration
There are a huge number of options for decorating boxes. We offer for your consideration the most popular and interesting of them, and you can supplement and modify them, guided by your own imagination.
Painting with acrylic paints
Of course, you are unlikely to be able to create a brilliant masterpiece with your own hands on the first try, since this type of art requires dexterity and certain skills.
But if you try, the result will certainly impress not only you, but also your loved ones.
We will need:
- acrylic paints for decoration;
- primer for acrylic paints;
- thin pattern brush, flat synthetic brush;
- pencil, eraser, palette;
- masking tape.
First you need to prepare a sketch. The simpler the drawing, the easier it will be for you to apply paint. You can come up with something yourself, or you can look for interesting drawings on the Internet or books.
First, we sketch a sketch on a sheet of paper, focusing on the dimensions of the box. For ease of use, repeating elements can be cut out of hard paper and subsequently applied to the walls and lid of the product.
We carefully treat the leveled surface with primer for acrylic paints and let it dry thoroughly. After this, we proceed directly to painting. First, we cover the surface of the box with the base, dry it, and only then apply a drawing to it using templates. Now, very carefully, using special thin brushes, paint the picture.
If you suddenly make a mistake during your work (and this happens even to professionals), don’t be upset.
Acrylic paints have a covering effect, so you can apply a new layer of the desired paint over the blot without any damage to the pattern.
Advice. If you doubt your abilities, before applying the pattern to the box, practice on another surface - for example, on a piece of paper.
The finished painted box needs to be dried thoroughly. If you are impressed with the result and you want to make the decor durable, you can coat it with furniture varnish.
Kanzashi
Kanzashi (or kanzashi) is the Japanese art of hair decoration. It is based on the ability to fold flower petals from ribbons and pieces of fabric and glue them to the base. Today, the kanzashi technique is used all over the world to decorate interior elements, decorative pillows, curtains, women's handbags, and jewelry boxes.
Ribbons can be used to decorate not only a wooden box, but also a box made of any other material - plastic, glass, clay, etc. Boxes decorated with kanzashi look very rich, impressive and elegant.
We will need:
First of all, you should cover the box - the very basis of the craft - with fabric or ribbons. To do this, generously lubricate the workpiece with glue and glue the fabric.
While the base dries, we begin preparing the decoration. From ribbons and pieces of fabric you can make not only flowers, but petals, miniature fruits, etc. You can decorate them in any way you like, using beads, buttons or rhinestones. Larger ribbon crafts should be glued to the lid, and smaller ones - to the sides of the box.
It is worth noting that it is best to decorate the box with ribbons made of expensive fabrics - satin, velvet, silk, as these materials look the most elegant and rich. But you shouldn’t buy cuttings specifically for these purposes - you can use scraps left over after sewing clothes, curtains or curtains.
If you want to decorate a wedding box (for money or rings), you can use the following idea. Cover the body with white or ivory satin, and decorate the lid with pink lilies or roses and white or light green ribbons.
Marine theme
Surely, while relaxing on the sea coast, you have repeatedly met merchants offering various souvenirs made from natural materials. Among such crafts, as a rule, there are always beautiful boxes decorated with shells.
Few of us thought that such a present could be easily made on our own, without shelling out fabulous money to southern craftsmen.
We will need:
You can decorate not only a wooden box, but also a cardboard box or chest with seashells. First, sort the shells and carefully think through the decor idea. When planning it, be sure to leave some shells of a certain size and color in reserve, since they can be damaged during work.
Read also...
- Federal State Budgetary Institution “National Medical Research Center for Psychiatry and Neurology named after V.
- Is it possible to legally avoid paying transport tax?
- Recipes for healthy dishes and drinks made from lingonberries
- Military registration Sample order on the organization of military registration