How to build a pool on your site with your own hands? We build a swimming pool at the dacha with our own hands from scrap materials Swimming pool at the dacha from boards
Swimming pools in the country have long ceased to be a rarity. Only the sizes of such structures and their shape vary. It can be either full-fledged, fully equipped with appropriate equipment, or small, intended only for bathing children.
Types of country pools and their features
First you need to decide which of the country pools you plan to place on your site. According to installation methods, they are divided into:

Based on the materials used to make them, garden pools are divided into products made from:

It is better to protect a stationary pool with at least a simple canopy. In this case, less debris and fallen leaves will accumulate in it.
Filtration system
Without a high-quality filtration system, stationary garden pools will simply become overgrown with mud in a very short time. Depending on the method of water circulation in them, you can choose any of the cleaning systems:

Monolithic concrete pool for a summer residence
From durable reinforced concrete you can make both a small swimming pond and a full-fledged swimming pool equipped with modern equipment. But in both cases, the process of its arrangement is largely similar. We will describe in detail how to build a swimming pool at your dacha with your own hands from concrete.
Selecting a location and preparing the area
 To ensure that the water in the pool warms up as quickly as possible, it is placed in an open space, away from tall buildings and trees that block the sun. Close proximity of vegetation is also undesirable because in the fall, falling leaves will clog the pool, and it will take much more time to clean it. The growing roots of such powerful plants as poplar, willow or birch can easily destroy even concrete.
Long gone are the days when a swimming pool on a plot of land was considered a sign of luxury and prosperity. In the modern world, any family can afford such a water feature, regardless of financial resources and the size of the dacha. Older generations visited country estates with the aim of growing healthy vegetables and fruits; now these goals are fading into the background.
Dachas become a place of relaxation and pleasant time with family and friends. Accordingly, there is a desire to improve and decorate your site, to equip it with all possible benefits for a cozy and comfortable stay.


What is it needed for?
A swimming pool can be not only a delight for eyes strained by city landscapes, but also an excellent way to relieve fatigue and improve the health of the body as a whole. Water helps to calm down and relieve nervous tension, resulting in better sleep. After a swim in the mini-pool, a healthy appetite appears; the workouts involve almost all muscle groups, while minimizing the load on the musculoskeletal system.
In addition, an artificial pond is a good supply of water for watering the garden, of course, if chemicals are not used to clean it.
There will be more advantages than disadvantages from building a pool on the site, and some negative aspects, for example, material costs, can be reduced by building the structure on your own.

Selecting a location
In order for the pool to not only please the eye and relieve fatigue, but also require less maintenance, you should seriously consider the issue of choosing a place under the pond. First you need to decide which pool is suitable for your site. If you can be content with temporary structures, for example, an inflatable analogue or a frame one, choose a sunny place close to the water supply so as not to have to pull the hose to fill it.
If the size of the dacha allows, you can build a permanent pool. Of course, construction will take more time, but the satisfaction from the work done will be many times greater. In addition, inflatable and frame analogues have a significant drawback - even with the most careful handling, the former tend to tear, and the latter tend to decay.


So if your choice is a permanent pool, pay attention to its location. Choose a site away from both tall and short trees, because the roots of large plants are attracted to moisture and can damage the foundation of your structure. Not to mention that their crowns shade the place and interfere with the heating of the water. And small branches and leaves constantly fall from low ones, so cleaning will have to be done frequently.
For owners of clay plots, nature itself hints at building a swimming pool: clay does not allow water to pass through, which is very important in case of accidental damage to the base. The slope of the ground and the wind will help determine the location of the drain. It is better to arrange a pond along a constant wind direction, this will make it easier to keep it clean.

Materials
Human imagination knows no bounds. Country pools are made from all kinds of materials: from old tires to custom-made bowls. Some examples can be given.
Craftsmen use tires from large household and construction equipment. The tire should be washed and painted to your taste; the bottom should be made, for example, from an old rubber pool or poster. The base for a frame homemade pool is constructed from wooden pallets. The mesh is used as a material for the pit, and stones are laid on top of it. This option is suitable for a decorative pond as a decoration for the site.
Somebody even uses plastic bottles for construction, using them instead of bricks. Of course, you will need a lot of this material for a good pool. So this method will be used by those who have accumulated a lot of plastic. Or you can buy bottles in bulk.


Ponds for swimming are also built from concrete rings. The disadvantages of this construction are that the rings are heavy, meaning additional costs will be required for their delivery and installation. But such pools are distinguished by their strength and long service life.
Those who have chosen to build a stationary pool need to decide what raw materials to use for lining the inner bowl. It can be tiles or mosaics, polypropylene, PVC film or fiberglass.
It is important to mention that stationary pools can be divided according to the method of their installation into partially and completely in-ground. Making a pool using available materials is not at all difficult. It can also be built from building blocks. If, of course, you have the necessary skills in construction.


Preparatory work
The first thing to do when a place for a pool is chosen is to clean the area. It is necessary to remove debris and foreign structures that may interfere with construction. After this, all vegetation is removed from the site, any holes or depressions are removed and any unevenness is filled with earth or sand and compacted. Thus, the construction site is leveled.
Be sure to decide on the shape and size of the pool. Do you need space for swimming or will it be a family-friendly place with a splash pad for the kids? Depending on the purpose of the reservoir, determine its depth. Safe space for younger family members is limited to half a meter, the optimal depth for adults is at least one and a half meters, and for trampoline lovers it’s worth adding another meter.

Preparatory work includes developing a plan and creating a drawing of the pool. The plan must show the laid pipes, indicate the dimensions of the bowl and draw the placement of devices for moving and purifying water.
So, the location, shape and purpose of the pool have been determined. The area has been cleaned and prepared. You can start marking the area to create a pit for the bowl.
If you have a purchased container, or “bathtub” for the pool, you can mark the place along its edges. Turn the container over and place it in your favorite area. Mark the boundaries of the reservoir with stakes and rope. If there is no “bathtub”, measure the edges using a tape measure. Next we dig a pit.


You can create a pit manually or using construction equipment (which, of course, will require additional material costs). Make sure that the walls are at a slope of at least 20 degrees. The size of the pit for the finished bowl should be larger in size.
The depth needs to be increased by several tens of centimeters (for example, 30) for waterproofing. Digging a pit is not at all difficult. When the foundation pit is ready, you can begin construction directly.


Manufacturing step by step
We offer for consideration the step-by-step production of several types of pools: a frame outdoor pool made of wooden pallets, a pond made of plastic (polypropylene or fiberglass) container and a monolithic concrete structure.
So, the cheapest option is a frame pool made of wooden pallets. The basic material can be purchased at construction bases or stores, or you can accumulate it in your barn. If you feel sorry for throwing away good pallets, but you can’t sell or give them away, feel free to put them to use.


Materials and tools you will need:
- PVC film;
- means that protect wood from decay processes;
- a pipe of the required diameter and length for draining water;
- shovels;
- buckets and basins for bulk materials;
- hammer, screwdriver;
- hacksaw;
- sandpaper;
- plane;
- roulette.

So, all the necessary preparations are completed, you can begin construction:
- Walk over the wooden blanks a couple of times with impregnation agents (antiseptic or antifungal solution)
- Pallets allow you to choose the shape of the pool depending on their location. Based on this, dig a niche up to 30 centimeters deep; along the perimeter, the hole should be slightly wider than the perimeter of the pallets.
- Place crushed stone or small stone at the bottom to a height of 15 centimeters and distribute it evenly.
- Inside the pit, assemble a base from pallets. To connect wooden equipment, use self-tapping screws, small boards or corners.


- If necessary, make a hole for the drain pipe and insert it with the drain facing out.
- Secure the structure with tie straps.
- Wedges in the form of bars will provide additional strength. Drive them outside the pool at a distance of 40 centimeters from each other.
- Pour cement 10-15 centimeters high inside the frame and level it.


- After pouring the concrete, leave it for two weeks. Once done, cover the inside with PVC film and secure it over the top edge of the pool.
- You can make the cladding based on your preferences, for example, using PVC panels or other materials that are resistant to getting wet.
- Remember that the concrete will dry completely only in a month, so postpone the ceremonial filling of the reservoir until then.
The next type of composite pool requires more careful and labor-intensive work, but it is much more like the beautiful pictures from glossy magazines.
Let's consider two options for installing a plastic bowl: using wooden formwork and strengthening the sides with cement.


Installation of formwork:
- As in the previous case, it all starts with digging a pit. Dig a hole of the required depth, around the perimeter larger than the width of the formwork boards.
- You need to fill in a drainage layer of sand and level it. To make the bottom more dense, it is recommended to fill the sand with water.
- While the water dries, assemble boards from boards to the size of the pit. Be sure to treat wooden parts with an antiseptic.
- Lower and install wooden walls in the hole.
- Place the PVC bowl inside the wooden rig.
- If there are gaps between the shields and the earthen walls, they must be filled with earth and compacted thoroughly.
- Compact the soil around the pool. Next, you can safely fill your man-made pond with water.


Strengthening the bowl with cement:
- Dig a pit, following the same rules as used in previous cases.
- Strengthen the bottom with a concrete base up to 20 centimeters thick.
- Prop the container from the inside and partially fill it with water.
- After this, pour cement between the bowl and the ground.
- A month after the concrete has completely hardened, you can refine the edges of the pool.

If you want to have a solid and durable water feature in your garden plot, and are also patient and full of energy, start building a monolithic concrete pool:
- Carrying out preparatory work: drawing up a plan, cleaning the site, marking the territory, digging a pit.
- Place a drainage layer of crushed stone, gravel, small stone and sand at the bottom. The layers of stone and sand must be equal in thickness and at least 15 centimeters. Carefully level each layer.
- Spread two layers of roofing felt on top of the waterproofing. Its edges should extend to the surface no less than 20 centimeters.
- Build in the necessary structures for draining water.
- Make a sheathing of reinforcement over the roofing felt.

- After this, proceed to concreting. The ideal option is to pour concrete at once. But for an inexperienced master this is too labor-intensive a task. Therefore, first fill the bottom with a slight slope of a couple of degrees towards the drain hole.
- When the pool floor has hardened, proceed to the walls. Make the formwork at a distance of at least 40 centimeters from the earthen walls.
- If you decide to fill the pool in two approaches, remember that the reinforcement should also be done twice. The second layer of reinforcement is laid to strengthen the vertical and horizontal parts of the reservoir, that is, the bottom and walls.
- Treat the concrete surface with waterproofing material. If the walls are uneven, plaster them. Be sure to use reinforcing mesh for this.
- Finish the inside of the pool. To do this, you can use PVC film, mosaic or tile. The decorative layer will serve as another protection for concrete from the destructive effects of water.

Water purification system
One of the factors that stops a person from building a pool on the site is that the container itself and the water have to be cleaned at certain intervals. It is important to note that modern technologies can significantly simplify this process, so you should not deny yourself the pleasure of soaking up some refreshing water on a hot summer day and dismiss the idea of beautifying your summer cottage with an attractive body of water.
Pollution can be divided into two types: material and bacterial. An open-air pool will not avoid small debris or garden accessories from getting into it. But even a roof over it does not guarantee its crystal purity. The entry of bacteria and microbes into the water provokes flowering and the appearance of a slippery coating., such oily stains on the surface, not to mention the unpleasant musty stench or rotting smell from natural debris. If you heat such water, the smell will be even worse.
A cover, if we are talking about small bodies of water, or a film that can be spread over the surface when the pool is not in use can protect a country pool from leaves and other objects.


Using a net, the pool should be cleaned of debris daily or once at a time convenient for the owner. If an unpleasant coating forms on the walls, use a brush. However, these actions will not protect against the influence of small organisms, so water should be purified in other ways.
It is best to completely change the water every 1-2 weeks. To avoid wasting precious liquid, you can water your garden with warm water. This product is good for small pools that fill and warm up quickly.

For large containers, other methods are used: filters, electrophysical disinfection and chemical treatment.
Filters can be divided into three types: sand, cartridge and diatomite. The latter use several layers of cleaning and are able to clean the pool down to the smallest particles. Cartridge ones are often placed in medium-sized containers, while sand ones, working on the basis of coarse sand, remove contaminants up to 20 microns.

Electrophysical purification is the use of ozonizer devices and systems that saturate water with silver ions. In addition, this also includes ultraviolet equipment that disinfects the water, ridding it of germs and mold.
Pool owners do not like to resort to chemical cleaning due to the high risk of drug overdose. It requires care and scrupulousness. However Chlorine perfectly disinfects water and helps get rid of blooms., despite the fact that large amounts of it can lead to poisoning and damage to the skin and mucous membranes. Bromine reagents have a low odor, unlike chlorine. Active oxygen is the safest and at the same time effective cleaning agent from a number of chemicals. It is added to the water after filling the pool according to the instructions, based on the total volume of liquid.

Finishing
Finishing a pool is a matter of taste, and sometimes financial capabilities. You can use PVC film, mosaic tiles on a mesh, just tiles and special acrylic paint with added color. It should be remembered that when gluing mosaics you need to use glue that can withstand temperature changes.
Mosaics or tiles that are laid with glue serve as an additional means of protecting the pool walls from moisture. Water bends the walls of the pool with its weight, so laying the tiles should be done with some difference from the classical method. A little more distance is left between the tiles in order to avoid deformation and cracks in the material.
Sitting near a private house or cottage in the summer heat, you probably imagined how cool it would be to plunge into the cool water of your own pool. You probably immediately drove away the thought of its construction, but it persistently returned and literally haunted you on hot days. Maybe we shouldn't give up on such an excellent idea?
After all, you can build a simple pool with your own hands, investing a minimum of money in the construction. And in this we are happy to provide you with effective assistance by providing full information support. Here you will learn about the types of artificial reservoirs and the features of choosing a location for the bowl.
We have collected for you popular design options and technologies for their construction. The detailed description is supplemented with explanatory diagrams, step-by-step photo instructions and videos.
We should start, of course, with the project. First you need to assess the condition of the site, decide on the location where the pool will be located, select the size of the tank, bowl configuration, etc.
An important point is the level of occurrence of the first groundwater horizon from the surface in the area. If this figure is less than one meter, i.e. groundwater lies high, it is not recommended to build a permanent pool in a pit.
Image gallery
Not every summer resident is lucky enough to have his own house near a pond, where after physical work he can relax and enjoy cool water. The rest have to either get into the car and go in search of the nearest river, or make a pool with their own hands at the dacha. More often they choose the second option, because in addition to relaxation, the pool also provides side benefits:
- warm, settled water, which can be used to water flower beds and vegetable gardens (if you did not add chemical disinfectants to the pool!);
- the opportunity to switch children who are keen on tablets, mobile phones and laptops to a healthier vacation;
- improvement of the body, etc.
All that remains is to choose from the many options for stationary pools the one that suits the needs of the family and the landscape of the site.
To simplify the maintenance of your built pool, consider the following points already at the planning stage:
- It is better if the pool area has clay soil. It will stop water leakage in case of waterproofing failures.
- Choose a place with a natural slope of the soil. This will make it easier for you to dig a pit and immediately decide where to install the drainage system.
- Tall trees should not grow near the future pool, because their root system, sensing the proximity of moisture, will reach the walls of the structure and can ruin the waterproofing. Poplar, chestnut, and willow are considered the most “aggressive”. If there are already trees growing on the site, you will have to part with them in advance. It's cheaper than rebuilding a damaged pool.
- Low-growing trees are also undesirable, because you will have to constantly remove leaves from the bowl, and during the flowering period the water turns yellow with pollen.
- Pay attention to which direction the wind most often blows at your dacha, and try to place the pool so that the air moves along the bowl. Then all the dirt and debris will be nailed to one wall, along the edges of which it is recommended to install a drain system.
- Try to locate the pool closer to the water supply to make it easier to fill.
Preliminary calculations - sizing
The width and length are determined based on the purpose of the pool. If it is intended for swimming, then choose a rectangular shape, making the bowl elongated. If for relaxation, splashing and resting the whole family, then it is more convenient to communicate in round bowls.
A more important criterion is depth. It is believed that in order to feel free, swim easily, turn around under water and jump from the side, you need a depth of one and a half meters (and no more!). But ski jumping requires a deeper bowl - at least 2.3 m. However, it is enough to make such a depth in the diving area, creating a smooth transition from the main size (1.5 m).
If the construction of a swimming pool at the dacha is intended exclusively for children's recreation, then the depth of the bowl should not exceed half a meter. This is enough for fun games and wallowing without risk to health.
The most complex design is a combined pool in which everyone will swim. In this case, different depths are created for the children's and adult zones, and both zones must be separated by a strong partition that starts from the very bottom. This will ensure that children do not accidentally enter the adult area.
Important! In any pool that has several different depths, it is necessary to make the bottom flat and smoothly transition from one size to another. Sudden changes in depth are unacceptable for safety reasons. A person, walking along the bottom, can gape and miss the boundary beyond which another depth begins, and in a panic, when his legs instantly go down, the risk of choking is very high.
Choosing a bowl: buy ready-made or make it yourself?
The most labor-intensive work involves preparing the pit and filling the bowl. But manufacturers have figured out how to build a swimming pool in a country house faster and easier. They created ready-made bowls that only need to be dug into the ground and fixed. In addition to the obvious advantage of ease of installation, ready-made structures are also advantageous in that they come in all sorts of shapes and colors, which cannot be said about concrete. In addition, during operation, concrete bowls may crack if the soil begins to move.
Types of finished bowls: plastic and composite
There are two types of ready-made bowls on sale: plastic and composite. The principle of their installation is absolutely the same. Only the technical characteristics of the materials differ.
A plastic bowl requires additional insulation of the pool walls from the outside
In plastic structures, the main material is polypropylene. It is not afraid of fading, does not require draining water for the winter, is environmentally friendly, and is resistant to mechanical stress. And the smooth surface prevents the formation of plaque and sediment on the walls and bottom. Such bowls do not require additional interior finishing because they look aesthetically pleasing. The only negative: if the pool is installed in a place where there is no shade, then in the heat the polypropylene can expand, causing the bottom and walls to “ripple.” But as soon as the temperature drops, the bowl takes on its normal appearance.

Composite bowls are made of fiberglass, which is not afraid of either frost or heat.
Composite structures do not have this problem. The main material in them is fiberglass, which is bonded with polymer resins. All the advantages characteristic of plastic bowls are also characteristic of this material. But there is a small “but”: the composite is quite expensive.
DIY bowl options
And yet, some summer residents still prefer bowls that are created on site, because you cannot always find a container with the size and shape that ideally suits a specific landscape, and very large pools (about 10 m in length) cause difficulties in transportation. The vast majority of owners make swimming pools for their summer cottages with their own hands from concrete. This material is always on sale. If it is impossible to deliver it to the site in the form of a liquid solution, an ordinary concrete mixer is installed and a mixture is created on site with the addition of sand.

A bowl made of polystyrene foam blocks is easy to install due to the lightness of the material and perfectly maintains the water temperature
It is possible to create the entire bowl from concrete, including the walls, but this requires a long time and a lot of labor to install the formwork and pour it.
Resourceful summer residents came up with a simpler design for a swimming pool at their dacha: they kept only the bottom concrete, and began making the walls from polystyrene foam blocks or steel sheets. In the first option, the pool turns out to be warm, since polystyrene foam has low thermal conductivity. Steel walls are very easy to install, as they are sold ready-made with all additional equipment in the form of facing film and mounting hardware.
Installation of a swimming pool with a finished bowl
Let's look at how to make a swimming pool at your dacha using a factory-made bowl.
Site marking
- We carefully measure the bowl delivered to the site.
- We mark the location of the future pit on the ground using pegs and rope. We drive pegs into the corners of the future bowl, and stretch the rope between them. The more irregular the shape of the pool, the more often you drive in the pegs.
- We step back a meter from the stretched rope and make marks along the entire perimeter (cut off the soil, hammer in new pegs, etc.). It is from this marking that you will begin to dig the pit. This reserve is needed to make it easier to lower the bowl, insulate its walls and create a solid foundation.
- We remove the internal markings and start digging a pit.
Excavation

The pool pit must have a flat and stable bottom, so it is concreted
The pit should be half a meter deeper than the size of the bowl itself. Now we create a base on which we will place the bowl:
- Spread the bottom with a 20-centimeter layer of coarse sand and compact it.
- We lay a metal mesh over the sand for a fortress and pour concrete mortar over it, 25 centimeters thick. We wait until it dries.

The concrete layer used to fill the bottom must be reinforced so that it does not crack when the soil moves
After this we insulate the pool:
- We lay geotextiles over the entire concrete base, and three-centimeter slabs of expanded polystyrene on it. They will insulate the bottom of the pool from the cold ground.
- Lay a thick, durable film over the insulation.
- While the bowl is at the top, its walls should be insulated. The outer surface of the walls is “packed” in polystyrene foam and insulated with polyethylene.

The outer walls of the bowl are insulated with polystyrene foam to insulate them from cold ground
Installing the bowl and connecting communications
- We lower the prepared bowl to the bottom of the pit.
- We connect all the necessary communications to the bowl. We put a protective sleeve on the pipes and fix it with tape so that it does not move during concreting.

Spacers will prevent the bowl from bending when the concrete reinforcement of the pool is poured; And all pipes must be packed in a protective sleeve so that they do not freeze in winter
- We concrete the remaining voids between the soil and the walls of the pool as follows:
- We install spacers inside the bowl so that the plastic or composite does not bend under the pressure of the concrete mass;
- We put up the formwork and lay reinforcement around the perimeter;
- We do not pour the solution all at once, but in layers: we fill the pool with 30-40 cm of water and raise the concrete to the same height. We wait for it to harden, then water again - and after that concrete. This way we bring the concrete layer to the surface of the soil.
- We wait a day until the pouring hardens and only then remove the formwork.
- We fill the voids from the formwork with sand, pouring it with water and compacting it.
All that remains is to decorate the pool area and fill it with water.
For outdoor pools, it is advisable to create a canopy roof that will protect you from dirty precipitation, or at least sew an awning with which you will cover the structure when you leave the dacha.
If installing swimming pools at your dacha seems like a difficult task, buy an inflatable or frame version. Such pools are quite suitable for water recreation, and for the winter you can easily disassemble them and hide them in the attic.
Who doesn't want to have a swimming pool on their property? There are probably not many of them, because everyone likes to swim on a hot day. Children especially love to do this! However, not everyone can afford such a pleasure, and sometimes there is simply nowhere to place large structures, so you have to come up with alternative options. Today we’ll tell you how to make a budget pool at your dacha with your own hands from scrap materials. Let's consider several options of varying degrees of complexity.
All you have to do is build in a jacuzzi, and life is good
A pool is a reservoir that must have sufficient volume for at least one person to swim. It must also be airtight. You can use a lot of things as improvised materials for it. In this chapter, we will look at the most daring and interesting, and everyday ideas that people use to make swimming pools.
Metal cargo container
If you've been to ports or seen them on TV, you know what shipping containers look like. This is a fairly large container in which you can organize a swimming pool.
Such a building will be stationary. If you compare its price with the construction of a tank of the same dimensions made of concrete, it will immediately become clear that this option is cheaper.
 Do-it-yourself swimming pool for a summer residence - a model made from a container is impressive in size
 The creator of the “miracle” approached the installation competently.
- First, the container was carefully painted.
- Secondly, a neat WPC edging was installed along the edges of the structure.
- Thirdly, there is a platform and stairs for easy access to the top.
- Fourthly, a normal water purification system is built in.
There is a noticeable lack of stairs to get into the water. The issue could be resolved by adding a small platform to the side.
If desired, such a reservoir can be dug into the ground, then no one will be able to understand what was used as the foundation. To ensure the tightness of such solutions, their interior is lined with thick pool film or painted with rubber paint.
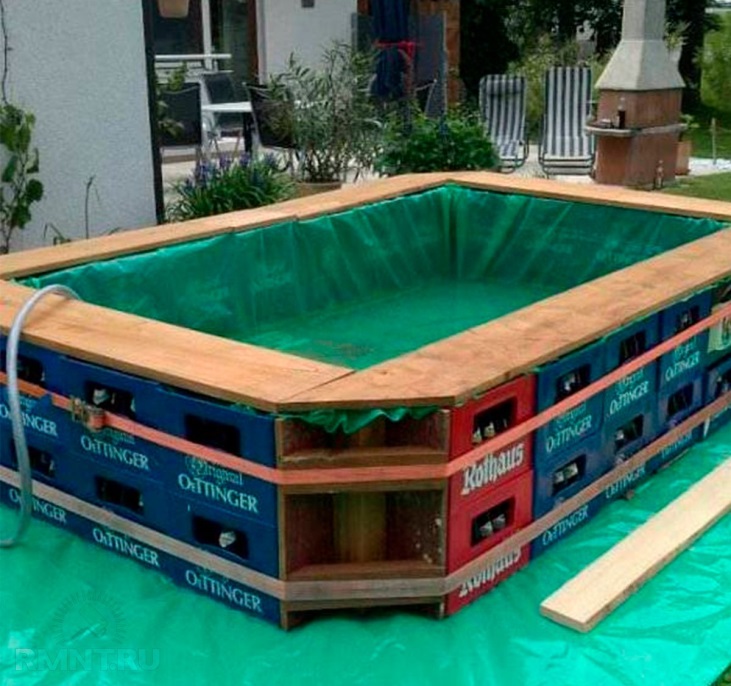
Cheap swimming pools for summer cottages made from beer crates
The body of such a pool is built from ordinary plastic boxes.
 DIY pool from scrap materials
 This idea makes me smile, but, nevertheless, the design can withstand loads and looks quite interesting. Such a pool will clearly become the center of attention at a youth party.
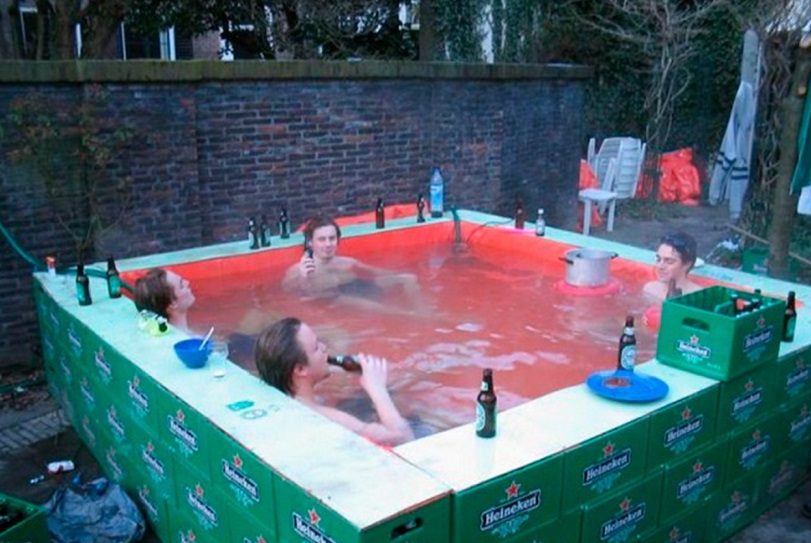 Beer without leaving the cash register - we have a good rest
 The boxes have the correct parallelepiped shape, which allows you to quickly form them into a structure of the desired size and shape.
To prevent such a base from falling apart from water pressure, it is tied from the outside with braided nylon cables, although they are not visible in the last photo, and it is not clear which tying method the designer chose.
The PVC film lined inside protects against water leaks. With the help of film, you can use almost anything under the frame that can withstand the weight of water and swimmers.
Swimming pool in the back of a pickup truck
You can quickly build a temporary pool by placing it in the side of a car. A pickup truck will be enough for this. The children will definitely be delighted with the ingenuity of the head of the family, and not only them.
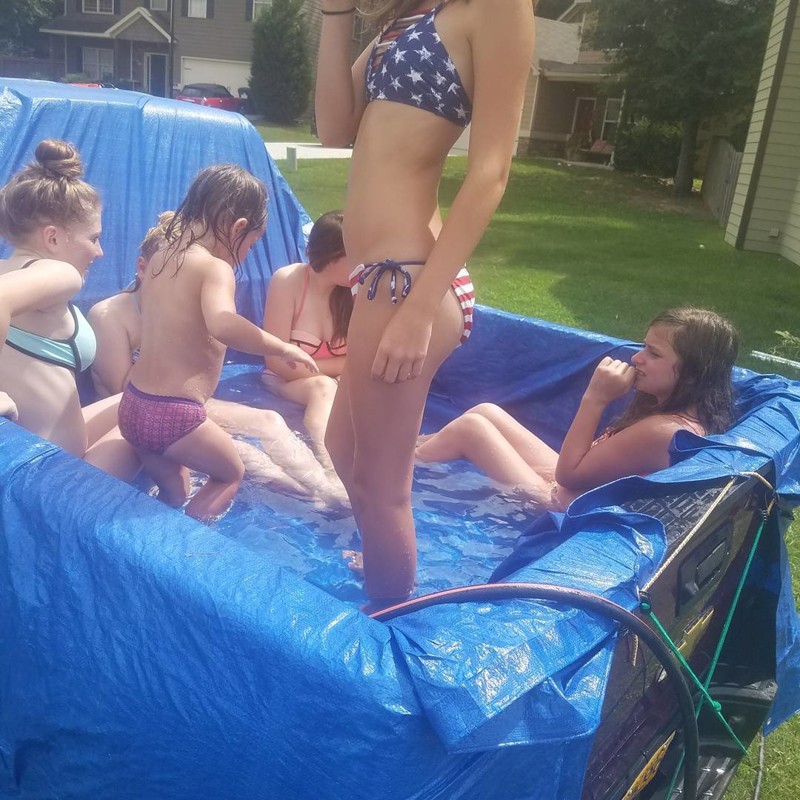 A universal car is universal in everything, or how to make a pool at your dacha with your own hands cheaply
 Here you will need a waterproof awning. The main thing is to securely fasten the film with straps, otherwise children playing will quickly crumple everything and the water will splash.
Now remember yourself in distant childhood, and answer yourself one question - would you refuse to swim in such a pool? We are sure not! Children's enjoyment is guaranteed.
Tire pool
How much does a cheap pool for a summer house cost? It can be made almost free of charge, for example, from an old stingray. Of course, the tire does not have enough volume to organize a normal pool for adults, but you can make a small version for children out of it.
 DIY children's pool from scrap materials
 To work, you will need an old tire from agricultural machinery. A good option is a combine wheel with a diameter of 32 inches. This pool can accommodate one adult or two children.
- You can look for such tires on private farms. Sometimes you can find them for sale on the Internet.
- If there are recycling plants nearby, you can look there to find the tire you need.
- Such a pool will be shallow, which means you don’t have to worry too much about the safety of children, although you can’t leave them completely unattended.
- The wire-reinforced tire walls can easily withstand a lot of poured water.
- The rubber will not deteriorate from moisture, and the pool will last for more than one season.
- Using paints, the pool can be decorated in an original and bright way.
- The price of such an idea will be extremely low.
Additional materials will require a film that lines the bottom of the tire. The material should be glued to the base so that it does not come off.
Budget swimming pool at the dacha made from pallets
You can put together a pool frame from individual boards, but this is very time-consuming and quite expensive, since lumber is not cheap. It is much more profitable and easier to use wooden pallets for these purposes. You can get them for almost nothing.
- The photo below shows an example of building a good frame from this material. The position of the pallets is clearly verified.
 Reliable frame material for large structures
 - On top there is a durable and beautiful side made of solid timber.
- For a large pool, 9-11 pallets will be enough.
- Since this material is not solid and does not look the best in appearance, you will additionally have to install a ring of any sheet material inside and perform the outer cladding.
 To strengthen the base, you can use plywood or plastic
 The advantages of a pool made from pallets include the following:
- The material is large in size, which will help make the tank deep.
- By building up parts in the design, you can set a sufficiently large diameter of the bowl.
- Wood is an easily processed material, which greatly facilitates installation.
- If necessary, the structure can also be easily dismantled.
- If you wanted to make the pool wider, there are also no restrictions, just take more film.
Earthen pool without concrete bowl
Perhaps the simplest in technical terms, but by no means the most difficult to implement, would be a pool dug in the ground. This is a stationary structure in which a waterproof bowl is not installed.
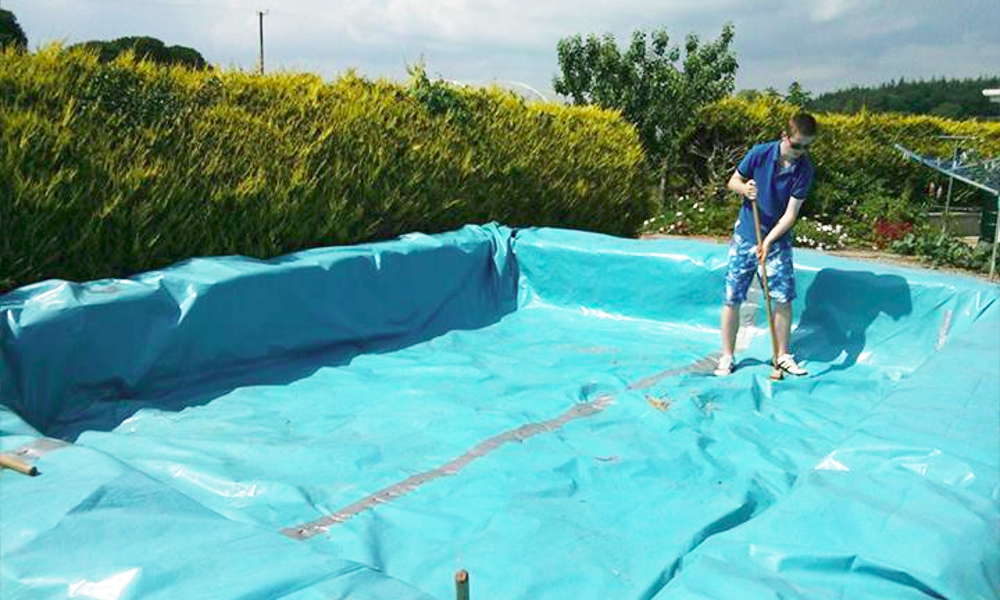 Cheap swimming pools for a summer residence - prices will be determined only by the design
 Advantages:
- Soil walls can cope with any load from water pressure, so you are free to make the pool deep.
- There are no additional costs required.
- You don't need any special tool for the job.
There are many more disadvantages to the pool.
- Firstly, the work will be labor-intensive. Digging a large pit will require a lot of effort or hiring special equipment. Of course, there is less work than when installing the same pool with a bowl, but we compare it with other options that we talked about above.
- Secondly, the film laid on the ground is easy to damage. Roots, sharp stones, metal objects, etc. may stick out from the bottom and walls of the pit. A torn film will not hold water, and the tank will quickly become shallow.
- Thirdly, it will be uncomfortable to move on such a bottom barefoot and you can even get injured. To avoid this, a layer of sand is first poured onto the bottom of the pit, and a fence is made along the walls, which is also covered with sand on the outside.
Crazy ideas from around the world
Of course, there are also amazing solutions from people that cannot always be called adequate and safe. Let's review several examples of such folk art.
- Such negligence simply makes your blood run cold. Of course, there are swimming pools on balconies, but even with serious engineering calculations, these structures remain very dangerous. Do not repeat such experiments.
 Swimming pool in an apartment is not a problem
 - A photo of this pool opened the article. An unusual object was chosen for the bowl - such ditches are used on construction sites for lifting cement mortar with a crane. We suspect that such a bowl had good adhesion to the tile adhesive from the inside. The smooth and durable walls made it possible to line the inside of the container with tiles, which made the pool more attractive. We are convinced that if you bury it in the ground, you will get a good font.
 Ditch for carrying concrete
 - An entire car was spared to create this pool, and it is clear that it was in excellent condition at the time the new option was installed. A plastic container, which was made to order, was mounted inside the body.
 Swimming pool on wheels
 And here the body of an old bus acted as a frame. An original idea, except that under the roof the water will heat up more slowly, but you can safely swim in rainy weather, and the water will be less clogged by leaves and other debris getting into it. Unfortunately, the photo does not show the entrance to the pool. If there is a ladder there, then the solution can be placed at the top of the rating.
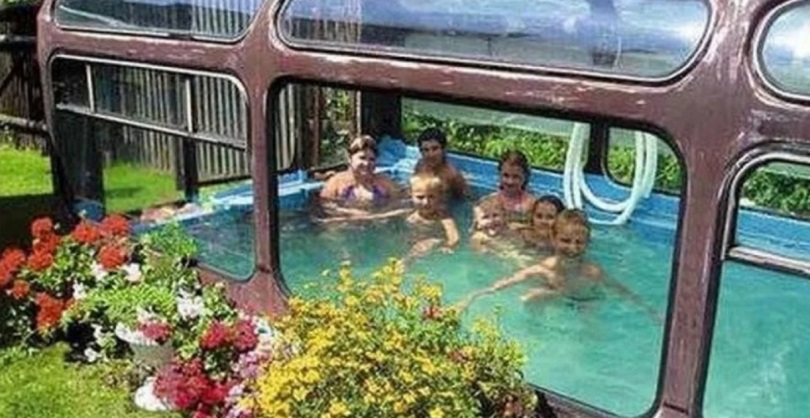 Bus body for a country pond
 In general, there are a lot of ideas, and they are all implemented in different ways. Next, we will look at ways to assemble inexpensive homemade pools.
How to make a pool with your own hands from what you have on hand
Everyone knows the proverb about a goal that is cunning. It is fair, of course, not to all people who build something similar at home. There are simple and creative individuals who do not recognize boundaries, but more often than not it hits the mark. Let's see how to make an inexpensive pool.
DIY frame pool from scrap materials - pallets
Let's start with materials close to us. Pallets can be found anywhere. They have standard dimensions (800*1200*144), so this option is suitable for any region.
- We begin work by creating a base - this will be a platform for the same pallets. You will need 8 pieces, which need to be laid out in three rows. In the central row, pallets will be laid parallel to the outer ones (2 pieces) to form a bundle.
 Pool bases
 - Then two squares are knocked together from the pallets. They are attached to the structure at the front, creating places for approaching the pool. This entire structure must be built on a level area. If there are unevenness, then boards can be used for leveling. The platforms are laid overlapping - they need to be connected to the base with nails or self-tapping screws.
Video instructions for making a pool
Read also...
- Federal State Budgetary Institution “National Medical Research Center for Psychiatry and Neurology named after V.
- Is it possible to legally avoid paying transport tax?
- Recipes for healthy dishes and drinks made from lingonberries
- Military registration Sample order on the organization of military registration