Welding polypropylene pipes tool. Soldering polypropylene pipes: do-it-yourself PP welding instructions, diagrams, nuances and mistakes. General description of technology
Types of polypropylene pipes
The service life of products depends on the temperature of the medium and the pressure created in them. With the right choice of the type of material, it is possible to significantly extend its operational capabilities.
There are 4 types of pipe materials that have different characteristics depending on the temperature of their operation.
PN10 brand materials refer to products intended for cold water supply. They are not able to withstand the high temperature of the environment. The second type, marked PN16, refers to products of a mixed type and is designed for cold and hot water supply, but with limited operating temperatures. PN20 and PN25 are materials intended for hot water supply. Such pipelines are able to withstand high temperatures, and products marked PN25 are additionally reinforced with metal, which increases their service life and ability to withstand high pressure and temperature conditions.
Pipe welding kit
If welding of polypropylene products has to be carried out regularly, then it is advisable to purchase a special welding kit, which is immediately sold in an appropriate suitcase. Its average cost is about one hundred dollars, and it consists of:
- heating element;
- Teflon nozzles of different sizes;
- scissors for cutting polypropylene pipes;
- bolts that are attached to the heating element of the nozzle;
- level;
- supports for the heating element;
- hexagon for tightening bolts.
In the case when welding work is carried out from time to time, it is more rational to rent welding equipment.
Types and purpose
Polypropylene pipes are available in four colors - green, grey, white and black. Only black ones differ in characteristics - they have increased resistance to ultraviolet radiation and are used when laying an irrigation system on the ground. All the rest have similar characteristics and are laid indoors or buried in the ground.
By appointment, polypropylene pipes are of the following types:
- For cold water (temperature up to +45°C). It is easy to distinguish them by the longitudinal blue stripe.
- For hot water supply (heating up to +85°C). A distinctive feature is a red stripe.
Universal (maximum heating up to +65-75°C depending on the manufacturer). Two stripes are applied side by side - blue and red.
For both cold and hot water, there are pipes with different characteristics. This is displayed in the label:
- PN10 are used exclusively in cold water supply systems (up to +45°C) with low pressure (up to 1 MPa). They have a small wall thickness. Not suitable for high rise buildings.
- PN16. They are often labeled as universal, but more often used for cold water - they withstand heating of the medium up to + 65 ° C and pressure up to 1.6 MPa.
- PN20. Thick-walled pipes, which can transport medium with temperatures up to +80°C, withstand pressures up to 2 MPa. Used in the distribution of hot water and heating systems.
- PN25. These are reinforced polypropylene pipes (foil or fiberglass). Due to the presence of a reinforcing layer, they often have a smaller wall thickness than PN20. Medium heating temperature - up to +95°C, pressure - up to 2.5 MPa. They are used for hot water supply and heating.
All of them are produced in different diameters - up to 600 mm, but in apartments and private houses they are used mainly in sizes from 16 mm to 110 mm
Please note that the inner diameter is indicated, as the wall thickness may vary.
Stage two. Welding of polypropylene pipes

This procedure will require an electric jigsaw (cutting polypropylene) and special welding equipment.

Step one.
While the apparatus is warming up, the necessary measurements are taken, the pipes are marked and cut.

Step two.
The ends of the products that are planned to be interconnected are carefully cleaned and degreased.
Step three.
Using a pencil, the depth of entry of each product into the sleeve is marked. It is characteristic that at the same time there should be at least a millimeter gap, so the pipes do not rest against the coupling of the fitting.

Step four.
A PP pipe with a fitting is put on the sleeve in accordance with the marks made, and the heating of all elements must occur simultaneously.
The duration of heating depends not only on the diameter of the products, but also on the depth of welding (this can be found in the table below).

Step five.
After a certain period of time, the products are removed and connected, with little effort, sitting on top of each other. It is forbidden to rotate the elements along the axial line.

Step six.
Within a few seconds after the connection, the primary adjustment is performed, then the elements are finally fixed.

If there are no gaps left at the junction, then it (the connection) can be considered of high quality.
Welding Machine Manufacturing
In view of the fact that a more or less good one costs over a thousand rubles, it is cheaper to rent it or make it yourself. If the latter was chosen, then for work you should prepare:

The sequence of actions should be as follows.
Step one.
In order to improve heat transfer, the sole of the iron is treated with thermal paste, then a Teflon sleeve is fixed. The location of the latter is determined in advance - the wide part up or down.
Step two.
A sharp “nose” is sawn off for more convenient work near the walls.
Step three.
The heating of the iron is carried out until the device switches off a second time.
Step four.
It is good if the iron is equipped with a temperature sensor - this will allow you to accurately determine the heating temperature. But there is an easier way - through lead. This metal melts at 230ᵒС and higher, which approximately coincides with the temperature required for welding.
Further technology is identical to that described above.
Required Tools
Polypropylene pipes themselves;
Special apparatus for welding such pipes;
Welding machine
A hacksaw for cutting them, a special cutter is often sold complete with a welding machine; for large volumes of work, you can use a ring cutter or special scissors;
Degreaser (ethyl or isobutyl alcohol); acetone in this case is forbidden to use, as it is able to soften the plastic;
Beveler: Its inside resembles a pencil sharpener, however, since the bevel must be cut evenly, the knives are located at a different angle; you can replace the beveler with an ordinary file and a knife;
 Beveler for plastic pipes
Shaver: a tool for removing the reinforced layer (if our pipes have a layer of reinforcement).
 Shaver
Advice.
Pipes that fit close to the heating boiler (at a distance of less than half a meter) should be made only of metal. They are connected to polypropylene using adapters from a welded joint to a threaded one.
Working with polypropylene pipes
Today's polypropylene pipe installation system includes all the necessary elements for connecting pipes of various sizes, contours, fittings, fasteners and inclusions. The assembly process is quite simple and, with the necessary skills, is fast.
The set of elements can be customized the way you want, so that the result is a completely unique system. The complexity and equipment depends only on the preferences and wishes of the customer, that is, you. The only feature that some attribute to the disadvantages of polypropylene is the welded connection method. After welding, it is no longer possible to separate the pipes and correct the error. Therefore, you need to think over everything in advance and try to avoid inaccuracies in actions.
If we break down the pipe welding process into separate steps, it will look like this:
- With a soldering iron for polypropylene, it is necessary to heat both parts that you want to attach to each other.
- After you need to connect the heated parts;
- After a short period of time, remove the already fastened elements from the apparatus.
Welding provides the elements with such a strong connection that it is almost impossible to separate the parts without breaking them. That is why polypropylene pipes are considered to be of high quality, durable and able to withstand almost any pressure.
Main stages of work
1. We take a pipe of the right size.
2. We clean its edges from burrs formed during cutting with a file or beveler.
3. We mark with a pencil at the end of the pipe (see photo) which section we need to melt, that is, we outline the place where the fitting will be put on.
 We outline the place of soldering with a pencil
4. We process the pipe and fitting with a degreasing agent.
5. Firmly fix the welding machine to the table.
6. Its kit includes nozzles of different diameters. We take the required nozzles (one for the fitting and one for the pipe) and fasten them on both sides of the device.
7. Set the temperature to 260°.
8. As soon as the lights go out (this means that the device has warmed up enough), you can start working. The average heating time is 2-3 minutes.
9. We put on hot nozzles (there are two of them) a fitting and a pipe to a pencil mark. Too much pressure on the parts to be welded or rotate them should not be.
 Butt welding machine. Fitting and pipe are put on hot nozzles
10. We count the prescribed amount of time. The heating time is always indicated in the instructions. For example, for a 25 mm pipe it is exactly 7 seconds).
 The heating time of the device depends on the diameter of the pipe
11. Quickly and accurately remove the heated parts, slightly holding the welding machine.
12. We connect them with each other. Excessive pressure on them or rotation is also unacceptable.
13. We are waiting for a few seconds.
14. If we did everything right, we get a perfectly even, homogeneous connection.
The reinforced layer on the segment of the connection must be removed, otherwise the connection will be inhomogeneous and fragile;

When buying a device, it is not necessary to spend extra money and purchase a model with a thermostat, because we need a single temperature regime of 260 ° C; using other modes may result in a poor connection;
Water must flow freely through the pipes; so that an obstacle in the form of frozen plastic does not form at the place of soldering, do not put too much pressure on the melted parts when connecting; however, low pressure is also unacceptable - the length of the connection for reliable fastening will not be enough; this can lead to the formation of turbulence and pressure drop in the system;
The basic rule of such soldering is: the fitting is put on the nozzle first, and only then the pipe; the countdown starts when both parts are on the machine;
Polypropylene seizes in 4-8 seconds, but you should not immediately release it - in order for it to completely freeze, you need to wait 20-30 seconds;
Parts during cooling must be motionless, the slightest shift can break the tightness of the connection; therefore, before soldering, it is better to prepare special clamps for fixing them; you can make them from any bar of wood or strong wire;
Cooling the resulting node with water or a jet of cold air is prohibited - the connection will be fragile;
Do not heat up the pipe and fitting more than the allotted time - polypropylene will be deformed; with less time for heating, the connection of parts will be difficult;
With proper welding, part of the plastic should form a slight influx on the sleeve;
You can check the quality of your work by cutting the connected section in half; you should see at the junction an even monolithic connection without deformations and voids.
Sewer system from PP pipes
As noted earlier, polypropylene pipes are actively used today in the arrangement. The installation procedure in this case has its own nuances.

Internal sewerage
There are a number of rules that must be observed when installing sewerage in the house.
- The pipeline is laid at an angle in the direction of the sewer riser (about 3 cm per linear meter).
- If the room is not heated, then the pipes are additionally insulated with mineral wool.
- Do not make sharp turns at an angle of 90ᵒ, so-called half-bends are used instead.
- Fan-type ventilation is a mandatory component of the sewer system, which will prevent the penetration of an unpleasant odor into the home.
- The toilet is connected only after the sink, otherwise the water seal will break.
Outdoor sewerage

Step one.
The diameter of the pipes is determined, depending mainly on the number of people living in the house.
Step two.
A trench is dug from the sewer riser to a septic tank or cesspool. At the same time, a slope is observed, depending on the soil freezing line, or the pipeline is insulated with mineral wool.


Step three.
The bottom is covered with a "pillow" of sand. Its thickness should be at least 20 cm.
Step four.
Pipeline is being laid
It is important to avoid possible sagging, otherwise the connections will soon collapse. Horizontal drilling of a trench for the pipeline is carried out using special equipment with pressure jack pumps
Drilling takes place using a steel cone-shaped tip. Similar technology is used in the construction of:
Horizontal drilling of a trench for the pipeline is carried out using special equipment with pressure-action jack-pumps. Drilling takes place using a steel cone-shaped tip. Similar technology is used in the construction of:
- auto and railway roads;
- pipelines to basements;
- highways to working wells.
Do-it-yourself installation of a PP pipeline will help save a lot, but only if it is done correctly.
Products made of polypropylene are used, as a rule, when creating drainage and irrigation systems, as well as when laying a water pipe or arranging a heating system. Polypropylene belongs to the class of polyolefins, which means that all products made from this material are distinguished by a high degree of environmental safety.
In addition, polypropylene drainage systems can last a very long time, while the cost of their operation will be minimal. However, when working with such products, you need to know how to weld polypropylene pipes in such a way as to avoid their deformation
and prevent leakage.
DIY welding
Work should be done in a well ventilated area. Polypropylene, when heated, is capable of releasing toxic substances, and they can be harmful to health, causing poisoning.
Step by step instructions for welding:
- First, the necessary nozzle of the correct size is installed on the soldering iron;
- To melt polypropylene, a temperature of 260 degrees must be reached;
- Prepare parts for connection, carry out their cleaning and proper placement;
- Then the soldering iron is put into operation;
- It is necessary to wait for the required time for heating, and this is indicated by the green color of the sensor.
 When soldering, it is better to place the device in such a way that it stands steadily
Then the pipe and fitting are simultaneously put on the blank and the soldering tool. The pipe is inserted inside the blank. The fitting is placed on the outside. It is pushed in until it stops, and the pipe is pushed in to the finished mark. The main thing is to keep the time right.
If the tool warms up badly, then the level of diffusion will be small, and this will violate the quality of the alloy. A high temperature will lead to overheating of the parts. The optimal time depends on the diameter of the pipe and fittings.
After heating, it is important to immediately dock. The main rule of procedure is compliance with tolerability
The first few seconds allow for a correction, but no turning is allowed. At the same time, it is required not to rush and not to pull, adhering to the golden mean.
Stage three. Pipeline installation


When laying the highway you will need:
- pipes;
- tees;
- Ball Valves;
- plugs;
- adapters;
- bends;
- couplings;
- detachable connecting elements;
- threaded fittings;
- plastic clamps.
First of all, the installation of the main elements of the system (plumbing, radiators, boilers, etc.) is carried out, after which, in accordance with the drafted project, the future highway is marked. The elements of the pipeline are interconnected by means of couplings.
If we are talking about heating or hot water, then thermal expansion is taken into account. To compensate for the latter, it is desirable to use mobile connections. When installing a closed pipeline, the walls are first ditched (in appropriate places, a groove is made two pipe diameters wide).
The pipeline may only be filled with liquid after one hour has elapsed from the end of installation. A hydraulic test can be carried out only after a day.


Why polypropylene
Today, pipe manufacturers provide a huge range of products for laying water supply, sewerage or heating systems. You can purchase metal-plastic, metal, or polypropylene pipes. Today, an increasing number of consumers prefer to choose polypropylene pipes, which have a lot of advantages:
- do not corrode;
- easy to install;
- do not require constant repair;
- durable and reliable in operation;
- can be laid inside a wall or floor;
- are significantly cheaper than metal pipes.
Polypropylene pipes can be used to install heating systems, for water pipes and for sewage.
Which pipes are right for you
To choose polypropylene pipes you need to know:
- the conditions under which the pipes will be operated;
- fluid pressure in the system and its temperature;
- the required throughput of the product, which determines the working diameter.
Polypropylene pipes have a special marking depending on the purpose of the product.
- PPH
- ventilation, cold water supply. - PPB
– systems of cold water supply, heating. - PPR
– systems of hot and cold water supply, heating.
Pipes with PPR marking
- are universal. Therefore, they are the most in demand. They are highly resistant to both high and negative temperatures.
Stage one. Drafting a project
Installation work should begin with the drafting of the future highway. An important criterion here is ergonomics, so that the number of turns and connecting elements should be kept to a minimum.

When arranging a heating system, a well-designed project is especially important, in which the location of such elements as:
- couplings;
- adapters;
- fasteners;
- corners;
- heating equipment.
The line is connected to the radiators in a one- or two-pipe way, from the side or from the bottom.

Plumbing

Here, the highway is connected to a centralized system in order to supply the necessary plumbing fixtures - a toilet bowl, sinks, a boiler, etc. There are two ways to perform wiring.
Method number 1.
Open option. Horizontal pipes are installed slightly above the floor level, and vertical pipes are installed exclusively at the corners. All this makes the pipeline less noticeable.
Method number 2.
Closed option. It is extremely difficult to perform, since it involves preliminary carrying out the most accurate calculations. Pipes (necessarily solid) are immured into the walls, and each joint should have free access.

In addition, plumbing can be:
- sequential type (the most budgetary and easiest option to implement);
- collector type (a collector is used when supplying water);
- with through sockets (little popular).
Stages of work welding process
Having measured the required length of the pipe, make a mark on it with a marker. With a pipe cutter or scissors, cut the product at an angle of 90º to the axis. The tool must be sharp enough so that the pipe does not deform.

The pipe is cut at an angle of 90º to the axis
The edge of the reinforced product must be cleaned, getting rid of the top layer and foil. Without this stage, the aluminum foil, which is part of the pipes, will come into contact with the liquid during operation. As a result, corrosion of the reinforced layer will lead to a violation of the integrity of the seam. Such a connection will leak over time.

The edge of reinforced pipes is cleaned
For non-reinforced products at the end of the pipe, the depth of welding is indicated, focusing on the length of the fitting sleeve. Another important point in preparing pipes for welding is degreasing the surface. Treatment of the junction with alcohol will provide more reliable contact of the parts.
Preparing the Welding Machine
Before welding plastic pipes, it is necessary to prepare the welding machine. The handheld device is fixed on a flat surface. Machine parts must be clean and free of defects. Clean them with a cloth soaked in alcohol. The heating elements are put on when the tool is off. A mandrel is used to fuse a fitting, a sleeve is used to fuse a pipe.

The heating time of parts for welding is determined according to the table
Then the device is connected to the network. At the same time, the indicators located on the unit body should light up. One of them signals that the device is connected to the network. The second, after reaching the required heating temperature, should go out. After the indicator goes out, it is desirable that five minutes pass and only then begin the welding process. This time depends on the ambient temperature and lasts from 10 minutes to half an hour.
What is the welding process?
After heating the apparatus, put the fitting on the mandrel, and insert the pipe into the sleeve. This is done at the same time and with little effort.

After heating the device, put the fitting on the mandrel, and insert the pipe into the sleeve
In order to know how to properly weld polypropylene pipes, it is necessary to take into account the heating time. The correct period will allow the parts to warm up to the required temperature and not melt. It depends on the diameter of the pipe.
After the required period of time, the parts are removed from the apparatus and connected. In this case, the pipe must enter the fitting strictly up to the mark. During this process, it is forbidden to rotate the parts along the axis.

In the process of connecting parts, it is prohibited to rotate products along the axis
After joining the parts, mechanical impact on the seam is not allowed until it has completely cooled down. Subject to technology, the result should be a strong and tight seam.
The article gives the necessary recommendations on how to properly weld pipes, with a detailed description of each stage. By putting these tips into practice, you can independently conduct a pipeline for water supply or heating. The main thing is to choose the right pipes and follow the process technology. Only then the polypropylene pipeline will serve for a long time and uninterruptedly.
Cast iron has not been used in modern water supply and heating systems for a long time. It was replaced by light, easy-to-install and non-corrosive plastic. Today we will talk about welding polypropylene pipes with our own hands for beginners - the main stages of this process and its intricacies.
Why polypropylene is better for welding than metal
A variety of elbows and fittings, as well as profile and round bends made of polypropylene, are deservedly popular because:
- After properly welded, they form monolithic parts that can last more than fifty years.
In this article, we will describe how to weld polypropylene pipes and what set of tools you will need to acquire for this.
The connection of PP pipes is carried out by diffusion welding, which involves softening the ends of the pipes under the influence of a specific temperature. Heating is achieved through the action of electricity. First, the parts of the welding machine themselves are heated to the required temperature, then the elements for joining are put on them for a while, and after melting, these parts are connected to each other.
It should be noted that the welded pipes should not differ in their properties.
It is not difficult to weld propylene pipes as best as possible, the main thing is to perform the following steps:
- Preheat welding fixture, pipe and fitting to 260 ºC.
Remember that 260 ºC is the melting point of PP fittings and pipes.
- Push the fitting onto the pipe clearly along one axis.
- Wait a few seconds, after which the connection is considered welded, thus forming a single element.

The resulting finished joint is seamless, as when welded, the structures of the two elements are combined to form a single piece. Thus, it is easy to weld a pipe from polypropylene in the best possible way, having received a high-quality connection.
Tools for welding PP pipes
Before welding polypropylene pipes, for example, for a water supply system, you need to acquire a standard list of tools.
The set should consist of:
- directly, soldering iron;
- roulettes;
- scissors;
- mounting bolts for fixing nozzles to the soldering iron;
- building level;
- hole control template;
- hexagon.
The welding unit can have a power of up to 1.5 kW, while it is powered by a 220 volt network. Its light weight makes it easy to carry from place to place, and thanks to the ergonomic handle, it is easy to operate the soldering iron in many positions.

Immediately after turning on the soldering iron, the red LED lights up, which goes out immediately after reaching the required temperature. This is a signal that you can start using the tool.
Variety of nozzles
The parts that directly heat the surfaces of pipes and fittings through contact are nozzles. The standard set, as a rule, contains nozzles, the sections of which vary from 16 to 40 mm.
Non-standard, large nozzles can always be purchased additionally in the appropriate stores.
The Teflon coating prevents the molten plastic from sticking to the welding machine. At the same time, the surface of such nozzles has a positive effect on plastic, providing a high-quality connection. However, do not forget that you should always keep the Teflon coating of the tips clean.

The nozzle consists of two elements:
- element with a hole - for insertion into the PP pipe;
- an element in the form of a protruding cylinder - for putting on a fitting.
The fitting and the pipe are put on with little effort, after which they are heated to 260 ºC, while the inner surface of the fitting warms up, and the outer surface of the pipe. Fixing of nozzles is carried out by the bolts which are going in a set.
It is worth noting that during the use of the soldering iron, the bolts can loosen, so they need to be tightened from time to time.
To tighten the bolts, a special screwdriver or hexagon is provided in the kit. It is worth installing the nozzles only before the start of heating the apparatus, and their replacement should be carried out under heating only in special cases.
Cutting pipes before welding
Before welding polypropylene pipes, they must be cut into the desired lengths. If the pipe section does not exceed 32 mm, scissors will be required, in which the blades are made of stainless steel. As a rule, they are accompanied by a one-year warranty, if only they were used for their intended purpose.

It is worth noting that on the market you can find scissors that allow you to cut pipes with sections up to 63 mm, and pipes whose diameter exceeds this threshold can always be cut with a hacksaw.
PP pipe welding sequence
To better understand how to properly weld polypropylene pipes, you should take a closer look at the sequence of preparing the soldering iron for work.
The steps will be:
- Connect the device to the network - the power indicator and the indicator of the temperature controller will light up.
- While the thermostat indicator is on, it can be judged that the heating process is in progress, this process usually lasts 10-12 minutes.
- The first heating uses more electricity - the nozzles will reach a temperature of 300-320 ℃. If you immediately start using it, the plastic is not deformed as it should. See also: "".

In this regard, you should wait until the heating indicator lights up and goes out again. Only after that you can proceed to welding PP pipes with your own hands.
Welding is carried out in the following sequence:
- The tube is placed in an appropriate nozzle.
- The fitting is put on a cylindrical protrusion from the opposite side. In both cases, gentle pressure will be required.
- With both hands, these two elements hold in this position for as long as the technology requires (more: ""). .

The duration of heating, the subsequent time for connecting the structures, and cooling, is determined by the cross section of the polypropylene pipe and the depth of welding. Approximate values can always be found in the relevant reference tables.

In the process of welding pipes made of polypropylene, the following nuances should be borne in mind:
- The finished connection will acquire maximum reliability only if the recommendations for the duration of heating are strictly followed.
- Prolonged uncontrolled heating can cause melting of polypropylene and damage to the elements to be welded.
- Heating, the duration of which will not correspond to the table, and will be less, will cause insufficient melting of the elements. As a result, leaky connections and leaks some time after the start of operation of the system. See also: "".

In the process of welding PP pipes, it is impossible:
- move parts in different directions, except for the axis of putting on and taking off elements;
- immediately after joining the parts, try to improve their placement - this will reduce the through diameter in the connecting place;
- try to change the shape of the pipe (bend) when the connection is cooling down.
Above, we have provided information on how to properly weld polypropylene pipes with your own hands. From what we read, we can conclude that there is nothing difficult in this process. The basic rule is to prepare the required tool and weld according to the developed technology and instructions, clearly following the warm-up time of the apparatus, elements and subsequent docking.
One of the best ways to replace old pipeline elements or lay a new one is to do the installation of polypropylene pipes with your own hands. The work will not take much time if the house has the pipes themselves, the necessary set of fittings and a welding machine for polypropylene pipes. Literally in half an hour it will be possible to use the new system.
This welding technology is called socket (sleeve). Pipes are connected not butt-to-butt, like metal ones, but through additional adapters - fittings with which the edges are soldered at a temperature of 260 degrees. There are also adapter fittings from welded to threaded connection.
Apparatus for welding  Varieties of fittings for polypropylene
For full-fledged work, the following list of tools is required.
- Welding equipment (machine for welding polypropylene pipes, special iron, soldering iron)
- A set of nozzles for a soldering iron (the most popular models are 20 mm)
- Special scissors or ring cutter. With small amounts of work, you can get by with a regular saw / knife
- Shaver for stripping the contour (needed when removing the reinforced coating, if any)
- Chamfer. It is used in case of poor quality of the contour (rags), so that the plastic does not bulge. But when using special scissors, this will not happen. If necessary, you can make a sharpener with your own hands by soldering a knife blade into the fitting at 45 °
Homemade welding machine for polypropylene
The price of soldering irons for polypropylene pipes starts from 1000 rubles. If the amount of work is not so large and there is a desire to save money, then you can make a soldering iron with your own hands.
For this you will need:
- old iron - 0 rubles;
- double-sided nozzle for the desired size - 250 rubles;
- computer thermal paste - 140 rubles;
- drill, drill for metal and a bolt with a washer of the appropriate diameter.


- Screw the nozzle to the soleplate of the iron, lubricating its ends with thermal paste for good heat transfer.
- Decide in advance how it will be more convenient to work, and fix the nozzle with the larger side up or vice versa. It is important to do this first, because when the iron is hot, it will be difficult to change it.
- Saw off the sharp tip of the iron for easy work against the wall.
- Before using, preheat the iron for a few minutes and wait for it to turn on the heat a second time.
- The nozzle temperature should be 260°-270°C. If there is no temperature sensor, you can approximately measure it using lead and tin. Tin (for solder) should melt well, its melting point is 231°C, and lead will only begin to melt at 327°C.
Video lesson
The video instruction will show how polypropylene pipes are welded.
Installation instructions

- Before starting work, it is important to determine the location of the pipes. It is advisable to make a plan on paper in order to reduce the number of welding "on weight". It will be much more convenient to assemble the main elements on the table, and then fix them into the system in several steps.
- To connect polypropylene pipes, the edges of the elements are heated. The inner wall is heated in the coupling, and the pipes from the outside. To do this, they are almost completely put on the nozzle of the soldering iron, and held for several seconds.

- After that, immediately connect the elements in the right direction. You will have a couple of seconds to center them if necessary, usually done by eye. In this case, you can not twist them inside in relation to each other. The welding time depends on the thickness of the plastic and the width of the seam.

- The heated polypropylene will mix at the junction, and will weld securely if it is heated to the right temperature. It is also impossible to keep it on the soldering iron for too long, the plastic may leak, the inner diameter of the channel will decrease, the tightness of the connection will be broken.
Before soldering polypropylene pipes, be sure to open the tap on the coupling, otherwise the air will push it out of the soldering iron nozzle.
- With the correct connection, a part of the plastic should come out evenly, forming a slight influx on the coupling. If problems arise during dressing and the plastic bends strongly, you need to chamfer the edge.
According to the German norm DVS-2207-1, stripping for polypropylene pipes should have an angle of 15°, and a recess of 2-3 mm. In Russia, a 45° chamfer bevel and a 1/3 thickness deepening are considered the standard. In fact, any bevel within these limits will do. The main thing is that it should be uniform.
 Manual pipe cutter
 - The welding machine for soldering must stand on a stand (special clamp). It is necessary to set the temperature on the regulator to 260°C, but for the speed of work, you can increase it to 280°C. Other temperatures will lead to an unreliable connection, so when buying a device, it is not necessary to choose a model with a thermostat.
- The elements will be difficult to put on the heating nozzle, because they have a larger radius. When dressing, you can slightly rotate them along the axis to make it easier to put on the nozzle. However, it is impossible to insert pipes all the way so that their ends do not melt inward. At first, to avoid this, it is worth making marks with a pencil, but then it will not be difficult to feel the desired depth.

- When all the elements are assembled, you can start welding "on weight". Usually these are transitions between walls, connection with batteries, water supply inlets.
Ordinary plastic pipes are only suitable for cold water, they are not designed to work under pressure. When installing pipelines and heating, it is necessary to use only reinforced polypropylene pipes. To weld them, you will need to remove part of the reinforcement with a special shaver.
 Shaver for stripping edges from reinforcement
 - If the pipes fit the boiler, there should be no plastic nearby. In order to “keep it out”, the pipes are fed using an adapter from a welded joint to a threaded one, through a metal pipe more than 0.5 m long.
- Remember to install a shut-off valve in front of the new pipe section, this will help when repairing or installing a new point.
- Starting a new segment will show if the soldering process went right. After opening the shut-off valve and letting water into the system, check all connections for leaks.
Joining metal with polypropylene

During repairs, situations often occur when a new section of polypropylene needs to be connected to old metal pipes. This connection is made using special fittings. If the fitting is soldered to polypropylene with a soldering iron, then when connecting to a metal pipe, you can go in two ways. You can weld the pipe to the fitting using a welding machine, or you can cut the thread on the pipe and screw the fitting. It is easier to weld, but a welding machine is needed, so the pipe is usually threaded. Before the joint operation, the iron section is cleaned and lubricated with grease.
The use of polypropylene pipes allows you to hide them inside the wall, unlike screw metal ones. First of all, it is important to make sure that the connections are tight.
Now you know how to solder polypropylene pipes correctly, and you can easily do it yourself. First, practice on small scraps, and you will quickly be able to update the plumbing for the house.
From the side it seems that there is nothing particularly difficult in welding polypropylene pipes: heat, connect, cool - it's ready. However, in practice it turns out that in this case there are a lot of important points that affect the quality of the connection of pipes and fittings. Neglecting these nuances leads to various flaws that cause clogging, leaking pipes and other problems. Some of the errors are discovered only a few months after the start of operation of the pipeline, when the unfortunate masters are already gone.
A little about the soldering process
For welding pipes and fittings made of polypropylene, the thermal polyfusion method is most often used. Its essence is to heat the parts to be welded to a certain temperature and quickly connect them. To heat the parts, a special device is used, popularly referred to as a "soldering iron". The process of soldering plastic pipes is clearly presented in the video:
Some manufacturers of heaters for soldering plastic pipes install two heating elements on one device at once. (This is typical for inexpensive models of Chinese and Turkish production). A separate switch is provided for each of them, and the power of each such element is enough to heat pipes and fittings of a specific diameter. Do not use two heating elements at the same time, so as not to overheat the plastic, overload the network and not consume excess electricity. The second heater should be used as a spare, necessary in the event of a breakdown of the first.
If the welding device is equipped with two heating circuits, they can be turned on simultaneously at the start of work in order to heat up the tool faster. Then one of the circuits should be turned off.
The use of a device for welding pipes made of polypropylene does not require special skills. However, novice installers should practice a little before starting work.
The heated pipe material retains plasticity for some (very short) time. In these seconds, you need to connect the elements and fix the connection, while eliminating distortions. Only at the end of the “fixation” phase, when the material has lost its elasticity, can the connected pipes be placed on the table.
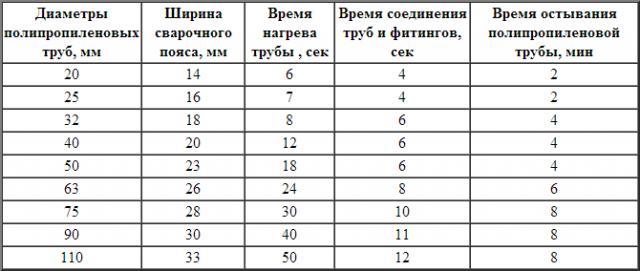
The optimum temperature for heating polypropylene pipes is considered to be a temperature of 260 degrees. During the heating process, it is necessary to heat the pipe material strongly enough to ensure a reliable connection. In this case, the pipe must not be overheated so that it does not lose its shape. To do this, you should monitor the heating time. Depending on the diameter of the pipes, it can be:
- 8-9 seconds for pipes with a diameter of 20 mm;
- 9-10 seconds for pipes with a diameter of 25 mm;
- 10-12 seconds for pipes with a diameter of 32 mm, etc.
If the pipe is not heated to the required temperature, the connection will be too weak, and over time, a leak will form there. Overheating of the pipe can lead to sagging and a decrease in its permeability.

The table shows the estimated welding time for polypropylene pipes depending on their diameter. You should not violate these deadlines so as not to spoil the work
There are models of devices for with or without a temperature control knob. The ability to vary the temperature was dictated more by the manufacturer's marketing considerations than by practical necessity. Professionals recommend setting the temperature correctly (260 degrees) and not changing it in the future, focusing on the heating time. Therefore, the old models of "soldering irons", in which there is no heating temperature controller, are quite suitable for high-quality welding of polypropylene pipes.
The pipes are warmed up and connected, now it is important to cool them properly. It takes the same amount of time to complete the “fixation” phase as it does to heat up. Inexperienced masters are in a hurry, stop the process before these few seconds, which causes deformation of the connection. Do not think that a stopwatch is indispensable for working with polypropylene pipes. Experienced craftsmen calculate the heating-cooling time automatically, without any devices.
The range of errors made when welding polypropylene pipes is quite extensive. Most often it is:
- Contamination at the junction of elements
- A small amount of water that has come into contact with the material during the welding process
- Long-term positioning of pipe parts
- Use of unsuitable or poor quality material
- Failure to comply with installation rules, etc.
It is not difficult to avoid these mistakes if accuracy, caution and a high professional level of performers are observed during welding.

The figure schematically shows the appearance of correct and incorrect butt welding of polypropylene pipes. To avoid such errors, it is necessary to follow the installation technology
You may also find the material on choosing a soldering iron for polypropylene pipes useful:.
Mistake # 1 - dirt and water on the connected elements
A professional installer must wipe all parts to be welded before starting work to remove possible contamination. You should also pay attention to the condition of the floor in the room where the welding is performed, since the pipes are laid on the floor, and dirt again gets on them. When dismantling a faulty pipe, it is not uncommon to find a clear line of dirt along the entire length of the connection.
The rest of the water in the pipe can be fatal for the connection. A few drops in the process of heating turn into steam, the material is deformed and loses strength. To remove water from the pipe, it is enough to fill it with salt or push crumpled bread crumb inside. At the end of the work, the pipe, of course, should be thoroughly rinsed. A connection with such flaws can remain stable even when pressure tested, but after some time (sometimes it can take a whole year), a leak will definitely appear. A similar error occurs when welding stabilized pipes if the foil from the intermediate layer is carelessly removed. Even a small piece of foil at the junction will significantly degrade the quality of the installation.
Not only pipes should be clean, but also a soldering iron. The master should promptly remove particles of molten polypropylene from all elements of his tool, otherwise they will fall on the next pipe.
Mistake #2 - wrong positioning
After the two heated parts of the pipe are connected, the master has only a few seconds to put them correctly relative to each other. The shorter this period, the better. If the time limit is exceeded, the deformation becomes irreversible and the strength of the joint is reduced.
Inexperienced craftsmen sometimes try to immediately remove the splashes that appeared during the welding process. You should not do this, since the uncooled connection at this moment can be easily deformed. Remove slugs after the joint has cooled. And it’s even better not to overheat the pipe, then the splashes simply will not appear.
Mistake #3 - wrong material
If inexpensive low-quality polypropylene pipes are chosen for installation, even the most skillful installation will not protect the owners of the house from breakage. It is best to purchase pipes and fittings from the same reliable supplier, choose a good company, etc. The miser pays twice.
Another problem of this kind is an attempt to connect two high-quality pipes from different manufacturers. The chemical composition of such elements may vary, therefore, such pipes will behave differently when heated. Under such conditions, it is almost impossible to achieve a reliable connection.

Visual result of incorrect soldering of polypropylene pipes in the section. The use of low-quality material and non-observance of the time of the “fixation” phase led to deformation of the connection
Mistake #4 - neglecting the installation rules
The poor quality of welding of polypropylene pipes is caused by various errors during the connection of the fitting and pipe. For example, if the pipe is not completely inserted into the fitting, a gap will form between its edge and the inner stop of the fitting. The result is a place where the inner diameter is larger and the wall thickness is smaller than planned. The design operating pressure for this section will not be high enough, normal loads may be excessive here, resulting in a leak.
It is also unacceptable to use excessive force when inserting the heated end of the pipe into the fitting. In this case, a significant slum can form inside. As a result, the permeability of the pipeline will be lower than the calculated values, which will adversely affect the operation of the pipeline.
Metal is being replaced everywhere. There are many reasons for this: they are more durable, easy to install and operate, and do not require anti-corrosion treatment. For the installation of heating and hot water systems, the most suitable are polypropylene pipes mounted by welding.
By design, polypropylene pipes can be ordinary and reinforced with aluminum foil. Aluminum significantly increases the reliability of the system and reduces the coefficient of thermal expansion of the material. Depending on the conditions in which polypropylene pipes are welded, the instructions for performing the work may differ in some details, but its main essence remains unchanged.
Equipment and tools for welding polypropylene pipes
The installation of polypropylene pipes for welding ensures maximum reliability and tightness of the joints, subject to the quality of the work and compliance with the technological regulations.
Since the parts of the pipeline connected by welding cannot be digested again, due attention should be paid to the accuracy of the work, using special equipment and tools to perform them.
The set of tools used for welding polypropylene pipes is as follows:
- a soldering iron, also called a welding machine;
- a set of nozzles of various sizes for welding (each nozzle consists of a mandrel for heating a fitting and a sleeve for heating a pipe section);
- special scissors for cutting pipes into sections of the desired size;
- trimmer for processing the edges of pipes before welding (used to remove aluminum foil from the ends);
In addition to this equipment for welding, you must have a tape measure, caliper and alcohol marker on hand. The presence of a complete list of tools will allow you to avoid unnecessary fuss when it becomes necessary to determine the dimensions in place and perform the work as efficiently as possible.

The main element of the equipment is an apparatus for welding polypropylene pipes (or a soldering iron) with a set of nozzles. The device is a heating device similar in principle to a conventional iron. To automatically maintain the set temperature parameters, the soldering iron is equipped with a thermostat.
The heating surface of the soldering iron has holes for attaching nozzles of various diameters (standard sizes of nozzles included in the welding kit: 20, 25, 32, 40 mm). For the convenience of working with pipes of various diameters in most machines for welding polypropylene pipes, it is possible to connect several types of nozzles at once.

Welding work
Welding pipes is not particularly difficult and does not require the contractor to have special education. In order to ensure the strength and reliable sealing of the welding joint, it is enough to follow a strict sequence of actions according to the regulations.
Preparatory work
The preparatory work performed before the start of welding of parts includes the following actions:
- development of a pipeline scheme;
- determination of places for attaching pipes and fittings to walls;
- punching holes in the walls if necessary;
- marking and cutting of pipe sections according to the scheme and full-scale measurements;
- before the final welding of the pipeline, all its elements must be laid out on a table or floor in an order that repeats the connection scheme in order to avoid assembling the structure in the wrong sequence and damaging the material;
- if aluminum foil is present in pipe structures, it is necessary to clean it at the ends of the parts to be welded using a trimmer to prevent contact of the reinforcing element with water;
- at the ends of the pipe elements to be welded, using a marker, it is necessary to mark the depth of entry into the fitting. Preliminary measurements of the depth of fittings are carried out with a caliper. The marking allows you to clearly control the immersion of the pipe section into the nozzle sleeve when the parts are heated with a soldering iron.
In addition to the measures listed above, prior to welding, it is recommended to degrease the parts to be joined. Degreasing is done with a cotton swab moistened with alcohol. Processing of the inner surfaces of the fitting and the outer ends of the pipe will provide better welding of the pipeline elements.

Warming up the soldering iron to operating temperature
Depending on the type and diameter of polypropylene pipes, the operating temperature of the nozzle will differ. Welding of polypropylene pipes with aluminum reinforcement is carried out at a nozzle surface temperature of 260-300 degrees.
In order for the soldering iron for welding polypropylene pipes to reach the operating temperature, it is necessary to set the thermostat to the appropriate position and turn it on.
The readiness of the device for operation will be indicated by the switching of the signal illumination. Depending on the type of soldering iron, the signaling methods may differ, therefore, before starting work, you must carefully read the operating instructions for the device.
Heating of pipeline elements
To perform the connection of pipeline parts according to the designed scheme, it is necessary to thoroughly heat them up using nozzles of the appropriate diameter. Both pipe and fitting are heated at the same time. Fitting elements are mounted on the mandrel of the nozzle, and the pipe is inserted into the sleeve.
The entry of pipeline elements into the sleeve of the welding apparatus occurs under the influence of a small physical effort. The depth of entry of the pipe into the sleeve must correspond to the previously made measurements of the corresponding fitting. The heating time of the parts to be welded depends on their diameter and usually ranges from 8 to 16 seconds.

Connection of pipeline elements
The connection of parts of polypropylene pipes and fittings should be made as quickly as possible in order to avoid temperature losses of the heated material. Docking of elements is carried out in one smooth translational movement. Rotation of the fitting and pipes during their connection is not allowed.
The connected structure of the pipeline section must be securely fixed until the polymer material gains strength. Depending on the diameter of the pipeline, the setting time can be from 10 to 20 seconds. In some cases, it is required to keep the welded parts in a fixed state until they cool down.
After welding and cooling of the material, the joints can be cleaned from. Processing is carried out in order to give the welded structure a neat and aesthetic appearance. Sometimes excessive polymer material build-up can prevent the pipeline sections from being securely seated in the mounting clips.
It clearly explains how polypropylene pipes are welded in the video below:


