Territory uplift. How to raise a plot: do-it-yourself tools and technology
The content of the article:
Raising the level of the land is the dumping of soil in order to eliminate the problems associated with the unsuccessful location of the allotment. Sometimes they are located in lowlands, in wetlands or in places full of construction debris. In this case, the arrangement begins with measures to raise and level the terrain. We will talk about how to do the job correctly in this article.
Reasons for raising the level of the site
In many cases, the need to raise the soil is not always visible the first time. To make a decision, you need to study the following points:
- The proximity of groundwater to the surface and the danger of waterlogging or erosion of the fertile layer.
- The presence of hills and deep depressions that complicate operation. For example, lamps in the lower part of the territory do not reach the top, and plants on a hill are likely to die from periodic slipping of the soil.
- The site is located on a steep slope.
- Hilly terrain above sea level. It is most often found in the mountains. To solve the problem, it is necessary to fill up large depressions.
- Land allotment below sea level. Differs in swampiness, the presence of solonchaks. The soil is raised to prevent water from reaching the foundation and to preserve the yield of the garden and vegetable garden. But it is necessary to weigh all the pros and cons well, because wetlands often have a thick layer of silt and are rich in elements useful for plants.
- Land below ground level. Such allotments are necessarily finalized in order to avoid flooding from high adjacent areas. After the rains, the area will be constantly in the water. Another nuisance is the access to the surface of groundwater.
- Surface. The soil is poured onto the prepared site, leveled and compacted.
- With excavation. Part of the soil is removed, and the vacated place is filled with the brought material. A fertile ball, removed at the beginning of work or brought in, is poured on top of the allotment.
Land level raising technology
The work on arranging the allotment is usually done first, even before the construction of the house begins. If such a decision is made after many years of operation, the task becomes more complicated, because you have to take into account the location of already built buildings, paths, green spaces, etc. Consider the simplest case of raising a section, when nothing interferes with the process.
The choice of soil for backfilling

The technology for performing work depends on several factors, the main of which is the height of the site and its purpose.
Rules for choosing soil for backfilling:
- If the additional layer is less than 30 cm, the best option is to use fertile soil taken from neighboring hills. It is poured in the right place and rammed with a vibrating plate.
- If necessary, pour more than 30 cm of earth to create intermediate layers of sand and gravel. They are laid in layers, between which fertilizers are poured. From above, the stones are covered with a fertile layer.
- The base for outbuildings or paths is created from sandy loam or clay. If the intermediate ball is very high, the use of construction waste is allowed. In this case, it must be remembered that large waste will sag, and not always evenly.
- In the presence of parking lots or roads, use crushed stone that can withstand heavy loads. If trucks are not expected, fill in cheaper excavated soil.
- Under capital buildings, create a sand cushion, no gravel.
- Based on the experience of construction work, it is recommended to carry out the first ball of backfilling with the same soil that is on the site. In this way, a strong bond is created between the new and untouched land. If you pour building material waste on soft soil, they will simply fail, and the sand will be washed away with water.
- To prevent one material from absorbing another, geotextiles are used. But this coverage is not cheap and will require large financial investments.
- When rising to a height of up to 1 m, it is uneconomical to use only expensive fertile land. You can first fill up construction waste - broken bricks, pieces of concrete, which will ensure the removal of excess water. Waste can be obtained free of charge if there is a large construction nearby. Very often, builders don't know how to get rid of the rubbish and quickly agree to bring in a few trucks of junk.
- Pour the soil to a level that is slightly higher than the cords stretched at the beginning of work. This is due to the shrinkage of the soil, which will appear after the first rain. Also, the amount of drawdown is affected by the density of the layers, their thickness and other factors.
Preliminary work

If you cannot decide how to raise the level of the land, analyze it - study the relief, soil composition, the presence of groundwater, the distance to the nearest reservoir.
Surveyors will conduct the most qualitative research, but the main characteristics can be determined independently:
- Often, to make a decision, it is enough to drill a well and inspect a section of the soil.
- If possible, watch the construction work going on nearby. The presence of water in technical recesses will allow you to determine at what depth it is located and in which direction it flows. Also, observation will allow you to determine the type of soil without excavating on your own territory.
- It is recommended that you create a map of the site showing heights and depressions. It can be used to determine how much soil is needed for backfilling, where to add it and to what height.
The foundation is built like this:
- Dig a trench at least 20 cm deep along the edges of the territory.
- Perform the installation of wooden formwork. It is made from boards 30-40 cm thick, which are fixed with stakes every 0.5-1 m. The height of the fence should ensure that the foundation protrudes above the neighboring site (height difference is at the discretion of the owner).
- Fill the formwork with a cement-sand mortar, for the preparation of which the components are taken in the following proportion: cement - 1 part, sand - 3 parts, gravel 0.5 parts. Within a week, the solution will acquire up to 70% strength if the ambient temperature is 15-20 degrees.
Soil pouring

For a rough calculation of the amount of land needed for backfilling, you can use our recommendations: to raise one hundred square meters by 1 m, you will need 100 m 3 of soil (loam with sandy loam). On smaller areas, the consumption is different: to raise a platform of 10 m by 2 10 cm, 1 m 3 of soil will be needed. When determining the height of the backfill, it must be taken into account that over time the earth will settle by 30-60%.
To create a new parcel level, do the following:
- Remove topsoil and move outside area to be leveled. Save it, and in the future you will not have to spend money on buying new fertile land. If there is no useful soil or is covered with debris, it is better not to remove it, but to fill it with an intermediate layer.
- When finalizing a part of the territory, place pegs along its perimeter and across this zone with a step of 2 m, exposing their surfaces to a horizontal plane. Stretch a cord between them, along which you can adjust the surface. Further work depends on the thickness of the poured soil.
- If the calculated height does not exceed 30 cm, lay the earth in layers of 5-10 cm, compact with a vibrating plate and fill with water. A day after watering, pour the next ball and repeat the procedure. The top layer should remain fertile soil, removed before starting work, or brought.
- Tilt the surface at a slight angle (no more than 3 degrees) so that water does not linger.
In this case, the work is performed in the following sequence:
- Bulldozer the top ball and move it off site.
- Cut off the protrusions with a knife and fill in the depressions to the specified marks.
- The advantage of using a bulldozer is that it performs its task on any difficult surface, on hills, in the beds of dried up streams, etc.
- Plow the area twice - in the longitudinal and transverse directions.
- Cultivate the area with a cultivator, also in the forward and transverse directions.
- Seal the top layer with a barrel of water.
- At the final stage, sow the allotment with grass and cover it with a thin layer of fertile soil.
- Then seal again.
Lawns are very common in summer cottages, and at first glance it is very easy to create them. In fact, creating a beautiful grassy area is not such an easy task. Before raising the level of the ground on a lawn area, examine the condition of the allotment to determine the possibility of raising it.
With constant flooding, you should make sure that there is no clay under the fertile layer. It will not allow water to escape, even if the groundwater is deep. If a clay layer is found, it must be removed, and covered with sand and black earth from above. If the clay layer is very thick and cannot be removed, create a good drainage system.
If a road passes above the lawn area, it is better to raise the level with sandy soil. To prevent it from being washed away, dig concrete slabs along the perimeter of the lawn to a depth of at least 20 cm, while they should protrude 3-4 cm above the soil.
First, dig a hole 30-40 cm deep, then pour sand in a layer of 10-12 cm. It should be strongly compacted with a vibrating plate. Loose mass contributes to the rapid removal of excess moisture. Pour the previously excavated soil on top, as a result of which the level will rise by at least 5-6 cm. To plant grass, fill the area with special fertile soil into which the seeds are poured.
The total thickness of the layer under the lawn can reach 20 cm. Under the garden beds, the layer must be at least 30 cm.
Drainage for a swampy area

Raising the level of the site in a marshy area may not lead to the desired result. To get rid of excess moisture, you need an effective water drainage system. In our case, it is carried out in the form of trenches, through which moisture is removed outside the allotment.
Distinguish between open and closed drainage. An open system is the simplest option for draining a site. These are ditches up to 0.7 m deep and about 0.6 m wide with a slope in one direction. A layer of crushed stone and sand 10-15 cm thick is poured at the bottom. Water seeps through the walls of the trench and independently flows out in the right direction.
A closed system is more complex to implement. It will require factory-made drainage pipes. The trenches are made with a slope of 7 cm for a length of 1 m. It is recommended to direct the water towards the lowest place or into the pool.
Near buildings, ditches are dug along the perimeter of buildings. In garden plots, they can be placed often, especially if clay soils are present. The depth depends on the composition of the soil. For clays and loams, ditches are dug up to 1 m. In any case, they should be located below the freezing level of the soil characteristic of the area. It is better to dig ditches in the form of a "Christmas tree" - one central trench and several additional ones that connect to it. On the main highway, water is discharged outside the site.
A pillow of rubble and sand is poured at the bottom of the ditch. After installing the pipeline, cover it with geotextile to protect it from dirt getting inside. From above, everything is covered with sand, gravel and fertile soil. Highways are usually decorated to give an aesthetic appearance.
How to raise the level of the site - look at the video:
Frustration from an unsuccessfully located site quickly passes if the solution to the problem is approached correctly. To obtain a beautiful and comfortable recreation area, it is necessary to study the features of the technology for raising the level of the site and make considerable physical efforts to implement the plan.

Now, when suburban construction is developing intensively, the acquisition of land for the construction of a dacha or a cottage is becoming especially relevant. However, it often turns out that with an insufficiently thorough study of the terrain, the owner turns out to have a plot on two levels, which leads to problems both in the construction of structures on it and in the arrangement of the territory. To imagine how to deal with this, consider the most common ways to solve the problem.
Types of land
Land plots differ greatly in their relief and geological features. Among them are:
- Land plots above sea level. Their feature is the location in the mountains or on a hill. This usually results in more precipitation falling in such an area and a lower average annual temperature. The soils here are predominantly podzolic, clay or sandy, but sometimes there are carbonate or podzolic chernozems. The relief of a land plot located above sea level can be both flat and hilly. In the latter case, one cannot do without raising the level, that is, without eliminating the most noticeable depressions.

- Land plots below sea level. They are often characterized by significant bogging of soils, sometimes by the formation of solonchaks, but fertile silty soils are also not uncommon. Therefore, you should not immediately refuse such an acquisition, but it is advisable to definitely raise the level of the site in order to avoid flooding the foundation of buildings in the future and create optimal conditions for growing garden and vegetable crops.

- Land plots below ground level. Here, raising the level on the site is mandatory, since its territory turns out to be, as it were, in a lowland and water will flow onto it from neighboring sections, a nearby highway, etc., leading to soil leaching and a decrease in the life of structures. The high level of groundwater typical for such territories can have a particularly detrimental effect.
- Land plots above ground level. At first glance, they are practically devoid of flaws, but the uneven terrain creates additional difficulties in the cultivation of the garden, caring for the garden, and simply in moving around the territory, where it is very easy to stumble. However, raising the level of the site, which is necessary here to smooth out irregularities, allows you to quickly solve this problem.
Why raise land
If, at first glance, the difference in levels on the site is not too pronounced, many have a desire to save money and start ennobling the territory without the hassle of raising the level of zones located in the lowlands compared to the rest. But there are several cases when experts recommend strongly thinking about this operation:
- Groundwater flows too close to the soil surface, which can cause waterlogging and erosion of the top, most fertile soil layer.
- The site has several pronounced hills and depressions. This makes it difficult not only to build a house, but also to improve the territory adjacent to it: for example, lanterns installed in a lowland will not do a good job of illuminating the site, and flowers or vegetables planted on a hill will not take root well from the gradual slipping of the soil.

- Neighboring plots are located much higher than this plot. And this automatically means that during heavy rains or floods, water will constantly and regularly stand in the area around the house.
Ways to raise the land
In practice, there are not so many ways to raise the level of a land plot, but they all have proven themselves quite well. They differ depending on what height it is necessary to raise the territory of the site:
- If this indicator does not exceed 30 cm, land is usually used (imported or taken from the heights of the site). Additionally, it is compacted with a vibrating plate and laid on top of a previously removed fertile soil layer.

- If the difference in levels between the zones of the local area reaches 30 cm or more, they act differently: they take the so-called "planning" mixtures in which sand is combined with gravel. They are laid in layers, between which it is recommended to place layers of fertilizers, and on top of them - the upper fertile soil layer, without which planting any plants will be impossible.

The situation requires special attention when it is necessary to raise the level of the site on which it is planned to make a lawn. In this case, one of three options is usually resorted to:
- If water regularly stands on the lawn, flooding it, then before raising the level of the site, you should make sure that there is no clay layer inside the soil. Otherwise, this operation will not give anything in terms of drainage, even if the groundwater flows deep. After confirming the presence of clay, it should be completely removed and replaced with a layer of sand, on top of which black soil is laid out. Then the water will go much better.
- If there is a road above the area on which the lawn is located, and this leads to water flowing into the area, it is best to raise its level with porous soil. Usually they are river sand. To prevent such soil from being eroded, it is advisable to enclose the lawn with a concrete fence with a height of 3-4 cm, however, its installation depth in the soil should be at least 20 cm.
- When it is precisely established that the depth of groundwater is really no more than a meter or two, then, in addition to filling the earth or sand layer in the lawn area, it is necessary to take care of additional installation of the drainage system.
Preparatory work for raising the land
In order for the improvement of the personal plot to be effective, before raising the level of the plot, it is necessary to perform a number of preparatory work. For this:
- They carefully study the relief of the territory, determine the type of soil and the depth of the flow of groundwater, as well as the proximity of water bodies.
- It will always be useful to observe neighboring areas where they can dig foundation pits for laying the foundation of a house, pits for fence posts, or lay a drainage system from the territory. This will allow you to visually determine the depth at which the water is in the well, find out in which direction the water flows from the site, and where it turns out to be impossible at all and the area partially resembles a swampy one, especially at certain times of the year. Also, such a kind of "spying" on neighbors makes it possible to determine whether the soil is sandy, clay or peat without expensive geological exploration.
- After preliminary orientation on the ground, it is necessary to clean the site: remove old tree roots, debris, stumps, weeds. Further, it is desirable to give the soil time to settle for a week, but on condition that the weather is dry.

- During the settling period, you should begin to create a strip foundation around the entire perimeter of the strip foundation. Its height is chosen so that the foundation rises above the soil level in neighboring areas. To achieve this, the perimeter is surrounded by a trench, the depth of which should be at least 20 cm. Wooden formwork is installed in it. For the manufacture of formwork, a wooden board with a thickness of approximately 30-40 mm is taken, which is fixed with stakes installed at a distance of 50-100 cm from each other. Cement-crushed stone or cement-gravel mortar is poured into the middle of the formwork. The ratio of components in it should be as follows: for one part of cement there are 3 parts of sand and 5 parts of gravel. If the air temperature is 15-20 degrees, the strip foundation will acquire 70% of its safety margin during the week. This will allow you to proceed to the next stage of work.

Land raising technology
When raising the level of the site, we will need:
- Shovels.
- Cord.
- Hose.
- Rake.
- Buckets.
- Sand.
- Rubble.
- Water.
- Gravel.
- Cement.
- Vibrating plate.
- hydrostatic level.
- Yardstick.
- Concrete mixer.
In order for the different levels of the site to turn into a flat surface with a slight slope (about 3 cm per meter of length) to improve soil drainage, the following operations must be performed:
- Carefully remove the fertile soil layer 10-20 cm thick. It is folded in a separate place until the final stage of work.
- If it is planned to level the ground level on a site on a local scale, it is advisable to place small wooden pegs across this zone and along the perimeter of the strip foundation at a distance of approximately 2 meters from each other and pull a cord between them. This will allow you to adjust the level of the soil, removing or adding it between the pegs until it reaches the level of the above cord. In order for the required height of the plot to be uniform, it should be controlled by means of a hydrostatic level.

- Properly distribute the areas where the soil is to be topped up. So, the level of the zone in which the beds or the lawn will be located is usually increased by adding sand. If the place is not intended for growing plants and paths pass through it or utility rooms are located, the level is raised by adding sandy loam or clay. With a very large difference between the levels at a depth, it is permissible to place even construction waste.
Further actions depend on the thickness of the layer that needs to be added to raise the level of the area:
- If the soil level needs to be raised to a height not exceeding 30 cm, we bring the earth to the site and lay it in layers, the thickness of which is 5-10 cm. After laying one layer, it should be compacted with vibrating plates, filled with water and left for a day. Only after that it is allowed to proceed to the next layer. The procedure is repeated until the desired height is reached. At the same time, be sure to take into account the thickness of the previously removed fertile soil layer, which is returned to its place, placed on top of all well-compacted layers.
- If the relief of the site is far from a perfectly flat surface, and the difference between the levels exceeds 30 cm, the algorithm of actions is almost the same, but instead of the earth they take a sand and gravel mixture. It is laid in layers 5 cm thick. At the same time, it is recommended to place a layer of fertilizers in the middle of each of them, usually representing a peat pad. Each layer of the “planning” mixture of sand and gravel must be well compacted and left to settle for a day before filling the next layer.
- At the final stage, the height of the laid layers of earth or sand and gravel mixture should be slightly higher than the required level, since the soil with a kind of filler inside shrinks. Its term depends on the amount of precipitation, the thickness of the laid layers and other factors.
All of the above is valid only for small areas. If the area to be leveled occupies several hectares, special equipment is used as follows:
- First, the fertile soil layer is removed using a special bulldozer. It is equipped with a hinged knife that allows you to cut and move the soil to other places. After the fertile layer is deposited in a safe place, the bulldozer is used to cut off high mounds and fill depressions with this earth. At the same time, the advantage of the bulldozer is that it is able to perform its functions not only on a relatively flat surface, but also in areas with difficult terrain, where there are hills, ravines, beds of dried up streams, etc.

- Then the plot is plowed twice: in the transverse and longitudinal directions, and after that it is treated - also twice - with a cultivator. The next stage is the sealing of the top layer. For this operation, a barrel filled with water is often used.
- The final stage is the sowing of lawn grass seeds, which are sprinkled with earth or sand. Then the surface is rolled with a barrel again.
Very good results are obtained by raising the level of the land, if it is accompanied by the arrangement of a drainage system that prevents flooding of the site. To do this, trenches are dug along the perimeter of the territory, the slope of which should not be less than 3-4 cm per meter.
After the acquisition of building land, it often turns out that the terrain and geology of the area are not quite suitable for long-term use and agricultural activities. We will talk about raising and leveling the ground, from marking to protective landscaping.
When it makes sense to raise the plot
One of the worst geomorphological conditions is considered to be the rise of the GWL above the depth of soil freezing. In such areas, heaving is especially pronounced, which is why there is a need for complex types of foundations, for example, pile-grillage. Shallow foundations do not work in such conditions, and full-fledged deepening requires support on a layer of soil 2.5-3 meters from the surface, above the foundation remains unstable and may be subject to precipitation due to high soil moisture.

This is not to say that geodetic site planning is a cheap method to get rid of soil problems. However, the usefulness of such a solution can be expressed economically in favor of the developer, if the raising of the soil eliminated the problems with waterproofing, insulation and stabilization of the foundation and the resulting costs. This is usually true: planning allows you to solve the problem of poor geomorphology cheaper, and most importantly, faster, ultimately significantly reducing the shrinkage time of the foundation. This solution is especially shown in the construction of a log house or the installation of prefabricated foundations.

But raising the level on the site does not always solve the problem. With a large slope (more than 5-7%), terracing should be performed, and not raising the soil, and this is a completely different technology. On such slopes, even the involvement of special equipment for pouring bored piles costs less blood, and yet this one is one of the most difficult among the foundations. In the area, there may also simply not be a sufficiently dense layer of soil to support a building of the required mass on it. Raising the site in such an environment will not give anything at all; in any case, you will have to make the foundation floating.

Is drainage necessary?
Drainage systems are shown for artificially leveled areas with significant elevation changes, where, as we know, the problem cannot be solved by conventional raising. However, erosion and washout phenomena can be expressed even on small slopes, so minimal backfilling and surface drainage will have to be done.

On both boundaries of the site, located along the slope, it is necessary to dig rain trenches, one of which (lower) receives water from a transverse section arranged along the upper boundary of the site. The bottom of the trenches is covered with rubble, shrubs are planted along the slopes. Periodically, the trenches will have to be cleaned, usually the owner of the site has the one that is higher in level. In depth, the trenches should reach the upper aquiclude and cut it a little - about 20-30 cm. In order to less disturb the terrain, the depth of the trenches can be adjusted with hygroscopic material - the same rubble or construction battle.

If the direction of the slope and the trenches diverge by more than 15º, you should be prepared for increased water flow. The bottom of the upper trench should be paved with bricks, even better - with trays. In such areas, it makes sense to level the ground locally exclusively for buildings. In this case, the plot for the garden is simply protected from erosion by a trench across the slope, along the upper slope of which a willow tree or several birches are planted. It is recommended to fill the bottom of the trench and its upper slope with crushed stone to prevent silting.
There is no point in lining the entire layer of the embankment with black soil, just as there is no point in throwing clay over the fertile layer. The top layer will have to be removed to clean clay, and then returned to its place. If only part of the site is to be leveled, the excess soil is simply discarded onto the adjacent territory. If the site is planned completely, the work is carried out in two stages.

Excavation is carried out in order to eliminate the plastic washable layer between two dense layers, because the probability of the embankment sliding under its own weight is so high. The only exception is when the site is located simply in a lowland without a slope 20-30 cm below the adjacent territory. Here it is reasonable to limit ourselves to increasing the thickness of the fertile layer.

After the tight formation is exposed, a series of geodetic measurements is carried out. Knowing the configuration of the upper aquiclude, it is possible to determine the required volume of soil and start its delivery. At the same time, the volumes of crushed stone for backfilling are calculated and the drainage system is planned.
How to fill up the hill
To create an embankment, hard-plastic clay in a swollen state, loam or sandy loam is used. The ability of the backfill to pass water is determined by geomorphology: if, with an abundance of water, it is impossible to fill a tightly compacted terrace, or the backfill is carried out over a porous layer, the embankment should pass water to a limited extent. Optimally, if the bearing capacity of the clay corresponds to the underlying layer, so do not be too lazy to take samples.

In places where the site plan rises above the adjacent territories by more than 30-40 cm, it is necessary to carry out retaining filling with road gravel of a fraction of 70-90 cm. It is also used in surface drainage. Crushed stone is dumped immediately after excavation of the soil under the formed board. The width of the filling in the lower part must be at least half the height of the crushed stone shaft. On the sides of the site along the slope with crushed stone, you can immediately form the bottom of the drainage trenches.

Supports more than a meter high are covered with geotextile, which is immediately pressed down with a small layer of clay. After that, imported soil is started up and distributed over the site. The easiest laying route is starting from the shaft laid from the vehicle entry point to the opposite point, and then to the dump in both directions.
It is not recommended to pour more than 0.7-0.8 meters of clay embankment at a time. If necessary, raise more should wait for heavy rain or give the embankment time to winter. But with the use of tamping and excavating equipment, more impressive dumps can be quickly poured.
Is tamping or rolling necessary?
It is optimal if imported clay is consistently unloaded completely at the top level of the dump, and then collides with a bucket into unfilled areas. This is how high-quality compaction occurs, in which the final shrinkage takes place in one or two wetting.

Ramming is used when a high speed of work is required, for example, when the optimal time for embankment is limited seasonally or by weather. With alternate tamping, layers of pure clay can be poured 0.6-1.0 one after the other without prior wetting. We note once again that only swollen clay is suitable for tamping, dry clay will not take on water-resistant properties until swelling and subsequent compaction.
Layers of 30-40 cm can be compacted by rolling, but wheeled vehicles are poorly suited for these purposes. A caterpillar excavator is indispensable if the site is raised to a height of more than a meter, in other cases it is more reasonable to resort to manual transportation and leveling, and entrust the compaction to precipitation.

Note that it is often not necessary to manually level the site. Under the influence of the movement of surface water, a fresh embankment will eventually take on a natural slope. With an abundant flow of water, sometimes it is even necessary to slightly raise the embankment in advance in the lower part of the slope.
If you hurry and bring in black soil before the final compaction of the clay, erosion will quickly have its detrimental effect and the site will greatly lose its fertility. Unfortunately, only plowing the soil in spring and autumn saves from such a phenomenon, and even then only partially.

Chernozem or a fertile layer is better to be poured dry and not rolled, preferably manual distribution and leveling of the soil. The equipment must deliver black soil in the reverse order than the one in which the clay was poured. The area is filled from the edges to the center. At the end of the backfill, it is also filled.

This is the most time-consuming stage of raising the site: in addition to the fact that it is necessary to level the soil not only in one plane, but also with uniform compaction, the upper bulk layer may not be uniform. Usually, before unloading the chernozem, formwork is mounted, the foundation is cast and waterproofed, then sprinkled with rubble. Mounds of surface backwater are also arranged before the formation of a fertile layer.

Protection against erosion, strengthening the embankment on the slope
In addition to backfill and drainage, there are other ways to prevent soil erosion. Of these, the most famous and quite effective is planting plants with a developed root system along the upper and lower boundaries of the planned area, and actively absorbing water in the upper part.

Shrubs are planted along the slopes of drainage trenches to strengthen their walls. Plants from blackberries and rose hips to reeds are suitable here: they do not create much shade and at the same time pump water out of the soil well. From the upper tier, in addition to birch and willow, you can use undersized elderberry and sea buckthorn. On steep slopes, it is recommended to strengthen the embankment with geogrids and an underground drainage network.

But with a small difference in the level of the soil, dumping and protective landscaping will be quite enough.
After the acquisition of building land, it often turns out that the terrain and geology of the area are not quite suitable for long-term use and agricultural activities. We will talk about raising and leveling the ground, from marking to protective landscaping.
When it makes sense to raise the plot
One of the worst geomorphological conditions is considered to be the rise of the GWL above the depth of soil freezing. In such areas, heaving is especially pronounced, which is why there is a need for complex types of foundations, for example, pile-grillage. Shallow foundations do not work in such conditions, and full-fledged deepening requires support on a layer of soil 2.5-3 meters from the surface, above the foundation remains unstable and may be subject to precipitation due to high soil moisture.
This is not to say that geodetic site planning is a cheap method to get rid of soil problems. However, the usefulness of such a solution can be expressed economically in favor of the developer, if the raising of the soil eliminated the problems with waterproofing, insulation and stabilization of the foundation and the resulting costs. This is usually true: planning allows you to solve the problem of poor geomorphology cheaper, and most importantly, faster, ultimately significantly reducing the shrinkage time of the foundation. This solution is especially shown in the construction of a log house or the installation of prefabricated foundations.
But raising the level on the site does not always solve the problem. With a large slope (more than 5-7%), terracing should be performed, and not raising the soil, and this is a completely different technology. On such slopes, even the involvement of special equipment for pouring bored piles costs less blood, and yet this one is one of the most difficult among the foundations. In the area, there may also simply not be a sufficiently dense layer of soil to support a building of the required mass on it. Raising the site in such an environment will not give anything at all; in any case, you will have to make the foundation floating.
Is drainage necessary?
Drainage systems are shown for artificially leveled areas with significant elevation changes, where, as we know, the problem cannot be solved by conventional raising. However, erosion and washout phenomena can be expressed even on small slopes, so minimal backfilling and surface drainage will have to be done.
On both boundaries of the site, located along the slope, it is necessary to dig rain trenches, one of which (lower) receives water from a transverse section arranged along the upper boundary of the site. The bottom of the trenches is covered with rubble, shrubs are planted along the slopes. Periodically, the trenches will have to be cleaned, usually the owner of the site has the one that is higher in level. In depth, the trenches should reach the upper aquiclude and cut it a little - about 20-30 cm. In order to less disturb the terrain, the depth of the trenches can be adjusted with hygroscopic material - the same rubble or construction battle.
If the direction of the slope and the trenches diverge by more than 15º, you should be prepared for increased water flow. The bottom of the upper trench should be paved with bricks, even better - with trays. In such areas, it makes sense to level the ground locally exclusively for buildings. In this case, the plot for the garden is simply protected from erosion by a trench across the slope, along the upper slope of which a willow tree or several birches are planted. It is recommended to fill the bottom of the trench and its upper slope with crushed stone to prevent silting.
There is no point in lining the entire layer of the embankment with black soil, just as there is no point in throwing clay over the fertile layer. The top layer will have to be removed to clean clay, and then returned to its place. If only part of the site is to be leveled, the excess soil is simply discarded onto the adjacent territory. If the site is planned completely, the work is carried out in two stages.
Excavation is carried out in order to eliminate the plastic washable layer between two dense layers, because the probability of the embankment sliding under its own weight is so high. The only exception is when the site is located simply in a lowland without a slope 20-30 cm below the adjacent territory. Here it is reasonable to limit ourselves to increasing the thickness of the fertile layer.
After the tight formation is exposed, a series of geodetic measurements is carried out. Knowing the configuration of the upper aquiclude, it is possible to determine the required volume of soil and start its delivery. At the same time, the volumes of crushed stone for backfilling are calculated and the drainage system is planned.
How to fill up the hill
To create an embankment, hard-plastic clay in a swollen state, loam or sandy loam is used. The ability of the backfill to pass water is determined by geomorphology: if, with an abundance of water, it is impossible to fill a tightly compacted terrace, or the backfill is carried out over a porous layer, the embankment should pass water to a limited extent. Optimally, if the bearing capacity of the clay corresponds to the underlying layer, so do not be too lazy to take samples.
In places where the site plan rises above the adjacent territories by more than 30-40 cm, it is necessary to carry out retaining filling with road gravel of a fraction of 70-90 cm. It is also used in surface drainage. Crushed stone is dumped immediately after excavation of the soil under the formed board. The width of the filling in the lower part must be at least half the height of the crushed stone shaft. On the sides of the site along the slope with crushed stone, you can immediately form the bottom of the drainage trenches.
Supports more than a meter high are covered with geotextile, which is immediately pressed down with a small layer of clay. After that, imported soil is started up and distributed over the site. The easiest laying route is starting from the shaft laid from the vehicle entry point to the opposite point, and then to the dump in both directions.
It is not recommended to pour more than 0.7-0.8 meters of clay embankment at a time. If necessary, raise more should wait for heavy rain or give the embankment time to winter. But with the use of tamping and excavating equipment, more impressive dumps can be quickly poured.
Is tamping or rolling necessary?
It is optimal if imported clay is consistently unloaded completely at the top level of the dump, and then collides with a bucket into unfilled areas. This is how high-quality compaction occurs, in which the final shrinkage takes place in one or two wetting.
Ramming is used when a high speed of work is required, for example, when the optimal time for embankment is limited seasonally or by weather. With alternate tamping, layers of pure clay can be poured 0.6-1.0 one after the other without prior wetting. We note once again that only swollen clay is suitable for tamping, dry clay will not take on water-resistant properties until swelling and subsequent compaction.
Layers of 30-40 cm can be compacted by rolling, but wheeled vehicles are poorly suited for these purposes. A caterpillar excavator is indispensable if the site is raised to a height of more than a meter, in other cases it is more reasonable to resort to manual transportation and leveling, and entrust the compaction to precipitation.
Note that it is often not necessary to manually level the site. Under the influence of the movement of surface water, a fresh embankment will eventually take on a natural slope. With an abundant flow of water, sometimes it is even necessary to slightly raise the embankment in advance in the lower part of the slope.
If you hurry and bring in black soil before the final compaction of the clay, erosion will quickly have its detrimental effect and the site will greatly lose its fertility. Unfortunately, only plowing the soil in spring and autumn saves from such a phenomenon, and even then only partially.
Chernozem or a fertile layer is better to be poured dry and not rolled, preferably manual distribution and leveling of the soil. The equipment must deliver black soil in the reverse order than the one in which the clay was poured. The area is filled from the edges to the center. At the end of the backfill, it is also filled.
This is the most time-consuming stage of raising the site: in addition to the fact that it is necessary to level the soil not only in one plane, but also with uniform compaction, the upper bulk layer may not be uniform. Usually, before unloading the chernozem, formwork is mounted, the foundation is cast and waterproofed, then sprinkled with rubble. Mounds of surface backwater are also arranged before the formation of a fertile layer.
Protection against erosion, strengthening the embankment on the slope
In addition to backfill and drainage, there are other ways to prevent soil erosion. Of these, the most famous and quite effective is planting plants with a developed root system along the upper and lower boundaries of the planned area, and actively absorbing water in the upper part.
Shrubs are planted along the slopes of drainage trenches to strengthen their walls. Plants from blackberries and rose hips to reeds are suitable here: they do not create much shade and at the same time pump water out of the soil well. From the upper tier, in addition to birch and willow, you can use undersized elderberry and sea buckthorn. On steep slopes, it is recommended to strengthen the embankment with geogrids and an underground drainage network.
But with a small difference in the level of the soil, dumping and protective landscaping will be quite enough.
In the photo: backfilling the site with sand
During the spring snowmelt or during periods of heavy rains, many suburban areas are subject to flooding. This is expressed in the formation of puddles on the surface of the earth or the loss of soil bearing capacity (the earth is too soft). The need to fill a ditch or raise a plot in the country may also arise due to the constant high level of groundwater, when even in the hot summer months the water mirror in the well is close to the surface. In any case, the abundance of water negatively affects the foundation of buildings, the root system of plants and the appearance of lawn grass.
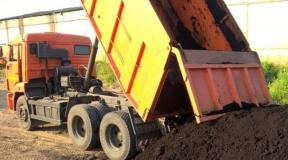
To eliminate such problems, the ZEMLECHIST company performs raising the site in the country. We offer backfilling of the territory with various types of soil to increase the filtering properties of the soil or to improve the relief in general.
Landfill prices
Changing the elevations on the site requires a high-altitude survey with a level and determining the volume of soil filling. It is very difficult to determine the volumes by eye, and even more so by phone, but ZEMLECHIST uses its own method of averaged calculations to determine the preliminary cost. To find out the price for raising your site, just call the phones on the site or leave a request in the form below. You can also calculate the estimate yourself using the prices from the table below.
"Before" and "after" raising the site.
By moving the slider to the sides, see how the level of the site has changed after adding soil. Click the left and right arrows to see different examples of work.


Materials for filling the site in the country
The choice of materials for raising the site in the country depends on the goals and is carried out after the survey of the territory by an engineer. In most cases, the best solution is to fill a layer of sand, but with a large area and elevation of the site, this can be expensive. Then instead of sand to backfill the site, you can use sand or any other planning soil - sandy loam, loam, clay.
Filling the site with fertile soil
Raising the site to a height of more than 10 cm with fertile soil is not recommended for two reasons. Firstly, the material of a good composition is expensive, it can hit the budget. Secondly, fertile soil is usually quite loose. And for normal growth and fixation of plants, including lawn grass, the root system needs to cling to something. An interlayer 7–10 cm thick is sufficient for nutrition, and a layer of denser soil is desirable under it. For these purposes, sand or loam is just right. Thus, the site can be raised with less expensive material, and covered with a fertile top.
When you need to raise the site in the country
1) The site is swampy, there is a lot of water in the soil all year round.
More
This happens when the site is located in a lowland or the groundwater level in this area is close to the surface of the earth. In any case, filling the site will literally rise above the water. The higher the area rises, the drier it will be. In the case of wetlands, it is difficult to predict the required volume of soil, because during backfilling it can sink under its own weight and compact the underlying layers.
2) Plot below the level of the road or neighboring plot.
More
In fact, such a site also turns out to be in a lowland, which means that water from the territories located above will flow onto it. Moreover, flooding may not occur constantly, namely in heavy rain or seasonal snowmelt, when the influx of water is significant. By measuring the area of the site and the required average elevation, the volume of soil for backfilling is calculated, and a margin for compaction is added.
3) The site has a strong slope, it is necessary to raise the lower edge to the level of the upper one.
More
The problem can be solved by the delivery of planning soil or sand soil in the required volume with its subsequent shrinkage during the year. At the same time, there is an important nuance: how the height difference will be strengthened. This may be a natural slope from the ground, if free space allows or the construction of a retaining wall is required. The decision should be made at the stage of surveying the site and included in the final estimate for backfilling the site.
Technological features of raising the site in the country
Before backfilling, all work on the site must be completed. Even before the start, it is desirable to lay the foundation of large objects, taking into account the future level of the soil.
Activities involve the following sequence:
- Complete cleaning of the area.
- Removal of the top fertile soil layer (if necessary).
- If necessary, the device of the strip foundation of the fence along the perimeter of the site. The tape acts as a retaining wall and must be poured taking into account future soil pressure. It should be 5-10 cm above the planned ground level.
- Direct delivery and distribution of soil on the site. It is carried out mechanically or manually. To raise the site in the country, it is recommended to fill with a slight slope - no more than 3 cm / m. This is necessary for the natural flow of rain and melt water.
- Arrangement of drainage systems. It can be both the simplest trenches and special engineering communications.

In the photo: a flooded area before backfilling

In the photo: the work of equipment when raising the site

In the photo: the site after backfilling
Professional approach to raising the site
Raising the site in the country requires a professional measurement of heights with a level and the correct calculation of the volume of backfill. In complex cases (for example, multi-level sections), we make calculations in the GeoniCS software package, build a cartogram of the movement of earth masses. It is quite difficult to determine the height of the elevation of the site, and even more so the required volume of soil "by eye". That is why only professionals should be trusted with operations of such complexity.