Butterfly net for catching butterflies with your own hands. How to make a net - step by step instructions. This decision has a number of positive aspects.
For the independent production of a net, I was inspired by the children, for whom the nets purchased in the store were either with short sticks, or the diameter of the net itself was too small. So I decided to make my own net.
To make it I needed:
- bamboo stick (support for plants),
- mesh (sold in fabric stores),
- very thick and better almost no bending wire,
- the wire is thin and flexible (not much is needed: 20-30cm),
- thread and needle

First, we make a circle from a thick wire, and connect it with 2 ends like this:

Next, we sheathe this circle with a mesh. I first sheathed, and then cut off the unnecessary fabric and gave the necessary shape in the form of a triangle. And I sewed 2 edges of the mesh to make a kind of cap.
That's basically it. The advantage of such a net is that you yourself regulate the diameter of the net and the length of the stick.
The dimensions of the finished net in my case were as follows:
the length of the stick is about 120 cm, the diameter of the circle is about 30 cm, and, accordingly, the length of the whole structure is about 1.5 m.
With this net, children perfectly catch May beetles.
In conclusion, I will only add that if you do not want to buy bamboo supports separately, find a suitable stick in the forest. It won't get any worse.
Often, the handle breaks off on Chinese products. To repair such a landing net, you need a metal-plastic pipe, self-tapping screws and a wooden handle as a handle.
Having chosen a suitable landing net model, the angler needs to roll up his sleeves and start manufacturing. Then the trophy fish will be successfully removed from the water thanks to a homemade landing net.
Photo 3. Attaching the tube to the net.

Photo 4. Net, tube and handle assembly.
Self-made landing net
Experienced anglers sometimes refuse to buy a landing net. The color of the net, the unreliability of the connections, or the fragility of the hoops - all this may not satisfy their needs. They make a landing net with their own hands.
To make a homemade net, you will need various materials, tools. Their list is given in the table.
For the sake of convenience, the presentation is divided into stages.
- We make a net for a net.
The simplest option is to take a finished mesh fabric, use a nylon thread to make a bag out of it.
Another option is to weave your own. For this you need:
- select cell size;
- using a thread, a ruler, needles, start weaving in a circle;
- when the desired height of the cylinder is reached, it must be narrowed. To do this, the number of loops is reduced;
- make the last knot tight;
- in conclusion, it is recommended to attach a small load to the bottom so that the network sinks faster.
- We make a head for a net.
First you need to choose between wire and aluminum tube, and then choose the diameter. If the choice fell on a tube, then 30 mm is enough for an average fish size.
Advantages of homemade landing nets
Whatever the purpose of the net, its independent production has a number of advantages:
- in a homemade fishing net, you can install a grid of the most optimal color for catching fish. It is known that a mesh that is too dark in color will only scare away fish underwater;
- the cost of a homemade net in most cases will be much less than in a store;
- if you make a net with your own hands, then you do it “in good faith”. Often, store nets require regular replacement due to breakdowns, and they are quite expensive;
- if you are making a homemade net for a child, you can choose the materials that you want. You can make a net of any size, adjusting it for different ages.
All fishermen who are fond of winter fishing know that the shabalka is designed to clean the hole from crushed ice, whether it is a hole made using an ice drill, no matter which one is electric or manual, or made with an ice pick. The hole always has to be cleaned.
Shabalki from various metals are best suited for this. Both ferrous metals and titanium or stainless steel are used. Dimensions are selected according to the required hole diameter. The good thing about a metal shabalka is that if it is strong enough, you can use it as a breaking tool and beat off frozen ice from anything, with the possible exception of ice drill knives.
According to the design of the hats, factory-made and home-made, there are a great many, both in the shape and size of the cup itself, and in the length and material of the handle.
Some fishermen make shabalkas combined with a gaff to make it more convenient to have one double-use item on hand.
Another type of shabalka, or rather, you can call it a net, is designed to scoop dry ice from the hole, while it has not yet been drilled to the water and water has not appeared there.
Such a net is very useful with a large thickness of ice, a large diameter of holes and a large number of them. For example, when a large number of holes of large diameter are drilled and a large number of winter vents are placed in order to catch trophy pike.

This type of net is used until water and dry ice have entered the hole, otherwise the net will get wet and become a stake in the cold and it will be difficult, but simply impossible, to use it.
In the same article, we will talk a little about others, not as brightly and diversely presented in fishing life as ordinary ones, shabalkas with a wicker net, which occupy a certain niche in the fishing winter economy.
Home-made shabalkas with a net are also made "under your own hand", like ordinary ones. A specific shape, mesh size and mesh material is selected. Someone makes using a ready-made mesh bought in a store. Someone weaves the net himself, more often from nichrome wire.
Fishing shops offer a variety of nets for catching fish. But homemade products have a number of advantages.
- You can make a mesh base from the most suitable thread in color. This approach allows you to less frighten the fish when playing.
- Factory nets are characterized by high windage, which negatively affects the speed of approach to the trophy.
- A homemade landing net can turn out to be more durable and comfortable, thanks to the competent selection of materials.
- When making with your own hands, you can save money by using improvised materials.
The design and overall dimensions of the landing net are largely determined by the method of fishing. Although it is necessary to remember about the features of the reservoir.
- Fly-fishers often enter fast-moving rivers while fishing. In order not to injure the caught fish, they use small landing nets with a small handle. It can be comfortably placed behind your back.
- When fishing from a boat, a handle 1-2 m long is enough to extract prey from the water. But if spinners need a capacious landing net for long pikes, pike perch and catfish, then a shallow landing net with a round shape is suitable for bream fishermen.
- Carp anglers hunt for trophy fish from the shore. They prefer to use huge folding landing nets with a long handle.
Despite the large selection of branded products, a homemade landing net is quite in demand among lovers of outdoor activities. This is due to a whole list of positive characteristics:
- do-it-yourself devices are made from light colors of fishing thread, and purchased options are made from dark-colored fishing line. The dark tones of the forests scare away cautious fish;
- store landing nets have a large windage, which negatively affects the speed of approach to the caught prey;
- a net of its own production has the best qualities of durability, since the angler uses more reliable materials and monitors the quality of workmanship. The product is reliable and durable;
- affordable price. When purchasing a landing net at a retail outlet, after a while the consumer faces the problem of its failure. Often the price and quality of the purchased goods do not match. In self-manufacturing, improvised materials are used, which significantly reduces the cost of a fishing accessory. A do-it-yourself fly landing net will also have a low cost.
Many anglers prefer to make their own net before fishing, rather than buying it from a store, for a number of reasons:
- Most purchased nets are made from dark-colored fishing line, and such colors, as practice shows, affect the quality of the catch. The dark color scares away the fish.
- Nets bought in the store have a large windage, and this negatively affects the speed of approaching the net to the caught fish.
- Reliability. Making a net on their own, the angler himself is responsible for its quality. He is interested in making a net that is reliable and durable in operation.
- Decent price for a bag. This factor also scares off potential buyers, since the cost of a net often does not match the quality. Having paid a considerable amount for it, anglers are faced with the need to replace it after a short period of time. When manufactured independently, its cost is much lower, due to the fact that almost all components of the net are made from improvised materials.
Fishing landing net: purpose and application
The landing net is used to retrieve fish from the water. This reduces the chances of a line break, a hook or rod breakage, and a catch failure.

It must be applied in the following order:
- bring the fish as close to the shore, the boat or the fisherman, if he is standing in the water, as long as the length allows. Only then use the landing net;
- lower the landing net into the water, wait for the net to sink;
- bring the landing net hoop under the fish, pull it towards you and slightly up. Pull sharply so that the fish does not jump out.
Birds of a feather flock together. This folk wisdom perfectly reflects the essence of people who are passionate about fishing. How are they different from other people? Probably because if you look closely into the eyes of a fisherman, you can see an endless blue water surface there. And, of course, longing, which disappears only in the pond.
Going fishing, every fisherman hopes to hook a decent fish on his hook. And everyone knows that not only luck, but also the quality of gear plays a significant role in this.
Tackle bought in a store may have defects and you can be completely sure of it only by repeatedly testing it for strength. That is why many experienced fishermen prefer to make some types of tackle on their own. In this article I will tell you how to make a very important item for catching large fish with your own hands - a landing net.
The thread is harsh with a diameter of 0.08-0.25 mm, a length of 60-120 meters. Nylon cord with a diameter of 2-5 mm (clothing rope), 50 cm long. Metal wire 3-3.5 meters. Landing net handle. You can use a piece of bamboo rod. Glue "Moment". Lead plate. Two small awls (you can take cloves).
Shuttle. It can be made from a school ruler.
Two small strips, narrow and wider, to even out the size of the cell. They can be made from pieces of wood. The slats need to be rounded and given the shape of an aircraft wing.
Length of 1 bar - 28 mm, width - 5 mm; length of 2 strips - 40 mm, width - 5 mm.
Take a nylon cord and tie its ends. You should get a circle with a diameter of 15 to 25 cm. In the work surface - it can be a table or a window sill - stick two awls at a distance of 10-15 cm from each other, and throw a rope ring on them - so that part of it hangs down on you .
Boil water with a pinch of ordinary baking soda and carefully lower a skein of harsh threads into it - no more than 1 minute (to soften).
Then let the threads dry slightly and wind them on the shuttle as follows: wind the thread on the upper pin of the shuttle in a few turns, and then turn by turn, “figure eight”, wind it on the shuttle itself - on the pin, on the lower notch and back. The consumption of threads in this case is not more than 50 cm (the excess will interfere with knitting).
Next, take the bar - the one that is narrower - best in your left hand (if you are right-handed) and hold it with four fingers. (This stage of work requires a certain skill so that the knots are knitted even and strong.) With your right hand, take the shuttle and thread the end of the thread into the ring from the bottom up.
Grab this end and press it against the bar in your left hand. Tighten well and adjust the length of the loop (6-8 cm). Then, with an arcuate movement of the hand, throw the thread from the shuttle onto the left hand, bring the tip of the shuttle from the bottom to the right of the clamped thread up and to the left of it. Pull the shuttle towards you to tie the knot.
This procedure must be repeated twice.
Then wrap the bar with a thread from the shuttle and draw the tip of the shuttle from bottom to top into the ring, again fix the thread that has come out and knit a knot. So we knit the first row. There should be 20 cells in total.
Carefully remove the cells from the bar, collect them in a bundle, lightly moisten with water, then twist tightly clockwise. Repeat this procedure after each next row of knitting is completed - this will ensure greater knot strength.
What to do now: Set the bar aside and manually tie the end of the thread from the hook to the tip that sticks out of the first knitted cell (the first cell should be slightly lower in height than the last). Mark this place by tying, for example, a piece of colored thread, so that in the future it will be easier to find the beginning and end of the row.
Now insert the bar into the cell that was the first, and continue to knit the next row ... Only, attention, now when knitting you need to make knots on both sides of the cell: bring the shuttle into the cell that was the last in the row, pull the thread to the sharp end of the bar and pinch it with your finger.
At the same time, throw a thread on the left hand, wind the shuttle inside the resulting triangle and make a single standard knot. By the same principle, you make the second knot, only now you capture both sides of the triangle with a shuttle at the same time.
Finish the second row - 20 cells, and knit 3 more rows.
cell gain
We pass to the next stage - we give the future landing net the shape of a cone. To do this, in the course of work, we begin to add cells. This is done very simply: at the right moment, draw the tip of the shuttle not into the very base of the cell, but a little to the left - above the first finished knot on the left. Then a double knot and a regular loop.
In the next row, we make increases after each 3 cells. Then we knit 3 rows without increments. And again a row with increments, we only add after each 4 cells. We knit 4 more simple rows, again a row with increases after each 3 cells, and 5 more simple rows. After that, we add again - every 2 cells.
To knit the next row, change the narrow bar to a wide one. We knit 4 rows without increments, but in the next row we make increments through 3 cells. Then 2 more ordinary rows and again with increments - through 4 cells. Two rows - and increases through five cells. Two rows - and increases through 8 cells. And finally, 2 final simple rows.
Rim fit
Before proceeding to the final step, do the following: dip the net you knitted 2-3 times in boiling water, then twist it tightly (as when wringing out laundry) and straighten it with a sharp movement. Hang up and let dry. As a result, the network will gain greater strength and elasticity.
We make a rim. To do this, take a stainless steel wire 7-8 mm in diameter. Measure about 25 cm and in this place bend it at an angle of 90 °. Bend the rest of the wire into a round shape.

Now you need to attach the mesh to the wire ring, and here again the shuttle will come in handy. Attach the thread with a strong knot at the bend of the wire. Take the landing net and thread the shuttle 3 cells, bring it out and spread the net evenly along the thread.
Re-tie the thread to the rim - and so on until the entire network is tied to the rim. Measure another 25 cm from the remaining piece of wire, bend it in the same way and then “bite off” unnecessary tails. Pull the finished wire base tightly with a thread and wrap it to the very end.
Coat the entire winding with glue - sparsely, let dry, then repeat the procedure 2-3 times.
Here the landing net is almost ready. It remains to attach a handle to it - a bamboo stick from an old rod will do. Slightly stitch it along, coat the resulting area with glue, wait until it “grabs” a little and attach the “antennae” of the landing net. And then wrap and glue in the same way as in the case of the rim.
And last but not least, choose a suitable lead weight for the landing net. The load should not make the landing net much heavier, but at the same time, it should be well immersed in water. (You can test this in the bathroom.)
...Perhaps, the process of making a landing net will seem too complicated for you, but believe an experienced fisherman - the result is worth it. Good luck fishing, and as they say - "no tail, no scales"!
Maxim Lutsenko
Necessary materials
Before you make a net with your own hands, it is important to think about its strength and weight. Some anglers produce products that cannot be held even with two hands in a combat position. Therefore, when selecting materials, attention should be paid to the combination of parameters such as lightness and reliability.
If you are not afraid of difficulties, then you can start manufacturing by weaving a network. For this job you will need:
- light-colored fishing thread in “unlimited quantity”;
- a device for weaving a mesh fabric;
- a ruler 125 mm long, 25 mm wide and 2 mm thick, which will help you knit knots;
- kapron thread for strengthening the mesh.
To make a working landing net for playing fish out of a mesh cloth, you will need:
- steel springy wire with a diameter of 2-3 mm for the manufacture of the rim;
- wooden handle or old telescopic rod.

A fishing net, sometimes referred to as a landing net or landing net by fishermen, is one of the most basic items in an angler's inventory.
Our article will talk about a homemade net for fishing, what are the advantages, what you need to make, how to do it yourself and how much it will cost.
The purpose of the net is associated with a number of features:
- It helps to bring fish to shallow water much faster, especially if it is a large individual. The landing net is simply indispensable in the process of fishing in reservoirs where abundant vegetation is observed.
- When playing trophy fish, the use of a net helps prevent the rod from breaking due to heavy weight.
Many anglers prefer not to buy a landing net in stores, but to make it with their own hands.
This solution has a number of positive aspects:
- Purchased products are usually made of dark-colored fishing line. In practice, this can scare away large fish and significantly reduce the quality of the catch.
- The windage of purchased nets is quite high. As a result, it is not possible to quickly bring it to the fish caught.
- The quality of a handmade fishing net will be much higher. The fact is that the angler himself is responsible for how reliable the product will turn out and for how long it will serve him.
- The cost of making it yourself will be significantly lower compared to a purchased product. Many anglers refuse to buy this product, as the price in most cases does not match the quality, and from time to time you have to purchase new and new products. In the production process, mainly improvised materials are used, which significantly reduce the cost of the product.
materials
The easiest way is to make a non-separable net. For him, you will need, first of all, a fishing line. The amount of this material is directly dependent on the size of the product. Experienced fishermen recommend using a white or light-colored fishing line so as not to scare away the fish.
The hoop is quite convenient to make from a duralumin tube. The ideal diameter of such an element is 9 mm.
In addition to the tube, you can use bent reeds, an ordinary tennis racket that has failed, or iron wire, whose diameter does not exceed 6 mm.
Dry and smooth wood of low weight is most suitable for the handle, many fishermen use ski poles or bamboo. With independent production, it will not be possible to do without cargo. It is usually made from a wire ring. It is installed in such a way that the load does not fall into the cells and does not prevent the net from opening normally when the fish approaches.
It should be noted that the diameter of the ring should be larger than the diameter of the cell.
To make a bag, you need to have a number of specific skills that not every fisherman has. The easiest way is to buy a net made of thick fishing line in a fishing store.
Assembly process
The sequence of actions in the manufacturing process is usually as follows:
- Weave a net bag or purchase a ready-made net.
- A hoop is constructed on which this mesh will be attached.
- Make a product handle.
- All elements are assembled into a common design.
- Low cost. With independent production, it will be possible to save a certain amount of money, since its cost will turn out to be quite low. You will probably only have to buy fishing line, and everything else can be made from improvised materials.
- Reliability. When making a net, a fisherman immediately counts on the fish of what size and weight it will be calculated. In this regard, its reliability will be at a fairly high level. In addition, nets are usually not strong enough - their handle or ring can bend under the weight of the fish.
- Little sail. A do-it-yourself net will practically not be demolished under the influence of the current. This is largely due to the additional load of the product. This effect allows you to very quickly bring a net under the fish and pull it out of the water.
- Self-selection of colors. Products sold in fishing stores are usually woven with dark wire, which can scare away the fish, causing them to additionally beat, and this will greatly increase the effort to get them out of the water. With self-production, you can use any most suitable fishing line.
Before starting the manufacture of the bag, a shuttle is made. An aluminum or plastic sheet is suitable for it, the length of which should be about 20 cm. To facilitate work, a small hole is made in its center so that the fishing line does not unwind during the weaving process.
When weaving, you can also use an ordinary plastic ruler, the length of which will be from 130 to 160 mm. Due to it, you can connect nodes of any complexity, and all cells will turn out to be approximately the same size.
The sequence of work in the manufacture of the bag is as follows:
- A ruler is taken in the left hand, and in the right shuttle, on which the required amount of fishing line is pre-wound.
- A small loop is caught with the right hand and put on the ruler, after which it is taken out from the other side. The fishing line is circled twice around the finger and passed into a large loop. When all these actions are completed, you should get two loops located on the left hand.
- The fishing line is supported with a finger and the first loop is dropped, while at the same time pulling the shuttle.
- On the ruler, they verify where the knot will be exactly located, press and pull the shuttle over the ruler.
- Tighten the knot carefully.
With self-assembly of the net, one way or another, you have to work with fishing line, connect and twist it. The matter is quite simple, the main thing here is to approach this issue correctly, to acquire the skill of fast and high-quality knitting of knots.
Knots for knitting networks. a - straight; b - double straight line; in - clew oblique; g - double clew; d - Russian.
All nodes that are used in the fishing process must meet certain requirements, which are dictated by the practice of their use:
- The node should be fairly simple.
- Making it is easy and simple.
- A small amount of material is spent on its manufacture.
- Under load, it does not untie.
- If the load is variable, then the knot will not spread, as it has a certain strength.
When making your own net netting, there are several key types of knots that can be used:
- straight;
- Russian;
- clew oblique;
- double clew.
Straight
Most often, in practice, you can find exactly a straight knot, which is usually used in the process of knitting a net, the cells of which are of small size. The line consumption here is not too great, and all the work takes a little time.
However, such a product has a number of disadvantages during operation:
- Over time, the grid itself and the cells begin to deform- first of all, this applies to a product made of thin fishing line.
- The holding force of such a bag is quite low.
The Russian oblique knot is the most reliable. However, in the process of its manufacture, much more material and effort will have to be spent.
In addition, the cell sizes here will have to be selected immediately as accurately as possible. The Russian oblique knot behaves perfectly even under heavy loads, it does not deform and does not intertwine.
Skew knot
Knit a clew knot quite quickly. It is characterized by low material consumption. However, it should be noted that under severe loads, the threads that are crosswise with respect to each other begin to deform. Professional fishermen do not recommend using this type of knot in the process of making a net from fishing line or from nylon threads.
clew double
The Russian and double clew knots are considered the most reliable. Making them is not too easy, and the material consumption will be quite large. This type of knot is the most reliable, since it is not able to untie. If necessary, it easily turns into an ordinary double knot.
To catch fish by using only one net is a very gross mistake. Such an action can only lead to damage to the product. If the bait has a long handle, then it will not be very convenient to work with it while fishing.
The fishing net is used only when the fish is in the water. Carrying large fish through the air is not very easy, and there is also the possibility that the handle will break off.
The main questions that a fisherman has are “how to make a landing net for fishing with your own hands?” And what you need to do?". First of all, you need to prepare the following materials:
- fishing thread. It should be light woods and in sufficient quantity;
- needle (shuttle). You can buy a special device for weaving nets at any outlet specializing in fishing goods, or you can make it yourself. You can take aluminum or plastic as a suitable material, cut a plate 20 cm long, make a hole in the central part to simplify working with fishing line. So it can be held and prevented from unwinding during the weaving process;
- ruler with dimensions 125x25x2 mm. It can also be made by hand. The ruler is used for more convenient knitting of knots. The frame of the measuring device is made of wire material, twisted several times. The base must be wrapped around (you can use a regular thread), which will protect the fishing line from damage in the process of working with it;
- kapron thread. It is necessary to give greater strength to the finished product. It is woven directly into the landing net;
- wire . The thickness of the material is selected taking into account the expected weight and size of the prey. A rim of a specific diameter and size is made from wire. If a thicker material is used, then one-piece construction (rim and handle) can be made;
- wooden beam. This is a great option for making a comfortable and practical handle.
Classifications and varieties
In fishing nets, there are three components: a head, a handle and a net. Accordingly, it is possible to classify according to the geometry of the elements, according to the material from which they are made.
There are three main shapes of the fish net head: round, triangular, quadrangular (square or trapezoidal). They are usually made from light alloys.
It is believed that the triangular shape is more convenient when you need to bring the landing net under the fish, but it is easier to lower the round head into the water, since there is less windage.
Landing nets are classified according to the mesh material. Each has its own advantages. The fishing line is easy to wash, mucus from the scales does not stick to it, but the pike easily cuts it with its teeth. Nylon and kapron are gentler and less injure the fish, which is suitable for fishing on a catch-and-release basis.
The handle can be of different lengths. Therefore, two more classes are distinguished: short (fishing from a boat or in the water) and long (fishing from the shore). The longer the handle, the greater the risk of breakage.
There are two varieties of nets: non-separable and folding.
Non-separable landing net
Such gear is more reliable and stronger, but is rarely used, because due to the length it is inconvenient for transportation. This also includes short landing nets, but they are not used so often: only when fishing from a boat or in the summer, standing in the water.
Folding landing net

These devices can be telescopic and plug-in, made of carbon fiber or composite materials.
Telescopic nets for fishing are adjustable to different lengths and can be reinforced with threaded clamps. The plug version is more reliable and tougher.
Manufacturing process
Non-separable landing net
To make a practical and durable landing net for fishing with your own hands, you must adhere to the basic manufacturing rules. The process itself is quite simple:
- A bag for landing net is woven or bought ready-made;
- A hoop is made to fix the bag;
- A handle for a net is cut out of a wooden block;
- All elements of the device are connected into a single structure.
How to tie a landing net from a fishing line if there is no experience? Here it is important to follow the sequence in actions and be extremely careful:
- You need to select the size of the cells;
- Then take a ruler in one hand, and a shuttle (needle needle) filled with fishing thread in the second;
- Make a loop with the index finger of your right hand, attach it to the ruler, pull it out from under it on the other side. The next step is to make two contours around the index finger, on which the loop is located. After that, it is necessary to pass under the measuring device and draw it into a large loop. As a result of such actions, two loops should be obtained on the left hand;
- Support the thread of the loop with your finger, throw off the first one and pull up the shuttle;
- Correct the exact location of the knot on the ruler, press it with your finger and pull the needle over the measuring device, resetting the remaining loop from the left hand;
- Tighten the resulting knot as tightly as possible.
If you need to tie a cylindrical landing net with your own hands, then all manipulations are performed in a circle. It is best to knit a bag with a depth of 70-80 cm, and choose a mesh size of 25-30 mm, depending on the size of the object of fishing.
Important! When the knitted canvas is of sufficient length, it is necessary to gradually reduce the number of loops to zero, thereby narrowing it.
So that the hand-made landing net does not lose its shape during the hunt, it is recommended to tighten the last knot as tightly as possible.
If the landing net was not made by hand, but purchased in a store, then a cylinder is simply made from it by pulling the bottom edge into a bundle. And already in this part a small weighting agent is fixed, which is necessary for better immersion in water. Otherwise, the mesh will simply float on the surface.

The process of making a net yourself is simple.
To make it high-quality, light, reliable and durable, you should strictly follow the technology and manufacturing sequence:
- Weave a net bag or buy a ready-made woven fabric.
- Make a hoop for attaching the bag.
- Prepare the landing net handle.
- Connect all the parts together into a single structure.
Weaving your own canvas for a net
The easiest to manufacture and design is a homemade net - non-separable.
Fishing line. Its amount required to make a net will depend on the size of this device. It is recommended to use a thick line of light shades.
Hoop. The material for its manufacture can be a duralumin tube with a diameter of about 9 mm, bent reed or iron wire with a diameter of up to 6 mm, and an old tennis racket is also perfect.
Net handle. For its manufacture, dry and light wood is often used, a ski pole is suitable, and if possible, it is better to take bamboo.
Net bag. The easiest option is to buy a net of thick fishing line in a specialized store, or you can tie the bag yourself. Additionally, you should stock up on electrical tape, thick thread and soft, preferably copper or aluminum wire.
How to increase the catch of fish? “(amp)gt;
For 7 years of active passion for fishing, I have found dozens of ways to improve the bite. Here are the most effective ones:
- Cool activator. This pheromone additive lures fish the most in cold and warm water. Discussion of the bite activator "Hungry Fish".
- Raise gear sensitivity. Read the appropriate manuals for the particular type of tackle.
- Pheromone based baits.
Before starting to tie the knots of the net, you should prepare a shuttle, the so-called. needle. For its manufacture, a sheet of aluminum (plastic), about 20 centimeters long, is suitable. To make it easier to work with the fishing line, a small hole with a tongue is made in the very center of the aluminum sheet. The fishing line in the process of weaving knots should not unwind and interfere with work. Although, in order not to waste time on making a shuttle, you can buy it in a special store.

In weaving, a special ruler with parameters of 130-160 mm is useful. It must also be made from any durable improvised material. Its use is necessary to facilitate the knitting of knots (you can use any, but were not sliding).
Having decided what size of cells should be knitted in a landing net bag, let's get to work:
- A ruler is taken in the left hand, and a needle with a fishing line wound in advance in the right hand.
- Pick up the loop with the index finger of the right hand, put it on the ruler, pull it out from under it from the back side. Then 2 loops are made around the index finger, on which there is already a loop, threaded under the ruler and drawn into a large loop. After performing these manipulations, two loops are formed on the left hand.
- Supporting the thread of the loop with your finger, drop the first one, then pull up the needle.
- Adjust the exact position of the knot on the ruler, press it with your finger and pull the needle over the ruler, while lowering the remaining loop from your left hand.
- Tighten the knot well.
To obtain a cylindrical shape, the net is knitted in a circle. The optimal depth of the tied bag should be 70-80 cm, and the size of its cells 25-30 mm (depending on the size of the fish). When the size of his canvas is sufficient, you should gradually narrow and reduce the number of loops in it to zero. In order for the landing net to keep its shape, you must try to tighten the last knot well.
If the canvas for the landing net was not connected, but bought in a store, then you need to make a cylinder out of it, pulling the bottom edge into a bundle. Attach a small weight to the bottom of the bag. It is necessary so that when lowered into the water, the mesh sinks well, and does not float on the surface.
What fishing net to buy?
Buying a fishing landing net should begin with theoretical preparation. You can re-read a ton of materials on the Internet, listen to hours of "noodles" words of sellers in fishing stores, completely get confused with the choice, buy the wrong thing at all, get disappointed in fishing, and take up chess ...
To prevent this from happening (although we respect chess), we have prepared for you the most simple, accessible and useful article on how to choose your first fishing landing net. In essence, a fishing net is a tool for lifting fish out of the water, which consists of three (most often) elements: a handle, a hoop and a net.
Lever. The main thing you should pay attention to in this moment is the material from which it is made.
Most often there are two types:
Aluminium alloy. These are the cheapest models. The handle made of this material is hollow inside, thanks to which the total weight of the landing net is as comfortable as possible for the fisherman. However, such a structure can negatively affect the strength of the entire structure. Carbon fiber. Handles made of this material are a little more expensive, but at the same time, they are much lighter than metal ones. Thanks to this, you can pull out the fish, with frequent bites, without feeling tired.

Hoop. A kind of frame that is attached to the handle, and on which, in turn, the mesh is attached. The shape of the hoop can be an ellipse, triangle, rectangle, circle or even a trapezoid.
Here it is important to pay attention to two points:
Assembly. Basically there are three types - solid, folding and multi-component. The former, due to the absence of joints, have a high degree of load and strength. The other two have the advantage of being easy to transport. There is also a third option - this is a combined hoop. In shape, these are two arcs of metal and a cord of fabric connecting them. Material. Most often - metal (aluminum alloy). However, there are, like the handle, carbon fiber options.
Grid. Usually it is a fishing line, fabric (kapron) thread or silicone.
The fishing line does not absorb water and fish secretions (mucus, etc.), which means it does not smell and dries quickly.
The fabric is stronger than fishing line and can withstand serious trophies.
Well, silicone is mainly intended for hunting for “gentle fish”, lenok, grayling or trout.
Knots used when tying a net
Knots are a special way of connecting fishing line or ways of forming loops. Knitting any knot is a simple matter. The main thing is to learn how to knit it correctly, efficiently and quickly enough, and this requires at least a little practice.
All knots used in fishing are subject to a number of requirements dictated by the very practice of their use. He must:
- Simple, quick and easy to knit.
- Have a small consumption of material.
- Do not untie under load.
- Under variable loads, do not creep, that is, have sufficient strength.
- Comply with your assignments.
When self-tying a bag in a net, several types of knots are used.

Straight knot.
Russian (oblique with stoppers).
Skew knot.
Shkotovy double.
The most common of these nodes is the straight line. It is used when knitting a bag with small cells, while the consumption of fishing line or thread is small. The speed of knitting a bag with this knot is quite high. But there are small disadvantages of using it: after a while, the cells and mesh of the bag are deformed (especially in a bag knitted from fishing line), the knots do not have great holding power.
The process of knitting with a clew is quite fast and at the same time the material consumption is small. It has sufficient holding power. But under heavy loads, lying on the threads arranged crosswise, the cells of the bag are deformed. This knot is not recommended when knitting a bag of fishing line and nylon threads.
A net for fishing (its other names: landing net, landing net) is considered an important and actively used accessory for the angler.
Why is it needed and is it needed at all? For experienced anglers, this question is not worth it. Firstly, the landing net provides an invaluable service in the process of playing the caught fish, especially large fish and in places overgrown with vegetation. Another reason for the importance of using a landing net is that many anglers manage to catch trophy fish and landing nets reduce the risk of breaking the rod from its large weight.
Here is an incomplete list of arguments that allow us to conclude how much a net is needed when fishing.
Advantages of a homemade net
Many anglers prefer to make their own net before fishing, rather than buying it from a store, for a number of reasons:
- Most purchased nets are made from dark-colored fishing line, and such colors, as practice shows, affect the quality of the catch. The dark color scares away the fish.
- Nets bought in the store have a large windage, and this negatively affects the speed of approaching the net to the caught fish.
- Reliability. Making a net on their own, the angler himself is responsible for its quality. He is interested in making a net that is reliable and durable in operation.
- Decent price for a bag. This factor also scares off potential buyers, since the cost of a net often does not match the quality. Having paid a considerable amount for it, anglers are faced with the need to replace it after a short period of time. When manufactured independently, its cost is much lower, due to the fact that almost all components of the net are made from improvised materials.
How to make a net yourself
The easiest to manufacture and design is a homemade net - non-separable.
Material for manufacturing and what is better to use:
Its amount required to make a net will depend on the size of this device. It is recommended to use a thick line of light shades.

Hoop. The material for its manufacture can be a duralumin tube with a diameter of about 9 mm, bent reed or iron wire with a diameter of up to 6 mm, and an old tennis racket is also perfect.

Net handle. For its manufacture, dry and light wood is often used, a ski pole is suitable, and if possible, it is better to take bamboo.


Net bag. The easiest option is to buy a net of thick fishing line in a specialized store, or you can tie the bag yourself.
Additionally, you should stock up on electrical tape, thick thread and soft, preferably copper or aluminum wire.

Knots used when tying a net
Knots are a special way of connecting fishing line or ways of forming loops. Knitting any knot is a simple matter. The main thing is to learn how to knit it correctly, efficiently and quickly enough, and this requires at least a little practice.
All knots used in fishing are subject to a number of requirements dictated by the very practice of their use. He must:
- Simple, quick and easy to knit.
- Have a small consumption of material.
- Do not untie under load.
- Under variable loads, do not creep, that is, have sufficient strength.
- Comply with your assignments.
When self-tying a bag in a net, several types of knots are used.
The most common and frequently used are:
Straight knot.

Russian (oblique with stoppers).

Skew knot.

Shkotovy double.

The most common of these nodes is the straight line. It is used when knitting a bag with small cells, while the consumption of fishing line or thread is small. The speed of knitting a bag with this knot is quite high. But there are small disadvantages of using it: after a while, the cells and mesh of the bag are deformed (especially in a bag knitted from fishing line), the knots do not have great holding power.
The process of knitting with a clew is quite fast and at the same time the material consumption is small. It has sufficient holding power. But under heavy loads, lying on the threads arranged crosswise, the cells of the bag are deformed. This knot is not recommended when knitting a bag of fishing line and nylon threads.
The most reliable types of knots are Russian and clew double knots. But compared to straight and simple clew, the material consumption is much higher, and the knitting speed is lower.
Manufacturing process

The process of making a net yourself is simple.
To make it high-quality, light, reliable and durable, you should strictly follow the technology and manufacturing sequence:
- Weave a net bag or buy a ready-made woven fabric.
- Make a hoop for attaching the bag.
- Prepare the landing net handle.
- Connect all the parts together into a single structure.
Weaving your own canvas for a net

Before starting to tie the knots of the net, you should prepare a shuttle, the so-called. needle. For its manufacture, a sheet of aluminum (plastic), about 20 centimeters long, is suitable. To make it easier to work with the fishing line, a small hole with a tongue is made in the very center of the aluminum sheet. The fishing line in the process of weaving knots should not unwind and interfere with work. Although, in order not to waste time on making a shuttle, you can buy it in a special store.
In weaving, a special ruler with parameters of 130-160 mm is useful. It must also be made from any durable improvised material. Its use is necessary to facilitate the knitting of knots (you can use any, but were not sliding).
Having decided what size of cells should be knitted in a landing net bag, let's get to work:
- A ruler is taken in the left hand, and a needle with a fishing line wound in advance in the right hand.
- Pick up the loop with the index finger of the right hand, put it on the ruler, pull it out from under it from the back side. Then 2 loops are made around the index finger, on which there is already a loop, threaded under the ruler and drawn into a large loop. After performing these manipulations, two loops are formed on the left hand.
- Supporting the thread of the loop with your finger, drop the first one, then pull up the needle.
- Adjust the exact position of the knot on the ruler, press it with your finger and pull the needle over the ruler, while lowering the remaining loop from your left hand.
- Tighten the knot well.
To obtain a cylindrical shape, the net is knitted in a circle. The optimal depth of the tied bag should be 70-80 cm, and the size of its cells 25-30 mm (depending on the size of the fish). When the size of his canvas is sufficient, you should gradually narrow and reduce the number of loops in it to zero. In order for the landing net to keep its shape, you must try to tighten the last knot well.
If the canvas for the landing net was not connected, but bought in a store, then you need to make a cylinder out of it, pulling the bottom edge into a bundle. Attach a small weight to the bottom of the bag. It is necessary so that when lowered into the water, the mesh sinks well, and does not float on the surface.
Hoop (base) for net
From a pre-prepared material (iron wire, a duralumin tube), an oval or round hoop is bent. For catching small fish, the base can be made with a diameter of up to 35 cm; for larger fish, many anglers prefer to use a triangular hoop with sides of 45-50 cm.
Having bent the hoop of the desired shape, leave paired branches of 10-15 cm in size from it, with the expectation that the handle of the net will lie tightly between the branches.
Making a handle for a net
For her, a light and well-dried tree rod is taken, usually from 1 m to 1.5 m long (as it suits you), with a thickness of 25-27 mm, the surface is treated with sandpaper or wrapped with tape.
Connect the finished parts of the landing net into a single structure:
- Fasten the bag of the net on the frame, and wrap the edges of the frame with a strong nylon thread. It is recommended to wrap in several layers. Such a winding will give the net transparency, protect the fishing line from damage on stones and sharp objects in the water.
- Fasten the handle of the net with its bag put on the base with soft wire. To keep the rim from moving, you can also use a clamp to secure it to the handle (it is often used in plumbing work and in cars).
This fishing gear is simple and has long been used to catch fish, preventing anglers from being left without a catch. A large number of its advantages compensate for the inconvenience that occurs during its transportation (carrying).
Features of the manufacture of a folding net
Compared to a conventional long net, the folding net is considered to be more convenient. When folded, it is a tube-handle, hollow inside and closed with caps on both sides.
Making your own folding landing net is very simple. The handle, as in a regular net, can be any hollow tube of a suitable size. The landing net rim is bent from a duralumin rod with a diameter of not more than 8 mm of the desired size and shape. Departing from the middle by 10-15 cm, this twig is cut into 2 halves. At the shortened part of the rim near the cut point, the end is straightened at a distance of 7 mm and a hole with a diameter of 5 mm is drilled in the end face. The shortened end is then bent again. The end of the elongated part should be cut down so that it can fit snugly into the hole made.
The opposite ends of the rim of the net are bent and filed down to then make a common thread for screwing into the rim sleeve. The mesh can be tied with rings with a diameter of 10 mm, made from brass wire. On any two adjacent rings, a small a piece of rubber tubing up to 12 cm long and up to 6 mm in diameter. The design of the folding net is ready!
How to improve a purchased net for yourself (which is usually a complaint)
It would seem that among such a variety of nets on the market, it is very easy to choose the one that will meet all the requirements.
But often having bought a net, after some time disappointment may come for some reasons:
- Fine mesh in the net bag, and this affects the size of the fish caught.
- The handle of the net does not fit the length.
- Poor quality of knitting of loops, which leads to their uneven stretching or tearing.
- Poor quality of the product itself.
How to fix deficiencies or improve landing net for yourself:
- If you are not satisfied with the mesh of the bag, then you can change it yourself by buying it with the desired cell size or tying it yourself.
- If you are not satisfied with the length of the handle, then if it is long - shorten it, if it is short - replace it with another one that is suitable in length.
- With a low quality of knitting loops, it is recommended to independently change the mesh in the bag for a new one by tying or buying another one.
- If the quality of the landing itself is not satisfied, refuse to purchase, and in the future choose and purchase only the product from trusted manufacturers.
- When making a net, it is better to make the handle longer, otherwise it will be simply inconvenient for them to catch.
- The width of the net itself should be at least 60 cm. It is much more convenient to use a large diameter net than a small one.
- Use a net with light-colored fishing line.
- It is recommended to use nets with an egg-shaped hoop, as there is more opportunity for landing large fish.
- The size of the hoop is selected depending on the size of the intended prey. For fish up to 3 kg, a landing net with a 50:35 cm hoop is suitable, and for large fish it is better to use a landing net with a hoop size of 55:85 cm.
- You should not lift a large fish by the handle of the juice, for the reason that it can break.
- The most reliable are nets with a duralumin handle that can withstand a significant weight of the catch and not deform.
- The net handle can be composite or solid. Using a solid handle is more reliable (it breaks less often), and a folded one is more convenient for transportation (carrying).
- The stronger the material from which the bag is made, the more reliable it is.
- Always a guarantee of a good and high-quality purchase is a product from well-known manufacturers, combined with an affordable price.
These little tips you need to consider when going fishing. The main thing to remember is that fishing comfort and the amount of catch often depend on little things.
A landing net is a rather simple device in design, which is usually used by fishing enthusiasts. Children also enjoy the variety of nets that can be used to catch butterflies or other insects. Ready net can always be bought in the store. Children's options are sold in any toy store, and nets for catching fish - in places where various accessories for fishing and hunting are sold. But such a simple device can be made independently. How to make a net, what tools and materials will be needed for this, we will learn from the article.
Self-made landing net
A homemade landing net can be no worse than a purchased one, if you take high-quality materials for its manufacture and do the work carefully and accurately.
To make a landing net for fish, we need:
- Handle. It can be wooden, metal, solid or composite.
- Hoop. It is made from a metal bar or tube.
- Grid. You can buy in the store, or you can knit yourself.
- Insulating tape, wire, self-tapping screws - everything that is needed to fasten the components of the landing net.
Having chosen the handle for the future landing net, we prepare it for assembly: the wooden one is skinned, painted or varnished. Metal can be left as is, depending on its condition. We outline the places for attaching the hoop, if necessary, we drill holes.
If an old plug or telescopic rod is available, then you can use its knees to make a handle. The result is a net with a long handle, for example, for feeder fishing.
We bend a hoop from a bar or tube. Preference is given to the oval shape of the hoop, as more spacious and comfortable. The hoop must be perfectly smooth so as not to damage the mesh attached to it.
A ready-made bag for a landing net made of fishing line or fabric is bought in a store or knitted independently. True, this task for those who do not have experience in knitting networks is very difficult.
This is, in brief, the technology for making a homemade landing net. Now, having learned how to make a net with your own hands, let's turn to another homemade product - a lure for pike perch.
Photo nets
Production of pike-perch baubles
Homemade baits for pike perch are very diverse, but one of the most catchy and versatile baits is a bait made from a tube. It can be used both in summer and in winter, and you can always be sure that the predator will not bypass the spinner with attention.
To make this bait we need:
- Metal tube with an outer diameter of 7 to 10 mm.
- Clockwork rings.
- Tee.
- Swivel.
The tube can be either aluminum or made from another metal, such as copper. It will be very nice if you can find a stainless steel tube, this is the best option for zander lures. Stainless steel does not require additional processing (grinding) and is not afraid of exposure to water.
A blank 5 to 10 cm long is cut from the tube. One end of the blank is cut at an angle of approximately 20 degrees, the other at an angle of approximately 30 to 60 degrees. A tee is attached to the sharp end (20°) through the winding ring. We choose for this hooks sharp and high quality. Some anglers use a large carp hook instead of a tee, but only practice can show how justified this is.
The other end of the workpiece is equipped with a swivel, and there are two options here: attach it either to the sharp end of the cut or to the blunt one. This changes the game of the lure.
The bait is ready, you can go to the pond to catch fish. Despite the outward simplicity, the tube lure performs well in almost any conditions and water bodies, and allows you to successfully catch pike perch. Before starting fishing, it is recommended to clean the lure with a fine-grained sandpaper, but not polish it.
Making a net for fishing with your own hands
materials
The easiest way is to make a non-separable net. For him, you will need, first of all, a fishing line. The amount of this material is directly dependent on the size of the product. Experienced fishermen recommend using a white or light-colored fishing line so as not to scare away the fish.
The hoop is quite convenient to make from a duralumin tube. The ideal diameter of such an element is 9 mm.
In addition to the tube, you can use bent reeds, an ordinary tennis racket that has failed, or iron wire, whose diameter does not exceed 6 mm.
Dry and smooth wood of low weight is most suitable for the handle, many fishermen use ski poles or bamboo. With independent production, it will not be possible to do without cargo. It is usually made from a wire ring. It is installed in such a way that the load does not fall into the cells and does not prevent the net from opening normally when the fish approaches.
It should be noted that the diameter of the ring should be larger than the diameter of the cell.
To make a bag, you need to have a number of specific skills that not every fisherman has. The easiest way is to buy a net made of thick fishing line in a fishing store.
Assembly process
The sequence of actions in the manufacturing process is usually as follows:
- Weave a net bag or purchase a ready-made net.
- A hoop is constructed on which this mesh will be attached.
- Make a product handle.
- All elements are assembled into a common design.
A guide on how to make a fishing net
Today, there are many devices for fishing. Today we will analyze in detail such a non-tricky tool as the simplicity of a fishing net.
Each of us perfectly imagines what a net looks like, let's now figure out why it is needed.
You can’t do without it if you are fishing for large fish, because after you have caught a hook, you need to carefully pull it into a boat or ashore.
When you fish, in the water it has a weight that is less than real, so while the catch is under water, it is easy to drag it with a fishing line.
And when it comes time to pull it out into the air, it actively starts to beat with its tail, fight, and the line may not be able to cope with this function, it breaks and the prey breaks. This is where the net finds its use. You bring it to the shore with a fishing rod, and then, substituting a net under the tail, you easily and simply pull your catch ashore.
Another net can be used not for its intended purpose, but for example, as a cage, if you suddenly forgot it, but without it in any way.
Fishing landing net: purpose and application
The landing net is used to retrieve fish from the water. This reduces the chances of a line break, a hook or rod breakage, and a catch failure.
It must be applied in the following order:
- bring the fish as close to the shore, the boat or the fisherman, if he is standing in the water, as long as the length allows. Only then use the landing net;
- lower the landing net into the water, wait for the net to sink;
- bring the landing net hoop under the fish, pull it towards you and slightly up. Pull sharply so that the fish does not jump out.

How to make a landing net for fishing with your own hands?
At first glance, the design of a fishing net is simple and unpretentious, but in its manufacture there are some tricks that can be used to make it more efficient and functional in use.
For example, when purchasing this device in a store, they often sail when they enter the water. Because of this, it becomes quite difficult to bring it to the fish quickly and imperceptibly. Moreover, most often they are black.
Some anglers find the black landing net unattractive to large fish. It should be either transparent or green. By the way, it is believed that it is the green net that attracts fish better than others.
So, let's take a closer look at what is needed to make a landing net for fishing with your own hands:
- The first thing you need is a fishing line, you need a fairly large amount of it. You need to choose the right color so as not to scare away the catch.
- Needle. This is a special device used for weaving nets. You can buy it at any fishing store, but you can also make your own. A needle is made of aluminum or plastic. You need to take a plate from any of these materials, about 20 centimeters long. In the center of the part, you need to make a hole that will simplify the work with the fishing line. It will be held and will not unwind during weaving.
- Ruler. It should not be simple, its approximate size is 125x25x2 mm. You can make a ruler from any available material. A ruler will come in handy to make it easier to knit knots. The frame of such a ruler can be made of wire twisted several times. You can tie the base with a thread, or with something else, wrapping the base several times. This must be done so as not to damage the fishing line during operation, and not to violate its strength.
- Kapron thread. It will give strength to the product, the thread must be woven into the net for the net.
- Wire. Choose its thickness yourself, depending on the size and weight of the fish it will be used for. It is necessary to bend the rim of the desired diameter and size. Thicker wire is also used to make the handle. You can take it with the same thickness and make the handle and rim one-piece, while bending the wire several times on the handle.
- Wooden beam. To protect your hands, you need to put a wooden block on the end of the handle, using it as a comfortable handle.
Let's get to work.
You need to start by weaving the net. Its size will depend on the size of the rim. When weaving, you need to alternate fishing line and rope, while knots should also be alternated. For rope use - right, for fishing line - left. In this way, the network will be as strong as possible.
From the wire, bend the base of the net of the required size. If the wire is small in diameter, you can use it in two layers.
On the finished workpiece, using aluminum rings, but you can do without them, attach the mesh, giving it the correct shape.
Prepare a wooden beam by sanding it and varnishing it. Fix the wire frame in the bar. To do this, make holes in it, and tightly screw the ends of the wire into them. That's all, a simple and functional net is ready.
How to make a net with your own hands - the benefits
Whatever the purpose of the net, its independent production has a number of advantages:
- in a homemade fishing net, you can install a grid of the most optimal color for catching fish. It is known that a mesh that is too dark in color will only scare away fish underwater;
- the cost of a homemade net in most cases will be much less than in a store;
- if you make a net with your own hands, then you do it “in good faith”. Often, store nets require regular replacement due to breakdowns, and they are quite expensive;
- if you are making a homemade net for a child, you can choose the materials that you want. You can make a net of any size, adjusting it for different ages.
How to use correctly?
It is also worth understanding that even though the tap is a simple, at first glance, device, you need to be able to use it correctly.
Beginners usually do not succeed, but experience comes with time. The main task is to catch fish and not spoil other gear.
The landing net must be carefully and silently placed in the water, turned towards the fish, and slowly, without making sudden movements, so as not to frighten the fish, bring the landing net as close to it as possible.
Do not try to catch fish with one net, this is a gross mistake. By performing such actions, you can spoil the tackle, and it is extremely inconvenient to wield a long landing net. Next, the prey that has fallen into the gear must be pulled towards you, and this must be done without removing it from the water.
How to increase the catch of fish?
- Biting activator. This addition of their dry blood attracts fish most strongly in cold and warm water. Discussion of the bite activator "Hungry Fish".
- Raise gear sensitivity.
- Lures based pheromones.
How to catch with a net
How to catch fish with a net
A net is a mandatory attribute for catching fish. Of course, if you are catching small fish, you can do without this device. But attempts to pull a large fish out of the water with a fishing rod can be unsuccessful. Why do many anglers not buy a ready-made net for catching fish in the store, but make it on their own? The fact is that the store very often sells nets with black mesh. Experienced anglers are sure that this color of the net only scares off prey. It is better to use a mesh that is transparent in water or green, which is the most preferred color. In addition, for many ready-made nets, the net "sails" on the water, which only complicates the process of catching fish.
- As smoothly as possible, so as not to frighten the fish, bring the net and turn it with the rim towards the fish.
- Do not remove the net with fish from the water. Bring it to you under water so that the fish does not spoil the tackle.
Before you buy a ready-made fishing net or make it yourself, you should know a number of requirements that apply to this attribute of a fisherman:
- when choosing a net, you should pay attention to the length of the handle. If you are fishing from the shore, then the handle of the net should be more than 4 meters. It is this net that will allow you to fish out fish without coming close to the water. When fishing from a boat, such a long handle will only interfere. Of course, the best option would be a net with an adjustable handle;
- when choosing a net, you also need to pay attention to the shape and diameter of the “head” of the net. The larger the fish you are going to catch, the larger the diameter of the net should be. The shape of the rim is not as important to many anglers, although some prefer triangular nets, arguing that they are easier to use. Other anglers believe that it is the classic round landing net that floats less on the water than nets of other shapes. Remember that it is always easier to control a net of a smaller diameter, which is especially true for beginner anglers;
- the mesh size of the canvas in the fishing net is also important. The larger the cells, the easier it will be to manage the net under water. This is especially important for fishing in areas with strong currents. If you are catching small fish, then the size of the cells can be medium or small.
How to catch butterflies, caterpillars with a net
Even if you have never used a net for catching butterflies or caterpillars before, this process will not cause you any difficulties.
- Before you catch insects with a net, you need to be sure that this is allowed in a given place. In some areas, the use of a net without a special permit is prohibited.
- With the help of a net, you can catch not only adult butterflies, but also caterpillars, which is even more interesting. By catching a caterpillar, you can trace the entire development cycle of this insect.
- In order to catch the insect in the net was easier, you need to choose a net with a fairly wide rim.
- The mesh in the net should be transparent so that you can see the caught insect.
- The net must have a strong handle, as in the process of catching insects it can hit the ground.
- In order to quickly catch a butterfly or a caterpillar in a net, you need to find the place where these insects are most concentrated. To "lure" butterflies to your site, plant plants such as buckwheat, calendula, zinnia.
- In order to catch a butterfly sitting on a plant, sneak up on it from behind and throw a net with a sharp movement. As soon as the butterfly is in the net, quickly turn the net over so that the net closes the exit from it.
- You can try to catch a butterfly on the fly, but it's much more difficult.
- It will be more humane to release a caught butterfly after you examine it in a net. You can keep it in the bank for a while. If you caught a caterpillar with a net, then it can be placed in a bucket covered with a breathable material on top. If you do not forget to feed such a “pet”, then you can observe its vital activity for a long time.
Many fishermen treat such gear as a landing net with disdain, not considering it an important and necessary detail when fishing. But it's not.
You need to carefully approach his choice, and the result will not keep you waiting, successful fishing is guaranteed. Fortunately, today the stores provide a huge selection for every taste.
Preference should be given to products with a handle length of more than 4 meters. This length of the handle allows you to fish far from the shore, or on steep banks, without going down close to the water.
It is clear that the faster you put the fish in the net, the less likely it is to leave. It is better if the handle is folding, thereby you can adjust its length. About fishing from a boat, a long handle only interferes, and if there is a strong latch, you can choose the optimal length of the handle.
When choosing the size of the head, it is worth determining for what size of catch this tackle will be provided, it all depends on the size of the fish.
The shape of the head depends on your personal preference. It is generally accepted that a triangular head is more convenient to use, while a round head has a lower windage. But here everyone decides for himself.
It is also necessary to focus on the size of the network cells. The larger they are, the lower the resistance of the product and the larger the fish caught. Such cells give an advantage when fishing in rivers with a large current, it becomes much easier to fish out fish.
If the cells are small, then the size of the catch should be smaller. These nets are great for float fishing. The depth of the net must be suitable to accommodate the prey being caught.
The ideal depth is approximately equal to the diameter of the head, then the fish, which has passed in size into the net, can easily fit in its net.
Classifications and varieties
In fishing nets, there are three components: a head, a handle and a net. Accordingly, it is possible to classify according to the geometry of the elements, according to the material from which they are made.
There are three main shapes of the fish net head: round, triangular, quadrangular (square or trapezoidal). They are usually made from light alloys.
It is believed that the triangular shape is more convenient when you need to bring the landing net under the fish, but it is easier to lower the round head into the water, since there is less windage.
Another classification is based on the difference in the materials of the mesh (from fishing line, nylon thread or nylon) and on the size of its cells. For example, bottom tackle due to large sinkers is more confused in large-mesh ones, and wobblers, spinners and other baits for predators are more confused in fine-mesh ones.
Landing nets are classified according to the mesh material. Each has its own advantages. The fishing line is easy to wash, mucus from the scales does not stick to it, but the pike easily cuts it with its teeth. Nylon and kapron are gentler and less injure the fish, which is suitable for fishing on a catch-and-release basis.
The handle can be of different lengths. Therefore, two more classes are distinguished: short (fishing from a boat or in the water) and long (fishing from the shore). The longer the handle, the greater the risk of breakage.
There are two varieties of nets: non-separable and folding.

Non-separable landing net
Such gear is more reliable and stronger, but is rarely used, because due to the length it is inconvenient for transportation. This also includes short landing nets, but they are not used so often: only when fishing from a boat or in the summer, standing in the water.
Folding landing net
These devices can be telescopic and plug-in, made of carbon fiber or composite materials.
Telescopic nets for fishing are adjustable to different lengths and can be reinforced with threaded clamps. The plug version is more reliable and tougher.
How to make a landing net with your own hands

A landing net for fishing (also called a landing net and a landing net) is one of the accessories for catching large specimens. Thanks to its convenient and simple design, it does not take up much space during transportation and does not cause difficulties in operation. This is quite a useful fishing accessory that allows you not to miss it when playing the coveted trophy if the line suddenly breaks or the fish falls off the hook. In addition, the use of a landing net reduces the likelihood of damage to tackle under a significant weight of prey.
There is a large assortment of landing nets on the market, but if you wish, you can make it yourself - this is both reliable and economical. How to make a landing net for fishing with your own hands, you can find out from the information below.
Advantages of a homemade product
- Low cost. With independent production, it will be possible to save a certain amount of money, since its cost will turn out to be quite low. You will probably only have to buy fishing line, and everything else can be made from improvised materials.
- Reliability. When making a net, a fisherman immediately counts on the fish of what size and weight it will be calculated. In this regard, its reliability will be at a fairly high level. In addition, nets are usually not strong enough - their handle or ring can bend under the weight of the fish.
- Little sail. A do-it-yourself net will practically not be demolished under the influence of the current. This is largely due to the additional load of the product. This effect allows you to very quickly bring a net under the fish and pull it out of the water.
- Self-selection of colors. Products sold in fishing stores are usually woven with dark wire, which can scare away the fish, causing them to additionally beat, and this will greatly increase the effort to get them out of the water. With self-production, you can use any most suitable fishing line.

Advantages of homemade landing nets
Despite the large selection of branded products, a homemade landing net is quite in demand among lovers of outdoor activities. This is due to a whole list of positive characteristics:
- do-it-yourself devices are made from light colors of fishing thread, and purchased options are made from dark-colored fishing line. The dark tones of the forests scare away cautious fish;
- store landing nets have a large windage, which negatively affects the speed of approach to the caught prey;
- a net of its own production has the best qualities of durability, since the angler uses more reliable materials and monitors the quality of workmanship. The product is reliable and durable;
- affordable price. When purchasing a landing net at a retail outlet, after a while the consumer faces the problem of its failure. Often the price and quality of the purchased goods do not match. In self-manufacturing, improvised materials are used, which significantly reduces the cost of a fishing accessory. A do-it-yourself fly landing net will also have a low cost.
Advantages of a homemade net
Many anglers prefer to make their own net before fishing, rather than buying it from a store, for a number of reasons:
- Most purchased nets are made from dark-colored fishing line, and such colors, as practice shows, affect the quality of the catch. The dark color scares away the fish.
- Nets bought in the store have a large windage, and this negatively affects the speed of approaching the net to the caught fish.
- Reliability. Making a net on their own, the angler himself is responsible for its quality. He is interested in making a net that is reliable and durable in operation.
- Decent price for a bag. This factor also scares off potential buyers, since the cost of a net often does not match the quality. Having paid a considerable amount for it, anglers are faced with the need to replace it after a short period of time. When manufactured independently, its cost is much lower, due to the fact that almost all components of the net are made from improvised materials.
Necessary materials
The main questions that a fisherman has are “how to make a landing net for fishing with your own hands?” And what you need to do?". First of all, you need to prepare the following materials:
- fishing thread. It should be light woods and in sufficient quantity;
- needle(shuttle). You can buy a special device for weaving nets at any outlet specializing in fishing goods, or you can make it yourself. You can take aluminum or plastic as a suitable material, cut a plate 20 cm long, make a hole in the central part to simplify working with fishing line. So it can be held and prevented from unwinding during the weaving process;
- ruler with dimensions 125x25x2 mm. It can also be made by hand. The ruler is used for more convenient knitting of knots. The frame of the measuring device is made of wire material, twisted several times. The base must be wrapped around (you can use a regular thread), which will protect the fishing line from damage in the process of working with it;
- kapron thread. It is necessary to give greater strength to the finished product. It is woven directly into the landing net;
- wire. The thickness of the material is selected taking into account the expected weight and size of the prey. A rim of a specific diameter and size is made from wire. If a thicker material is used, then one-piece construction (rim and handle) can be made;
- wooden beam. This is a great option for making a comfortable and practical handle.
Basic knitting knots
With self-assembly of the net, one way or another, you have to work with fishing line, connect and twist it. The matter is quite simple, the main thing here is to approach this issue correctly, to acquire the skill of fast and high-quality knitting of knots.

Knots for knitting networks. a - straight; b - double straight line; in - clew oblique; g - double clew; d - Russian.
All nodes that are used in the fishing process must meet certain requirements, which are dictated by the practice of their use:
- The node should be fairly simple.
- Making it is easy and simple.
- A small amount of material is spent on its manufacture.
- Under load, it does not untie.
- If the load is variable, then the knot will not spread, as it has a certain strength.
When making your own net netting, there are several key types of knots that can be used:
- straight;
- Russian;
- clew oblique;
- double clew.
Straight
Most often, in practice, you can find exactly a straight knot, which is usually used in the process of knitting a net, the cells of which are of small size. The line consumption here is not too great, and all the work takes a little time.
However, such a product has a number of disadvantages during operation:
- Over time, the mesh itself and the cells begin to deform - first of all, this applies to a product made of thin fishing line.
- The holding force of such a bag is quite low.
Russian oblique with stoppers
The Russian oblique knot is the most reliable. However, in the process of its manufacture, much more material and effort will have to be spent.
In addition, the cell sizes here will have to be selected immediately as accurately as possible. The Russian oblique knot behaves perfectly even under heavy loads, it does not deform and does not intertwine.
Skew knot
Knit a clew knot quite quickly. It is characterized by low material consumption. However, it should be noted that under severe loads, the threads that are crosswise with respect to each other begin to deform. Professional fishermen do not recommend using this type of knot in the process of making a net from fishing line or from nylon threads.
clew double
The Russian and double clew knots are considered the most reliable. Making them is not too easy, and the material consumption will be quite large. This type of knot is the most reliable, since it is not able to untie. If necessary, it easily turns into an ordinary double knot.
Manufacturing process
Non-separable landing net
To make a practical and durable landing net for fishing with your own hands, you must adhere to the basic manufacturing rules. The process itself is quite simple:
- A bag for landing net is woven or bought ready-made;
- A hoop is made to fix the bag;
- A handle for a net is cut out of a wooden block;
- All elements of the device are connected into a single structure.
How to tie a landing net from a fishing line if there is no experience? Here it is important to follow the sequence in actions and be extremely careful:
- You need to select the size of the cells;
- Then take a ruler in one hand, and a shuttle (needle needle) filled with fishing thread in the second;
- Make a loop with the index finger of your right hand, attach it to the ruler, pull it out from under it on the other side. The next step is to make two contours around the index finger, on which the loop is located. After that, it is necessary to pass under the measuring device and draw it into a large loop. As a result of such actions, two loops should be obtained on the left hand;
- Support the thread of the loop with your finger, throw off the first one and pull up the shuttle;
- Correct the exact location of the knot on the ruler, press it with your finger and pull the needle over the measuring device, resetting the remaining loop from the left hand;
- Tighten the resulting knot as tightly as possible.
Important! When the knitted canvas is of sufficient length, it is necessary to gradually reduce the number of loops to zero, thereby narrowing it.
So that the hand-made landing net does not lose its shape during the hunt, it is recommended to tighten the last knot as tightly as possible.
If the landing net was not made by hand, but purchased in a store, then a cylinder is simply made from it by pulling the bottom edge into a bundle. And already in this part a small weighting agent is fixed, which is necessary for better immersion in water. Otherwise, the mesh will simply float on the surface.

Creating a simple non-separable landing net
How to make a hoop
How to make a landing net handle
After all the preparatory measures, it is necessary to assemble all the structural elements into a single whole:
- Fix the knitted stocking on the frame of a homemade landing net for fishing and wrap its edges with a strong nylon thread in several layers for greater reliability. Thanks to this winding, it is possible to protect the landing net from the fishing line from various damages;
- Mount the handle with soft wire material. If the rim moves in different directions during fastening, it can be fixed with a clamp used in car and plumbing repairs.
Now it’s clear how to tie a landing net for fish with your own hands. Such a simple and functional product will not allow hunters to be left without a coveted trophy. Despite some difficulties that arise during its transportation, the benefits of such a fishing accessory are much greater.
Folding landing net
After making sure that the manufacturing technology of a non-separable device is quite simple, even a beginner will understand how to make a landing net for fishing. Now you can consider how to make a landing net for fishing of a folding type.
This type of net is the most in demand, its indisputable advantage is its compactness. In the assembled position, it looks like a tube-handle.
The manufacturing process is similar to the previous one:
- A handle for a fishing landing net is made from any hollow tube of the desired size;
- The base is made of a duralumin rod, the diameter of which should not exceed 8 mm. Product configuration is up to you. Having measured 10-15 cm from the middle, it is necessary to cut the rod into two parts. The end of the short part near the incision site should be straightened at a distance of 7 mm. A hole with a diameter of 5 mm is drilled in the end. Then the shortened part must be bent again, and the long part is carefully filed so that it can be freely inserted into the prepared opening;
- The opposite ends of the base must be bent and also washed down;
- Make a common thread for screwing into the rim sleeve;
- The mesh bag is tied either with a strong thread or with brass rings with a diameter of 10 mm.
How to tie a net for a landing net was described above.
Landing net for wading fishing
Unlike other types of landing nets, the fly landing net has a compact size, is easy to use, and has a three-dimensional mesh.
For information! For manufacturing, it is better to take a silicone mesh for landing, it does not cause significant harm to the scales and mucous surface of the prey and does not allow the hooks and tees of the bait to catch on.

Homemade fly landing net
A fly landing net can also be purchased at a specialized outlet, but it is possible to make it at home. Here's how you can make your own landing net for wading fishing:
- the first option: disassemble an unnecessary tennis racket, instead of a net, tie a deep stocking for a net;
- second option: a fork of a willow or other flexible tree is taken as a basis and a mesh bag is mounted;
- the third option is a kind of folding landing net made of a spring plate.
A do-it-yourself fly landing net can be made both triangular and round in shape.
Manufacturing procedure
It is easiest to make a landing net from ready-made individual elements, fitting them to each other. But if you set a goal, you can create a fishing tool from scratch.
Landing net for fly fishing
A distinctive feature of a landing net for wading fishing is its compactness. It is convenient when moving the fly-fisherman and when playing the fish.
It is interesting! Many fly anglers, when landing on their own, prefer to use a mesh of silicone thread. Hooks do not cling to it, the fish is less injured.
There are several working options for making a fly net.
- As a base, you can use a tennis racket. It is enough to remove the threads to get the finished frame. It remains to attach a deep mesh, tying it with a nylon thread.
- The basic element of the landing net can be a Y-shaped branch of a flexible tree. In this case, the net will look like an isosceles triangle.
- The simplest light net is obtained by bending a circle of wire. It is inserted into a piece of aluminum tube. Fixing is done with a vice or a hammer.
Non-separable landing net with handle
For catching fish from the shore or boat, you can make a convenient landing net from scratch. First you need to weave the mesh.
Mesh production
Weaving technology is performed according to the following scheme.
- The angler is determined by the size of the cell.
- With the help of a ruler and a shuttle with a thread, weaving begins with the formation of a loop. Then you need to manipulate around the index finger, and get two more loops.
- When a cylindrical mesh is made, the direction of weaving is chosen in a circle. When it is possible to obtain the required height of the cylinder, it remains to narrow the grid, reducing the number of loops.
- If a mesh cloth fell into the hands of the fisherman, then a bag of the required diameter can be made from it by connecting the edges with a nylon thread.
- Important! The last knot should be made especially tight. Then the net will not untie at the crucial moment while fishing.
- In order for the net to immediately sink when lowered, a small load must be placed on the bottom.
Creating a hoop
You can make a landing net hoop from wire or a thin aluminum tube.
- First, the wire or tube is bent into a circle or oval. Its value depends on the size and type of fish. For bream, ide or large crucian carp, a net with a hoop diameter of 30-35 mm is suitable. It is more convenient to extract pike or pike perch from the water with a triangular net with a side size of 50-60 cm.
- To connect the hoop to the handle, the ends of the wire are bent in the form of two parallel segments 5-10 cm long.
How to make a landing net with your own hands
- This is an auxiliary tackle that is used in fishing. Thanks to him, you can successfully bring out large fish, without being afraid of her cliff. To do this, the landing net is wound under the prey, preventing it from returning to freedom in the event of a break from the hook.

The pod consists of:
Nets for knitting auxiliary gear are made on the basis of cotton and kapron threads. Some manufacturers take the cord as a basis (for cone types). The lower part of the product is equipped with a weight that resists the floating of the mesh material.
Ideally, a metal ring will perform the function of a weighting agent, the diameter of which will exceed the size of the network cell. You can impregnate the threads to extend the service life using linseed oil or by staining with aniline dyes. The depth of the mesh should not exceed 50 cm.
The hoop is made from rods or duralumin tubes. Steel wire (galvanized) can also be used. The handle vaguely resembles a fishing rod and is made from bamboo. The length should not be less than 1 m 10 cm. Folding products will bring maximum comfort.
The main advantages of the landing net include:
- Reducing the risk of the catch falling off the hook when playing.
- In the absence of a cage, use the product to store fish in a pond.
- The possibility of bringing large specimens of fish ashore without entering the water.
Weaving your own canvas for a net
Before starting to tie the knots of the net, you should prepare a shuttle, the so-called. needle. For its manufacture, a sheet of aluminum (plastic), about 20 centimeters long, is suitable. To make it easier to work with the fishing line, a small hole with a tongue is made in the very center of the aluminum sheet. The fishing line in the process of weaving knots should not unwind and interfere with work. Although, in order not to waste time on making a shuttle, you can buy it in a special store.
In weaving, a special ruler with parameters of 130-160 mm is useful. It must also be made from any durable improvised material. Its use is necessary to facilitate the knitting of knots (you can use any, but were not sliding).
Having decided what size of cells should be knitted in a landing net bag, let's get to work:
- A ruler is taken in the left hand, and a needle with a fishing line wound in advance in the right hand.
- Pick up the loop with the index finger of the right hand, put it on the ruler, pull it out from under it from the back side. Then 2 loops are made around the index finger, on which there is already a loop, threaded under the ruler and drawn into a large loop. After performing these manipulations, two loops are formed on the left hand.
- Supporting the thread of the loop with your finger, drop the first one, then pull up the needle.
- Adjust the exact position of the knot on the ruler, press it with your finger and pull the needle over the ruler, while lowering the remaining loop from your left hand.
- Tighten the knot well.
To obtain a cylindrical shape, the net is knitted in a circle. The optimal depth of the tied bag should be 70-80 cm, and the size of its cells 25-30 mm (depending on the size of the fish). When the size of his canvas is sufficient, you should gradually narrow and reduce the number of loops in it to zero. In order for the landing net to keep its shape, you must try to tighten the last knot well.
If the canvas for the landing net was not connected, but bought in a store, then you need to make a cylinder out of it, pulling the bottom edge into a bundle. Attach a small weight to the bottom of the bag. It is necessary so that when lowered into the water, the mesh sinks well, and does not float on the surface.
Landing net types
Such a simple device has many varieties, which are divided according to features. According to the variety of the catch, landing nets go on sale of the following types:
- for white fish (roach, bream, etc.);
- for predators (zander, pike and perch).
This division is very conditional, since the mass of the catch plays a large role in choosing the type of landing net. According to this characteristic, the products go on sale:
- light type - the main purpose is to help in fighting fish weighing no more than 2 kg,
- heavy - can withstand trophies weighing 8-12 kg.
Experts advise to purchase both options, which will allow you to be prepared for any catch. Many novice anglers make the mistake of trying to save money by purchasing a heavy landing net. After an hour of catching, the hands begin to hurt from the severity of the product, since the constant use of a weighty device requires considerable physical strength.
Landing nets can also be classified according to the type of mesh. Distinguish:
- forest view- designed for fishing with the use of a wobbler, baubles with a large number of hooks. The abundance of hooks when playing can damage fabric varieties of products.
- fabric- ideal for whitefish fishing. The main advantage of this type of landing net is the presence of a smooth burlap that prevents injury to prey. To extend the service life, dry the material thoroughly after fishing.
The most popular brands of landing nets are:
In addition to purchased options, you can use homemade landing nets. However, the quality indicator of tackle will depend entirely on the master.

Making a butterfly net
You will need:
- Stick made of wood or plastic
- Textile
- Wire
- Insulating tape
- Start by making the net handle. If it is made of wood and has roughness, sand it with sandpaper so as not to grab splinters. Make an arc out of the wire.
- The most popular shape is a circle, although the net can be triangular or oval. Leave a piece of wire with an allowance to attach it to the handle. Attach the arc to the handle by making two holes in it, through which thread the ends of the wire.
- Wrap the joint with electrical tape.
- For the bag, take the fabric in a fine mesh. It can be gauze, capron, tulle.
- Sew a triangular bag and attach to the hoop. To prevent insects from clogging the corners, make the corners to a minimum.

Armed with a net, you can easily catch delicious fish and colorful butterflies. And having made it with your own hands, you will be sure of the quality and durability.
Do it yourself
Despite the external simplicity of the design, knowledge of certain secrets will allow you to build the most effective and functional landing net. In addition, you can eliminate some of the shortcomings that are inherent in purchased models.
For example, the presence of windage when lowering into the water surface. This feature is inherent mainly in products painted in black tones. In addition, experts believe that the dark shade of burlap scares away fish. In this case, it is more appropriate to use green or transparent shades of the network.
Materials for manufacturing and what is better to use
When making a landing net, you can not do without the following materials:
- fishing lines- the amount directly depends on the dimensional characteristics of the device. Experts advise choosing fishing lines of large diameter and light colors.
- Hoop- is made of a duralumin tube, the diameter of which does not exceed 9 mm. You can take reeds or iron wire as a basis, the diameter of which is 7 mm.
- Net handles- made on the basis of bamboo, ski pole or dry wood.
- cargo- a wire ring, the size of which exceeds the diameter of the network mesh, which will prevent it from getting inside.
- Burlap- you can purchase a ready-made version or weave a network with your own hands.
- Electrical tape.
- Thick thread.
- Copper (aluminum) wire.

Step by step manufacturing process
The instructions below will help you avoid possible errors. Accurate adherence to technology will contribute to obtaining high-quality, durable and reliable auxiliary gear.
The process consists of the following steps:
- Buying a ready-made network or weaving a homemade version.
- Making a hoop designed to fix burlap.
- Preparation of the landing net handle.
- Connecting all parts of the structure together.

How to increase the catch of fish?
For 7 years of active passion for fishing, I have found dozens of ways to improve the bite. Here are the most effective ones:
- Biting activator. This pheromone additive lures fish the most in cold and warm water. Discussion of the bite activator "Hungry Fish".
- Raise gear sensitivity. Read the appropriate manuals for the particular type of tackle.
- Lures based pheromones.
How to make a net with your own hands
How to make a butterfly net - instructions
In order to make a net for catching butterflies with your own hands from improvised means, you will need:
- thick aluminum wire;
- stick, thin wooden rail or any other material for making a net handle;
- insulating tape;
- mosquito net;
- needle and thread.

The process of making such a homemade butterfly net for catching butterflies will not take you much time. Follow instructions:
- first you need to make a net frame out of wire. Bend the wire into a circle of the desired diameter;
- the ends of the wire must be bent so that they are parallel to the handle of the net;
- attach the aluminum frame to the handle with electrical tape. If it is assumed that the net will be used by a child, then the handle of the net must be made as smooth as possible;
- now you can start making the mesh for the net. Fold the mesh in half, cut a piece in the form of a rectangle. The length of this rectangle should be equal to the circumference, and its width - the desired depth of the net;
- with the help of threads and a needle, sew the ends of the mesh so that a cylinder is obtained;
- now you need to attach the resulting mesh bag to the aluminum frame with threads and a needle;
- now the net is almost ready. It remains to fasten the end of the bag with threads or tie it into a small knot. A simple net for catching butterflies or other insects is ready.

How to make a landing net for fishing - instructions
Every fisherman is proud of the big fish caught. In such fishing, a quality landing net is simply a must. If you like to do everything with your own hands, then you can make a fishing net yourself from simple materials. The manufacturing process will not take you much time, but the resulting net will last more than one year. What do you need for a homemade fishing net?
- Fishing line. When acquiring fishing line, it is better to go to a fishing store. Choose the lightest shade or green. The line should also be as strong as possible, so give preference to the option with the greatest thickness.

- Duralumin tube, thick wire or any other material for making a net hoop. The material must be strong enough to support the weight of a large fish. The thickness of the tube or wire should be between 6 and 9 mm.

- A wooden stick or any other device for making a net handle. You can use bamboo, an old ski pole, a handle from an old tennis racket.

- Wire. This material is needed to create a load. It is important that the wire ring be larger in diameter of the mesh cells so as not to interfere with its opening.

- Net bag. Ready-made canvas for a fishing net can be purchased at any fisherman's store. You can also weave such a fabric yourself using wire.

If all the necessary materials and tools for making a net for fishing are ready, then you can get to work:
- making a fishing net should start with weaving a canvas if you decide not to buy a ready-made version in a store. If you have never experienced fishing netting before, then it can be quite difficult to master this skill on your own. It would be better if an experienced person in this matter shows you clearly how to weave a net. After all, the net for a fishing net must be strong, the knots must not be untied under the weight of the fish, the net must not be deformed, etc. For weaving you will need a ruler, knitting needle, fishing line.

Some anglers weave a nylon thread into the bag, which will give elasticity to the product. Various types of knots can be used in mesh knitting: straight, Russian, clew, double clew and others.
The most popular is the direct knot, since the consumption of material with this method of weaving is minimal, the cells are small, and the weaving speed is high:
- bend the wire or other material into a circle or other shape. If the wire is thin, then use it in 2 layers;
- now you need to attach the rim of the net to the handle. Make a hole in the handle where the free ends of the wire or tube are fixed. With the help of electrical tape, the entire structure is firmly fixed;
- in order for the mesh to acquire the desired shape, rings can be made from aluminum wire. Fasten them inside the bag;
- now it remains to attach the finished bag to the rim using wire or any other material at hand. A reliable and strong fishing net is ready.
How to make a net for the pool - instructions
What could be more beautiful than a spacious outdoor pool on your site? But it is very important to take care of the pool properly and in a timely manner. Swimming in dirty water is not only unpleasant, but also fraught with various diseases. If the pool is in the open air, then garbage of various origins will appear in the water regularly. It can be tree leaves, garbage carried by birds. It is for cleaning the pool in the house that there should always be a net. Of course, it can be purchased at the store. But we will consider the budget version of the net, which you can do yourself without much effort:
- to make a net for cleaning the pool, prepare the following materials: a piece of mosquito net, any long stick, wire, electrical tape;
- if your pool is large, then the handle of the net should be long. You can use an old rod, an adjustable mop bar, etc. If the length of the net is sufficient, then to collect garbage in the pool, you just need to walk along its perimeter, reaching with a net to the most secluded places;
- From the mosquito net, cut a piece of the length you need. With the help of threads and needles, sew it so that you get a cylinder. The bottom of the bag can be tied in a knot or also sewn with a thread;
- make a net rim from flexible wire and fix it with electrical tape on the handle;
- now it remains to fix the bag on the handle. This can be done with thread or thin wire. The perfect home net for cleaning the pool is ready.

How to make a landing net for children - instructions
You can make a net for a child from rather unusual things. For example, from an old tennis racket that has been idle in the country for many years. If you still have a mesh bag, in which vegetables are usually put, then making a net will be without financial costs. Consider detailed instructions for making a landing net for a child, with which you can easily catch butterflies or any other insects.
- Prepare an old tennis racket. If there is still a mesh left in it, then remove it with scissors or a knife.

- After the net is removed from the racket, we get a ready-made base for the future net. The huge advantage of such a children's net will be that you do not need to work on strengthening the handle, it was initially made quite firmly and reliably. There is no need to work on the surface of the handle so that the child does not get hurt while playing.

- Next, you need to make a net for the net. For this purpose, a mesh bag, which is usually found in any country house or private courtyard, is ideal.
- Using sharp scissors, cut the bag to the desired net length for the net.

- All parts of the net are ready, and now they just need to be connected. You can use an ordinary thread and a needle, or you can use a flexible wire to fix the net on the racket.

- After these simple manipulations, the old racket will turn into a convenient net that can be offered to a child for outdoor games.

How to make a children's landing net for catching water - instructions
For the development of fine motor skills of the hands and just for a cheerful mood, the child can be offered water games with a net. Just pour water into a basin or any other container, place various small objects, toys there. The kid will be completely absorbed in the process of "catching" these items with a net. You can make such a net from quite affordable materials. You will need: a plastic bottle (for example, from milk), scissors, a mosquito net, an awl, adhesive tape, a needle and thread.

- First you need to make the base for the net. With sharp scissors or a knife, if it’s more convenient for you, cut off the bottom of the plastic bottle, the neck, leaving a ring 1.5-2 cm wide. You need to cut these parts in such a way that a single strip remains, which will act as a handle for the net. The width of such a handle should be about 2-2.5 cm.
- Do not rush to throw away the cut parts of the bottle. Long strips will go to strengthen the handle of the net. Place one strip inside the ring and the other outside. Carefully rewind this design with tape. Since the landing net is for children, it is necessary to take care of safety. Use scissors to round off the sharp corners of the handle. Tape will help make the design even safer.

- You can also use a hole puncher to make a hole in the net handle. This is necessary in order to hang the net after the game to dry.
- Now let's start creating the most important part of the net - a mesh bag. Fold the mosquito net in half, draw a triangle with a rounded base and cut out the blank. Sew the bag with a thread and a needle and overcast the edges for strength.

- All parts of the children's net for fun water games are ready. It remains to combine them into a single structure. Using an awl, connect the mesh bag to the plastic ring.

For safety reasons, this work should only be done by an adult. Funny children's net is ready.

How to make a landing net for an aquarium - instructions
If you decide to start breeding aquarium fish, then you will definitely need a net to clean the aquarium. The net can also be used to transport fish. A homemade aquarium net has many advantages. First, you can make a net of the most non-standard size. Secondly, it is much more economical to make a net with your own hands than to buy it in a store. To make a net for an aquarium, you will need the same set of materials and tools as for making other types of nets.
- Prepare flexible wire, electrical tape, material for making a net bag and a handle.
- First, let's start sewing a bag for a net. You can use any thin fabric - organza, chiffon, nylon. Some aquarium hobbyists find that the most convenient shape for a net bag is a rectangular shape with a flat bottom. They argue this by the fact that it will be most convenient to move fish in a net of this shape. You can choose any form convenient for you. If you make a pattern in the form of a parabola, then the bottom will be rounded, if you make a cross-shaped pattern, then flat.

- If you need a very small net, then the handle for it can even be made from wire, from which you will make a rim. It is more convenient to compress the wire with pliers. After the rim is ready, connect it to the handle with electrical tape.
- Fix the bag on the rim with threads or in any other way. A practical and easy-to-make aquarium net is ready.
Independent weaving of a net for a net
First of all, we prepare the shuttle. For manufacturing, you should take an aluminum sheet with a length of 20 cm. We construct a hole in the center of the sheet with a tongue, which will facilitate the work with the fishing line. Never unwind the thread during the manufacturing process! If desired, you can purchase a ready-made shuttle in a specialized store.
- We place the ruler in the left hand, and the needle and fishing line, the winding of which was carried out in advance in the right.
- We hook the loop with the index finger of the right hand. We adjust it on the ruler and bring it out from under it from the opposite side.
- We make 2 turns around the finger, on which the loop was originally located. We pass it under the ruler and draw it into a large loop. Similarly, we get 2 loops on the left hand.
- Holding the thread of the loop with your finger discard the first and tighten the needle.
- We adjust the exact location of the nodal part on the ruler. We press our finger and pull the needle over the ruler. At the same time, we lower the loop from the left hand.
- Tighten the knot firmly.
To get a cylindrical shape, we knit the network in a circle. The ideal mesh size is 25 mm, the depth of the burlap is about 60 cm. Having driven out a sufficient size of the bag, we gradually narrow it and reduce the number of loops, gradually reducing them to zero. To give the landing net a good shape, tighten the last knot tightly.
Using shop cloth instead of homemade burlap, we make a cylindrical shape out of it and pull the bottom edges into a bundle. At the bottom we equip the canvas with a weight, which will ensure the quick immersion of the bag into the water surface.

Hoop (base) for net
Making a handle for a net
We are preparing a light wooden rod with a length of 1.20 m and a thickness of not more than 27 mm. We process the surface with sandpaper. If desired, you can wrap it with insulating tape.
To connect the finished parts of the structure into a single whole, you should:
- Fix the bag on the frame part.
- The edges of the frame are wrapped with high-strength nylon threads. It is advisable to wind in several layers, which will prevent the fishing line from being damaged by sharp stones located at the bottom of the reservoir. In addition, the landing net will be transparent, which will not scare away the fish.
- We fasten the burlap with the handle of the net using soft wire. It is possible to ensure reliable fastening by using a clamp.
Auxiliary gear is easy to use, but often saves the angler from missing the catch.

Knots used when tying a net
Knots are a special way of connecting fishing line or ways of forming loops. Knitting any knot is a simple matter. The main thing is to learn how to knit it correctly, efficiently and quickly enough, and this requires at least a little practice.
All knots used in fishing are subject to a number of requirements dictated by the very practice of their use. He must:
- Simple, quick and easy to knit.
- Have a small consumption of material.
- Do not untie under load.
- Under variable loads, do not creep, that is, have sufficient strength.
- Comply with your assignments.
When self-tying a bag in a net, several types of knots are used.
The most common and frequently used are:
Straight knot.
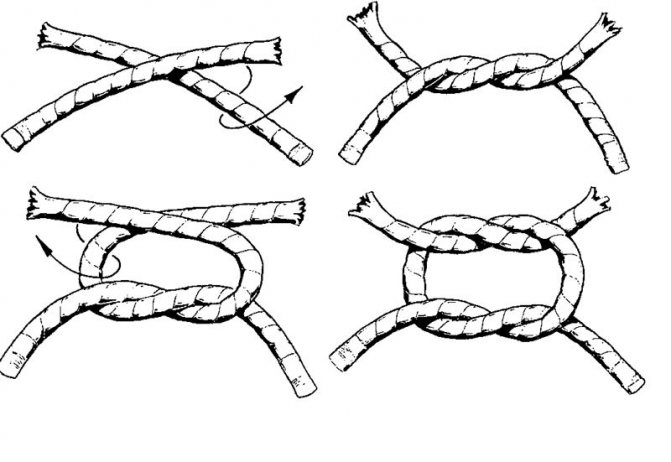
Russian (oblique with stoppers).

Skew knot.
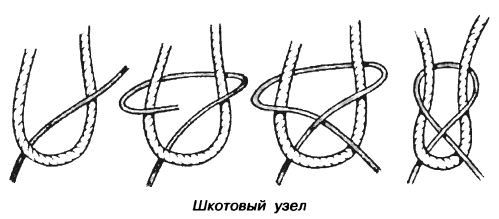
Shkotovy double.

The most common of these nodes is the straight line. It is used when knitting a bag with small cells, while the consumption of fishing line or thread is small. The speed of knitting a bag with this knot is quite high. But there are small disadvantages of using it: after a while, the cells and mesh of the bag are deformed (especially in a bag knitted from fishing line), the knots do not have great holding power.
The process of knitting with a clew is quite fast and at the same time the material consumption is small. It has sufficient holding power. But under heavy loads, lying on the threads arranged crosswise, the cells of the bag are deformed. This knot is not recommended when knitting a bag of fishing line and nylon threads.
The most reliable types of knots are Russian and clew double knots. But compared to straight and simple clew, the material consumption is much higher, and the knitting speed is lower.
Features of the manufacture of a folding net
The only drawback of the landing net is the inconvenience of transportation. However, this can be avoided if a folding type of structure is made. This variety consists of a tube-handle, hollow inside and closed with caps on both sides.
You can make a convenient option for gear yourself:
- As a hand in this case, it is more appropriate to use hollow tube of the required size.
- Having prepared a duralumin twig with a diameter of 7-8 mm, bend it, giving it an oval shape.
- Departing from the center about 12 cm, cut the twig in half.
- The tip located near the shortened part of the rim, not far from the section of the cut, straighten.
- Drilling in the end hole with a diameter of 5 mm.
- Bend the shortened end again.
- The tip of the long part is washed down to a tight fit. into the resulting hole.
- We bend and file the opposite ends of the hoop to make a common thread, which will contribute to screwing the rim into the sleeve.
- We tie the mesh material with rings with a diameter of 10 mm. It is advisable to use brass rings.
- We tie a small piece of tube (rubber) to any 2 rings. The diameter of the rubber product should not exceed 6 mm, and the length - 11 cm.
- The design is ready to use!

How to make a net yourself
The easiest to manufacture and design is a homemade net - non-separable.
Material for manufacturing and what is better to use:
Fishing line. Its amount required to make a net will depend on the size of this device. It is recommended to use a thick line of light shades.
Hoop. The material for its manufacture can be a duralumin tube with a diameter of about 9 mm, bent reed or iron wire with a diameter of up to 6 mm, and an old tennis racket is also perfect.

Net handle. For its manufacture, dry and light wood is often used, a ski pole is suitable, and if possible, it is better to take bamboo.


Net bag. The easiest option is to buy a net of thick fishing line in a specialized store, or you can tie the bag yourself. Additionally, you should stock up on electrical tape, thick thread and soft, preferably copper or aluminum wire.
Improving the purchase option
How to fix deficiencies or improve the landing net for yourself:
- With an uncomfortable burlap mesh, you can replace it yourself purchased or homemade option with the desired mesh size.
- If there is an excess length of the handle, you can shorten it. Too short option can be replaced with a suitable homemade one.
- The poor quality of net knitting also negatively affects the functionality of auxiliary gear., so it's worth replacing the network with a better instance.
- If you want to become the owner of a store landing net, you should select models from trusted manufacturers and not try to save money by purchasing less quality products, but at a bargain price.
Making a net for catching fish
Materials:
- Hoop (wire will do, an old badminton racket, bent reeds)
- Handle (wooden or old ski pole)
- Weight (wire ring)
- Bag (buy a fishing line net in the store or tie it yourself)
- Insulating tape
- Wire (copper or aluminum)
- Thick threads
- The first step is to weave a net bag out of line. There are tips on the Internet about strong knots for weaving. It is easier to buy a ready-made bag of fishing line.
- Use a light-colored fishing line, dark fish scares away.
- Next, bend the hoop from the prepared material in the shape of a circle or oval. For catching a medium-sized fish, you need a diameter of 35 cm, for a large one - 50 cm.
- From the hoop, leave taps for the handle.
- Wrap the wooden handle with electrical tape. Choose a longer handle, with a net with such a handle it is more convenient to fish.
- Attach the net bag to the hoop and secure with strong thread. Fasten the handle to the base with wire.

- When making a landing net, you should make a handle at least 1.20 m long. Shorter handles are inconvenient to use.
- Experts advise making wide networks(60 cm), which will make them versatile and equally convenient for both small prey and trophies.
- Picking up the line, you should give preference to light colors.
- Egg-shaped landing net allows you to comfortably plant large specimens.
- When hit in the net the trophy should not be lifted by the handle, which can provoke a break.
- The most reliable handles are made on the basis of duralumin material. They are absolutely not subject to deformation and are able to withstand 15-20 kg catches.
- The handle can be either a composite type or a solid one. The latter option has a high degree of reliability, and the composite option does not complicate the angler during transportation.
A group of anglers during interrogation revealed the name of the secret bait.
Making a handle for a net
For her, a light and well-dried tree rod is taken, usually from 1 m to 1.5 m long (as it suits you), with a thickness of 25-27 mm, the surface is treated with sandpaper or wrapped with tape.
Connect the finished parts of the landing net into a single structure:
- Fasten the bag of the net on the frame, and wrap the edges of the frame with a strong nylon thread. It is recommended to wrap in several layers. Such a winding will give the net transparency, protect the fishing line from damage on stones and sharp objects in the water.
- Fasten the handle of the net with its bag put on the base with soft wire. To keep the rim from moving, you can also use a clamp to secure it to the handle (it is often used in plumbing work and in cars).
This fishing gear is simple and has long been used to catch fish, preventing anglers from being left without a catch. A large number of its advantages compensate for the inconvenience that occurs during its transportation (carrying).
We make a net handle and a ring with a mount
Take a stick with a diameter of no more than 10-15 mm. The stick must be well processed so that both you and the child do not splinter your hand. If the stick is serrated, sand it, you can varnish or varnish it.
Now we make a steel ring. Cut the wire with wire cutters. The length depends on the diameter of the ring and on your preference.
The optimal length is 0.7-1m. The wire should be no more than 3 mm. Now make an arc. To make it, just wrap it around a tree trunk. Nets can be of various shapes: round, rectangular, square. But the most reliable net shape is a circle. This form is both rigid and occupies a maximum of space with a minimum of perimeter. In addition, the circle is also convenient in that the fabric does not wear out as much as on a rectangular shape. The presence of hard corners contributes to the rapid wear of the fabric. But make the hoop, taking into account the fact that the ends with a hanging fabric measuring 10-15 cm should remain.
From the remaining ends you should make two shoulders. One shoulder should be longer than the other. Bend them down perpendicular to the circumference of the shoulder. Bend the ends of these shoulders down. Bend the ends of the shoulders inside the structure. Do this very carefully, as you and your child can be seriously injured with them. In the correct scenario, such a design should lie in the same plane. Fastening to the handle The fastening of the handle must be very strong, as a falling stick will only interfere with your activity with the child. Therefore, make the mount strong. To make such a fastening, you must drill two holes in the handle, the depth of the holes must be at least 1 cm. Only in this way the fastening of the handle will be reliable. Such holes must be drilled on a par with the shoulders. The ends of the shoulders are hammered into these holes. An indicator of reliability will be considered that the shoulders should fit snugly against the handle. Now we need to attach them. To do this, wrap them with wire to the handle. Fasten tightly.
Fly sets
Which set of flies to choose? When you go fishing, you already have a rough idea of what kind of fly you will be catching. Therefore, it is important to have several flies of the same type in several colors.
And ideally, everyone wants to have their own universal set of flies. Such sets are assembled independently. There are five silhouettes that mimic five different flies:
- Mayfly.
- caddis.
- Vesnyanka.
- Mosquito.
- Field insect: grasshopper, ant, beetle.
Based on these silhouettes, you need to choose your set. Flies are knitted on hooks of different sizes. The set should contain various hooks.

A set of flies for chub
Sponge
When the fly gets wet, you can blot it with a special Amadon sponge, covered inside with hygroscopic moss. Such a sponge will gently and delicately dry any fly.
Box
Be sure to have two boxes for flies. One for dry, the other with a vent, for those who have already been in the water.
How to improve a purchased net for yourself (which is usually a complaint)
It would seem that among such a variety of nets on the market, it is very easy to choose the one that will meet all the requirements.
But often having bought a net, after some time disappointment may come for some reasons:
- Fine mesh in the net bag, and this affects the size of the fish caught.
- The handle of the net does not fit the length.
- Poor quality of knitting of loops, which leads to their uneven stretching or tearing.
- Poor quality of the product itself.
How to fix deficiencies or improve landing net for yourself:
- If you are not satisfied with the mesh of the bag, then you can change it yourself by buying it with the desired cell size or tying it yourself.
- If you are not satisfied with the length of the handle, then if it is long - shorten it, if it is short - replace it with another one that is suitable in length.
- With a low quality of knitting loops, it is recommended to independently change the mesh in the bag for a new one by tying or buying another one.
- If the quality of the landing itself is not satisfied, refuse to purchase, and in the future choose and purchase only the product from trusted manufacturers.
How to choose a landing net for an aquarium
Very often when I came across information about nets, I always wondered if aquarists know where to get these same nets, or how to make them correctly, what this or that net is for. After all, the standard “soup side” that can be found in stores is of little use for an amateur aquarist who begins to master the basics of aquarium skill in subtleties. Naturally, each net is necessary for completely different purposes, some aquarists catch food in reservoirs, others catch fish in an aquarium, others collect food from incubators, and catch fry from spawners.
So nets, First of all, you need to understand the device of the net: It consists of a handle, which is fixed on a metal plastic or wooden rod, on the other side of which a metal frame is fixed, which can, has completely different sizes and shapes, from round to polygonal. The frame, as a rule, is covered with fabric or synthetic material, which also has different shapes and lengths of the “sleeve” (net depth)
Now let's take a closer look at each element individually.
A huge task is assigned to it; it should not only be comfortable, but ergonomic and have a comfortable grip. Since the aquarist sometimes has to spend hours holding the handle of the net while wandering around the reservoirs in search of food, or perform complex movements in the aquarium in pursuit of a nimble fish. Therefore, if you are going to make a net yourself, then for a large net it is best to make a handle, either from a bamboo stick or from chiseled dense hardwood. Very often, the function of the handle is replaced by a net rod, it is made either from wire or from wood (wood species that are not afraid of moisture) or from plastic.
The main criterion put forward for the "rod" is, first of all, reliability, and its least resistance to the water column.
For the manufacture of large nets, a duralumin tube with plugged ends is also suitable, this will allow air to keep the net afloat if it falls into the water. The frame of the net, depending on the purpose for which the net is intended, its frame is also made. If the aquarium has most right angles, then it is more expedient to use rectangular nets, but if you are catching live dust in the water column, then the shape of a round net will save you the trouble of choosing hooked algae from the corners of the net. The net frame is usually made of wire of stainless materials, such as electrodes for welding stainless steel or nichrome wire.
In order to increase the service life of the fabric of which the frame will be fitted, in order to avoid rubbing against the metal. Before bending, the frame wire is placed in a plastic tube, or sealed with a thermotube.
One of the most important criteria is the choice of fabric for the net. After all, the main task of the net is to filter the feed from the water. But it is not advisable to use a very fine cloth, since small particles of debris and other suspension can get into the place with food, moreover, too fine cloth will create sufficient resistance to the species, which will significantly increase the time of catching and the effort expended. Therefore, the fabric for each net is selected individually, it is desirable that it be a synthetic fabric that does not rot. Who remembers in the USSR, old women's tights served for these purposes, it must be said that it was not the best choice, but still they coped with their task.
Very often in the literature you can find approximately the following text: "to catch live dust in reservoirs, nets made of parachute fabric No. xxx are used." A beginner immediately has a question, where to get a piece of this fabric. In large cities, it is possible that there are shops that sell the necessary types of matter that can help the aquarist in his endeavors, but what about the inhabitants of the outback?
For them, I will try to explain what fabrics can be used and where to get them. 1 most of the fabrics you have at home, you just did not pay attention to them: a) tulle. The time when you can find cotton tulle in homes has long since sunk into oblivion, modern synthetic tulle is an excellent material for sewing nets.
b) bows, the cheapness of this fabric is simply captivating. And the small size of the mesh allows you to sew nets for catching food such as nauplii.
c) the second hand market, if you look at the lining of many things, then by its structure and mesh size, you can choose a material that will filter water no worse than parachute fabric, trapping living dust.
Another serious nuance that you should pay attention to when sewing a net is the shape of the cap. Beginning aquarists make it sharp, which is not entirely correct, since the food is clogged into the very corner, which is then quite problematic to extract from it. The bottom of the cap at the juice should have the shape of the end of the sock. Therefore, if you cannot tailor the shape you need yourself, contact a sewing workshop for the help of a tailor.
After that, it will not be difficult to overcast and sheathe a cap made of fabric around the frame.
How to choose a landing net for an aquarium, 5.0 out of 5 based on 4 ratings
A very important thing is the landing net for fly fishing. Of course, experienced fly anglers who are fluent in casting techniques do not need this accessory, they pull the prey by hand. But sometimes they also find themselves in situations where it is necessary, and for beginners this thing is simply necessary.
Landing net is needed for playing big fish. So, it must be large. Since you will be moving around a lot when fly fishing, it would be nice to have the landing net crawl under the straps of your backpack. Landing net should have solid edges all around.

Fly landing net
In order to be able to pull the hooks out of the purse without any problems, the most optimal material for making it is fishing line. The mesh size and strength of the line depends on the size of the fish. Some have adapted to unhook the hooks from the cloth landing net.
A good landing net should be deep with a solid handle made of solid material. There is another version of the handle - telescopic, such a landing net is convenient for transportation.
How to make a net
Hello to all readers of my blog!
Every aquarist can make a net for an aquarium. Perhaps, someone will say, it’s easier to buy and will be partly right, why bother with a needle, thread and wire, when you can just buy it, especially since it doesn’t cost much money.
In fact, it depends on the net, or rather, on its size, how much easier and more convenient it will be for you when working with catching fish. The idea for using a large net (a hoop 20 cm in diameter) did not come to me immediately.
The big net, which I now use for fish, was originally made for catching coretra and daphnia, but the daily torment with catching fish for buyers prompted me to use a large net, because it takes a lot of time and patience to catch fish with an ordinary net.
If you don’t often catch fish and don’t go after coretra and daphnia, you may not need a large net, but it still doesn’t hurt to make a spare net. Once in a pet store I bought zebrafish, I felt sorry for the seller, who took about 15 minutes to catch 4 fish. At that time, I thought how much a big net is now missing.
How to make a net with your own hands
To make a large net, you will need: a piece of hard wire approximately 120 cm, preferably (not necessary) from stainless steel with a diameter of 4-5 mm. Not very dense fabric organza, chiffon, capron, nylon, voile No. 7-76.
The shape of the hoop, square or round, does not matter, but I make it square with the dimensions of each side 20 cm, and twist the remaining tails of the wires with a twist, they will serve as a handle. If the handle seems short, you can lengthen it.
Next, we make a pattern and a bag. Net bags are different, for example, simply from two halves of fabric, the pattern of which has a parabolic shape. Or a cruciform pattern, which of all possible options is considered the most profitable. The bag is rectangular with a flat bottom and safe for fish when they are caught.
To be honest, I have used different nets and have not hurt a single fish and I think it depends on the aquarist himself, and not on the shape of the bag. We carefully measure the pattern, taking into account the fact that the length of the bag should be about half the diameter of the hoop, in my case 30 cm, we also take into account the part of the wrapped fabric on the lining of the darling.
To improve the quality of the net, it is desirable to strengthen the places where the darling is sheathed by sheathing with additional material. To catch daphnia or coretra, we fix the net to the pole by wrapping the handle of the net with wire or rope.
www.blog-akvariumista.ru
Equipment and accessories for the aquarium
AQUARIUM ACCESSORIES AND EQUIPMENT: fish net, aquarium brushes, aquarium glue sealant To maintain and care for the aquarium, in addition to standard equipment (filter, aeration, compressor), other equipment is also needed - little things without which it will be difficult to care for the aquarium and keep the fish. Aquarium net The net is needed for catching fish: it is a rectangular hoop with a handle that allows you to conveniently manipulate it in the aquarium.
They also distinguish: nets for feeding fish and nets for catching food. For a home aquarium, they are actually not needed.
When choosing an aquarium net, you should pay attention to its size. Do not take a large net for a small aquarium or small fish. And vice versa. In addition, upon purchase, check the mesh of the net for tears and other defects.
When using an aquarium net, do not forget to rinse it after. And if a sick fish was deposited, the net must be disinfected.
Windshield wipers - aquarium brushes!
Windshield wipers are: magnetic, like ordinary scrapers and brushes.
Actually, they are intended for cleaning aquarium glasses, on which plaque forms over time.
Useful advice: Using various glass cleaners and brushes for the aquarium, over time I came to the conclusion that there is nothing better than an ordinary dishwashing sponge. The only thing is that it is not convenient to clean deep aquariums. So I recommend, but each time use only a new, clean sponge.
Siphon
The siphon is designed to clean the soil, such as the "Aquavacuum cleaner". Useful thing if you need to clean the bottom.
Hose
Used to drain the water from the aquarium during a partial water change or when reloading the aquarium. Any flexible hose can be used for this. Given a long time ago, I somehow took a corrugated hose for old washing machines ... that's how I use it.
Silicone adhesive sealant for aquarium
Silicone sealant is a necessary, but not very common thing! The sector of its application is diverse from gluing the background to "patching" the aquarium. There are: black, white and colorless.
As for building silicone sealants, they definitely cannot be used (they contain toxic substances and dyes). However, I want to note that somehow I had an “Aqua accident”, and at home there was nothing but building sealant. As they say, there was no choice. And you know - everything went with a bang! The fish and others survived and there were no signs of poisoning. Then I read the composition of silicone, ... my mother is a woman, it turned out to be additionally biocidal. Maybe I'm just lucky!
Water container
Usually used - buckets.
Necessary for draining and settling water.
Spray
A piece necessary for aerating water and decorating an aquarium with bubbles. Optional nozzle to the aeration system.
Fish feeders
Not required. They are convenient to use using live and frozen food in feeding.
fanfishka.ru>
Do-it-yourself net for an aquarium.
Yes, I myself never intended to do it myself aquarium net. It would seem that something, but there is enough of this goodness in stores. But no, I grew Brown Paku about forty centimeters. And it does not fit into any standard net. And you need to replant it from time to time. Although such a need does not often arise, the question of how to transplant it normally every time torments. The fish is big and strong and has an absolute rejection of all transplants. Apparently, he thinks that every time I have something wrong and I hide a large frying pan with hot oil behind my back.For this simple reason, the first homemade aquarium net was born. Actually, for its production, the wire that fell under the hands was seized. After twirling it in my hands and thinking about all sorts of options, it was decided to make a simple rectangular profile and not bother. With the help of pliers, a rectangle was bent. And you need to start with about two-thirds of the length of the wire. After bending the rectangle, from the middle of it we bend the handles of our net at a right angle. The handle, it was decided not to make it too long.

It was inserted into a plastic cambric and then wrapped with electrical tape. The grid also came to hand very handy. It was a piece of synthetic mosquito net with a cell diameter of about a millimeter. Such a net is usually pulled over windows in the summer to protect against midges and mosquitoes. In order to determine the size of the mesh, I measured the perimeter of the wire rectangle and, based on this, cut out a rectangular piece of mesh with an allowance of about 2 cm for stitching. The network was sewn by hand using a nylon thread. For the first time it turned out fine, but of course not a machine seam. The main thing is that my big net began to perform its functions properly, and now there was no danger of dropping the fish on the floor. Subsequently, it turned out that a large net is good not only for large fish, but also for schooling, but not very large fish (neons, tetras, barbs and the like are caught by a whole flock).
I made other aquarium nets as needed. For example, a purchased net refused to climb into an ordinary glass jar. And the need to get a fish out of the jar periodically arises. I had at my leisure to engage in the manufacture of a small net for this purpose.
And now let's take a closer look at how to make it - this unusual ordinary net.
First, of course, you need to make a wire frame. The wire must be selected depending on the size of the thickness and stiffness. For large nets, steel wire with a diameter of 2 - 5 mm is suitable. The larger the net hoop, the larger diameter we take the wire. You need pliers to bend it. If the frame is rectangular, you need to make sure that all corners are right. A round hoop can be made by bending the wire around a suitable object (jars, mugs, buckets).
For the handle, you need to leave a sufficient amount of wire on both sides of our hoop blank. It is bent at a right angle parallel to each other. If the stiffness of the wire allows, you can twist the handle wire in a spiral around each other. For small nets, even aluminum wire 1-2 mm thick can be used. Sometimes a soft wire is useful if you need to bend the net in one direction or another.
When the frame is ready, it can be inserted into a suitable cambric tube. And if there is no tube, you can wrap it with electrical tape. The main thing is that the handle is tightly connected.
Next, you need to cut out the net for the net. As I said, a good option is a mosquito net, which can be found in the housekeeping departments of stores and in the market. To cut off the desired piece, you need to know the length of the perimeter of the hoop. It can be simply roughly measured with a tape measure or even a ruler. It is better to make the depth of the grid large enough. At shallow depths, caught fish can easily jump out.
You need to sew the mesh with synthetic threads. Threads made from natural materials quickly deteriorate when wet. And yet, it is better not to cut out the grid in the form of a cone, the fish, rushing into this cone, will certainly get stuck in it. And if it has spikes or thorns, then it will also catch on and it will be extremely difficult to remove it.
Making a bag for a net

A soft fabric, such as gauze, is suitable for the bag; it should be dense and durable. Make the bag so that it has as few corners as possible. This will be more convenient for you, otherwise insects are hammered into the corners. To fix the bag on the hoop, you need to buy a wide ribbon and sew it onto the hoop so that the wire remains inside, attach the bag itself to this ribbon.
The butterfly net is ready!
tackle sets
If you are a beginner and you do not have any experience in the selection of tackle, then it is better to buy a ready-made set for fishing. Fly fishing sets include rod, line, undergrowth, leash. All elements are selected by class and are representatives of the same company. The manufacturer has already thought for you.
But not everything is so simple, there are pitfalls. Having tasted all the delights of fishing, you will try to improve this set, pick up better gear. In addition, it is very difficult for a beginner to purchase tackle in a set specifically for the conditions of fishing in his reservoir.
Having purchased a ready-made fly fishing set, a beginner may face another problem: the rod may be underloaded. As a result, when casting on the undergrowth, knots will form, the so-called Tail Loop will form. This happens because the fly, passing below the cord, crosses it and ties a knot. In order to fix this problem, you need to check the weight of the rod. It is necessary to make sure that the class of the rod and line are indicated in the set correctly. It often happens that these parameters are violated. For example, if you bought a class 6 set, then after checking it, it may turn out that the cord is 1-2 classes less. An experienced fly fisher will immediately understand what the problem is, but a beginner will need time to figure it out.
In the video, see how a ready-made set is used for fishing:
What fishing net to buy?
Buying a fishing landing net should begin with theoretical preparation. You can re-read a ton of materials on the Internet, listen to hours of "noodles" words of sellers in fishing stores, completely get confused with the choice, buy the wrong thing at all, get disappointed in fishing, and take up chess ...
To prevent this from happening (although we respect chess), we have prepared for you the most simple, accessible and useful article on how to choose your first fishing landing net. In essence, a fishing net is a tool for lifting fish out of the water, which consists of three (most often) elements: a handle, a hoop and a net.
Lever.
The main thing you should pay attention to in this moment is the material from which it is made.
Most often there are two types:
- Aluminium alloy. These are the cheapest models. The handle made of this material is hollow inside, thanks to which the total weight of the landing net is as comfortable as possible for the fisherman. However, such a structure can negatively affect the strength of the entire structure.
- Carbon fiber. Handles made of this material are a little more expensive, but at the same time, they are much lighter than metal ones. Thanks to this, you can pull out the fish, with frequent bites, without feeling tired.
Hoop.
A kind of frame that is attached to the handle, and on which, in turn, the mesh is attached. The shape of the hoop can be an ellipse, triangle, rectangle, circle or even a trapezoid.
Here it is important to pay attention to two points:
- Assembly. Basically there are three types - solid, folding and multi-component. The former, due to the absence of joints, have a high degree of load and strength. The other two have the advantage of being easy to transport. There is also a third option - this is a combined hoop. In shape, these are two arcs of metal and a cord of fabric connecting them.
- Material. Most often - metal (aluminum alloy). However, there are, like the handle, carbon fiber options.
Grid.
Usually it is a fishing line, fabric (kapron) thread or silicone.
The fishing line does not absorb water and fish secretions (mucus, etc.), which means it does not smell and dries quickly.
The fabric is stronger than fishing line and can withstand serious trophies.
Well, silicone is mainly intended for hunting for “gentle fish”, lenok, grayling or trout.
Auxiliary equipment for the aquarium
Aquarium net
According to their purpose nets can be divided into: - For feeding fish. This is a small net of a round (4-6 cm in diameter) or rectangular (side length 4-6 cm) shape with a straight short handle and a bag (fabric No. 70-76). Food organisms are placed in a bag, washed with water and fed to the fish. - To catch fish. The hoop of such a net is rectangular in shape with a side size of about 12 cm and a long handle that allows you to manipulate it in the aquarium. - For catching food. The diameter of the hoop of the net is 25-40 cm, the length of the bag is up to half a meter, the handle of the net is telescopic or composite, about 2.5 m long. The number of fabric used for the bag also depends on the size of the feed. I immerse the net in water so that the bag is located in a horizontal plane. Moreover, the bag is moved in the shape of a figure eight: at the intersection of the straight lines, pressure is applied, and the curves are carried out freely. The whirlpool created during this movement contributes to the suction of organisms into the net. After making 5-6 eights, the net is lowered a little down, and then returned to its previous position and the movement along the eight resumes. Having made 30-40 eights, the net is taken out of the water. After use, the net must be washed, and after sick fish are pulled out, the net is disinfected with a solution of potassium permanganate.
Wipers
The purpose of the wipers is to clean the sight glass from algae. Regular and magnetic scrapers and brushes are available. When using glass cleaners with a metal blade, there is a risk of damaging the acrylic or the silicone sealant that holds the aquarium walls together. Therefore, they must be used with great care.
Siphon
The siphon acts as a “vacuum cleaner” for gravel (soil), which removes detritus well. It is also useful for them to drain silted soil. Since this procedure is quite hard on the population of ground organisms or organisms living in the biofilter, it should not be used on a weekly basis.
Hose
During a water change (partial or complete), a hose is needed to drain the water from the aquarium. A flexible plastic hose with a diameter of 100-125 mm is best suited for this purpose.
Silicone sealant
The very name "sealant" speaks of insulation. Silicone sealant has found wide application in repair work, sealing work, etc. In addition, with the help of a sealant, you can make any equipment with your own hands. However, construction sealants must be used with caution, as they may contain toxic dyes and fungicides.
Buckets
In the aquarium trade, buckets find a wide variety of uses. Dirty water can be removed with standard non-food plastic buckets. For clean water, which is filled in the aquarium, it is better to use enameled buckets, large food storage boxes, ice cream containers, etc.
Chemistry
For fly fishing, you can not do without the development of the chemical industry. So, in particular, floatants are widely used. These are substances that are applied to a dry fly so that it does not get wet and does not sink. Also, the floatant needs holders that are attached to clothing and allow you to have the floatant always at hand.

To clean the fly line, a special Fly-Line-Dressing cleaner is produced. Apply it to a rag and run it through the cord. All the dirt that prevented him from flying well will come off.
Factory Net Repair
Often, the handle breaks off on Chinese products. To repair such a landing net, you need a metal-plastic pipe, self-tapping screws and a wooden handle as a handle.
Having chosen a suitable landing net model, the angler needs to roll up his sleeves and start manufacturing. Then the trophy fish will be successfully removed from the water thanks to a homemade landing net.
A fishing net, sometimes referred to as a landing net or landing net by fishermen, is one of the most basic items in an angler's inventory.
Our article will talk about a homemade net for fishing, what are the advantages, what you need to make, how to do it yourself and how much it will cost.
Why do you need a net
The purpose of the net is associated with a number of features:
- It helps to bring fish to shallow water much faster, especially if it is a large individual. The landing net is simply indispensable in the process of fishing in reservoirs where abundant vegetation is observed.
- When playing trophy fish, the use of a net helps prevent the rod from breaking due to heavy weight.
Many anglers prefer not to buy a landing net in stores, but to make it with their own hands.

This solution has a number of positive aspects:
- Purchased products are usually made of dark-colored fishing line. In practice, this can scare away large fish and significantly reduce the quality of the catch.
- The windage of purchased nets is quite high. As a result, it is not possible to quickly bring it to the fish caught.
- The quality of a handmade fishing net will be much higher. The fact is that the angler himself is responsible for how reliable the product will turn out and for how long it will serve him.
- The cost of making it yourself will be significantly lower compared to a purchased product. Many anglers refuse to buy this product, as the price in most cases does not match the quality, and from time to time you have to purchase new and new products. In the production process, mainly improvised materials are used, which significantly reduce the cost of the product.
Making a net for fishing with your own hands
materials
The easiest way is to make a non-separable net. For him, you will need, first of all, a fishing line. The amount of this material is directly dependent on the size of the product. Experienced fishermen recommend using a white or light-colored fishing line so as not to scare away the fish.
 The hoop is quite convenient to make from a duralumin tube. The ideal diameter of such an element is 9 mm.
 In addition to the tube, you can use bent reeds, an ordinary tennis racket that has failed, or iron wire, whose diameter does not exceed 6 mm.
Dry and smooth wood of low weight is most suitable for the handle, many fishermen use ski poles or bamboo. With independent production, it will not be possible to do without cargo. It is usually made from a wire ring. It is installed in such a way that the load does not fall into the cells and does not prevent the net from opening normally when the fish approaches.
It should be noted that the diameter of the ring should be larger than the diameter of the cell.
To make a bag, you need to have a number of specific skills that not every fisherman has. The easiest way is to buy a net made of thick fishing line in a fishing store.
Assembly process
The sequence of actions in the manufacturing process is usually as follows:
- Weave a net bag or purchase a ready-made net.
- A hoop is constructed on which this mesh will be attached.
- Make a product handle.
- All elements are assembled into a common design.
Advantages of a homemade product
- Low cost. With independent production, it will be possible to save a certain amount of money, since its cost will turn out to be quite low. You will probably only have to buy fishing line, and everything else can be made from improvised materials.
- Reliability. When making a net, a fisherman immediately counts on the fish of what size and weight it will be calculated. In this regard, its reliability will be at a fairly high level. In addition, nets are usually not strong enough - their handle or ring can bend under the weight of the fish.
- Little sail. A do-it-yourself net will practically not be demolished under the influence of the current. This is largely due to the additional load of the product. This effect allows you to very quickly bring a net under the fish and pull it out of the water.
- Self-selection of colors. Products sold in fishing stores are usually woven with dark wire, which can scare away the fish, causing them to additionally beat, and this will greatly increase the effort to get them out of the water. With self-production, you can use any most suitable fishing line.

Features of weaving
Before starting the manufacture of the bag, a shuttle is made. An aluminum or plastic sheet is suitable for it, the length of which should be about 20 cm. To facilitate work, a small hole is made in its center so that the fishing line does not unwind during the weaving process.
When weaving, you can also use an ordinary plastic ruler, the length of which will be from 130 to 160 mm. Due to it, you can connect, and all the cells will turn out to be approximately the same size.
The sequence of work in the manufacture of the bag is as follows:
- A ruler is taken in the left hand, and in the right shuttle, on which the required amount of fishing line is pre-wound.
- A small loop is caught with the right hand and put on the ruler, after which it is taken out from the other side. The fishing line is circled twice around the finger and passed into a large loop. When all these actions are completed, you should get two loops located on the left hand.
- The fishing line is supported with a finger and the first loop is dropped, while at the same time pulling the shuttle.
- On the ruler, they verify where the knot will be exactly located, press and pull the shuttle over the ruler.
- Tighten the knot carefully.
Basic knitting knots
With self-assembly of the net, one way or another, you have to work with fishing line, connect and twist it. The matter is quite simple, the main thing here is to approach this issue correctly, to acquire the skill of fast and high-quality knitting of knots.
 Knots for knitting networks. a - straight; b - double straight line; in - clew oblique; g - double clew; e - Russian.
 All nodes that are used in the fishing process must meet certain requirements, which are dictated by the practice of their use:
- The node should be fairly simple.
- Making it is easy and simple.
- A small amount of material is spent on its manufacture.
- Under load, it does not untie.
- If the load is variable, then the knot will not spread, as it has a certain strength.
When making your own net netting, there are several key types of knots that can be used:
- straight;
- Russian;
- clew oblique;
- double clew.
Straight
Most often, in practice, you can find exactly a straight knot, which is usually used in the process of knitting a net, the cells of which are of small size. The line consumption here is not too great, and all the work takes a little time.
However, such a product has a number of disadvantages during operation:
- Over time, the grid itself and the cells begin to deform- first of all, this applies to a product made of thin fishing line.
- The holding force of such a bag is quite low.
Russian oblique with stoppers
The Russian oblique knot is the most reliable. However, in the process of its manufacture, much more material and effort will have to be spent.
In addition, the cell sizes here will have to be selected immediately as accurately as possible. The Russian oblique knot behaves perfectly even under heavy loads, it does not deform and does not intertwine.
Skew knot
Knit a clew knot quite quickly. It is characterized by low material consumption. However, it should be noted that under severe loads, the threads that are crosswise with respect to each other begin to deform. Professional fishermen do not recommend using this type of knot in the process of making a net from fishing line or from nylon threads.
clew double
The Russian and double clew knots are considered the most reliable. Making them is not too easy, and the material consumption will be quite large. This type of knot is the most reliable, since it is not able to untie. If necessary, it easily turns into an ordinary double knot.
To catch fish by using only one net is a very gross mistake. Such an action can only lead to damage to the product. If the bait has a long handle, then it will not be very convenient to work with it while fishing.

The fishing net is used only when the fish is in the water. Carrying large fish through the air is not very easy, and there is also the possibility that the handle will break off.
Read also...
- Education of the USSR: prerequisites, stages, significance When the USSR was created
- Education of the USSR: briefly about everything What led to the formation of the USSR
- Socialist-Revolutionary Party: who are they? Their goals and program. Political parties at the beginning of the 20th century Socialist-Revolutionaries party program table briefly
- Vitaprost rectal suppositories: how to use the drug correctly You can take Vitaprost without a doctor's prescription


