How to properly insulate a wooden house from the inside: the choice of material and technology, stages of work. How to properly insulate a wooden house inside? Properly insulate a wooden house inside
The owners think about the need to insulate a wooden house at low temperatures in the rooms in winter, the appearance of dampness and mold on the walls, and the high cost of heating.
Professional builders recommend insulating the walls of buildings from the outside, but there are situations when this is unacceptable. In such cases, thermal insulation is mounted indoors. Such work will be inexpensive. The article tells how to insulate the walls in a wooden house from the inside and outside.
Features of wall insulation in a wooden house
The wood used in construction has features that must be taken into account.
Wood is a vapor-permeable material; if used improperly, it becomes damp, becomes infected with a fungus, becomes covered with mold, and is destroyed by pests. Over time, the house settles in logs or timber cracks appear.
Old house made of logs, traces of aging of the outer walls are visible
A properly designed and installed insulation system minimizes the negative impact - otherwise, there is no need to talk about the durability of the building.
Comparison of thermal insulation methods
Insulation of wooden walls is possible from the inside and outside, each of the methods has advantages and disadvantages. The information collected in the table will help you make the right decision about the method of installing thermal insulation.
| Advantages | Flaws |
| Insulation inside the building | |
| Preserving the appearance of the house | The outer parts of the walls are not protected from adverse weather conditions |
| Can be combined with major or cosmetic repairs | The useful area of rooms is reduced by the thickness of the insulating structure |
| Reconstruction does not depend on the time of year | The dew point moves inside the building, condensation may occur |
| No scaffolding required, one person can handle the job. | Loss of heat storage properties of wood |
| External thermal insulation | |
| Usable area is saved | Insulation is protected by external decoration - the volume of construction work increases |
| The dew point from the wooden walls is shifted to the insulation layer - the walls do not collapse, there is no condensation in the rooms | Thermal insulation is carried out in the warm season |
| Insulation according to the ventilated facade method prevents the appearance of fungus and mold | Working at height will require strict adherence to safety measures. Can't work without helpers. |
Before deciding on the method of carrying out the work, it is necessary to familiarize yourself with the options for insulating a wooden house from the inside or outside.
Material selection
To insulate the internal surfaces of the walls of the house and facades, many specialized heaters have been developed, each of which, however, requires proper use.
Insulation is supplied in the form of piece products or rolls.
When choosing, take into account:
- price;
- service life during which the performance characteristics and the geometric shape of the thermal insulation are maintained;
- fire and sanitary safety (availability of certificates);
- thermal conductivity characteristics;
- resistance to mechanical damage and climatic conditions.
Polystyrene has long been successfully used for thermal insulation of buildings. The mechanical properties and size of the sheets allow you to insulate the house with your own hands, and if you have the skill, you can do without helpers. In thermal insulation, two types of sheet material made from polystyrene are used. They differ in the way they are made.
Expanded polystyrene is called polystyrene foam. Represents plates of white color. On the fault, balls of different sizes are visible.
 Expanded polystyrene (polystyrene)
 Erudite polystyrene is most often light yellow or orange in color, it is denser than polystyrene foam.
Styrofoam
The material is well suited for warming a wooden house.
Advantages:
- light weight - 98% of the volume of the product is occupied by air;
- maintaining dimensional accuracy during long-term operation;
- low thermal conductivity;
- the possibility of mounting in different ways;
- self-extinguishing within 4 seconds - without maintaining combustion with an open fire, the foam goes out.
Foam Disadvantages:
- releases toxic substances when heated above 80 o C;
- easily damaged by mechanical action;
- quickly destroyed by exposure to sunlight;
- low vapor permeability, which must be taken into account, and facade ventilation should be provided.
When buying a heater, it should be borne in mind that a material with a density of 15 kg / m 3 cannot bear a mechanical load, therefore it cannot be plastered. Styrofoam with a density of 25 kg / m 3 can be plastered and used for street insulation. With a mass of insulation of 35 kg / m 3 and above, you can walk on it and most often the material is used for thermal insulation of floors. It is not economically feasible to use foam with such a density for walls.
Extruded polystyrene
Insulation on sale is found under the names Penoplex, Penoplex. Sheets have grooves (selections) along the edges, which allows them to be stacked with an overlap. This eliminates additional sealing of seams. The density of the material is higher than that of polystyrene, any extruded polystyrene can be plastered.
 Jointing seams of extruded polystyrene
 As with the use of foam plastic for insulating wooden houses, ventilated facades are arranged.
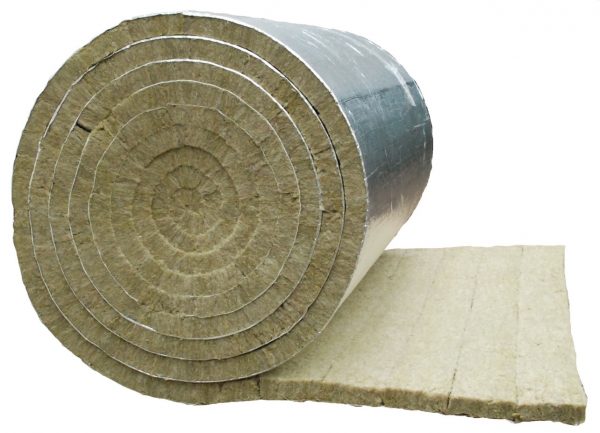
Mineral wool
Mineral wool is obtained by melting rocks. It is a fiber, between which there is a large amount of air, which provides thermal insulation properties. It is supplied to trade organizations in rolls or in the form of plates of standard sizes.
Material advantages:
- ease of installation;
- democratic price;
- does not support combustion;
- high rates of heat and sound insulation;
- environmental friendliness;
- high vapor permeability, commensurate with wood;
The main disadvantage is the ability of mineral wool to absorb water, while losing thermal insulation properties. Over time, the material shrinks and shrinks, and performance decreases.
To reduce the impact of water and moisture from the air, mineral wool is protected with a special waterproofing film.
glass wool
The structure of glass wool is similar to mineral wool, but inferior in performance and manufacturability. When exposed to water and moist air, it quickly loses its thermal insulation properties. Over several years, it becomes caked, which leads to a deterioration in performance. The installation of glass wool requires strict adherence to safety precautions - the smallest particles penetrate the lungs during breathing and enter the eyes, causing irritation of the mucous membranes.
Ecowool
The material is obtained from waste paper and cardboard during the processing of waste paper, as well as waste from the textile industry. Additives prevent rotting, caking, combustibility of ecowool, insects and rodents consider the material unattractive for eating and nesting.
 The process of applying ecowool
 Laying ecowool on your own will not work - the material is sprayed, mixed with water by special installations.
Isoplaat
Fibreboards from sawdust of coniferous trees are made without the use of chemical components.
 Isoplatate sheets
 The surface of the pressed sheets is treated with paraffin, which reduces the susceptibility to decay. The vapor permeability of the material is approximately equal to the characteristics of wood, which eliminates the accumulation of condensate between the wall and the insulation. It is applied to external and internal way of installation.
Foil insulation
The material is a foam substrate with a glued layer of aluminum foil. It is found on sale under the names Penofol, Isolon, Izodom, etc.
The material performs several functions:
- thermal insulation;
- soundproofing;
- waterproofing;
- wind protection.
 Foil insulation
 Products are resistant to chemical, thermal, biological effects and decay. Installation is reduced to fixing on a wooden surface with a stapler or with the help of nailed rails. When using foil materials, the insulation is nailed with a stapler, then the master has to decide how to sheathe the wall - drywall, distillation, plastic siding.
Warming process
Thermal insulation in a timber house will be of high quality if you follow simple rules and a sequence of manipulations. Deviation from the algorithm and incorrect alternation of layers will make the results of labor meaningless.
There are two methods: frame and frameless. They are applicable for outdoor and indoor use.
Frameless way
Without pre-fabrication of the frame, it is possible to insulate with polystyrene foam and extruded polystyrene, basalt mineral wool, Isolat - that is, materials with structural rigidity. The foil material also does not imply a frame structure, although it can be used as one of the layers of the "pie".
Before installing the insulation, the walls are thoroughly cleaned of dust and dirt. Cut off or grind irregularities - the insulation should fit snugly against the base.
The easiest and fastest way to insulate a house is to use Isolate slabs. They are simply nailed with wide-head nails or screwed with self-tapping screws. Of the tools you will need a hacksaw for cutting sheets to size, a hammer or a screwdriver. The surface of the slab is plastered or trimmed with siding. The lack of finishing will lead to the destruction of the sheets under the influence of climatic factors.
Polystyrene sheets are attached to a wooden base with self-tapping screws, using wide plastic washers. Under the influence of ultraviolet, the foam quickly loses its mechanical properties, therefore, with external insulation, plastering work will be required within 20-30 days.
At the first stage, cement-based adhesives are used. Use a special mounting adhesive for polystyrene foam or glue for ceramic tiles.
The surface of the foam is covered with a thin 1-1.5 mm layer of glue, a fiberglass mesh is applied and sunk into the applied solution. The adhesive composition is re-applied and leveled. After drying, the base is treated with a primer and plastered using any composition compatible with cement. For example, plaster bark beetle. The surface can be painted with facade paints.
 Warming the house with basalt slabs
 Similarly, insulation is carried out with basalt slabs.
Frame option
The frame method of installing insulation can be used for any materials, but it is mainly used for installing mineral wool. In the case of using foam, the grate can be used to fasten a finish on it, for example, siding.
 Frame method of insulation
 Installation sequence:
- surface cleaning;
- treatment of wooden walls with a bioprotective primer (antiseptic) and flame retardants (fire retardant impregnation);
- frame installation;
- installation of insulation between the crate;
- installation of a windproof membrane or plate;
- finishing installation.
The opinion is often expressed about the need to install a vapor barrier film between the beams of the walls and the insulation. Such a membrane can fulfill its purpose if the insulation is. For materials that are not vapor-permeable, such a layer is useless - moisture will accumulate at the “wood-insulation” border, accelerating the processes of decay.
For roll materials, the sequence may be different:
- surface preparation, chemical treatment;
- fixing brackets on the wall surface, on which the crate will be attached in the future;
- fixing the roll material with dish-shaped dowels.
- Cutting holes in mineral wool through which the brackets protrude outward;
- Installation of a hydro-windproof membrane;
- Fastening the finish coat to the frame.
By choosing the right heat-insulating material and following the above rules, you can qualitatively insulate a wooden house from a bar or boards. Comfort on winter evenings and lower energy bills will be a reward for hard work.
Many do not consider heat loss through the roof and ceiling significant. In fact, there are often gaps through which the log house simply heats the street. Also, the surface of the roof can heat up from poor thermal insulation of the ceiling. By getting rid of these losses, you can save up to 60% of heating costs.
Before you begin to insulate the upper part of the wooden house, you should seal the entire seam of the upper beam of the wall and the roof structure.
If the attic in the house is non-residential, it is very simple to insulate the ceiling with your own hands. To do this, a layer of thermal insulation of about forty centimeters is laid there. You need to understand that the insulation for the ceiling should be light. Typically, sawdust, polystyrene, mineral wool and other lightweight materials are used for this purpose.
If the ceiling is a roof vault, insulation is a little more difficult. To begin with, the entire surface of the roof from the inside must be covered with a layer of waterproofing so that moisture does not get on the insulation. Roof insulation is done in two ways:
- Sheet insulation is laid tightly to each other. In this case, special attention should be paid to the absence of gaps between the sheets, because between them the heat will still go out.
- Sheet insulation is laid from top to bottom with an overlap. This is done for additional protection against moisture, it will simply drain over the sheets of thermal insulation.
After that, it remains to ennoble the surface with decorative trim. For this purpose, lining is perfect.
Materials for warming a log house
For wood, it is better to use natural heaters - in the attic you can lay expanded clay or sawdust mixed with earth. Log cabin caulking is produced with moss or jute - a flax-based insulation. It is undesirable to use tow, because the material quickly absorbs moisture. Expanded clay can be used to fill the floor or basement, you can make a warm floor by laying extruded polystyrene foam plates.
 Izover specifications
If standard procedures are still not enough and the house is cool, then you can not do without additional insulation of the walls of a log house. The heat-insulating material must be vapor-permeable (quickly give off excess moisture that it has absorbed from warm air). If the building is insulated from the outside, then the material must be moisture resistant, environmentally friendly and fireproof.
Materials and tools for insulation
Like any finish, insulation work can be carried out with suitable materials and certain tools. Basically, the tool kit will be identical for all types of insulation.
The choice of materials for insulation

Mineral wool
To insulate walls (including wooden ones), the construction market offers a sufficient selection of materials for both external and internal work. If you wish, you can study the technical characteristics of each of them in online stores. Here is only a brief description of the main insulation used for walls:
- Mineral wool. It is produced in the form of rolls or panels, while one of the sides can have a foil coating. Melts of blast-furnace slag, basalt or glass are used as minerals.
- Polyfoam (expanded polystyrene, PSB-S). The material has a 15th, 25th or 35th density and the higher it is, the lower the thermal conductivity, and the panels crumble less when cutting.
- Extruded polystyrene foam (aka penoplex, technoplex, technonikol). For insulation use sheets from 20 to 200 mm thick. Their width, as a rule, is standard - 600 × 1200 mm.
- Cement particle boards (DSP). Standard parameters are 3200 or 3600 mm long and 1200 or 1250 mm wide. Thickness varies from 8 to 36 mm.
- Boards, bars or galvanized profile for lathing.
- Self-tapping screws with washers.
It is important! From mineral wool for external insulation, materials are used only from melts of basalt (stone wool) or glass (glass wool). It is undesirable to use slag wool, since blast-furnace slag melts contain particles of iron, which is susceptible to corrosion from moist air
This leads to the loss of thermal insulation qualities.
Tool set

construction knife
The most commonly used tools are:
- construction (painting) knife;
- hacksaw for wood or drywall;
- metric tape measure;
- screwdriver.
Dew point - what does it mean for insulation

Dew point patterns
In accordance with the rules adopted by SP 50.13330.2012, paragraph B.24, the dew point in construction work is the temperature at which moisture (steam), even in dry air, is transformed into water condensate. When insulating buildings, this parameter is necessarily taken into account by builders, but in order not to enter into calculations using formulas, you can simply consider how the installation of insulation on the outside and inside of the building affects this.
If the wall of a frame, log or timber house is not thick enough, then due to the temperature difference between the street and the room, condensation forms on the inside. When the house is insulated from the inside, condensation can occur between the insulation and the load-bearing wall, which will lead to the formation of fungal mold. To avoid this, the insulation must be powerful enough - the dew point will shift to it and condensation will not occur. That is, in this case, the insulation will protect the wall from exposure to the warm air of the room.
But only external insulation can solve several problems at the same time. Firstly, the wall will be protected from the cold outside, therefore, the thermal insulation efficiency will be maximum. Secondly, the formation of condensate in such cases does not threaten at all. The only problem is that in houses built from logs or glued beams, hardly anyone wants to cover an attractive facade with insulation, so here you have to use the internal option.
Preparation is an important step
The components of success are the right choice of material and thorough adherence to technology.
- Caulking the log house and treating the walls with an antiseptic;
- Installation of the crate with a step equal to the width of the insulation;
- Laying thermal insulation on the facade between the guides;
- Installation of a windproof film over the entire structure;
- Stuffing the crate for the ventilation gap and installation of siding.
 Insulation of the facade of the house with mineral wool for siding
The windproof film and vapor barrier will protect the insulation from getting wet, but will freely pass moisture from the thermal insulation layer to the outside. For better ventilation between the vapor barrier and the outer skin of the facade, a ventilation gap of 20-30 mm should be left. Vents should be arranged at the bottom and at the top so that air flows from below under the skin and takes away excess moisture from the surface of the film.
How to insulate a house from a log from the inside
This option should only be used in extreme cases. Builders are against the fact that the insulation is mounted from the inside of the room. When insulating walls from the inside, you may encounter the problem of condensation and mold between the wall and the thermal insulation layer. Inside the house there will be more than enough standard measures to insulate the floor on the ground floor, the attic floor and the slopes of the windows.
Floor insulation in a log house
To make the floor on the first floor warm, it is necessary to lay basalt insulation between the lags or pour expanded clay. A draft floor of boards is laid on the logs, on which linoleum or laminate is laid. If this is not enough, then the insulation of the strip foundation and the blind area of the house should be done. It will not be superfluous to make independent insulation of the basement of the house with foam plastic or thermal panels.
 Spraying ecowool on the walls and blowing the floor
Attic insulation in a log house
If you decide not to equip the attic, but simply insulate the attic floor, then first you should lay a waterproofing film, and lay the insulation on top with a layer of at least 250 mm. If an attic is equipped in a private house, then you need to insulate the roof with mineral wool with your own hands. The ceiling between floors should also be insulated with mineral wool to improve the sound insulation of rooms and premises.
Insulation of walls inside the house from a log house
It is not worth laying insulation on the walls of the house from the side of a warm room, it is better to caulk the gaps between the logs well and. To finish log walls, you can use clapboard or drywall, while the room will become much warmer by creating an air gap between the wall and the sheathing, as well as by increasing the thickness of the outer wall.
How to insulate the walls of a wooden house
First, the walls of the house need to be caulked. For this, a special tool is used - a caulk. If it is not available, a hard spatula or a wide screwdriver is used. Tow, hemp, felt or jute rope are used as insulation. It is not difficult to do it with your own hands, the main thing is to correctly follow the sequence of actions.
You need to start caulking from the bottom seam around the entire perimeter of the house, only then move on to the next one.
The insulation must be driven into the cracks of the timber as densely and deeply as possible. You need to understand that after finishing work, the ceiling height will increase by several centimeters. Therefore, if you caulk each part of the house separately, one of the walls may collapse - the timber will simply pop out of the groove. Another way is to apply acrylic or silicone sealant to the joint of the timber.

If you are not satisfied with the result achieved, experts advise to additionally insulate the walls with thermal insulation. To do this, a guide beam is vertically attached to the wall, its height must be equal to the thickness of the insulating material. The entire surface is covered with a layer of waterproofing. Insulation is laid tightly between the guides, without gaps. For this purpose, any sheet material is suitable. After that, it remains only to make decorative wall cladding.
A few words about the choice of insulation
First of all, home craftsmen are interested in how to insulate the walls of a wooden house from the inside, as well as the floor and ceiling. The choice of insulation for a wooden house requires a special approach, because one of the main advantages of such housing is vapor permeability and environmental friendliness. Accordingly, it is desirable to preserve these qualities.
Wood is known to be a combustible material. Therefore, it is desirable that the insulation be fireproof.
Given these points, you can use the following materials for home insulation:
- mineral wool;
- ecowool.

Mineral wool
mineral wool
Mineral wool is the most common insulation.
It is excellent for thermal insulation of wooden housing due to the following properties:
- good thermal insulation properties - 0.032 - 0.048 W/mK;
- environmental friendliness;
- good vapor permeability;
- fire safety - mineral wool not only does not burn, but also resists the spread of fire;
- Sold in the form of mats and rolls, making it convenient to work with mineral wool.
It should be noted that only basalt wool is environmentally friendly. In addition, it is the most thermally stable. Therefore, use it to insulate a wooden house.

Basalt wool Technikol
True, the price of basalt wool is slightly higher than stone wool and glass wool:
| brand | Cost per 1m3 |
| Isoroc Isoruf-V | 3990 |
| TECHNOFAS L | 3500 |
| Ecover Light | 1950 |
| TECHNOFLOR | 4800 |
Another disadvantage of basalt wool is that it causes irritation on the skin, although to a lesser extent than, for example, glass wool. But, in any case, when working with it, it is desirable to protect the eyes and respiratory organs.
In general, in my opinion, basalt wool is the most optimal insulation for wooden walls.

Extruded polystyrene foam
Penoplex
Extruded polystyrene foam is a type of regular polystyrene foam.
Thanks to a special manufacturing technology, it has higher characteristics than expanded polystyrene:
- high strength - 0.2-0.5 MPa versus 0.07 MPa for foam;
- thermal conductivity is lower than that of mineral wool - 0.028-0.034 W / mK;
- during the manufacturing process, manufacturers add flame retardants to extruded polystyrene foam, due to which the material corresponds to the flammability class G1 (low combustible material). True, this applies only to insulation from well-known manufacturers;
- resistant to moisture, therefore, during installation does not require hydro-vapor barrier;
- does not irritate the skin.

Penoplex differs from polystyrene in a more homogeneous structure
However, penoplex has some disadvantages:
- vapor permeability is very low, so it is better not to use penoplex to insulate the walls of the house. At the same time, it will be a good solution for thermal insulation of the floor, as it is not afraid of moisture;
- high cost - penoplex is today one of the most expensive heat-insulating materials.
Below is the cost for some common grades of extruded polystyrene foam:

Ecowool is a modern eco-friendly material
Ecowool
Ecowool is a relatively new thermal insulation material that has become increasingly popular in recent years.
Its merits include the following points:
- environmental friendliness - the material is made on the basis of wood fibers;
- vapor permeability;
- thanks to special additives that are present in ecowool, the insulation is fireproof and resistant to biological influences;
- has a low thermal conductivity of 0.031-0.040 W / m * K;
- low cost - from 1200 rubles. per cube
Ecowool can be used to insulate horizontal surfaces
I must say that for the insulation of walls with ecowool, special equipment is required. Therefore, when working independently, it is possible to perform only floor or ceiling insulation with this material.
Here, and all the most common heaters that are used to insulate wooden houses. True, there are still materials that are applied in the form of foam, for example, polyurethane foam. However, they will not be able to perform insulation on their own, so we will not consider them.
Manufacturers overview
When choosing a heater for a wooden house, it is worth giving preference to well-known, well-established brands.
- The leading position among manufacturers is occupied by the company rockwool(Danish brand, which is also produced in 4 cities in Russia). The range is amazingly varied. Each section of the house has its own line of products. So, for walls, mineral wool insulation "Butts Light" and "Scandic" will be optimal. There are innovative mats for walls of different stiffness within the same mat, roll and slab counterparts. The disadvantage is the high cost (on average 1500 - 6500 rubles / m2).


- Not inferior in quality and products from Germany - tile and rolled mineral wool brands Knauf and Ursa. To insulate the room from the inside, it is enough to select materials with a density of 10-25 kg / m3. The price is within 1200 - 3000 rubles / m2.


- Leading positions are also occupied by French mineral wool insulation in slabs, mats and rolls from the brand Isover. In the collections you can find both lightweight products (density 10-20 kg/m3) and rigid mats for frame houses (density 150-190 kg/m3). The cost is quite high - from 2000 to 4000 rubles / m2.

- Mineral wool produced in Russia, for the most part, is not inferior to Western counterparts in terms of thermal efficiency, vapor permeability and fire resistance. However, it has a more affordable price. User reviews allow you to mark companies such as TechnoNikol, Izovol.


All the manufacturers mentioned above produce a type of thermal insulation wool with improved sound insulation performance.
- Among the best manufacturers of ecowool, it is worth noting the firms Isofloc (Germany), Ekovilla and Termex (Finland), as well as domestic companies Equator, Ecowool Extra and Nanovata.


- Finnish interventional insulation "Polyterm" is rightfully considered one of the most optimal for operation in domestic conditions. In addition to improved thermal insulation qualities, it is distinguished by the presence of special figured elements for decorating joints, corners, and transitions in the house.

- A similar interventional thermal insulation material based on polyester is produced by the Russian brand "Avaterm". According to the manufacturer, due to the highest performance characteristics, the material is able to serve up to 100 years. Popular sealant brands are Weatherall and Neomid - Warm Seam.

How to calculate the thickness of thermal insulation

Warming with mineral wool
To determine the thickness of the insulation, you need to determine the total thermal resistance (R). This is a constant value, which is determined by the climatic conditions of a particular region. Let's take conditional values for this (they are more suitable for the southern regions), but to determine this indicator, you need to find out the norms for your place of residence:
- for the floor - 3.5 (m2 * K * W);
- for the ceiling - 6 (m2 * K * W):
- for walls - 4.6 (m2 * K * W). / li>
To calculate the multilayer thermal insulation of the floor of the walls and ceiling, it is necessary to sum up the thermal resistance of all layers according to the principle Rtotal=R1+R2+R3.
The thickness of the thermal insulation is calculated by the formula R=p/k. In this case:
- p is the layer thickness;
- k is the thermal conductivity coefficient of the material used.
To determine the value of k (coefficient), use the table below.<
For example, let's make a test calculation for a wall. Let's say we need to get a thermal resistance of at least 4.6 (m2 * K * W). A house made of oak timber with a section of 0.2 × 0.2 m, where the coefficient is 0.2 (W / m * k). We use the formula: R (k) \u003d 0.2 / 0.2 \u003d 1 (m2 * K * W).
It remains to achieve a total R value of 4.6 (m2 * K * W). So, R insulation \u003d R-R timber \u003d 4.6-1 \u003d 3.8 (m2 * K * W).
Now, according to the basic formula, we calculate the thickness of the thermal insulation (we take the foam plastic for this): or mount them inside and outside.
Warming the bath from the inside
Today it is not often possible to find bathhouses cut down from good logs. In such a bath, you can perfectly take a steam bath even in severe frost, it is enough to insulate it with traditional natural materials - moss, felt, flax, hemp. But since builders are now increasingly using modern building materials, it is necessary to recall some of them.
In this case, special attention should be paid to how the bath is finished from the inside. Many nuances are important here, including the difference in the microclimate in different rooms of the bath (steam room, dressing room, relaxation room), as well as the use of environmentally friendly materials
Since the bath, for which thick and high-quality logs served as building materials, does not particularly need additional insulation, thermal insulation has to be resorted to only in those cases when the specified structure is built from relatively small bars. In this case, a crate is made with the installation of a heater on it - mineral wool. Foil is laid on top of it, then the resulting cake is sheathed with clapboard.
With all these rules and features, almost anyone can really insulate their home. As follows from theory and practice, this is not at all difficult.
Sheathing preparation and installation
When installing the crate, it should be repelled from the thickness of the insulation. The thickness of the bars will be the same. The most commonly chosen beam 10-50 mm thick and 100 mm wide.
The crate is mounted transversely to the laying of logs with a step between the bars equal to the width of the heat-insulating mats with minus 3 centimeters for tight entry. The height of the crate is individual for individual rooms.
In parallel with the laying of logs, a crate is also similarly mounted (the so-called "counter-lattice"). For the installation of the crate, you should choose high-quality material without traces of decay. Before installation, all wooden parts and surfaces should be treated with an antiseptic.
NOTE!
Do not use thin boards for lathing, as it also serves as a place for attaching finishing coatings.
crate
Insulation of the ceiling of a wooden house
 As a rule, ceiling insulation is not treated responsibly. Many people think that it is not necessary to insulate it, but this is far from the case. The air that people try so hard to warm in winter rises up and goes through the ceiling to the street. Making a serious mistake - leaving the ceiling not insulated, many themselves, without knowing it, lose half of the heat, they senselessly spend money on warmth fading into the unknown.
Ceiling insulation material:
- Mineral wool. This material is not expensive, but reliable and easy to install. He is one of the few heaters with whom you can work on your own without calling for help from other workers and, most importantly, do not pay them money.
- Glassine. Used as a waterproofing material is used.
For frame structures and sheathing you will need:
- Cutting board.
- Nails, glue, polyurethane foam.
- Drywall.
Ceiling insulation tools:
- A hammer.
- Hacksaw.
- Screwdriver.
- Electric jigsaw.
- Tile adhesive.
Stages of ceiling insulation:
- From edged boards we make a frame, you need to be prepared for the fact that this will reduce the height of the room. The distance between the boards of the frame should be no more than 1 meter.
- Between the boards of the frame it is necessary glue glassine, without leaving empty spaces, so that the material holds well, it needs to be smeared a little with tile adhesive.
- Over glassine we lay the insulation- mineral wool. Do not leave holes between the insulation. If the material does not hold, use tile adhesive in small quantities.
- The last step is plasterboard ceiling lining. Using a screwdriver, we fasten sheets of drywall to a wooden frame.
It is necessary to insulate the ceiling from the inside in the warm season and not earlier than 1 year after the construction of the house. Only in this case, the insulation will pass correctly and last for many years.
Which heater to choose
When choosing insulation for the walls of the house, first of all, you should pay attention to the ability of the material to pass steam and air, while retaining heat. . The severity of the climate of the region of residence should also be taken into account.
The severity of the climate of the region of residence should also be taken into account.
Of the materials for insulation can be distinguished:
- interventional heaters used at the construction stage;
- and heaters used for insulation from the outside or inside.
The interventional insulation is used in the laying of the interventional joints. Such heaters are synthetic and natural (from jute, moss, flax, hemp). The main property of these materials is low thermal conductivity and the ability to accumulate and release the resulting moisture. The most common today are linen and jute fiber insulation.
Basalt (mineral) wool is widely used to insulate walls from the outside or from the inside., or fiberglass wool in the form of rolls or mats, with a density of 80 -120 kg / m3. In addition, it is an environmentally friendly material.
It is not recommended to use polystyrene or polystyrene foam as an element of the pie, since these materials are vapor and moisture resistant and prevent air exchange between the house and the external environment.
Materials such as:
- mineral wool;
- Styrofoam;
- extruded polystyrene foam;
- penoplex;
- penofol;
- penoizol;

Mineral wool - the best option for insulation
Nuances and proper insulation avoid mistakes
We decided on the scope of work and the choice of materials. A lot of money and labor has been spent, it will be a shame if, due to mistakes, you do not get the desired effect. To keep your home warm:
First, insulate inside: floor, ceiling, roof, windows, doors. Caulk the cracks and seams between the logs. If there is little effect, insulate the house from the outside.
Insulate the facade after precipitation, in a year and a half. The new house shrinks 3 - 10%. If it is old, the period is not important, but treat the wood with an insecticidal solution, get rid of the living creatures. Birds love to pull the caulk out of the cracks, looking for insects.


Treat wood with an antiseptic to prolong its life and prevent mold. Let the house dry. When applying impregnation, follow the instructions given by the manufacturer.
If the logs are the same, fill the crate under the insulation horizontally (there will be no gaps), although the vertical position makes it easier to align with a plumb line (level).
The advantage of the horizontal arrangement of the crate is the uniform weathering of moisture from the insulation. With vertical - it accumulates at the bottom, the material dries longer.
Between the logs, if there is a gap, add pieces of insulation. The fewer voids, the higher the quality of work.
Fasten the ends of the film with tape or twist, like a seam in jeans, and press with a stapler so that they do not unfold. The vapor permeability of the membrane must be at least 1400 g/m2.
Take the choice of windproofing seriously. It protects the insulation from external influences: moisture and wind. To the outside, it works with the opposite effect. To dry the insulation, a ventilated gap is used, which should be at least 5 cm.
The correct insulation technology (“sandwich”) looks like this: log house wall + tight-fitting insulation (preferably 2 layers with overlapping joints) + membrane, i.e. wind-proofing film + air space (ventilation) and crate for siding or other decorative material for the facade, on which the last layer is fixed - the lining.
To insulate a log house only from the outside - transfer of funds. You can save heat and save on fuel by conducting complex thermal insulation.
When external insulation is impossible, this does not mean that you need to make a “thermos” inside. Wood is an excellent insulation, do not “cut off” it with a film.
Internal wall insulation with air ventilation is ineffective. Lay the insulation tightly to the logs, increasing the heat capacity of the wood due to thickening.
Note: Calculate the dew point. According to the rules, with external insulation, it is located in a heater, with internal insulation - in wood, closer to the street.


How to caulk walls correctly?
Warming from the outside does not mean that it is not necessary to caulk or that it is enough to process the wall from the inside. This is mistake. With or without insulation, you need to caulk. The process looks like this:
- start from the bottom;
- walk along the contour of the house;
- process one crown from the outside, then from the inside;
- second row - repeat, and so on to the very top.
The main rule of caulking is the uniformity of work on the office on both sides of the walls. Stepping back from it, you will break the laying of logs and create distortions in the structure. This will lead to the appearance of “cold bridges” in the area of \u200b\u200bwindows and doors.
The process is labor-intensive, so the caulk is replaced with a sealant. It is synthetic but provides 100% sealing. Reviews about the quality are positive - you choose.
Owners of log houses most often face drafts in the premises, often blowing on their legs from the floor, the house cools down quickly if the heating is turned off. From all this, it is concluded that a log house should be insulated with high quality, and start from the floor, as it blows strongly and gives off a lot of heat. The ceiling should also be checked, as up to 70% of the heat can escape through the attic.

How to insulate a log house from the inside
To retain heat, it is necessary to insulate the attic or attic floor, process the outer walls and all structures - windows, slopes, entrance doors, etc. Do not forget to check whether the walls are carefully caulked, maybe cracks have already formed over time. We also note that it is necessary to make heating more efficient, it is possible to equip "warm floors" in addition to the existing system.
Too thin walls of the house are also the cause of the cold in the room. For example, for a climate with low humidity, logs with a thickness of 200 - 240 mm are sufficient; for regions of Russia with wet winters, it is advisable to use logs for walls with a diameter of more than 400 mm. Next, we will consider what materials are best used to insulate a log house, if the house has already been built, but there is no comfort in it.
Used thermal insulation materials
The main characteristic of thermal insulation is the coefficient of thermal conductivity. No less important when deciding on the choice of a particular material will be the class of combustibility and density.
Mineral wool
Non-combustible, fibrous material produced from melts of silicon and basalt rocks, slag residues of metallurgical production and their mixtures. It is produced in the form of rolls or mats of various densities.

When insulating vertical surfaces, it is more convenient to work with separate plates. The optimal density in this case should be in the range from 40 to 60 m³/kg.
When using, the use of hydro and vapor barrier is mandatory. Wet cotton wool contributes to a sharp decrease in thermal insulation properties.
Styrofoam and XPS
The structure of foamed insulation, which includes EPS and foam plastics, is a large number of closed, air-filled cells. Such a structure eliminates the need for any additional protective layers. The difference between XPS compared to foam is a denser and therefore more resistant to moisture structure.

When organizing work, you should opt for low-combustible grades (G1 or G2). G4 is characterized by the release of acrid black smoke and burning drops during combustion and is not allowed for use in wooden houses.
Wireframe creation
When working with any kind of soft material, including mineral wool, you must first create a frame around the entire perimeter of the walls, which will securely hold the insulation. Wood is most often used to create the crate, but metal guides can also be used if sheathing is then carried out with heavy material, such as drywall.

The crate is a guide located vertically from floor to ceiling at a distance of 40 - 60 cm. Such stiffeners allow not only to securely fix the insulation, but also to close it with clapboard or any other material.
First, the corner elements are mounted. To do this, a bar is attached to the rib bar, the cross section of which is most often 50x100 mm, at a right angle. After manufacturing, such elements are sewn to the corner of the wall after checking the level. The entire frame is already marked from them, and stiffeners are attached.

Taking into account the possibility of moisture, all elements of the frame should be treated with antiseptics, like the walls of the house themselves.
Insulation protection
An important element of the frame with insulation are special films that prevent moisture from entering the material. After mounting the frame, a waterproofing film is stretched around the entire perimeter of the walls. Usually, it is laid in a horizontal plane, protecting the joints with a special waterproofing tape. Such a film will serve as an effective protection for the insulation, because the wetting of the material significantly increases its thermal conductivity.

It is equally important to protect the heat insulator from internal moisture. Such wall cladding almost completely removes natural ventilation, so condensation can form at the border of the insulation, which can harm the material.
In order to avoid the negative influence of internal humidity, the insulation is closed with a vapor barrier, which additionally protects all residents of the house from particles of mineral wool.
Solving the cold floor problem
Home heating will not work efficiently if the house has cold floors. They cool the room and do not allow the air to warm up.
The wooden floor is insulated very simply, for this it is necessary to remove the floor upholstery. In order not to confuse the order in which the boards lay, it is better to mark them in advance. This will save a lot of time during assembly. Then the entire surface between the lags is covered with waterproofing so that the insulation does not pick up moisture from the soil.

The heat-insulating material is laid on it in such a way that there are no slightest cracks over the entire surface of the floor. Insulation is used by anyone who is not afraid of moisture. On top, you need to lay another layer of waterproofing, because when cleaning the premises, water can get there and accumulate inside. After that, the floor boards will need to be laid in the reverse order.
The cement floor is insulated in two ways. If the height of the premises allows, logs made of wooden beams are laid on the floor. Between them, a heater is laid, which is closed with waterproofing from above. Then the floor is upholstered with a board.
If the ceiling height does not allow raising the floor level, you need to remove the cement screed and remove the floor backfill by about half a meter. After that, the pit is waterproofed and the insulation is filled up. Usually expanded clay is used for this. A layer of foam or other dense material is laid on top of it. A new screed is made on top.
Reconstruction of an old country house is not only: the replacement of floors and ceilings with insulation, the installation of new modern windows and doors is, first of all, the alteration and restructuring of the structure with the possible replacement of load-bearing structural elements.
If it is necessary to increase the area of the house, you can build on the second or attic floor for additional bedrooms, make an extension to the house by placing a toilet and a bathroom there.
This is a good opportunity to make a new and convenient layout of the premises in the house. I have been to over a hundred houses, small and large, expensive and cheap, and most of them did not have a good - comfortable interior layout.
For example - “You bought yourself new shoes, but it’s uncomfortable and uncomfortable for you to walk in it, it’s big or small or tight for you. No matter how fashionable and beautiful it is, it will be extremely inconvenient for you to use it. Each time, rubbing your legs, you are unlikely to think about her beauty, only irritation and disappointment about the money spent will remain. Comfort and convenience above all!
Bedroom decoration
The central design element around which the composition of the room is assembled is a large wooden or wrought-iron bed with a natural mattress (ideally a downy feather bed) and a large number of pillows of different sizes. For textiles, linen or coarse calico in pastel shades with or without a medium-sized pattern should be preferred. Small rugs or rag rugs are placed on the floor.
It is better to choose bedside tables, cabinets, chairs, a massive chest of drawers or a chest of impressive size, decorated with carvings. The most important condition is good lighting, preferably natural, so there should be many windows in the room.

A wooden wall will keep warm in the most severe frosts

Wooden walls look very nice
Creating a rural style is an exciting process in which you can show all your creativity. Any skill will do. The ability to sew, knit and embroider will help you create designer napkins, tablecloths and curtains. Having learned the technique of wood carving, you can make unique pieces of furniture and decor even from old things. Handmade accessories in this design are more relevant than in any other stylistic direction. Show your imagination, remember your childhood hobbies, and as a result you will get a village house that fully reflects your personality.
The interior of a country estate in the style of Provence
Another name for the style is “French country”, such interiors are great for people who are tired of the bustle of the city and dream of immersing themselves in the atmosphere of a leisurely rural life. The walls, most often, are whitewashed or painted with white paint, decorated with paintings and natural or artificial flowers. All textile accessories should be made of bright fabrics with floral patterns. Exquisite, thin forged elements are actively used. The floor should be made plank and painted in a light color or decorated with stone tiles.
A distinctive feature is the large windows, which are not typical for other similar styles due to the peculiarities of climatic conditions. For the same reason, in most of Russia, such a solution is not recommended, since the building will cool too much in winter.

Home decor can be decorated with beautiful curtains

A wooden house will last a very long time
Foundation reconstruction
When a wooden house is repaired, the reconstruction of the foundation depends on how damaged it is. If the foundation crumbled only in a few places, they take up the restoration of the old one. But it often happens that wooden houses settle, growing into the ground. In this case, they must be completely replaced.
 Raising the foundation of an old house
When repairing a wooden house with your own hands, difficulties arise when replacing the foundation. Doing all the work yourself is very problematic. It is better to hire a small construction team that will deftly and relatively quickly cope with all tasks. To do this, the lower crowns of the house are raised with a jack to a height of about half a meter. Fix in this position.
When choosing a new foundation, it is worth stopping your choice on a columnar or columnar-tape. It is most suitable in this situation, you do not need to disassemble the floor. Formwork is made, which is reinforced with metal rods. It is filled with concrete. When the concrete hardens, the surface of the foundation is covered with waterproofing. A house box is placed on the foundation.

Tips from experienced builders on how to repair wooden houses:
- If the house stands on a brick or reinforced concrete foundation, it can be strengthened with anchor rods.
- The point foundation is strengthened by filling the gaps between its parts. Thanks to this, it becomes monolithic, its reliability and strength are ensured.
- Reinforcing the foundation helps to evenly distribute the load on it. It will decrease several times if reinforced concrete or metal beams are installed at the basement level. They put the box at home.
Further repair of a wooden house is not difficult.

Be sure to read the data sheet at home
Information about the house is indicated in its technical passport. This document must be read. In it you can find information about the owners and all the technical data: a home ownership plan indicating its size and all related buildings; building plan with the areas of the rooms, indicating the load-bearing structures, the material and thickness of the walls, the composition of the floors, the height of the ceilings, etc., as well as the year of construction and reconstruction. If the house was previously reconstructed, and the new data was not entered into the registration certificate, then it should be taken into account that this will create problems when making a purchase for the property.
(⇑) An adobe house lined with bricks (pictured) can be passed off as a more expensive and reliable brick one. Be careful and attentive - do not let you be deceived.
A set of tools for checking the condition of the house
Going to inspect the house, you should take a flashlight, a screwdriver or an awl, a knife, and a camera with you. Disadvantages are sure to be found, as they are inevitable as a result of long-term operation of the building
But it is important to determine how serious they are. Then the cost of repairs, the resource of the house and the adequacy of the price to quality will become clear.
The most favorable time of the year for viewing is from April to November, when there is no snow hiding the flaws of the facade and the surrounding area. Early spring and late autumn are preferable, as you can see how warm the house is, whether the walls are blocking, whether there is water in the basement, whether the roof is leaking. Photos will allow you to calmly think about what you saw again.

(⇑) The presence of dust indicates that insects are sharpening the tree - such structures need to be checked more carefully, as this threatens with serious consequences.
Features of the interior of a village house inside
Village houses are different, depending on what territorial area they are located in and what culture they belong to. For example, the decoration of a village house in the Siberian hinterland will differ significantly from the hut of the inhabitants of southern Russia.
And a traditional Japanese house is incomparable to the provincial style of a French village.
The unifying moments of all the houses of rural residents are the naturalness of materials, the simplicity of finishing and household items and decor made by hand. Most often, objects of arts and crafts were used, since any thing, even the most exquisite, for example, a knitted tablecloth or embroidered towels, had quite a practical application.
In Russian village houses that were located in the forest area, the house itself, furniture: beds, tables, benches and chests were made of strong durable wood.
In mountainous areas, in the construction of the house and in the interior, solidity was emphasized with the help of stone.

Rustic kitchen interior
When finishing and decorating, it must be taken into account that in the past the kitchen was the central place in which most family events took place. The rest of the rooms were for sleeping.
Therefore, when designing, close attention should be paid to the space of the kitchen.
If the size of the room allows, place a wooden nook and a dining table made of the same material.
The kitchen needs to be made light: whitewash the ceiling with lime or water-based paint, paste over the walls with plain light wallpaper (a floral ornament is possible), it is recommended to lay rugs on the floor. To decorate the room, use herbariums or straw figurines; napkins, curtains and potholders made of natural fabrics, hand embroidery will be a wonderful touch.

The bedroom should be bright

In the house you can make a fireplace and bask while sitting in the living room
When is a refurbishment needed?
The following signs indicate the need for reconstruction (full or partial):
- Foundation. The base cracks or begins to collapse (and water, which regularly enters the cracks, will completely destroy it in a couple of years). If the foundation sags, a caulk (seal) may fall out or the seams between the crowns begin to open, cracks form. The porch can change position, the front doors begin to overwrite the floor, the windows open with difficulty. All these signs indicate that the house has an angle of inclination, which can only be straightened out by a major overhaul.
- Wood condition. The appearance of a wooden wall does not always indicate the magnitude of the problem. It is important to assess the condition of not only the upper layers of logs (beams), but also their inner part.
- Roof. Almost always in old houses, the roof is a source of problems - leaks and dampness in living quarters. Rafters and floor beams rot and are damaged by fungus or insects.
- Walls. Often the lower crowns rot, the rest of the wood becomes a breeding ground for mold and woodworm.

Bottom rims need to be replaced
Russian country style
The historically established characteristic feature of the direction is the active use of wooden materials. The walls, ceiling and floor are sheathed with boards, the furniture is made of the same material. Chests with traditional ornaments are often used. In the modern version of the style, rafters and beam ceilings are required.
An indispensable element is a Russian stove or a stylization of it, tiled stoves are often made, which in the past were characteristic of the design of palaces and castles, but harmoniously fit into a village house. To decorate the room, you can use towels, knitted toys, rag dolls, potholders (preferably handmade).

A fireplace in the house would be a great idea

The wooden house looks very practical

A small house can be made into a living room
A village house made of wood is designed for the life of a person engaged in agriculture. Therefore, its main purpose is to create comfort and coziness in an uncomplicated way. Furniture for storing things and utensils should be roomy, without decorative excesses, not involving polishing and painting.
Textiles for curtains and table linen should be in bright colors and set off the inconspicuousness of the walls. Beds and linens are basic but sturdy.
A mandatory attribute of a village house should be a chest, better not a “remake”, but one that served faithfully to the ancestors.
Patchwork dolls, rugs made from the remnants of fabric, knitted lampshades, hemstitched curtains, lace valances and even embroidered carpets will find their rightful place in a village house.

Consider the standard service life
When choosing a house, it should be borne in mind that each type of building has a standard service life. It depends on the quality of the supporting structures:
A building made of stone materials (brick, foam blocks, limestone, shell rock) - 100-150 years. At the same time, in such houses, the standard service life of floors on wooden beams is 60 years.
Wooden, frame, frame-panel buildings, adobe houses, mud huts - 15-50 years, depending on the quality of the material, the type of foundation.
Systematic repairs lead to an increase in the life of the building. If the house is not used, then it collapses much faster than with constant operation.
(⇑) If the old hut has a wooden foundation, be sure to check if it is rotten.
Pay attention to the condition of the roof
When buying an old house, it is important to examine the condition of the roof - rafters, battens and roofing. It should be checked whether the wooden structures are well preserved and whether they are reliable enough for the installation of insulation.
If there is already any insulation, it is important to make sure that a waterproofing film has been used - otherwise, everything will have to be removed and reinstalled using hydro (ideally a membrane) and vapor barrier. The thickness of the insulation should be at least 20-25 centimeters.
When arranging lighting using roof windows, the decisive factor is the step between the rafters: the window should be slightly smaller in size to fit into this opening. In extreme cases, the technology of cutting and strengthening the rafters is used, but it is quite labor-intensive and not cheap. Since ventilation is especially important for the attic, you should make sure that it is possible to install it or, if it already exists, that it is in good condition.
G). Roof defects are more often found at the joints of material elements at the points of attachment to the crate. e). Damp floors indicate poor ventilation of the underground and leakage of the foundation.
Advantages of wooden houses
A wooden house is a living organism, with a unique atmosphere, designed for more than one generation. The wooden house is warm in winter and cool in summer. It maintains a certain level of humidity, because the tree allows it to "breathe". Owners of wood smoke inhale the medicinal air filled with phytoncides that the tree releases.
- Living warmth of the village hearth
In all village houses there was a hearth with a real fire, it was vital for heating the dwelling and for cooking. There were different sources of heat, but the main ones were and remain relevant today are the stove and fireplace.
- Russian stove
The Russian stove returns to the space of country houses and serves its intended purpose and as an element of decorative design. No worthy replacement has been found for this device, characteristic of Russian culture.
- Fireplace
A fireplace - a hearth with an open fire that serves to heat the room and attracts with the possibility of admiring the flame is often an accent in modern homes. There are many shapes and designs of this device that can decorate the house and create an atmosphere of warmth.

How to decorate a village house with your own hands
You can start filling a village house by bringing in household items left over from grandparents: a poker, lids, clocks with clocks, wicker baskets or a spinning wheel.
Only a person trained in carpentry can make furniture. If there is no such skill, you can start restoring old furniture.
Textiles for the whole house can be sewn independently even on a mechanical sewing machine: curtains, tablecloths, pot holders and even bed linen.

On long winter evenings, gathered in front of a living hearth, you can crochet napkins, embroider tablecloths using the Richelieu technique, sew patchwork quilts or knit colorful rugs.
In the summer, harvest dried flowers and make bouquets filled with solar energy from them.
You can paint the furniture yourself using a stencil or decoupage technique.
In a country house, compositions made from natural materials would be appropriate as decorative elements for decorating hangers, beds, stairs.
In order to return to your roots and educate children in the spirit of their ancestors, you can create or recreate the interior of a village house. To enjoy the simplicity of the interior and human relations, to see the big in the small and to be able to appreciate this little.
Housing should not harm your health
You should avoid buying a country house whose walls are made of sleepers and then plastered with clay. Such structures will always emit creosote vapors (wooden sleepers impregnated with creosote serve for 30 years before rotting, and the impregnation remains in the walls for 100 years). As a rule, with well-plastered walls, this smell is imperceptible, but harmful vapors are present in the room and are detrimental to the health of residents.
Sometimes houses were built "in two halves", one of which was used as a barn for livestock. If in the future this room was turned into a residential one, then when it is heated, an ineradicable fetid smell arises. Walls made of monolithic cinder concrete or cinder blocks will not add health either. Harmful gases from coal slag will always be released.
a). A structure that has been flooded with water for years will not be strong. b). If it is clear that the crack has been repaired and reappeared, it is clearly a danger.
Wooden house
Since ancient times, log huts have been built in Russia. Our ancestors believed that this is the most suitable building material for the house. This is explained quite simply - wood is a unique natural material that is able to pass air and perfectly retain heat indoors. An indisputable fact is that houses built of wood have a kind of energy that persists for a long time and has a beneficial effect on human health.
A wooden house, unlike a concrete or stone structure, is a kind of living organism that is able to independently tell the owners about its condition. The fact that he needs restoration, the old wooden house will let you know through various crackles and creaks, which the owners should learn to listen to. Most often, problems arise due to the characteristics of wood: it is prone to decay and is very sensitive to temperature fluctuations and moisture. However, even the oldest can be restored with your own hands.
Most often, in such buildings, the porch, the base of the house, the roof, and the front door come into a dilapidated state. Before proceeding with the restoration and repair of old wooden houses, it is necessary to carefully inspect all structures, identify places that require repair, and determine the scope of future restoration work.

Overhaul of a wooden roof
A distinctive feature of each wooden house is the roof, which is made under a certain slope. It can be of several types: gable, tent, in the event that it is equipped with an attic, attic. When carrying out a major renovation of the house, these features should be taken into account
What is the first thing you should pay attention to when covering the roof? To ensure that the tree is dry, otherwise it may be displaced after the completion of the repair work. It is necessary to erect extreme rafters, and install intermediate between them
In order for the roof to be even and as stable as possible in the future, it is necessary that all the upper parts of the rafters be located strictly on the same level. Increasingly, roofs are covered with ondulin, soft tiles or other modern materials, but first the old coating is removed.
The roof is mounted only after the installation and fixing of the rafters with special ties. Please note: the distance between the installed rafters should not be more than 60 cm.
Building coloring
After all the completed activities, you should start painting the house. Here it is necessary to observe several nuances. This procedure involves the application of several different means - tinting, varnish, azure. All of them will retain an interesting texture of natural wood.
Please note: the ends of the logs cannot be subjected to either protective or decorative processing. It is in this place that a kind of capillaries of the tree are concentrated, with the help of which it "breathes"
If this condition is not met, then normal air circulation will be disturbed. In view of the fact that the processing process will seal them, soon the timber or log will undergo a rotting process.
You can learn how to sheathe a house with facade panels from the video presented.

Repair stages
Renovation of an old wooden house is carried out in several stages:
- replacement or repair foundation;
- repair roofs;
- replacement communications;
- installation of new doors and windows;
- styling gender;
- finishing walls outside;
- replacement plumbing fixtures;
- repair premises.

Each stage needs to be thought out carefully so as not to make extra costs and not spoil what is already there.
Foundation reconstruction
The type of reconstruction is chosen depending on how old the wooden house is. In the event that the foundation has worn out in only a few places, it is possible to repair it without building a new foundation. The base may be worn to such an extent that it will need to be replaced. Used for residential buildings three types of foundation:
- concrete tape;
- concrete slab monolithic;
- pile screw.
For residential buildings, a columnar foundation is not applicable.
On our website you can find contacts of construction companies that offer foundation repair services. You can directly communicate with representatives by visiting the exhibition of houses "Low-Rise Country".
What can be done with the base should be determined by a specialist.
Most often, the process of replacing or repairing the foundation itself is as follows: the box of the house is lifted, the foundation is repaired or replaced, the building is returned to its place.
The foundation should be strengthened, as the load on it will increase. The nuances of work:
- Brick or reinforced concrete base stands strengthen through anchor rods.
- To strengthen the point foundation, you need to free space pour a special solution. Due to this, it will become monolithic. It will be stronger and more reliable.
- Another way to distribute the load on the foundation - reinforcement. To reduce the load on the base of the house, metal or reinforced concrete beams are mounted in the basement.

Often, the reconstruction of the house begins with the foundation.
Sometimes, in order to strengthen the old foundation, one brickwork is enough. After the repair of the base, its waterproofing is required.
Roof repair
A solid roof is the key to a warm home. Before starting work, it is necessary to determine the material with which the roof will be covered. Its choice depends on the type of roof. It can be flat or sloped. Residential buildings are extremely rarely covered with a flat roof, since the pitched type of roof allows you to equip the attic. It is used as a utility room. In addition, the attic contributes to the ventilation of the house. If you plan to use the attic for household needs, then it is better to make a broken or gable roof. If the house is one-story, then it is preferable to build a high roof. It will give the house a solid look. In addition, the impressive height increases the operational properties of the roof. During precipitation, moisture will not linger on the slope.
On our website you can find contacts of construction companies that offer the service. You can directly communicate with representatives by visiting the exhibition of houses "Low-Rise Country".
Roof repair steps:
- Withdrawal old roofing and rafters
- Replacement rotten structural elements
- Treatment wooden elements with insect repellent (if necessary)
- Mounting new coating

Roof replacement needs to be taken seriously.
The attic space will not be wet if the roof is thermally and waterproofed. To do this, you need to do the following types of jobs:
- Between rafters and covering fit mineral wool or foam.
- Performed lining. For this fit lining.
- A double layer of polystyrene foam is laid on the attic floor
It is important that its joints do not overlap each other.
. - Expanded clay is poured backfill. Its layer should be 200 mm.
A few tips to improve roof performance:
- Gutters should be installed when roofing is being replaced.
It is worth paying attention that they should be located at a distance of 2-3 m from the foundation. Otherwise, rainwater will flood the base, which will negatively affect its condition.
- If a bug or traces of its vital activity was found in the beam on the roof, then this part must be replace. It is sawn out, and a new log is installed in its place.
In some cases, roof frame replacement is required. All roof repairs are carried out in dry, warm weather.

The roof frame also needs updating.
Replacement of communications
Communications are an integral part of any home. During a major overhaul in a wooden house, all communications must be replaced:
- Circuit. Old wires are dismantled. Replaced with new wiring. It is closed with special tubes or boxes.
- Plumbing pipes. It is better to give preference to plastic structures.
Tidying up steps
Restoring an old building is a rather troublesome business, but a pleasant one.
It is necessary to pay attention to the protective and bearing, and only then the decorative part. The first thing to do is to test for strength.
Walls
The degree of deterioration of the walls should not be ignored. If they have darkened over time, this still does not mean anything. Very often, under the dark surface of the log, you can see a white core. However, if there is dust there, it must be cut out in whole pieces, along with clean areas, because it makes no sense to decorate a rotten surface.
truss system
Foundation
It should be carefully inspected for damage. Restoration of an old log house of a wooden house does not make sense without strengthening and strengthening the foundation. In the event that it is not strong enough, its base will receive a strong load, which will lead to a violation of the external and internal finishes.
It is recommended to take a small pick and a lantern and inspect the foundation surfaces from the outside and inside. If whole pieces of the foundation fall off during tapping, it is advisable to invite specialists to evaluate the capabilities of the supporting platform.

Preparation for repair
Any repair begins with preparation. It is necessary to assess the degree of deterioration of the house, the scope of work, time and costs. Conventionally, preparation for repair can be divided into several stages:
- House freed up from unnecessary things and garbage.
- Wooden details of the building look around specialists for the presence of decay. If there are even the slightest signs of decay, they must be disposed of. In some cases, even entire logs need to be replaced. To do this, they are carefully removed from the structure of the house. New logs are installed in their place. At the same time, they are protected by roofing material.
- Revealed and sealed cracks in the house. If this is not done, then they can cause rotting. When sealing, it is recommended to use an antiseptic.
- being looked around floor. Often in old houses there is a rotten floor. It needs to be dismantled.
- A detailed work plan and budget.
Design in different rooms
- Kitchen
The kitchen is the center of a village house; in the old days it replaced the hall, the hallway, and the living room. Therefore, the traditions of honoring the cuisine have been preserved to this day. This room should be bright, the ceilings and walls in which are whitewashed, wallpapered with floral or floral ornaments. You can use modern material and decorate the room with wood panels. Color will be given by self-knitted rugs, embroidered table linen, bouquets of natural dried flowers: wheat ears, oregano, St. John's wort or tansy. You can choose dishes made by design workshops, clay, ceramic or wood.
- Living room
The interior design of the guest room of a modern country house is distinguished not only by functionality, but also by comfort. A mandatory component is the presence of upholstered furniture with embroidered pillows, cozy curtains and a fireplace. The carpet will create additional comfort.

- Bedroom
The central place in the bedroom is designed for a large bed made of wood or metal. All bedding, preferably, should be made from natural high-quality materials. And the best option is a feather bed with a mass of whipped pillows.
Bedroom furniture, like the bed, is massive, simple and durable. You can give preference to carved furniture or painted in ancient traditions.
- Children's
A rustic nursery will allow little ones to grow up in an environment filled with natural materials. The simplicity of the interior and the lack of deliberate decoration will only stimulate the development of children's imagination.
- The corridor
The corridor should match the style decision of the house. Wooden furniture, carved hangers, wicker storage boxes, stools for convenience, metal accessories and original lighting fixtures should all be directed towards solving practical problems.

Restoration of an old rustic log cabin
If you need a major overhaul or reconstruction of an old log village house, then most likely you will need a complete restoration of the old log house, whether it is a log house or a bathhouse. Restoration of an old rural log house includes the whole range of works: grinding, caulking, impregnation with antiseptic compounds and finishing decorative painting. If desired, you can additionally insulate the outer walls and make a new finish with a ventilated facade. After such a major alteration, the old village house will find a new life and will last for more than a dozen years.
The cost of such a repair.
An old log house in the village will require a lot of effort and money to restore it, such a need may be justified by circumstances, but not always economically justified.
Replacement and reconstruction of windows in an old house
If the window openings are equipped with a concrete lintel, then replacing windows in an old building is not a problem. If the arch of the opening rests on the old window frame, then it cannot be removed when replacing the window - it is necessary to dismantle the sashes and glazing, remove protruding elements and rotten or rotten areas on the old frame, and mount a new window in the opening formed by the old frame. For the rehabilitation of windows in old buildings, there are even special profiles equipped with facing protrusions that hide the unsightly old frame.
If you want to expand the window openings, then you need to prepare for serious construction work. Before expansion, it is necessary to mount a reinforced concrete jumper of the required width over the existing opening (if the material and construction of the wall of the old building allow it) and only then cut the opening of the required size below.
Very often in old rural houses there are no ventilation ducts.
When installing modern sealed structures, the humidity in the premises will increase, so it is important to equip the windows with special ventilation valves.
(⇑) Old village houses, built on rubble foundations, are often in good condition, they are quite suitable for life.
Exterior wall renovation
Do-it-yourself repair of a wooden house can be done by partially or completely updating the external walls and roof.
If it is necessary to renew rotten crowns at the base of the foundation, the house rises above the foundation. The damaged log is removed and replaced with a new one. When replacing, it is necessary to select a log of the required length and diameter.
A layer of roofing material or other waterproofing material spreads on the surface of the foundation. A whole box is already installed on it. When cracks form along the perimeter of a wooden house, restoration consists in updating the walls.
 Before and after siding
Damaged logs are cleaned, treated with antiseptic compounds, the cracks are covered with sealant. Then the outer walls of the wooden house should be sheathed with wooden, plastic siding or lined with bricks.
In those cases when the log rots under the window frame as a result of the accumulation of melt water in this place in the spring, the damaged part is sawn out. Wooden combs are installed along the ends in sawn places. A new piece of log is driven into them.
Repair of wooden houses to restore the external walls of the house can be done independently.
Benefits of rural life
Today, life outside the city ceases to be a luxury, and sometimes village buildings become almost the only place of residence acceptable for health. In the current state of affairs, buying and maintaining a rural house is much cheaper and more profitable than a tiny apartment in a multi-storey city "anthill". And there is no need to talk about the accompanying benefits and benefits of such a habitat for humans.
Cars do not scurry back and forth, the nasty city smog does not hang overhead - instead, birds chirp and a pleasant breeze blows from a forest or a river. Clean air, saturated with the smell of fruits, berries and herbs, natural food (bought cheaply from neighbor grandmothers) and the absence of city noise please not only the body, but also the soul.

If the house is located near water, it is important to find out if flooding occurs in the area. 2
During rains, dirt roads can become a big problem.
The most difficult task is to find a really worthy countryside version of the old house, durable, warm, comfortable. To do this, it is important to understand the state of the building structure, take into account the features of the area of its location, and evaluate the quality of the site. The future owner may not even be aware of what surprises lurk behind an attractive facade. How to protect yourself from trouble and not buy a pig in a poke, read this article.

(⇑) Inspection of the house should begin with checking the condition of the foundation.
Mandatory elements of a country house made of wood
Houses in the suburbs are often built of wood, and if not, then it is sure to be present in the interior of any rustic style. It is worth highlighting three main features characteristic of a house in the village:
- a real fireplace, stove or their decorative versions;
- the presence of an attic or second floor;
- Lots of light, mostly natural.
All rustic styles are characterized by the use of only natural materials, so plastic, synthetics and artificial materials should be canceled at the design stage.

Rustic kitchen
If the house in the village is small, it is necessary to draw up its layout correctly. Each residential building should have the following premises:
- kitchen;
- living room;
- bedroom;
- veranda, terrace or at least a porch;
- basement.
If a country house with a Russian stove is being built, then it should be located mainly in the kitchen, but you can place the stove in the living room, as well as the fireplace. When a stove or fireplace performs an exclusively decorative function, gas or electric heating is required, these nuances must be taken into account even at the design stage of the house.
Beautiful examples
- The first photo shows a simple bedroom design using a rough rustic style. Pay attention to the rug in the bedside area, which is made by hand. The headboard of the bed is decorated with wood and covered with woven fabric with folk patterns.
- And this is the design of a small village house, which was divided into several sections with the help of a wooden beam and supports.


- In this photo you can see the design of the facade of a two-story house built of wood with a stone oven.

- Here is the design of the office in country style, characterized by aristocracy and restraint. Scottish cage adds coziness and home warmth to the room.

- This photo shows a cozy living space in a Russian country style with a samovar, photographs of Russian nature and a wall clock.

- If you are not yet ready for large-scale changes in the interior, then you can do much easier. To update the interior and give it a touch of rustic style, stylized decor items will be enough: towels, embroidered pillowcases, clay figurines, a samovar.
For more tips on how to furnish your home, see the following video.
Wall insulation from the inside in wooden houses makes them more comfortable and economical. In addition, the good performance of the walls in terms of heat engineering allows you to save on heating. The issue should be approached seriously, since the result will completely depend on the chosen material and compliance with the technology.
Thermal insulation of the house from the inside avoids the need for exterior decoration. With this approach, it is possible to preserve the attractive appearance of a building made of timber or rounded logs. But the technology has a number of disadvantages that you should prepare for:
- interiors are protected from the harmful effects of cold, but not walls;
- the useful area of the building is reduced;
- there are certain restrictions on the materials used.
Which heater to choose
What is the best way to insulate a house? It is worth starting from the material of the walls. The tree has gained well-deserved popularity due to the fact that it is able to "breathe". Wood is well breathable, while providing excellent ventilation in the premises.
To preserve the useful properties to the fullest, when working from the inside with your own hands, you need to use materials that are similar in breathability to wood. To insulate the house, it is better to abandon such heat insulators as:
- Styrofoam;
- extruded polystyrene foam (or more simply "Penoplex");
- penoizol.
They are highly airtight, so they can create a greenhouse effect in the building. This will require an expensive forced ventilation device or the installation of air conditioners.
The best material for thermal insulation will be mineral wool.
Its advantages include:
- high efficiency;
- the ability to pass air without interfering with natural ventilation;
- safety for human health and the environment;
- incombustibility;
- ease of installation;
- availability;
- low cost.
But when using cotton wool, it is worth remembering its shortcomings. The material absorbs moisture well, while ceasing to perform its main function. To avoid getting wet, you should also purchase a vapor barrier and wind-waterproofing.
Scheme of layers for insulation with mineral wool
There are several varieties of mineral wool. The best option would be basalt (stone) insulation in slabs. You can also choose glass wool, which is available in the form of mats twisted into a roll. The second option can cause difficulties during installation. The material is highly prickly, and the particles, getting into the lungs or on the skin, cause itching. To avoid unpleasant consequences, all work with glass wool is carried out in special clothing and masks.
The most undesirable, but inexpensive option would be slag wool. But, insulating your home, it is better not to save. Cotton wool is made from industrial waste. Manufacturers are responsible for safety, but it is not always possible to check from which slags the insulation is made. You can easily come across low-quality material or a fake, with which the insulation of a wooden house from the inside will be dangerous to health and life.
Preparatory stage
Before insulating a wooden house from the inside, you will need to prepare the walls. This is especially true if it is necessary to insulate an old wooden house. In this case, the material that was used for the caulking has managed to clot. The main task at this stage will be the elimination of cracks - sources of drafts, cold and moisture.
Work begins with cleaning the base. You will need to remove the dust and dirt that has accumulated on the walls. Before insulating an old house, it is worth checking the strength of the wood. It should not be damaged by various pests. Otherwise, it is better to strengthen the walls.
To prevent problems with insects and microorganisms in the future, the surface is treated with antiseptic compounds. You can also perform the treatment with fire retardants, they increase the resistance of the material to fire.
 Treatment with antiseptics will protect the wood from decay
Wood shrinks over time. Because of this, cracks may appear in the walls. Before starting work on insulation, it is worth caulking old walls. Currently, jute is most often used for these purposes. For large gaps, it would be wise to purchase tape tow. The material is hammered between logs or timber using a chisel.
 Caulking will protect the walls from blowing and become an additional heat insulator
It is necessary to perform work until the material ceases to fit into the space and begins to hang out. High-quality caulking is the key to a warm home.
Wind waterproofing of walls
Mineral wool is afraid of moisture. Before you insulate the walls in a wooden house, you should take care of protecting the insulation. On the outside of the mineral wool, a layer of wind-waterproofing is fixed. It prevents weathering and penetration of atmospheric moisture. There are several types of suitable materials, but the best option is a vapor diffusion membrane.
 Description and characteristics of the windproof membrane
This modern material reliably protects against water, but does not interfere with the movement of air and steam. This allows you to maintain the ability of the walls to breathe, as well as ensure the removal of moisture from the insulation.
Waterproofing is attached to the walls with a construction stapler. The joints of the canvases are made with an overlap of at least 10 cm and glued with adhesive tape or a special tape.
Insulation installation
Internal wall insulation is carried out according to the frame. It can be made of wood from a metal profile. The easiest way to insulate a building made of wood is to use wood for the frame. It is important to correctly select the geometric dimensions of the frame:
- The pitch of the racks is selected taking into account the width of the insulation. It should be about 2 cm less than the width of the mats or slabs. This is necessary for a tight fit of the material. For mineral wool, such a step of racks is most often used so that a distance of 58 cm remains between them in the light.
- The frame overhang must take into account the thickness of the insulation and the required ventilation gap. It is needed to remove condensate from the surface and allows you to keep the material dry. The thickness of the ventilation gap is usually taken equal to 3-5 cm.
Installation of plates in the walls should be carried out with an interference fit - then it will not begin to slide over time
Mineral wool is laid between the racks of the crate. With the right choice of the step of the latter, the heat insulator will be held due to friction. For additional fixing, you can use special plastic dowels, they are usually sold together with insulation.
vapor barrier
How to properly insulate the walls of a wooden house from the inside? It is important not only to choose the right insulation, but also to protect it from all types of moisture. Indoor spaces are characterized by sufficiently high humidity, water in the form of steam can easily reach the mineral wool and reduce its effectiveness.
 Vapor barrier is a mandatory layer when using mineral wool
Internal wall insulation implies the obligatory presence of a vapor barrier layer. It is mounted on top of the heater. A good option for protection is vapor barrier membranes.
Characteristics of the vapor barrier membrane
They are more expensive than films, but they do not interfere with the movement of air through the walls. Membranes will become a more modern and efficient option.
Insulation of a wooden wall from the inside with their help is carried out according to the manufacturer's instructions. Mounting method may vary for different types.
Finishing
The insulation of the walls of a wooden house is completed with a fine finish. For these purposes, you can use a variety of options. But when choosing a material, it is worth remembering about ventilation. The finishing layer should not impede the movement of air, otherwise the entire previous choice of materials is useless.
Lining for interior lining - a simple, inexpensive and environmentally friendly option
Insulation thickness
Wall insulation in wooden houses from the inside should begin with the calculation of the thickness of the heat insulator. Only a professional can perform detailed calculations. With independent construction, you can use special programs. For example, the Teremok program. It is quite simple and is freely available. There is both an online version and a PC app.
On average, mineral wool 80-100 mm thick is used for walls. But it all depends on the climatic region.
Before insulating your own wooden house from the inside, you should carefully study the information on the topic.
And do not forget that from the point of view of heat engineering, it is more correct to insulate with mineral wool from the outside.
Competent performance of work is the key to durability and comfort.
Building science recommends doing external insulation of buildings, since in this case the dew point is outside the room in the insulation or in the outer layer of the walls. With such insulation in rooms, moisture will not condense on the walls.
However, there are cases when insulation of a wooden house from the inside- is the only correct solution. For example, if the owner of the house wants to preserve the beautiful appearance characteristic of houses made of logs or laws prescribe to preserve the historical appearance of the building.
Modern building science allows you to make internal insulation of wooden houses, but for this you need to use the right materials and follow the technology.
Preparatory work
All work on the construction and arrangement of residential buildings must be preceded by
engineering calculations. This also applies to the internal insulation of a wooden house.
The thermotechnical calculation should show how effective the insulation will be and, in general, is there a possibility of internal insulation? The insulation will always fulfill its function, but the position of the dew point is of decisive importance.
The dew point should never be on interior walls. and even more so in the insulation and calculations should show this. If the dew point is inside, then the room will be warm, but in the cold season it will be constantly damp. And from dampness, porous heaters get wet, the walls of houses rot, mold and various unwanted living creatures are massively bred.
Only if the dew point is not inside the room even in the coldest period, you can confidently produce internal insulation. True, for this you will have to sacrifice part of the internal volume of the house, but without this - nothing!
Materials used for internal insulation
Materials that are used in the internal insulation of the house, must meet certain requirements:
- Firstly, they must have low thermal conductivity in order to fulfill their main function - insulation.
- Secondly, these materials must meet the fire safety requirements for the premises.
- Thirdly, the material alone or in combination with the mounting structure must provide the required mechanical strength.
- And, finally, all materials used indoors must be environmentally friendly and not release any chemicals into the surrounding air that adversely affect the health of living beings.
Warming methods
Ways to insulate a wooden house directly depend on the materials used for this. In modern construction, several types of them are used:
- Mineral basalt wool slabs- are most commonly used. This material does not burn, environmentally friendly, its use provides excellent heat and sound insulation. Low mechanical strength requires the construction of a building envelope, and high hygroscopicity obliges to cover mineral wool with special vapor barrier films.
- Expanded polystyrene plates (polystyrene), have also found application in internal insulation. Their use is not recommended, as they can release substances containing styrene into the air. When burning, pressless expanded polystyrene releases deadly substances: hydrogen cyanide and toluene diisocyanate. Therefore, only extruded polystyrene foam, flammability class - G1, can be used. Insulation with expanded polystyrene also requires a building envelope.
- glass wool- a widely used material for insulation. It has a lower price than basalt wool, however, it also has a higher thermal conductivity. To insulate the interior with glass wool, only material specially designed for this purpose should be used, which should additionally be covered with films. Small particles of glass wool are very harmful to health, so the installation is carried out only in the means of protecting the skin and respiratory organs. Requires building envelopes.
- Isoplat- modern insulation, which consists of a layer of pressed linen fiber and fiberboard with a thickness of 12 to 25 mm. High mechanical strength makes it possible not to make powerful enclosing structures, and the environmental friendliness of this material allows it to be used indoors. The thermal conductivity of Isoplat is worse, and the price is much higher than that of other heaters.
- Insulation with polyurethane foam sprayed on the surface - a modern excellent method that requires special equipment. Enclosing structures for such insulation are needed.
In this video you can see how a wooden house is insulated from the inside with polyurethane foam.
Insulation of the walls of a wooden house from the inside
Sealing joints
A wooden house, even an impeccably built one, settles down for quite a long time. In addition to precipitation, when the heating is turned on in the house, there is an intensive drying of the wood, which affects the geometric dimensions of the log or glued beam. Initially, even well-laid logs or beams can form enlarged gaps at their joints, through which heat will be ruthlessly carried out into the atmosphere.
Therefore, the first operation for warming a house is sealing joints.
This can be done in various materials: tow, jute, synthetic sealants or combinations of different sealants. The main thing at this stage is to stop the leakage of heated air through the joints.
Fire bioprotection of wood
The inner part of the walls during insulation will be hidden by a layer of insulation, and for quite a long time. That is why the tree must be treated with a good fire-retardant composition, which for a long time eliminate the development of living creatures and make it difficult to ignite. It’s not worth saving on this, you need to choose only good compositions that are guaranteed to provide the necessary protection.
When processing walls with fire-retardant compounds, it should be taken into account that all enclosing structures, if they are wooden, must also be processed, since they will also be hidden in the insulation structure.
Thermal insulation and ventilation
Why didn’t they think much about the ventilation of houses before? Yes, because ventilation was carried out in a natural way - through leaks in wall and window structures.
Modern building materials and technologies exclude any leaks and gaps through which air can pass, but this does not mean that air should not circulate in the room. In modern houses, a ventilation system is designed, which should supply fresh air to the room and remove the exhaust.
Good internal thermal insulation must always be accompanied by ventilation. Only then will the microclimate in the room be normal. But ventilation is also required by the thermal insulation itself, which has a soft and porous structure, for example, mineral wool. Therefore, in the gap between the wall and the thermal insulation layer, there must be an air gap, through which air must circulate freely, removing excess moisture, comparing the air humidity in the entire room.
Such intervals are realized in practice very easily. A wooden lath about 2.5 cm thick is attached to the walls with a certain gap, and a vapor barrier membrane is already attached to it. It turns out that there is an air gap between the wall and the insulation, which prevents the increased humidity of the internal walls and insulation.
If the walls of the house are built from a cylindrical log, then the ventilation gaps are obtained naturally, and if from glued beams, then the ventilation gap is highly desirable.
vapor barrier
If used as a heater basalt wool, glass wool, pressless polystyrene foam, then vapor barrier must be done. To do this, a vapor barrier film is attached to the ventilation crate using a construction stapler. The film must be sufficiently stretched so that there is a ventilation gap between it and the wall. the joining of two panels of vapor barrier is done with an overlap of at least 10 cm using adhesive tape and a stapler.
If the interior of the house will be insulated with extruded polystyrene foam, then vapor barrier is not needed. This material already has the necessary waterproofing qualities and will be a reliable barrier to moisture.
Installation of the enclosing structure
With all methods of insulating the internal walls of a wooden house, except for Isoplat plates, the construction of a building envelope is required. Most often, it is made from a wooden square bar with a cross section of 50 mm. The installation step of the bar is determined by the width of the insulation. If mineral wool insulation is used, then the distance between adjacent bars should be 10 mm less than the width of the insulation - for a snug fit. If extruded polystyrene foam is used, then the distance must be exactly the width of the insulation boards.
Before installation it is necessary to process all the bars with a fire-retardant composition. Installation is carried out using screws of the required length directly to the wooden walls. If a crate was used for the ventilation gap, then the bars are attached to previously mounted rails. In this case, it is better to wrap the screws in holes previously drilled with a thin drill. This will prevent possible cracking of the wood.
Sometimes plasterboard profiles are used as a building envelope, which are attached to the walls on direct suspensions. This should only be done when drywall will be used as a finish, and in all other cases it is better to use a block of wood. The thermal conductivity of wood is much lower than that of metal.
When insulating the ceiling, the enclosing structure is made similarly to the wall. When insulating the floor, the wooden logs themselves, on which the floor covering will be attached, act as a building envelope.
Insulation installation
Insulation is placed in the space between the enclosing bars. If a sheet insulation, then installation on the walls is carried out from the bottom up, and rolled, on the contrary, - from top to bottom.
Mineral wool slabs are laid at random, which makes it possible for them to hold securely. However, it is still necessary to additionally strengthen the foam or mineral wool with special dowels with a wide head, one dowel per slab.
Roll insulation fixed on top with one dowel, rolled down and fixed with dowels at 1 meter intervals. First, whole slabs or rolls are laid, and the remaining space where trimming is required is filled with insulation last.
Ceiling insulation, in the case of a sloping roof, rolls up from the bottom up and can be fastened with dowels or with a cord. To do this, small carnations are stuffed onto adjacent bars with an interval of 15 cm, and then, after laying the insulation between the beams, a cord is pulled in a zigzag manner, which will securely hold the mineral wool.
If extruded polystyrene foam is used for insulation, then all possible gaps at the joints can be filled with mounting foam. Before applying the foam, the surfaces are moistened, and after it dries, all excess is cut with a knife.
Final waterproofing
After installing the insulation, if the thermal insulation was made with porous materials that can absorb water, then it is necessary to cover the insulation with a layer of waterproofing, but with a special one - vapor permeable membrane, which is, on the one hand, a reliable barrier to water, and on the other hand, the membrane freely releases water vapor from the insulation. Even if water has condensed in the insulation, it will come out in the form of steam until the humidity of the insulation is equal to the humidity in the room.
The breathable film has two sides: one is smooth and the other is rough, through which water vapor escapes. The rough side of such a film is laid to the insulation and fastened with a stapler to the building envelope. Joints with an overlap of 10 cm are glued with adhesive tape and fixed with a stapler. For waterproof insulation, a vapor-permeable membrane is not needed.
The final stage of warming there will be installation of the finishing coating, which can be wooden lining, drywall, plywood, OSB boards and others.
conclusions
- Wall insulation inside a wooden house is extremely rare and very often a necessary measure.
- Before installing the internal thermal insulation, it is necessary to carry out thermal calculations showing the position of the dew point in the cold period. Tochna dew should not be on the inner walls and in the insulation.
- As a heater, you should choose only environmentally friendly from well-known manufacturers.
- Porous insulation must be covered with waterproofing films from the side of the wall and a vapor-permeable membrane from the side of the room.
If you are going to independently carry out the insulation of a wooden house from the inside, I recommend that you read this article. We will consider in detail all the main nuances and subtleties of this procedure, which you are unlikely to be told about on other resources.
Thermal insulation of a wooden house from the inside
A few words about the choice of insulation
First of all, home craftsmen are interested in how to insulate the walls of a wooden house from the inside, as well as the floor and ceiling. The choice of insulation for a wooden house requires a special approach, because one of the main advantages of such housing is vapor permeability and environmental friendliness. Accordingly, it is desirable to preserve these qualities.
Wood is known to be a combustible material. Therefore, it is desirable that the insulation be fireproof.
Given these points, you can use the following materials for home insulation:
- mineral wool;
- extruded polystyrene foam;
- ecowool.
Mineral wool
mineral wool
Mineral wool is the most common insulation.
It is excellent for thermal insulation of wooden housing due to the following properties:
- good thermal insulation properties - 0.032 - 0.048 W/mK;
- environmental friendliness;
- good vapor permeability;
- fire safety - mineral wool not only does not burn, but also resists the spread of fire;
- Sold in the form of mats and rolls, making it convenient to work with mineral wool.
It should be noted that only basalt wool is environmentally friendly. In addition, it is the most thermally stable. Therefore, use it to insulate a wooden house.
Basalt wool Technikol
True, the price of basalt wool is slightly higher than stone wool and glass wool:
| brand | Cost per 1m3 |
| Isoroc Isoruf-V | 3990 |
| TECHNOFAS L | 3500 |
| Ecover Light | 1950 |
| TECHNOFLOR | 4800 |
Another disadvantage of basalt wool is that it causes irritation on the skin, although to a lesser extent than, for example, glass wool. But, in any case, when working with it, it is desirable to protect the eyes and respiratory organs.
In general, in my opinion, basalt wool is the most optimal insulation for wooden walls.
Extruded polystyrene foam
Penoplex
Extruded polystyrene foam is a type of regular polystyrene foam.
Thanks to a special manufacturing technology, it has higher characteristics than expanded polystyrene:
- high strength - 0.2-0.5 MPa versus 0.07 MPa for foam;
- thermal conductivity is lower than that of mineral wool - 0.028-0.034 W / mK;
- during the manufacturing process, manufacturers add flame retardants to extruded polystyrene foam, due to which the material corresponds to the flammability class G1 (low combustible material). True, this applies only to insulation from well-known manufacturers;
- resistant to moisture, therefore, during installation does not require hydro-vapor barrier;
- does not irritate the skin.
Penoplex differs from polystyrene in a more homogeneous structure
However, penoplex has some disadvantages:
- vapor permeability is very low, so it is better not to use penoplex to insulate the walls of the house. At the same time, it will be a good solution for thermal insulation of the floor, as it is not afraid of moisture;
- high cost - penoplex is today one of the most expensive heat-insulating materials.
Below is the cost for some common grades of extruded polystyrene foam:
Ecowool is a modern eco-friendly material
Ecowool
Ecowool is a relatively new thermal insulation material that has become increasingly popular in recent years.
Its merits include the following points:
- environmental friendliness - the material is made on the basis of wood fibers;
- vapor permeability;
- thanks to special additives that are present in ecowool, the insulation is fireproof and resistant to biological influences;
- has a low thermal conductivity of 0.031-0.040 W / m * K;
- low cost - from 1200 rubles. per cube
Ecowool can be used to insulate horizontal surfaces
I must say that for the insulation of walls with ecowool, special equipment is required. Therefore, when working independently, it is possible to perform only floor or ceiling insulation with this material.
Here, and all the most common heaters that are used to insulate wooden houses. True, there are still materials that are applied in the form of foam, for example, polyurethane foam. However, they will not be able to perform insulation on their own, so we will not consider them.
Warming technology
The process of warming a wooden house includes three main stages:
The main stages of thermal insulation of a wooden house from the inside
Floor insulation
To insulate the floor yourself, you will need the following materials:
- one of the heaters that I talked about above;
- vapor barrier;
- slats and boards - will be needed if there is no subfloor between the lags;
- antiseptic impregnation for wood.
Wooden floor plan
The instruction for floor insulation looks like this:
- if the floor has already been used, it is necessary to dismantle the wooden flooring;
- then you need to complete the draft floor, unless, of course, it is missing. To do this, fasten the cranial bars on the rafters from below and lay the boards on top of them;
- Further treat all wooden floor elements with an antiseptic to protect them from biological influences;
Laying vapor barrier on logs
- then a vapor barrier is laid over the rafters and the subfloor. The strips of the membrane should overlap each other by 10 centimeters. Be sure to glue the joints with tape.
As I said above, in the case of floor insulation with extruded polystyrene foam, vapor barrier can be omitted;
Insulation laying
- Next, you need to lay the insulation. If mineral plates or penoplex are used for these purposes, place the insulation close to the logs. In addition, make sure that there are no gaps between the insulation plates;
It is desirable to leave a small gap between the insulation and the top layer of the vapor barrier.
- then you need to lay another layer of the vapor barrier;
- at the end of the work, it is necessary to lay the boards, fixing them on the logs with nails or self-tapping screws.
I must say that the thermal insulation of the attic floor is performed in exactly the same way, with the only difference being that the insulation is placed between the floor beams.
Wall insulation
The next stage is the insulation of the walls from the inside of a wooden house. I must say right away that it is necessary to resort to this procedure only if it is really necessary.
Scheme of wall insulation from the inside
It is much more expedient to insulate the house from the outside.
The fact is that internal insulation contains a number of disadvantages:
- insulation, although not significantly, but still takes up useful space in the room. For large houses, this, of course, is not critical, but in small houses, for example, garden ones, the reduction in space can be very noticeable;
- after the walls are insulated from the inside, they completely stop heating;
- moisture forms between the insulation and the wall, which leads to dampness of the surface and, accordingly, a decrease in the durability of the structure.
If insulation from the inside cannot be avoided, it is necessary to strictly adhere to a certain technology that will minimize all the negative consequences of this procedure.
Antiseptic impregnation
So, for wall insulation, it is necessary to prepare the following materials:
- antiseptic impregnation for wood;
- interventional insulation;
- wooden slats;
- vapor barrier;
- thermal insulation material;
- finishing material - lining or, for example, drywall.
The process of wall insulation can be divided into four main stages:
Stages of wall insulation from the inside
To prepare the walls for insulation with your own hands, you need to perform the following steps:
- wall surfaces must be impregnated to prevent wood decay, protect it from moisture and other negative factors;
Warming of the crowns of the house
- if the house is made of beams or logs, it is imperative to insulate the intervention gaps by filling them with tow, jute insulation, or other suitable material.
Now we need to equip the ventilation space between the wall and the insulation so that the walls do not get damp.
It is done as follows:
- fasten the rails to the walls in a horizontal position. Their thickness should be at least 1.5-2 cm.
The layout of the planks on the wall
Install them at a distance of 0.5 m vertically, and 2-3 cm horizontally. At the same time, try to arrange them so that they form a flat horizontal plane. Minor deviations are allowed, since the plane of the frame can be corrected at the stage of installing the racks;
The vapor barrier membrane must be stretched
- then a vapor barrier membrane must be attached to the rails. It should be stretched to form a ventilation gap. Glue the joints of the membrane with adhesive tape;
- for the ventilation gap to work, it is necessary to drill holes in the wall from below near the base, and from above under the visor.
Now let's start assembling the frame:
- the bars that will serve as racks must be cut to the height of the room;
Racks can be mounted on the wall with hangers
- prepared bars must be fixed on the rails. If their thickness is equal to the thickness of the insulation, the racks can be placed close to the rails using metal corners and self-tapping screws. If the bars are thinner, they should be fixed on suspensions, while the thickness of the frame should be equal to the thickness of the insulation.
Make the distance between the posts so that the insulation fits snugly against them. For example, if mineral mats are used for insulation, the step of the racks can be made two centimeters less than the width of the mats.
An example of a well-executed frame
To make the wall even, first install vertical posts (required in level) along the edges of the wall, i.e. near the corners, then pull the threads between them. This will allow you to set the intermediate racks in the same plane as the extreme bars;
Mineral mats must be laid close to each other
- Now we are laying the insulation in the frame. In order for the wall insulation in a wooden house to be effective from the inside, try to ensure that there are no gaps between the plates. In addition, place the tiles flush against the ceiling and against the walls.
If the cracks are nevertheless formed, they must be filled with scraps of mineral wool;
Installation of the second layer of vapor barrier
- then a vapor barrier membrane must be attached to the racks. To fix it, you can use a construction stapler.
Be sure to overlap the strips of the membrane, and glue the joints with adhesive tape; - fasten wooden slats about two centimeters thick over the membrane. They will provide the necessary clearance between the skin and the vapor barrier membrane.
Keep in mind that the crate should be perpendicular to the plastic panels or lining.
To ensure good sound insulation in housing, it is necessary to insulate the internal walls with mineral wool, i.e. partitions. The principle of installation of insulation is the same as for the insulation of load-bearing walls.
Now we need to sheathe the frame. Usually, wooden finishing materials are used for these purposes - lining or block house.
Their installation is carried out as follows:
- lining is most often installed vertically, so the boards must first be cut to the height of the room;
- the first lining is installed so that the spike is directed towards the corner. To fix it, self-tapping screws are screwed into the face from the side of the spike.
An example of fastening a lining with a kleimer
From the side of the groove, the vgonka can also be fixed with self-tapping screws, which are screwed into the lower ridge of the groove. It is even easier and faster to fix with the help of special fasteners - kleimers;
- the subsequent board will be connected to the lock with the previous one and attached to the frame from the side of the groove. The last board on the wall is cut in width, and docked with the previous one. From the side of the corner, the lining is fixed to the frame with self-tapping screws, which are screwed into the face;
An example of installing wooden slats
- at the end of the work, wooden corners are mounted on the corners. They will hide the joints of the lining and the hats of the screws.
This completes the insulation of the walls inside the house.
Ceiling insulation
As I said above, ceiling insulation can be done from the attic side. However, sometimes it becomes necessary to install insulation from the inside.
If you have a similar situation, you need to prepare the following materials:
- slab insulation;
- wooden slats;
- vapor barrier membrane.
Mineral wool ceiling insulation
Installation of insulation is carried out as follows:
- if there is no flooring in the attic, it must be done. Boards or other material that is used as flooring should be fixed to the floor beams with nails or self-tapping screws;
- then, from the side of the room, a vapor barrier membrane should be attached to the floor beams and flooring;
- further, the space between the beams must be filled with heat-insulating plates. To fix them, you can fix the rails perpendicular to the beams. You can also nail studs to the lower side surfaces of the beams, and pull threads or wire between them;
- after the insulation of the floor, it is necessary to fix another layer of vapor barrier;
In the photo - installation of a vapor barrier
- then the crate is performed and the ceiling material is mounted. You can also make a frame and sheathe the ceiling with drywall.
Here, in fact, is all the information on how to properly insulate a wooden house from the inside.
Conclusion
Having familiarized yourself with the technology, you can safely take on the insulation of a wooden house from the inside. As you can see, there is nothing complicated in this work. I recommend watching the video in this article. For any questions, you can contact me in the comments, and I will be happy to answer you.
Country wooden houses are being built more and more often. This is explained not only by fashion old Russian style but also for other, quite material reasons.
For example, dry wood retains heat 2.5 times better than brickwork of the same thickness, and wooden walls, gradually drying out, emit pleasant-smelling substances into the air and thereby create a favorable microclimate.
Modern building codes (SNiP 23-02-2003) establish requirements for the thermal insulation of buildings. However, a wooden house, even built in compliance with all the rules, dries up and shrinks about three years after construction and is not always warm enough to meet these requirements. For this reason, it has to be insulated.
Usually wooden buildings warm outside. This is explained by the fact that during the external laying of thermal insulation, the dew point shifts from the surface or from the thickness of the wall to the surface or inside the layer of external thermal insulation. This means that logs or beams warm up well and always remain dry. And under such conditions, the wood is well protected from decay and destruction by fungi.
However, for some reason, it is not always possible to lay the thermal insulation on the outside. For example, old wooden buildings, considered architectural monuments, local authorities do not allow to be insulated in this way, as this changes their appearance. In such cases, the owner is forced to mount heat-insulating materials from the inside. Details about the features and technology of these works can be found in the article "Internal wall insulation is the best way to keep warm."
Rules for wall insulation from the inside in a wooden house
Warming the walls of a wooden house from the inside with your own hands is possible if comply with such rules:
- Before starting work, make heat engineering calculations, taking into account the thermal conductivity and wall thickness, as well as insulation materials of various types and thicknesses. With all these calculations, the dew point must remain inside the wooden wall for any temperature fluctuations.
- For indoor installation, you need to choose heat insulators that do not emit harmful substances and are not decomposed by fungi and bacteria at high humidity.
- Porous insulation must be reliably isolated from the wall with a vapor-tight membrane, and from the side of the room - vapor-permeable. In this case, the wood does not freeze and does not get wet, since only outside air with a low vapor content penetrates into it. And if condensate forms in the heat-insulating material when the dew point shifts, then when the temperature in the room rises, it will evaporate and exit through the pores of the vapor-permeable membrane.
- Between the finish and the insulation, protected by a vapor-permeable membrane, there must be an air gap for the evaporation of condensate.
What heater to choose?
For internal insulation of wooden houses usually used such materials:
- Warm seam. This concept includes natural and synthetic sealants. From natural, tow, flax or linen rope is used. Synthetic sealants are available in tubes. They contain sealing masses based on rubber, silicone or acrylic plastic. One of these materials fills the gaps between the logs, which were formed after the drying of the wood.
- Mineral wool. Usually use basalt wool in slabs. Glass wool is not used for internal insulation, because small fragments of fiberglass irritate the skin and respiratory tract. Basalt wool allows steam to pass through and can accumulate some moisture, so it requires mandatory waterproofing from wood. Mineral wool does not have combustible properties.
- Expanded polystyrene in slabs. It is used in the form of various modifications (foam, foam). It is preferable to insulate the walls with foam. This fine-mesh material has greater strength and better thermal insulation properties than foam. Expanded polystyrene does not require vapor barrier, since it practically does not let steam through, but it needs waterproofing. In terms of its ability to retain heat, it is approximately 1.5 times superior to basalt wool.
- Penofol. This is a small-mesh polyethylene foam covered with aluminum foil. Is issued in rolls. In this case, it is worth using a 3 mm thick material with a one-sided coating to reflect heat radiation towards the room. Typically, penofol is used for combined insulation protecting the foam from moisture.
Insulation installation technology
Internal insulation of wooden walls in any case begins with joint sealing logs or beams (warm seam).
After that, the dry inner surface of the walls is processed several times antifungal agents. Bars for crates are also treated with these preparations. After complete drying, proceed to the laying of thermal insulation.
Insulate the walls in the following sequence:
- Laying a vapor-tight membrane. The film is fixed on the beams or logs of the walls in a tense state with the help of brackets and a construction stapler. Neighboring panels are overlapped to a width of 15 cm. The edges of adjacent panels are glued with construction tape. This layer does not let steam or water through. Usually, the Megaspan B membrane is used for this, laying it with the rough side to the wall, and the smooth side to the insulation.
- Lathing installation. To do this, you need bars with a cross section of 50 × 50 mm (the thickness is selected according to the thickness of the insulation layer, i.e., with a two-layer laying of mineral wool, the section of the bar is 50 × 100 mm). The bars are screwed vertically to the wall with self-tapping screws. The distance between them is 2–3 cm less than the width of the mineral wool slab.
- Placement of thermal insulation. Between the bars of the crate, mineral wool slabs are tightly inserted end-to-end. If 2 layers are mounted, then the plates of the upper layer must overlap the joints of the lower one. After laying, the surface of the slabs should be on the same level with the beams of the crate.
- Fixing the vapor permeable membrane. A vapor-permeable membrane is stretched over the insulation. It is fastened with a stapler to the lathing bars with an overlap of 15 cm. This film protects the mineral wool from water drops, but freely passes steam. Usually, the Megaspan A membrane is used for this, which is laid with the fleecy side to the heat-insulating material.
- Lathing installation and finishing. The crate for the heat-insulating material is increased horizontally with bars with a section of 50 × 50 mm, screwing them with self-tapping screws. Finishing material (wooden panels, gypsum boards) is attached to this crate.
Installation of polystyrene boards slightly different in technology:
- laying a vapor-tight membrane on the wall is not required, since this material practically does not allow steam to pass through;
- on top of the expanded polystyrene, a vapor-tight membrane (Megaspan B with the smooth side to the insulation) or penofol foil towards the room is fixed (15 cm overlap film, penofol butt-butt with gluing the joints with metallized adhesive tape).
Properly installed internal thermal insulation not enough to keep the walls of a wooden house warm. Internal insulation provides reliable insulation of walls from steam penetrating into the wood from the room.
Previously, this steam escaped through the pores, and after warming this path is blocked. This means that excess steam must now be removed. forced ventilation. This is best done with an air heating system. In it, forced ventilation and air heating are carried out in one cycle.
exhaust air with an excess of water vapor is constantly removed from the room. Under such conditions, the accumulation of condensate in the heater does not occur. At the same time, the steam does not penetrate the wood and does not moisten it.
You can insulate a wooden house from the inside yourself. However, this method of thermal insulation requires some knowledge and strict adherence to the rules. If you break the technology, the walls of the building quickly collapse.
The main condition for the preservation of walls with internal insulation - reliable vapor barrier. Vapors from the room must not penetrate dry wood.
Forced ventilation and air heating eliminate the accumulation of moisture in the insulation and the deterioration of the microclimate in the house, even in case of severe frosts.
A master class on warming the walls with mineral wool in a wooden house from the inside with your own hands, look at the video:
See below for a video tutorial on using a warm seam to insulate a wooden house:
A few decades ago, wall insulation from the inside of a wooden house was not required: to keep the heat in the room, it was enough to increase the thickness of the walls. But the use of more material to build a thick wall leads to an increase in financial costs, so the owners are thinking about how to properly and whether it is possible to insulate the house from the inside. Yes, you can, the modern construction market offers many different thermal insulation materials for the internal insulation of wooden houses.
What you need to know about wall insulation
Wood is a material with high thermal insulation properties, but with a decrease in the thickness of the walls, it becomes necessary to insulate. It is not possible to carry out external insulation, as this will spoil the appearance of the wooden structure. Additional heat loss occurs due to poor-quality connection of logs, under the influence of natural shrinkage of the house. Therefore, the insulation of a wooden house from the inside is an urgent problem that modern heat-insulating materials help to solve.
Before proceeding with the choice of insulation and carrying out thermal insulation work, you need to find out two details:

Work on warming the house is best planned for spring or summer. A newly built house is not insulated - you need to wait a year for the building to shrink. Otherwise, the work will be useless: after shrinkage, cracks and gaps between the logs will reappear, additional work will have to be done.
The choice of insulation
Not only the heat in the house, but also the health of the residents depends on the quality of the insulation.. The following requirements are imposed on the materials that are used to insulate the walls of a wooden house:
- Low thermal conductivity.
- Fire safety.
- Mechanical strength.
- Ecological cleanliness, safety for human health.
Many modern materials with excellent thermal insulation properties have been created. The following types of heaters are used:

Proper organization of work and a thoughtful approach are the lion's share of success in this difficult task. The following will describe the main stages in the insulation of the room. Preparatory stage
 Before starting insulation work you need to prepare the walls. The first operation is to check and seal the joints. To do this, use synthetic sealants, jute fiber, tow. Preparing the walls for applying polyurethane foam includes cleaning the surface from dirt, old paint, grease stains. After filling the joints, they proceed to the next stage - the treatment of wood with fire-retardant compounds.
Treatment with compounds that prevent fire and mold infection is very important, because the wood after thermal insulation will be hidden from free access for many years; the condition and service life of a wooden building depends on the quality of processing. Not only wooden walls, but also enclosing structures are treated with fire-retardant compounds, even if they are made of other materials.
Ventilation device
When carrying out thermal insulation work remember to ventilate: without it it is impossible to achieve the correct microclimate in the room. Some heaters have low air conductivity, which negatively affects indoor air quality. In order for the air to circulate properly, ventilation gaps are arranged - a small gap is left between the wall and the heat-insulating material. In this gap, free air circulation occurs, due to which the normal humidity of the insulation and walls is maintained.
Materials such as basalt wool, non-pressed polystyrene, glass wool require an additional vapor barrier device. To do this, use a vapor barrier film, which is attached to the ventilation crate.
All thermal insulation materials require construction of enclosing structures- without them it is impossible to fix the insulation on the wall. To do this, use wooden bars, which are installed at a distance from each other, equal to the width of the insulation. In order for the material to adhere more closely to the fence, the distance between the bars is made 1 cm smaller than the required size. After laying the insulation between the fencing bars, it is additionally fixed with cords or dowels.
 After mounting on the wall, insulation with high porosity requires additional waterproofing. For this, waterproofing films with vapor-permeable membranes are used, thanks to which the humidity of the insulation will always be equal to the humidity of the air in the room. Drywall, wooden lining, plywood are used as a finishing coating for thermal insulation.
The technology of warming a wooden house from the inside is not difficult, does not require professional skills from the owners. You can perform the thermal insulation of the walls yourself, you just need study the technology of work and purchase high-quality materials.
Read also...
- Education of the USSR: prerequisites, stages, significance When the USSR was created
- Education of the USSR: briefly about everything What led to the formation of the USSR
- Socialist-Revolutionary Party: who are they? Their goals and program. Political parties at the beginning of the 20th century Socialist-Revolutionaries party program table briefly
- Vitaprost rectal suppositories: how to use the drug correctly You can take Vitaprost without a doctor's prescription


