How to glaze a balcony with your own hands: step by step instructions (video and photo). Do-it-yourself balcony glazing instructions Do-it-yourself balcony glazing
A glazed balcony or loggia not only provides additional thermal insulation and protects from extraneous noise from the street. Such a solution makes the owner of square meters the owner of an additional (albeit small) room, which can be arranged according to one's own taste and needs. Many construction companies offer their services in this regard, as well as sellers of PVC and aluminum profile structures. However, often the financial situation forces us to look for more cost-effective options that involve most or all of the work to be done independently. The article will discuss how to glaze the balcony yourself.
Important: glazing of balconies requires official approval from the relevant authorities. If you do everything “according to the law”, then you will first have to take care of additional “permitting” documents.
How best to glaze a balcony
There are a lot of ways, we will list all the main ones and give a little idea about them, which will allow us to decide on the direction of work in the future.
Glazed balcony photo

- "Cold" glazing, regardless of how the frames are opened, suggests that the balcony can be used as an additional “livable” room only in the warm season. This is the most inexpensive option, since aluminum profile structures, which are most often used for these purposes, are quite affordable. Among the positive qualities of this type of glazing is its low weight, so if there is any doubt about the reliability of the support, then aluminum will be the right choice. The material is very resistant to external influences, it is not afraid of humidity and low temperatures, although it can still be deformed from sudden jumps. Sometimes for the "cold" method, wooden frames with one glass are used.
- There is also an option with "warm" aluminum profile. It uses double frames and double-glazed windows. And in addition, it keeps the heat inside and does not let cold air in from the street with a special plastic placed inside the profile. But this design is almost not in demand because of the high cost.
- Usage wood frame considered a budget option, but time-consuming in terms of caring for them: you will have to renew the paint once a year if the appearance matters. To reduce the cost, some use used wood. With proper care, it will last quite a while. If income allows, then it is possible, as they say, to install wooden "euro windows" once and for life. The technology of their production makes them durable, and they look very impressive.

- Panoramic view glazing suggests that special glass, additionally processed to increase the strength characteristics, serves as the basis for assembling the balcony railing from floor to ceiling. From the point of view of creating a spectacular space, this method occupies a leading position. Due to the thickness of the material, the apartment becomes protected from heat losses and sound insulation performance increases. The partition can be made of tinted glass and looks especially amazing when assembled without frames.
- Frameless way glazing a balcony requires certain skills and literacy during installation. But the complexity is justified by the result, when the "output" is a light, like a weightless construction of one glass. The absence of frames is compensated by special metal guide profiles. It is in them that the glass sections are attached and moved along them. Special tempered glass is used for such tasks.
- PVC profile frames are a popular and practical way of glazing. The possibility of installing double-glazed windows with three air chambers significantly insulates the room, especially in combination with a wider profile. Installation is simple and quick, and the service life is long enough that all this magnificence does not require complicated maintenance. For those who do not want to install plastic windows due to the fact that the sashes “eat up” a lot of space when opened, you can opt for the option with sliding sashes.

- If you want glaze the balcony "with the removal" of the structure, then you should be very confident in the strength of the parapet, because the load on it in this case will increase in two directions at once.
Important: it is better to carry out work on the exterior decoration of the balcony with siding or other materials before glazing. This sequence will facilitate the cladding work.
How to glaze a balcony with plastic windows
- This process is not very difficult, especially since the manufacturer itself takes measurements, so there should be no mistakes in this area. So, the finished PVC structures have been delivered, the decision has been made to abandon the installation, what's next?
- The existing old shutters are being dismantled and along the way the balcony must be freed from all objects and things that may interfere. The space of the balcony can’t be called large anyway, so ideally it’s worth taking everything out of it. What else is the "deep cleaning" stage useful for? All the nuances that require refinement and elimination during work on insulation, waterproofing and so on become immediately visible.
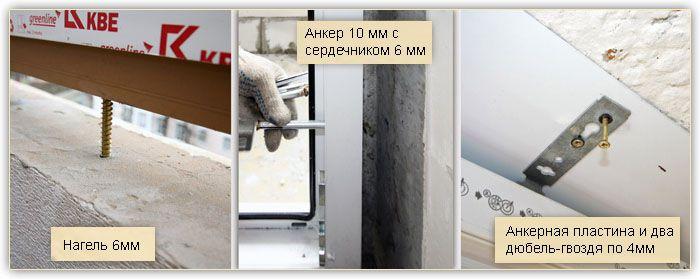
- A wooden beam is fixed along the perimeter of the balcony with the help of mounting dowels. When measuring, the presence of bars is taken into account. That is, the height of the finished structure will be equal to the height from the side of the barrier to the top plate, minus the parameters of the crossbar. It is worth checking with the representative of the company - the supplier, what thickness of the beam he lays in the calculations.

- First, the PVC frame itself is installed without flaps. First of all, the main and largest frontal part is mounted. And then the side. In order to save money, many refuse glass in the side part in favor of sandwich panels. This, of course, is a matter of taste.
- From the side of the street, an ebb is attached under the frame. If a balcony with a roof is glazed, then it is necessary to fix the visor. It is brought under the structure and fixed with self-tapping screws, the gaps are filled with sealant. The visor will protect against moisture ingress and its flow into the profile and into the room. Therefore, more attention should be paid to issues of tight fit.
- When the frame is level and fixed, you can proceed with the installation of the sashes in place. After installation, check them for tightness. An important indicator and smooth running when opening and closing. If everything is done correctly, then the frames will open easily and close without effort, firmly standing in the opening.
It is important to think carefully about the options for opening the valves. This structure will have to be washed, and it is better to plan it so that it is easy to get from the detached section to the neighboring “deaf” one. It is unlikely that anyone wants to risk their lives, bringing cleanliness.
- Outside, it is convenient to hide the joints with the help of additional decorative elements. They can be purchased separately, or "included" when ordering from a company that supplies PVC frames. All gaps from the inside are sealed with foam. When it dries, it is cut, the protective film is removed from the frame and sashes. Further work continues on the final decor of the room.

Glaze balcony video
Glazing a balcony with an aluminum profile
Another plus in favor of a lightweight aluminum structure is the sliding opening system. It saves space, however, because of it, there are problems with freezing of the sashes in winter. If the choice is nevertheless made in her favor, then we learn how to properly glaze the balcony.
- We dismantle the previous glazing.
- If the parapet is made in the form of metal handrails, then an “apron” made of galvanized steel must be installed on top of them. If the fence is concrete, this is not required. The profile will fit right on top of it.
- The visor is mounted.
- The window sill is installed.
- To fix the frame, anchor plates are installed in the opening. With the help of anchor bolts, a frame structure is installed on them.
- An ebb is attached to the frame.
- Shutters are installed in the openings.
- All seams are sealed with mounting foam and covered with flashings (optional)
- As the final step, the fittings are adjusted. The shutters should move apart smoothly, without making a rumble. This indicates correct installation.

Glazing a balcony with a tree
It is good if the home master has carpentry skills. Then the option with glazing with wooden frames is cheaper. After all, using wooden beams, glazing beads and ordinary glass 4 mm thick, he can assemble the doors, providing them with the simplest fittings from the nearest store. However, even in the absence of such talent, you can order an inexpensive finished product in the workshop. After that, you can proceed with the installation.
It is important to consider that a large structure can "sail". Therefore, despite the external attractiveness of large and wide openings, this unpleasant effect is worth remembering.
- We have already written about the preparation above, so we skip this stage.
- There are no special tricks in installing such a design, moreover, the process itself differs little, say, from the installation of a PVC profile. Using metal mounting plates and self-tapping screws, we install a wooden frame without frames.
- Ebb, visor and window sill are installed similarly to the previously described glazing methods.
- The seams are foamed and subsequently hidden under the trim.
- The sashes are fixed in place, the fittings are debugged.

For a long time, this was the only way to glaze a balcony in Khrushchev. Of course, such glazing will never become the object of envy of neighbors. But made neatly and securely fixed, it is able to protect against dust, falling leaves and change the microclimate on the balcony by a couple of degrees.
How to glaze a balcony with your own hands in a frameless way
- A very effective type of glazing, but also requiring some effort and courage. The first thing that many homeowners fear when they are offered this option is safety. If we are talking about installing “full-length” glasses, then it may be worthwhile to provide for some kind of removable structure that reaches a meter in height and is attached to the walls or floor at a time when, for example, children are playing on the balcony. It is quite simple to weld it from metal pipes of small diameter.
- The second not entirely desirable effect of a great view of the surroundings is an equally great view of the privacy in the apartment. Especially in the evening with the lights on. Those who do not want to give neighbors and passers-by the opportunity to watch the reality show "live", you can choose the following "rescue" options.
- Consider a system of curtains or blinds. The second option will turn out to be costly, given the non-standard dimensions of the opening, and you will have to suffer with the fabric solution.
- You can choose the type of glass with one-sided transparency even at the planning stage. They look good, they are very good on sunny days, but in autumn and in cloudy winter weather, such glazing makes you sad due to the low light throughput. Alternatively, the presence of such glasses can be combined with conventional ones.
- If we are talking about frameless glazing of a balcony only in the part where most people are used to seeing a window opening, then the difficulties described above do not arise.

Important: glazing to the floor involves the dismantling of the parapet. Before performing work, you need to make sure that the demolition is legal and will not cause negative consequences for the entire house.
- For all its attractiveness, the panoramic method requires additional costs for insulation, and you shouldn’t choose it if you have a “wonderful view” of the factory complex or dull neighboring multi-storey buildings from the balcony.
- An aluminum panoramic profile will cost less, but its qualities of keeping warm, let's say, tend to zero and you should think carefully before installing it.
There are many options, but each of them can be implemented on your own. Therefore, balcony glazing can be considered one of the types of work on which you can save.
If the balcony is properly insulated and properly glazed, the open area will turn into an additional living area. Armed with the necessary knowledge, you can do it yourself, following the instructions for completing the main stages of installation of the selected balcony structure.

A glazed balcony will not only expand the space of the room, but also protect the additional area from the effects of bad weather from the outside, and reduce heat loss in the room. To determine the direction of work, you need to know what types of glazing of an additional room exist, what type your balcony belongs to.
Choice of glazing method
For cold type glazing, single glass is used, framed by lightweight window frames. An inexpensive do-it-yourself glazing option, suitable only for summer time, is made with an aluminum profile that does not load the support.
When choosing a warm glazing option, you will have to install double frames with special plastic inside the profile. This design reliably protects from the cold from the street, but has a high cost and more weight.

The French type of glazing is carried out by windows with transparent mirror glass. High-strength glass frames are installed along the perimeter of the balcony space along the entire height. A solid glass sheet creates a stunning viewing effect.

Important. For comfortable use of the balcony at any time of the year, the space should be protected from condensation. They realize the task by using high-quality insulation with a double seal, as well as the presence of an adjustable ventilation system.
Which double-glazed windows to choose
- The most convenient for installation on a balcony is considered to be plastic structures with single glass for low-budget reconstruction. The option of massive windows with the installation of double-glazed windows is more expensive.
- Lovers of antiquity prefer double-glazed windows framed with wooden frames. Massive structures made of natural wood look solid, but have a significant drawback - the need for careful maintenance.
- An aluminum profile can be considered an actual option for glazing a loggia in old houses. Installing a light frame on the balcony base plate and the parapet will not heavily load the weakened ceiling.

How to glaze a balcony with your own hands
Before starting installation work, you need to decide on the installation option for balcony frames. Among the methods of independent glazing of an internal or hinged balcony, the following methods are most popular.

It is important to take care of the outer skin of the balcony in advance. It will be difficult to do exterior decoration from an already glazed room, but for exterior work it is better to turn to craftsmen who have special equipment for working at heights.
Construction Guide
When starting to glaze your own balcony with your own hands, you need to decide on the front of the preparatory work. Step-by-step instruction:
- having cleared the room of things and debris, assess the condition of the external and internal structures;
- if defects (irregularities, cracks, bevels) are found, they must be leveled so that there are no problems during operation;
- when installing frames on a metal parapet, insulate it before starting work on glazing;
- leaving the old fence, take care of the strict horizontalness of its surface and strength;
- if old frames are installed, dismantle them; in case of a balcony on the top floor, install a canopy.
Having finished the preparation, they begin to measure each surface, not forgetting about the space from the processed parapet to the installed visor. The dimensions of the side windows and the front section must be carried out with particular care. The control is performed by the difference of the diagonals - no more than 2.0-2.5 cm.
Measurements and design order
The inaccuracy of measurements threatens with problems after installing the frames, it is better to entrust the measuring work to a professional measurer. If you are not a professional, performing an independent measurement will help you estimate the size of the estimated cost of glazing a balcony space.

Measurement plan:
- the height of the balcony is measured as the distance from the plane of the parapet up to the bottom of the balcony slab located on top;
- for a plastic structure, 8-10 cm are subtracted from the resulting height, in the case of an aluminum frame - 3-4 cm;
- the width of the loggia is determined by taking measurements in a horizontal plane along the parapet between its edges;
- with a plastic version of glazing, 5-6 cm are subtracted from the resulting length, for an aluminum type - 2-3 cm.
Advice. Measurements are carried out with a construction tape, it is important to monitor the tightness of its web. If the balcony room is wide, height measurements are taken at a distance of a meter from each other. By choosing the smallest value among the obtained values, you will determine the height of the balcony.
Before placing an order for the manufacture of balcony windows and frame support structures, it is necessary to decide which of them will remain fixed and which will need to be provided with sashes. If deviations are found, they must be taken into account when ordering the manufacture of frames with double-glazed windows.
The accuracy of measurements can only be guaranteed by a professional who will take into account the features of the structure, tell you the volume of necessary components, and give advice on finishing and insulating the interior.
Additional preparation for glazing installation
When taking measurements of a hinged balcony, before measuring the front and side balcony handrails, you should make sure that the roof of the balcony overhangs its vertical railing with railings. This is checked with a plumb line. Also check the calculated value of the upper perimeter with the lower one, they must match.
In order to install windows on an open balcony or loggia with your own hands, you must prepare a set of tools in advance:
- reliable hammer with a hacksaw, nails, screwdrivers;
- puncher with a powerful drill (8 mm), dowels, a set of self-tapping screws;
- gun for construction work, spatula;
- varnish and brushes, high-quality sealant, polyurethane foam.
Important nuances. Balcony glazing works, from a legal point of view, are classified as redevelopment of an apartment, you need to get permission for this. To ensure safety, you will have to stock up on a safety belt, find a partner to install heavy frames with glasses.
How to glaze a balcony with your own hands
If the parapet is not supposed to be dismantled, it will have to be additionally insulated to preserve heat in the built room. Cracks in the vertical fence of the loggia are sealed, surface irregularities are leveled, insulated and insulated.
Frame installation rules
The installation of the balcony is started after the installation of the visor. We take out double-glazed windows with non-opening sashes, hinged ones are removed from the hinges. Such actions will protect the glass from damage, lighten the weight of the window product. What to do next:
At the end of the above operations, a window sill (inside) and a drainage system (outside) are mounted. After that, the installation of a balcony with glazing is considered complete.
After sealing all the cracks with mounting foam, you can return the double-glazed windows to the frame, not forgetting the flaps. They need to be hung back, making sure that the opening mechanism works.
Installation of ebbs
For reliable protection of frames from moisture penetration, ebbs from a material with a long service life are chosen. What protective elements provide:
- upper - drainage protects the window structure from the weather outside;
- lower - to protect the junction of the window frame with the railing of the balcony box.

The canvas of the upper ebb along the balcony perimeter is fixed with galvanized screws to the surface of the upper floor slab. The lower tide is fixed under the lower part of the window frame with self-tapping screws designed specifically for the type of material from which the casting products are made. Do-it-yourself drainage is sealed.
Advice. For reliable protection against displacement of the "dew point" and the formation of condensate, balcony walls must be insulated not only from the inside, but also from the outside. If the old parapet is being disposed of, the weight of the material of the new design should be taken into account so that it does not load the base of the balcony.
Installation of wooden window structures

First you need to install a box made of wood. After fixing the lower beam (railing) and the upper part of the structure (ceiling), the side elements are fastened with brackets to the walls.
Step-by-step instructions for glazing a balcony with your own hands:
- installation and fastening of support posts made of wooden beams - corner, end, intermediate;
- insert the frames after preliminary removal of the glass, first install the front glazing, then the side glazing;
- if distortions or other defects are found, they are eliminated by leveling with wedges;
- after fixing the frames with self-tapping screws and anchors, seal the seams with mounting foam;
- return the double-glazed windows and the removed sashes to their place, making sure that the glazing beads fit tightly to the frames.
Advice. Before installing the wooden frame, treat the mounting surface of the main beams with sealant and antiseptic. This will help protect the structure, which can be pre-painted, from the accumulation of moisture penetrating from the outside, making the balcony room much warmer.
Glazing of a loggia using an aluminum profile

Lightweight aluminum construction is the most popular today due to the low cost of a fairly durable product. The high-strength construction chosen for the cold method of glazing the balcony space will last at least 80 years if it is correctly installed:
- we install a prepared wooden frame, we seal all the cracks;
- we dismantle all sliding elements, remove glazing that is not tightly fixed;
- on the top plate we fix the visor with special fastening fittings, and also install ebbs on the parapet;
- along the perimeter of the wall panels, we attach mounting plates to the frame at pre-marked places;
- we return back the previously dismantled elements of the balcony system, filling all voids with mounting foam.
Video instruction:
Thanks to its modern design and wide range of colors, the aluminum profile can be easily adapted to any home interior. A significant disadvantage of aluminum structures is low noise insulation, a high probability of negative consequences associated with changes in ambient temperatures.
Installation of frameless window structures

The frameless method of glazing balconies has a spectacular view, but it will take a lot of effort to create a home panorama. It is also important to take into account that when installing a “full-length” glass sheet, neighbors and passers-by on the street will become witnesses of your private life in the apartment.
What else will have to do for lovers of viewing the surroundings:
- take care of the safety of the space when people are there;
- ensure reliable insulation of the room, which will increase the expense item;
- choose the option of glass shading - curtains, blinds, tinted windows.
Advice. When choosing frameless glazing, which you will do yourself, you will have to dismantle the balcony parapet. For this type of work, it is necessary to obtain permission, as well as a conclusion that the dismantling of the structure of the house will not result in negative consequences for its residents.
Features of glazing with removal

If you are going to build a winter garden on a glazed balcony, it is wiser to choose the option of glazing with removal. But you will have to take into account some restrictions - a ban on the installation of removal for old houses and the maximum offset, it should not exceed 35 cm.
When there is no ban on taking out a balcony, you can implement the idea in one of the following ways.
- along the windowsill. An additional metal structure is mounted on which double-glazed windows are installed, but the floor area remains unchanged.
- It will take more time and effort to expand the balcony space along the floor line. As a result, the owners receive not only a visual expansion of the balcony space, but also real additional meters.
Remote work on glazing this type of balcony can be done independently with the appropriate knowledge and experience. But one cannot cope with an extensive front of construction work alone; two people will be needed to install the supporting structure.
Do-it-yourself glazing of an apartment balcony will significantly reduce costs and allow you to gain pride in your own work. But this is only if you have sufficient knowledge of the construction specialty, you can quickly assemble a small team of professional builders. Otherwise, problems are guaranteed at the very beginning of glazing work. It is much safer to spend money, but to order a quality product created by time-tested craftsmen of a well-known company.
How to glaze a balcony with your own hands
A glazed balcony or loggia not only provides additional thermal insulation and protects from external noise from the street. A similar decision makes the owner of square meters the owner of an additional (albeit small) room, which can be arranged according to one's own taste and needs. A huge number of construction companies offer their services in this regard, as well as traders of PVC and aluminum profile structures. But, often the financial situation forces you to find more profitable options in terms of savings, which involve a huge part of the work or all of it to do completely on your own. We are trying to glaze the balcony with our own hands. The article will discuss how to glaze the balcony yourself.
Fundamentally: the glazing of balconies requires official approval from the relevant authorities. If you do everything “according to the law”, then at first you will have to take care of additional “permitting” documents.
How best to glaze a balcony
There are quite a lot of methods, we will list all the main ones and give a little idea about them, which will allow us to determine the direction of work in the future.
Glazed balcony photo

- "Cold" glazing, regardless of the methods of opening the frames, means that the balcony can be used as an additional “livable” room only in the warm season. This is the most inexpensive option, because duralumin profile structures, which are most often used for these purposes, are fully accessible. Among the positive properties of this type of glazing is its low weight, so if there are doubts about the reliability of the support, then aluminum will be the right choice. The material is very resistant to external influences, it is not afraid of humidity and low temperatures, although it can still be deformed from large jumps. From time to time, for the "cold" method, wooden frames with one glass are used.
- There is also an option with "warm" aluminum profile. Making a closet on a balcony or loggia with your own hands is easy. It is required to know some of the nuances and features, to have at least an approximate drawing or diagram. It uses double frames and double-glazed windows. And in addition, it keeps the heat inside and does not let cold air in from the street with a special plastic placed inside the profile. But this design is almost not in demand because of the high cost.
- Usage wood frame considered a budget option, but time-consuming in terms of caring for them: you will have to renew the paint once a year if the appearance matters. To reduce the cost, some use used wood. With proper care, it will last quite a while. If income allows, then it is possible, as they say, to install wooden "euro windows" once and for life. The technology of their production makes them durable, and they look very impressive.

- Panoramic view glazing suggests that special glass, additionally processed to increase the strength characteristics, serves as the basis for assembling the balcony railing from floor to ceiling. From the point of view of creating a spectacular space, this method occupies a leading position. Due to the thickness of the material, the apartment becomes protected from heat losses and sound insulation performance increases. The partition can be made of tinted glass and looks especially amazing when assembled without frames.
- Frameless way glazing a balcony requires certain skills and literacy during installation. But the complexity is justified by the result, when the "output" is a light, like a weightless construction of one glass. The absence of frames is compensated by special metal guide profiles. Do-it-yourself window installation video instruction. It is in them that the glass sections are attached and moved along them. Special tempered glass is used for such tasks.
- PVC profile frames are a popular and practical way of glazing. The possibility of installing double-glazed windows with three air chambers significantly insulates the room, especially in combination with a wider profile. Installation is simple and quick, and the service life is long enough that all this magnificence does not require complicated maintenance. For those who do not want to install plastic windows due to the fact that the sashes “eat up” a lot of space when opened, you can opt for the option with sliding sashes.

- If you want glaze the balcony "with the removal" of the structure, then you should be very confident in the strength of the parapet, because the load on it in this case will increase in two directions at once.
Important: it is better to carry out work on the exterior decoration of the balcony with siding or other materials before glazing. Glaze balcony video. How to glaze a balcony with your own hands frameless. This sequence will facilitate the cladding work.
How to glaze a balcony with plastic windows
- This process is not very difficult, especially since the manufacturer itself takes measurements, so there should be no mistakes in this area. How to decorate the balcony from the inside with your own hands (photo). So, the finished PVC structures have been delivered, the decision has been made to abandon the installation, what's next?
- The existing old shutters are being dismantled and along the way the balcony must be freed from all objects and things that may interfere. The space of the balcony can’t be called large anyway, so ideally it’s worth taking everything out of it. What else is the "deep cleaning" stage useful for? All the nuances that require refinement and elimination during work on insulation, waterproofing and so on become immediately visible.
- A wooden beam is fixed along the perimeter of the balcony with the help of mounting dowels. When measuring, the presence of bars is taken into account. That is, the height of the finished structure will be equal to the height from the side of the barrier to the top plate, minus the parameters of the crossbar. It is worth checking with the representative of the supplier company, what thickness of the beam he lays in the calculations.
Do-it-yourself balcony glazing (Part 1, window sill and siding installation)
Glaze do-it-yourself balcony not as difficult as it might seem. Moreover, do-it-yourself lining of the balcony with clapboard, as there is a video lesson on the balcony: In this series of videos, I will try.
HOW TO GLAZE THE BALCONY CHEAP!!! Do-it-yourself balcony glazing.
HOW GLAZE the balcony for 30000?!!! Channel DelaGarden Affairs Garden Hello, my viewer! My name is Belik.

- First, the PVC frame itself is installed without flaps. First of all, the main and largest frontal part is mounted. And then the side. How to glaze a balcony with your own hands: step by step. In order to save money, many people refuse glass in the side part in favor of sandwich panels. This, of course, is a matter of taste.
- From the side of the street, an ebb is attached under the frame. How to glaze a balcony with your own hands. If a balcony with a roof is glazed, then it is necessary to fix the visor. It is brought under the structure and fixed with self-tapping screws, the gaps are filled with sealant. The visor will protect against moisture ingress and its flow into the profile and into the room. Therefore, more attention should be paid to issues of tight fit.
- When the frame is level and fixed, you can proceed with the installation of the sashes in place. After installation, check them for tightness. An important indicator and smooth running when opening and closing. If everything is done correctly, then the frames will open easily and close without effort, firmly standing in the opening.
It is important to think carefully about the options for opening the valves. This structure will have to be washed, and it is better to plan it so that it is easy to get from the detached section to the neighboring “deaf” one. It is unlikely that anyone wants to risk their lives, bringing cleanliness.
- Outside, it is convenient to hide the joints with the help of additional decorative elements. They can be purchased separately, or "included" when ordering from a company that supplies PVC frames. How to sheathe a balcony with a clapboard with your own hands, a video on sheathing and walls on the balcony. All gaps from the inside are sealed with foam. When it dries, it is cut, the protective film is removed from the frame and sashes. Further work continues on the final decor of the room.

Glaze balcony video
Glazing a balcony with an aluminum profile
Another plus in favor of a lightweight aluminum structure is the sliding opening system. It saves space, however, because of it, there are problems with freezing of the sashes in winter. If the choice is nevertheless made in her favor, then we learn how to properly glaze the balcony.
- We dismantle the previous glazing.
- If the parapet is made in the form of metal handrails, then an “apron” made of galvanized steel must be installed on top of them. If the fence is concrete, this is not required. The profile will fit right on top of it.
- The visor is mounted.
- The window sill is installed.
- To fix the frame, anchor plates are installed in the opening. With the help of anchor bolts, a frame structure is installed on them.
- An ebb is attached to the frame.
- Shutters are installed in the openings.
- All seams are sealed with mounting foam and covered with flashings (optional)
- As the final step, the fittings are adjusted. The shutters should move apart smoothly, without making a rumble. 6 do-it-yourself balcony glazing video; glaze the balcony with your own hands. This indicates correct installation.

Glazing a balcony with a tree
It is good if the home master has carpentry skills. Then the option with glazing with wooden frames is cheaper. After all, using wooden beams, glazing beads and ordinary glass 4 mm thick, he can assemble the doors, providing them with the simplest fittings from the nearest store. How to glaze the balcony yourself: video and photo. However, even in the absence of such talent, you can order an inexpensive finished product in the workshop. After that, you can proceed with the installation.
It is important to consider that a large structure can "sail". Therefore, despite the external attractiveness of large and wide openings, this unpleasant effect is worth remembering.
- We have already written about the preparation above, so we skip this stage.
- There are no special tricks in installing such a design, moreover, the process itself differs little, say, from the installation of a PVC profile. Using metal mounting plates and self-tapping screws, we install a wooden frame without frames.
- Ebb, visor and window sill are installed similarly to the previously described glazing methods.
- The seams are foamed and subsequently hidden under the trim.
- The sashes are fixed in place, the fittings are debugged.

For a long time, this was the only way to glaze a balcony in Khrushchev. Of course, such glazing will never become the object of envy of neighbors. But made neatly and securely fixed, it is able to protect against dust, falling leaves and change the microclimate on the balcony by a couple of degrees.
How to glaze a balcony with your own hands in a frameless way
- A very effective type of glazing, but also requiring some effort and courage. The first thing that many homeowners fear when they are offered this option is safety. If we are talking about installing “full-length” glasses, then it may be worthwhile to provide for some kind of removable structure that reaches a meter in height and is attached to the walls or floor at a time when, for example, children are playing on the balcony. It is quite simple to weld it from metal pipes of small diameter.
- The second not entirely desirable effect of a great view of the surroundings is an equally great view of the privacy in the apartment. Especially in the evening with the lights on. Those who do not want to give neighbors and passers-by the opportunity to watch the reality show "live", you can choose the following "rescue" options.
- Consider a system of curtains or blinds. The second option will turn out to be costly, given the non-standard dimensions of the opening, and you will have to suffer with the fabric solution.
- You can choose the type of glass with one-sided transparency even at the planning stage. They look good, they are very good on sunny days, but in autumn and in cloudy winter weather, such glazing makes you sad due to the low light throughput. Alternatively, the presence of such glasses can be combined with conventional ones.
- If we are talking about frameless balcony glazing only in the part where most people are used to seeing a window opening, then the difficulties described above do not arise.

Important: glazing to the floor involves the dismantling of the parapet. Before performing work, you need to make sure that the demolition is legal and will not cause negative consequences for the entire house.
- For all its attractiveness, the panoramic method requires additional costs for insulation, and you shouldn’t choose it if you have a “wonderful view” of the factory complex or dull neighboring multi-storey buildings from the balcony.
- An aluminum panoramic profile will cost less, but its qualities of keeping warm, let's say, tend to zero and you should think carefully before installing it.
There are many options, but each of them can be implemented on your own. How to insulate a balcony with your own hands - step by step. Therefore, balcony glazing can be considered one of the types of work on which you can save.
Tsugunov Anton Valerievich
Reading time: 4 minutes
The modest dimensions of most apartments force their owners to use each square as rationally as possible. The most attractive option for increasing the useful space of a home is glazing a balcony. In the process of its modernization, you can get a comfortable place for a summer vacation or a full-fledged living space, available all year round for comfortable use. Do-it-yourself glazing of a balcony is quite realistic if you have at least elementary building skills.
Glazing types
At the initial stage, it is worth deciding on the nature and scale of the work being carried out. Depending on the time range in which you plan to use the balcony, you can choose a cold or warm option for glazing the loggia.
- With a cold version, the balcony can be glazed using frames with a single glass. In this case, you can create a comfortable room for use in the warm season at minimal cost.
- With warm glazing, window frames include at least two panes of glass. This option also involves warming everything for year-round use. In some cases, the balcony becomes part of the adjoining room, not even separated by a door. There is no need to specify that it is necessary to glaze the balcony with such an expansion of space as efficiently as possible.
By profile type
Balcony windows may differ, which serves as the frame of the entire structure. They can be:
- Wooden. This type of glazing is the most familiar, affordable both in price and in complexity for doing it on your own. The main disadvantages of this type are that the frames must be periodically painted to protect them from rotting. With warm glazing, it is problematic to wipe the double frames twisted together.
- Made of aluminum profile. Lightweight, durable, reliable, unaffected by the external environment. Cons - only a rectangular room can be glazed. With warm glazing, special thermal inserts will be required, since the aluminum profile conducts cold and heat well.
- Plastic. The most popular type of balcony glazing at present. With high-quality insulation of the entire loggia, it allows you to create comfortable conditions there at any time of the year. Metal-plastic windows are easy to operate and maintain, have good indicators of durability, tightness and sound insulation. Among the shortcomings, in addition to the high cost, can be called a solid weight, which will require serious calculations in the design and, if necessary, strengthening the design of the parapet and the entire balcony as a whole.
Frameless glazing
Aluminum profiles, which play the role of a frame in this design, are practically invisible. These frames are very easy to use. But there are also enough shortcomings: very high cost, do-it-yourself installation is almost impossible due to the complexity of the work, poor thermal insulation. In addition, over time, the glass in the structure begins to rattle due to a decrease in the rigidity of the frame.
Remote glazing of a balcony can be classified as a separate type, in which the usable area increases due to the removal of window blocks beyond the plane of the parapet. Naturally, such glazing requires major changes in the design of the entire balcony.
When choosing an option, one should take into account the design of the parapet: if it is made of brick or concrete, then all glazing methods are available. A simple metal balcony railing will have to be strengthened if it is planned to install plastic double-glazed windows. If the glass is from floor to ceiling, then the parapet is removed.
Do I need to get permission?
Before you start glazing the balcony with your own hands, you need to take care of obtaining permission for these works. Installing windows on a balcony is not considered redevelopment, but is equated to it. Therefore, complications after changes made to the design of the loggia are inevitable. At a minimum, in the absence of the necessary approvals and permits, it will not be possible to sell the apartment. For unauthorized glazing, a fine threatens, after which it will be necessary to legitimize the changes made or to dismantle them.
In addition, an increase in the total weight of the loggia can provoke its complete or partial collapse, which will lead to much more unfortunate consequences. So take care of permission and approval, as well as instructions for upgrading your balcony better in advance. This is quite long and tedious, but necessary.
Stages of balcony glazing
To begin with, let's highlight the general points that will be relevant for glazing a balcony of any configuration with any type of frame:
- The balcony is freed from all unnecessary items. All coatings are removed, up to concrete, dust and dirt are removed.
- Necessary changes are being made in the design of the loggia. This may be strengthening the base with a metal frame, followed by leveling with a screed. If necessary, the metal parapet is additionally reinforced with corners or wooden beams. And when glazing with metal-plastic windows - even with aerated concrete blocks or bricks. If a remote structure is planned, then a frame made of metal triangles welded to the parapet serves as a support for it. In any case, one should take into account the loads that the loggia will experience after the changes made, including wind effects.
- Window frames are carefully measured. If the frames are made to order with or frameless glazing, then all the necessary calculations are made by the manufacturer's measurers. You can only make wooden frames for cold glazing yourself, or limit yourself to buying ready-made ones.
All work on leveling the surface must be carried out before mounting the frames. Otherwise, it will be inconvenient to produce them, there is a chance to damage the windows during operation.
It is better to postpone insulation and final finishing until the moment when the balcony is glazed. Delivery and installation of frames may take a certain period of time. Moisture that has entered the balcony at this time will spoil the interior finish and worsen the thermal insulation characteristics of the insulation.
Step-by-step instructions for installing wooden windows
Since wooden windows are most often installed with your own hands from beginning to end, we offer you instructions for glazing a balcony using a wooden frame.
A couple of years ago I decided to glaze my balcony. I wanted to give it a cozy look, put an armchair, a coffee table. But without glazing, this was impossible. I decided right away that I would carry out all the installation work on my own, because I have little experience, and glazing the balcony with my own hands is a time-consuming process, but quite real.
A couple of decades ago, all apartments had only wooden windows, but nowadays in the modern world there are several options for glazing residential premises. They have different characteristics, composition, and each has its own pricing policy. Therefore, everyone can choose the most suitable option.
Do-it-yourself balcony glazing
Choosing a material
Since I wanted to make my balcony cozy, the main task for me was thermal insulation. Therefore, I immediately stopped my choice on the “warm” version of the glazing. But I will write about each more precisely.
So, there are three types of balconies glazing:
- Cold - does not keep heat in the room, is used for glazing balconies where room temperature is not required
- Warm - maintains room temperature at any time of the year, does not let the cold through. It differs from the cold type by the set of materials used and their characteristics.
- French - a balcony is glazed around the entire perimeter and height. High-strength and tinted glasses are used

French balcony glazing with transparent mirrored windows.
It remains to choose the option of glazing for your balcony.
The most popular today is the option of glazing with PVC windows, but there are also:
- Aluminum profile
- Wooden windows

Aluminum profile glazing belongs to cold balconies
The option of glazing with an aluminum profile immediately became impossible for me. This type of glazing refers to cold balconies. The material is not heat-insulating - it is used on those balconies that do not need to maintain room temperature. The aluminum profile serves to protect the premises from wind, rain and snow.
However, this form has its advantages:
- Light weight of materials used
- Low cost
- Parallel sliding doors

Balcony glazing - wooden frames
Wooden windows are made from two types of materials. If homogeneous wood is used, then the cost of windows is relatively low. If the material is glued laminated timber, then the price automatically rises and already becomes on average 60-80% higher than the cost of similar PVC windows.
For me, the option with wooden windows did not fit because of the price. Although it is beautiful, but still the financial side of the issue interested me no less. My choice was on PVC windows. A good price / quality ratio, heat and sound insulation properties brought this material to the first places in demand.
siding
In addition to glazing the balcony, I was interested in the option of the outer skin of the balcony. And for this I chose siding. Such material is the most optimal, it is durable, consists of PVC and is not afraid of sunlight, precipitation. In addition, it enhances the thermal insulation on the balcony. Siding has a large range of colors, and the manufacturer claims a service life of at least 50 years.

Do-it-yourself balcony siding
Advice! For those who decide to do all the work on the glazing of the balcony on their own, you need to know that it is better to complete the outer skin of the balcony before glazing. This will save time and money. Indeed, after glazing the balcony, it is not so convenient to carry out external skins, and calling the masters who will do all the work with the help of climbing equipment will cost a lot of money.
It is quite possible to do siding work yourself, but if you are confident in your abilities and have skills in such work.
Otherwise, it is better to entrust all work on cladding the balcony with siding in apartments to qualified specialists who have professional equipment.

Balcony siding
The instructions for sheathing are described by me below:
- First you need to build fastening belts from wooden beams - upper and lower. In the future, siding will be attached to them.
- We fasten the bars to the wall using liquid nails. They are connected to each other with the help of iron corners.
- We proceed to the installation of siding - you should start from the sides. We do not overtighten the screws, they should be left in the middle of the hole.
- Upon completion of the installation of the siding, we hide all the heads of the screws with the help of platbands

Balcony siding
Balcony glazing
After all the work on the outer skin of the balcony was completed, I proceeded directly to the glazing of my balcony.
Next, I will write a step-by-step instruction with which everyone can try to do the glazing of the balcony with their own hands.
Advice! Start glazing with the installation of a visor - then you won’t have to guess: where to attach this visor so that it doesn’t fall off with the first strong wind. It will be enough to fasten it to the ceiling using dowel-nails.

Glazing of balconies with plastic windows
- Before buying windows, you need to find out what size they are needed. To do this, you need to measure the length of the parapet to the ceiling and from wall to wall with a tape measure. You need to know if there is a skew on the parapet - a level will help with this. By the way, many glazing companies send their own master who makes his measurements. This is very convenient and minimizes the possibility of incorrect calculations. I did the measurements myself, the gap left 1.5-2 cm on both sides, for those who are not sure that the diagonals are even, you can leave somewhere around 1.5-3 cm. In any case, it will all be puffed up with foam.
- Next, we take out the double-glazed windows from the windows, this is not required for opening shutters. There are a couple of reasons for this action - firstly, together with double-glazed windows, the windows are very heavy, and secondly, it is possible to damage the glass during installation.
- After we fix the stand profile. Turn the frame over and insert the profile into the grooves. Then we turn the frame back. It will be convenient and simple to do everything, the frame without a double-glazed window is very light.
- We set the fasteners for the frame with a distance of 15 cm from each edge. We drive the fixing plate into the grooves with a hammer, then turn it 90 degrees to fix it to the concrete wall.
- The next step is to install the frame in the opening. A friend helped me with this. Using a level, we set the frame evenly and fixed it in the opening with self-tapping screws. You do not need to drive them in - you need to screw them in.
- After all the frames are inserted according to the same principle, using a level and self-tapping screws.
- Once all the frames were in place, I attached them to the parapet, ceiling, and walls using anchors. Deepened them by about 60 mm.
- It remains to cover all the cracks. For this, mounting foam is used.
- So there is just a little left - we insert a double-glazed window into the frame and return the flaps to their place. It is enough to hang them back on the hinges and check the performance of all mechanisms.

Installation of low tide and window sill on the balcony
In the end, I installed a low tide on the outside of the balcony, and installed a window sill inside.
Although I spent quite a lot of time doing all the work, and then cleaning the entire room from construction dirt, I was satisfied. Self-glazing the balcony allows you to save a decent amount of money. In addition, I gained valuable experience and new skills in construction work, and the external cladding of the balcony with siding is doubly pleasing. Now the balcony looks perfect from the outside, and this is not only the merit of the siding manufacturer, but also mine.
 Technologies and types of balconies cladding from the outside
Read also...
- Education of the USSR: prerequisites, stages, significance When the USSR was created
- Education of the USSR: briefly about everything What led to the formation of the USSR
- Socialist-Revolutionary Party: who are they? Their goals and program. Political parties at the beginning of the 20th century Socialist-Revolutionaries party program table briefly
- Vitaprost rectal suppositories: how to use the drug correctly You can take Vitaprost without a doctor's prescription


