The device of a broken mansard roof. How to build a mansard roof with your own hands using a unique construction technology. The device of a broken mansard roof and its differences
If we talk about the broken shape of the roof, then for some reason many people have questions. Meanwhile, it is nothing more than a kind of gable roof. Therefore, for those who decide to expand the space on the attic floor, there is simply no better option. And there are many fans of such original designs.
A broken mansard roof can be built independently. You just need to know a certain sequence of actions for this. The main principle of the construction of a sloping roof is the principle of supporting the rafters on the floor beams.
Before starting the construction of a roof, it is best to start by properly developing a project on paper, preferably in a cage. So it is possible in a fairly simple way to determine the height of the structure, the angles of slopes, the size and location of window openings. People who have drawing skills or who know how to work with graphic programs on a computer are even easier. When certain proportions are found, it remains simply to adhere to them.

After determining the desired proportions, you need to decide on the sections of the elements of the truss system, and then make calculations for strength. You can use for this purpose any suitable calculation program, where such an opportunity is provided, for example, "Calculation of the truss system". Or make detailed preliminary calculations in an Excel spreadsheet.
After all the dimensions of the future broken mansard roof are fully calculated, you can proceed to its direct construction. It is worth considering this process in more detail, literally in stages. It is best to do this on someone specific example, taking, for example, a house with sides of 8 by 8 m as a basis.
Phased construction of a broken mansard roof
Step 1. First of all, you need to start by installing the Mauerlat and floor beams. Approximate parameters for calculating the cross section of beams are 100 by 200 mm. You need to mount the Mauerlat on the inside of the walls, and lay bricks on the outside for aesthetic reasons. During installation, it is necessary to ensure that the upper part of the mauerlat does not protrude 2-3 cm beyond the facing brick. This is necessary so that the load of the roof rests precisely on the mauerlat, otherwise it will be transferred to the facing brick, which is fundamentally wrong.

The next step is the installation of beam ceilings. First you need to install the extreme floor beams. Their removal will determine the width of the eaves. The width of the cornice, depending on the wishes of the customer, can be 40-50 cm. Beams are special beams, the cross section of which must be calculated separately, taking into account various points (snow load, wind load and other factors).

First of all, we put the beams indicated by the numbers 1,2,3,4.
For the specified brick box with a size of 8x8 meters, the cross section of the timber is selected 100x200 mm. When the extreme beams of the section are installed, it is necessary to pull the cord along the top and expose the other beams.
It is necessary to take into account the step of the beams, based on the step size of the rafters that will be laid in the future. For example, if floorboards of 50x150 mm are taken, then it will be good to choose a step of 60-70 cm, it is even better to stop at 60 cm, taking into account that roofing insulation usually has such a width. After installing long beams, you need to put short ones. The step for them is most often 1 meter. To attach the beams to the Mauerlat, 150 nails are suitable. Sometimes the use of self-tapping screws and metal rafter corners is allowed.
Step 2 The installation of racks begins, which should be placed strictly vertically. First of all, racks are installed from a bar measuring 100 by 150 mm along the edges, and then, when the laces are pulled, and intermediate ones, smaller, with a section of 50 by 150 mm. The distance between any elements must not exceed 3.

Temporary spacers are used to keep the racks strong. The height of the racks should be 10 cm larger than the finishing ceilings in the rooms.
It should be said about a very important nuance. When building a new roof, when everything seems to be calculated and laid out properly, for some reason the correct rectangle does not work out. The result is the shape of the house, actually narrowed in any of the directions. In principle, this should not be of particular concern, but to facilitate subsequent work, you should still arrange the racks so that the correct rectangle eventually turns out. So the rafters of the upper slopes will be possible to make using one template. Otherwise, you will have to use cords, and trim the finished elements accordingly. An extra waste of time and effort is unlikely to please anyone.
Step 3 Runs are laid on top of the racks, consisting of boards, 50 by 150 mm in size. There is an installation having the same dimensions, missing racks, other spacers are not needed. These structures will serve as a frame for the proposed walls of the room.

Step 4 In order to properly fix the runs, roofing corners and puffs, that is, crossbars, are fixed on them. If based on the parameters according to the example, then in this case the length of the puffs will be 5.5 m. The cross sections can be calculated in a special program. With a cross-sectional width of 50 mm, then, accordingly, the height will be over 210 mm. Various deflections are eliminated with the help of hangers. Of course, this will significantly increase the load on the rafters of the upper slopes, therefore, the cross-sectional dimensions of the rafters of the upper slopes obtained during the calculations would be reasonable to increase from 50 to 150 mm to a value of 50 to 200 mm.

A temporary support is placed under each of the puffs (crossbar). To do this, use the middle of the span. There may be sagging that needs to be reduced. An inch with dimensions of 25 by 150 mm is perfect. All these measures will allow you to safely move along puffs. Breakdowns, as well as all kinds of sagging, are practically excluded.
To make the structure more rigid, you need to fasten the puffs from above, after they are fully installed, with a board measuring 25 by 150 mm. This very board should not be placed strictly in the middle, you need to deviate from any of the axes by at least 20 cm.
Step 5 Next, you can proceed to the installation of side rafters. You will need to pre-make a template, after which the top is washed down. As for the lower cut, it is marked in place, and then the rafters are fastened and the plugs for the insulation are installed.


Step 6 After that, the process of installing the rafters of the upper slopes begins. To make a template, a piece of board measuring 25 by 150 cm is taken, which is then fixed on the extreme crossbar strictly vertically. Any of the corners of the board must necessarily coincide with the axis of the roof under construction. After all, the right side of the board will coincide with the axis of the roof. Next, a suitable small board is taken, applied, and the upper and lower cuts are marked on it with a pencil.

According to the template, two rafters are made and installed. It is better not to use a ridge beam for this. After installing the first pair of rafters, it must be fixed with a strut so that a fall does not occur.

Next, all the other rafters are installed. For a roof 8 m long, 4 struts will be appropriate, a pair in different directions. We temporarily fasten the remaining pairs of rafters with an inch board, because there is no crate yet.

Step 7 There is a sewing of pendants, that is, boards measuring 25 by 150 mm. This is done so that the crossbars, after the elimination of temporary supports, do not sag. This board should also not be placed in the middle of the structure, otherwise it will simply interfere with the process.

Step 8 The final stage of the construction of the roof is coming. Namely, the pediment frame is installed and then sheathed. Only after that you can start making cornices, battens, gable overhangs and ebbs.


After the broken mansard roof is completely ready, you can start roofing work. This, no doubt, is no less important stage, but, as they say, a completely different story. It is worth noting that all the construction work that was discussed is best done by three people.
The construction of the attic is a very important process that is carried out both at the design stage of the entire house and after its construction. This room provides its owners with additional square meters of living space. On the features of the construction of the attic, we will consider further.
Attic construction: project and its development
The attic is a rather difficult part of the building to build. It is preferable to design it at the stage of building the house itself. Because, the construction of a residential attic already on a finished building is not always possible. First of all, due to the fact that the attic room has a considerable weight, and therefore loads the foundation.

The construction of the attic consists of a certain kind of stages, such as:
- attic construction blueprints;
- dismantling of old roofing materials, in the event that the attic is being built on an already finished building;
- strengthening the walls on the upper floor, strengthening the foundation, if necessary;
- erection of the walls of the attic room;
- roof construction, its insulation, waterproofing and finishing;
- installation of window structures;
- internal finishing works.
Compliance with all technological nuances in the construction of the attic will allow you to get a reliable and durable building.
The first and most important stage is the drafting of an attic room. At this stage, one should take into account such features as the size of the room, the material used in its construction, the roof and the level of its slope, and many other nuances.
There are three ways to design an attic. The first is the most budgetary, drawing up a project manually. However, this operation requires minimal design experience. The second way is to use ready-made project documentation, however, it’s not a fact that someone’s attic project is completely suitable for your home, so you still have to make some adjustments to it. The third way is to contact specialized organizations that, in the shortest possible time, will help you draw up an attic project for you, which is ideal for your home.
In the process of independent design, one should take into account the wall loads on the building, its appearance and finishing materials used both inside and outside the premises. In addition, it is imperative to take into account the load from the building on the foundation, it may need to be strengthened. If the attic is too heavy, then there is a risk of deformation or cracks in the house.
Experts will help you choose the best building materials, which, on the one hand, will ensure the durability of the attic in operation, and on the other hand, will help reduce its load on the base of the entire building.
In addition, after drawing up the project, it should be coordinated with special state institutions. In the presence of a competent project, this process will pass quite quickly.
Do-it-yourself attic construction in the house
We suggest that you familiarize yourself with the option of building an attic in an already built and commissioned residential building. In this case, the first step is to dismantle the old roof. Thus, it will be possible to expand the under-roof space, and increase the safety of the building under construction.
To dismantle the roof, it is not necessary to hire specialists, all work can be done by hand. To do this, you must first get rid of the external roofing finishing material. Next, you need to completely remove the crate and truss system.
After that, it is necessary to strengthen the walls on the adjacent floor, since the attic will exert a certain pressure on them. The design features of the attic put pressure not only on the surface of the base of the building, but also on its walls. Therefore, first of all, before the construction of the attic, it is necessary to strengthen the walls that lie close to it. To do this, you should use special calculations, according to which this process is performed and the level of strength of old walls is determined.
The next stage is the insulation and waterproofing of the attic floor, which is also the ceiling on the previous floor. With the help of this action, it will be possible to ensure a healthy atmosphere in the room. To insulate the attic, you can use various heat-insulating materials in the form of foam, mineral wool, etc.
Attic construction photo:

This is followed by the process of building walls in the attic room. The walls are made in relation to the project developed in advance. Most often, wood or timber is used to build walls. To insulate the attic, it is recommended to use mineral wool or expanded polystyrene. When choosing a material for exterior and interior wall decoration, try to give preference to materials with a high level of fire safety.
The next process is the construction of the roof. In this case, the calculation of the correct angle of inclination of the roof is very important. Since too sloping roof will adversely affect the usability of the attic space. Please note that the roof must be properly waterproofed, since if there are the slightest leaks on its surface, moisture enters the attic.
In addition, the shape of the roof should be as simple as possible, the presence of broken and curly elements will only complicate the process of their construction. Also important is the issue of insulation of the attic. For these purposes, various building materials are used. When choosing a heater for the attic, try to give preference to materials that do not absorb moisture, are resistant to frost, temperature extremes and rodents. In addition, the heat-insulating material should not allow heat to pass from the room.

It is best to focus on internal thermal insulation work. To form it, follow a series of steps:
- install the finish in the form of a plasterboard or plywood base;
- form a layer of vapor barrier; special films are used for these purposes;
- lay heat-insulating material - the ideal solution is mineral wool;
- ensure proper waterproofing of the roof with a special kind of membranes;
- lay the outer finishing roofing material.
To build a roof, you will also need to install a truss system, mount a crate, the installation step of which depends on the type of roofing material. After the installation of the roof is completed, the windows should be mounted.
In order to provide high-quality lighting in the room, several windows should be installed in it, the size of which directly depends on the size of the attic itself. The window in the attic ceiling must be of high quality. It must be resistant to precipitation, wind, temperature changes. In addition, with the help of window structures, high-quality ventilation of the attic is provided.
Further actions for the construction of the attic are associated with interior finishing work, organization of heating, decoration and design of the room. Strict adherence to all recommendations for the construction of the attic will help ensure the long-term operation of this room.
Frame attic construction technology
A frame attic is a great solution for any home, garage and even a bathhouse. Among the advantages of frame-type attics, we note:
- ease of construction, so it does not load the main building, there is no need for additional strengthening of the walls and base;
- affordable cost of the attic - in comparison with its stone options;
- high level of thermal insulation and sound insulation;
- the possibility of building an attic of almost any shape and configuration;
- ease of construction work, since the materials for the construction are quite light and no special equipment is required to raise them to the surface of the house.
The construction of a frame attic allows you to get a finished building with excellent heat and sound insulation performance. In addition, the roof will remain intact, and the usable area of the premises will increase significantly.
A simpler process is the construction of an attic on a building that has not yet been erected. The construction of an attic on an already finished house requires the dismantling of the old roofing. Work should begin by studying the characteristics of the soil on the site and determining the bearing capacity of the foundation. If the foundation is not able to withstand the attic, then it will be necessary to carry out a number of works aimed at strengthening it.
Next, you should examine the walls of the house for their susceptibility to additional loads. In this case, if necessary, it is necessary to strengthen the walls. After that, the old roof is dismantled and the ceiling is strengthened.
The construction of a wooden attic consists of the following stages:
- production of a frame system;
- wall installation;
- performance of attic wall insulation;
- installation work related to the installation of the roof;
- attic finishing with roofing materials and roof insulation;
- interior decoration of the attic.

In addition, the construction of an attic involves the installation of window and door structures, the manufacture and installation of stairs, etc.
In order to carry out the construction of an attic from a bar, it is necessary to prepare an edged board, plywood, self-tapping screws and the bar itself. The frame structure should be comfortable in height for the movement of an average person. The optimal height of the attic is at least two meters. The height of the ridge zone should be about 350 cm.
The easiest way is to assemble the frame on the ground, and then raise it to the roof. The top beam or frame frame will act as a hearth in the attic. To fix the frame structure on the surface of the house, special plates or plywood are used. Thus, it is possible to obtain a special platform. The knots and quality of fastening depends on the material from which the walls of the attic are made. Self-tapping screws are used to connect the timber in the upper part of the structure. After the frame walls are made, the roof should be thermally insulated and waterproofed. After that, external and internal wall cladding is performed, windows and doors are mounted, internal finishing work is carried out.
When planning an attic, you should carefully analyze the general condition of the main building. The attic can be one room or will consist of several rooms. At the design stage, the design and shape of windows, as well as their location, should also be taken into account.
The attic should be built from lightweight, but at the same time durable materials. Since the materials should easily rise to the roof and exert a minimum load on the base of the building.
The most optimal materials for building an attic are wood or steel profiles. An attic made of stone or concrete will load the main building. Roofing materials should also be lightweight, but at the same time durable and reliable. It is preferable to use shingles or piece metal for roofing. We recommend using plasterboard for interior wall decoration and for leveling them.
Since the attic is located above the main building, it is more in contact with cold air. Therefore, it is necessary to ensure proper thermal insulation of this room. The heated air in the room should not penetrate through the insulation. In addition, in order to prevent moisture from entering the room, it is necessary to ensure its waterproofing.
In relation to the design features of the attic, it consists of a system of rafters, which is installed in compliance with a step of sixty centimeters. To fill the gaps between the rafter system, it is recommended to install heat-insulating materials such as mineral wool inside them. It is possible to lay insulation in one, two or even three layers. To calculate the total thickness of the thermal insulation material, the total heat loss coefficient in the room should be taken into account. To protect the roof from the inside of the room, a vapor barrier should be installed. Next, you should finish the roof with drywall, lining or finishing panels.
Do not forget to leave a ventilation gap, the main function of which will be to get rid of excess moisture in the under-roof space. The width of this gap depends on the type of roofing material. A vapor-permeable wind protection should be installed on the outside of the thermal insulation material.
An excellent vapor barrier material is polyethylene film, glassine or roofing material. The insulation is laid with an overlap of 15 cm. Construction tape is used to glue the seams. Please note that foil waterproofing is laid with a foil coating inside the room. Thus, the foil will reflect the heat that comes from the room.
Attic construction video:
Project documentation
- We complete the attic on an already finished house
- What is included in the truss system?
- Heat engineering
- Construction process in detail
- Advantages of the frame system
Many owners of private homes want to make their home more functional. You can achieve the goal by increasing the free space that can be used for personal purposes. Experts suggest using the area under the roof itself for this, namely to build an attic. This process cannot be called easy, but subject to the technology, it is possible to make an add-on, both at the stage of building a house and after putting it into operation. Both options will be discussed below.
We are developing a project
Mansard roof - design and calculation
Anyone who is interested in how to build a mansard roof with their own hands, first of all, you need to understand that this part of the building is quite complicated. If possible, it is better to design an additional floor at the construction stage, because not all houses already built can be equipped with additional square meters. The main obstacle is the increase in the load on the foundation part, which requires its strengthening.
In general terms, the whole process can be divided into stages:
- the construction of the mansard roof begins with the drawing up of drawings;
- then the walls of the under-roofing room are erected;
- the next step is the arrangement of the roof itself, the performance of work on insulation, waterproofing;
- window installation;
- interior decoration.
Only strict adherence to technology makes it possible to obtain a durable, and most importantly, reliable building as a result.
Each stage of work is important in its own way, one of them is design. Here it is important to take into account the dimensions of the room, the material that will be used as the main one, the features of the roof, the degree of its slope, the number of slopes, etc. There are several ways to design an add-on.
The least expensive is the compilation of the necessary documentation manually, for this you will need at least minimal, but experience, knowledge. You can go the other way - use ready-made drawings, but no one can guarantee that they will be perfect, adjustments may be required.
The most expensive, but win-win option is to contact specialists. There are many companies offering to draw up a project that matches the parameters of your home in a short time. A team of specialists will also help you choose the right building materials. The main requirements for consumables are: ensuring durability in operation, reducing the overall load on the base. We must not forget that the new project must be agreed upon in state institutions, if it is drawn up correctly, then there will be no problems with this.
What if the house is already built?
In this case, the construction process begins with dismantling. Having dismantled the old roof, you can not only expand the usable space later, but also ensure the safety of the new superstructure. You do not have to hire someone for these purposes, you can do everything on your own. First, you remove the roofing material from the outside, then the crate, and at the end you disassemble the truss system.
When the dismantling work is successfully completed, proceed to strengthen the walls on the lower floor. It is impossible to neglect the stage, because the additional load is not only on the foundation, but also on the vertical structures. To do it right, you will need to carry out calculations in order to determine the level of strength of the old walls.
Mansard roof - structural components

Understanding how to build a mansard-type roof will help information about the main load-bearing parts, connections.
- Rafter legs - they transfer the load exerted by the weight of the roofing material on the walls of the building. The cross section of wooden beams is selected taking into account such indicators as the angle of inclination, span width, step, design load. If you do not know how such calculations are carried out correctly, it makes sense to contact a specialist. In private construction, approximate values \u200b\u200bare allowed to be used, but we must not forget about a small margin.
- Narozhniki - the so-called rafter legs, based on one or two sides on the slanting elements. Their cross section is determined in the same way as in the case of the main rafters.
- Slanted legs - this type of construction is used in the construction of a hip roof. It is used as a base for sparrows. The cross-sectional index is determined taking into account the load, span. Remember, this figure should be greater than that of the rafter legs.
- A crossbar is a support beam for rafters, located in the upper part of the structure, namely in the ridge or at the break of the slope (if a sloping roof is planned).
- Mauerlat - is one of the main elements, it is a support for all rafters, through it the load on the walls is transmitted and evenly distributed. The optimal section is 100x100 or 150x150mm, it all depends on the complexity of the object.
For you to know, the construction of a Mauerlat is not required when it comes to building a frame or wooden house. This is because the crown of the walls or the strapping is the support for the rafters.
It does not do in construction without additional elements, such as struts, racks, fights. They are necessary to reduce the cross section of load-bearing structures. Their size is selected taking into account the convenience of making connections. Arguing on the topic: "How to build a mansard roof at home", — not to mention the material. Experts focus on the fact that wood should be used only coniferous species, such as pine, larch, spruce. The grade should be the first, maximum the second, and the humidity should not exceed 15%. Before use, do not forget that all boards and bars must be treated with an antiseptic.
Thermal engineering calculations

Mansard roof - insulation
The construction of the attic is not complete without the use of insulation, most often mineral wool is used for this purpose, it is supplied in slabs or mats. It is also possible to use polyurethane foam, ecowool, polystyrene foam, extruded polystyrene foam. Having decided on the material, you need to choose the right thickness, here it is important to take into account the height of the rafters, it should be equal to or slightly more than the thickness of the heat-insulating layer. If mineral wool is used, it is necessary to ensure the presence of a ventilation gap, it is a space of 50 mm between the heat insulator (its upper surface) and the roof.
Step-by-step description of the process
Let's move on to the main thing - how to build a mansard roof at home with your own hands. To cope with this task, it is important to follow a certain sequence of work. It all starts with attaching the Mauerlat to the wall (if the house is not framed or wooden), then the rafter system is installed along with struts and racks. It does not do without the installation of waterproofing, wind protection. Before laying the outer roof, a crate is made. At the end, insulation is carried out from the inside, sheathing of protruding structural elements.
And now a little more about some stages.
- If laying a Mauerlat is required, then this is done on the inside of the outer wall. There are several ways to fasten elements, to a greater extent it depends on what the house is built from. Anchors, studs or staples can be used in the work. In relation to buildings made of foam or aerated concrete, a monolithic belt is made, due to this it is possible to prevent destruction. After the construction of the Mauerlat, crossbars are mounted (if necessary), support structures are laid, and rafter legs are laid out at a certain interval. Mounts can be made rigid or hinged.
- Before you start laying the insulation, try to protect it from negative external influences. We are talking about laying a membrane sheet that protects from wind and moisture, fixing the crate. After that, you can start laying the finish coating, as an option, you can use bituminous tiles.
- In order to ensure effective thermal insulation of the house, the material must be laid without gaps, cracks. If you plan to use expanded polystyrene, the resulting spaces must be filled with sealant / polyurethane foam. Upon completion of the work, the vapor barrier is fixed from below, then the inner crate, after which you can proceed to the ceiling sheathing. The ideal option in this case is drywall 12.5 mm thick.
To provide access to the room of natural light, as well as tightness, it is necessary to install special skylights. Their feature is the ability to withstand the effects of external precipitation, which are negative. Also important is the possibility of high-quality ventilation of the living space. Regarding the installation of windows, it is better to contact specialists, because they have all the necessary skills.
Positive features of the add-on

Knowing how to properly build a mansard roof will not hurt anyone, because it is an excellent solution for a building of any purpose. If you give preference to the frame version, you can appreciate its main advantages. For example:
- the design is light, which means that it does not heavily load the main building. It follows from this that there is no need for additional strengthening;
- compared to stone options, this type of construction is much cheaper;
- it is possible to provide a high level of thermal and sound insulation;
- the attic can be made of any shape, configuration. mansard roof
And lastly, the consumables used are quite light, so there are no difficulties with lifting them up.
Everyone dreams of expanding the usable area of \u200b\u200bthe home. But not always the area of \u200b\u200bthe house allows you to equip, for example, an extension. One of the best solutions in this case is the construction of a mansard roof - additional footage with minimal investment.
Such a roof is built quite easily and quickly. And by enlisting the help of a few friends, you can save on labor.
To build a mansard roof on your own, you need to arm yourself with knowledge in this area to the maximum. Read more about the mansard roof device. So, mansard roofs are:

− in 1 level - the building has remote consoles, a large area and vertical windows. An attic with a single-level roof extends beyond the level of one of the sides of the house;
- in 2 levels - a project with a mixed type of support. This type of roof - the most difficult at all stages of construction, is designed together with the house;
− gable - add-ons for the attic in one level, easy to install. The main disadvantage is a small area and low ceilings;
- double-slope broken lines - buildings with 4 pitched planes at different angles. Somewhat more complicated than the previous version, but among the advantages is a full-fledged interior.
Different projects of mansard roofs almost do not differ from standard pitched roofs and include the following elements:
- roofing - appearance and protection from precipitation;
- crate - the base for roofing and insulation materials;
- ridge - the crown of the truss structure;
- rafters - inclined stiffeners of the entire structure;
- mauerlat - base beams for installing a truss system;
- diagonal bevels - connections for longitudinal beams and vertical racks;
- internal beams - supports for the ridge run and / or rafters for structural stability;
- insulation - a structure of layers of vapor, hydro, heat and sound insulation.

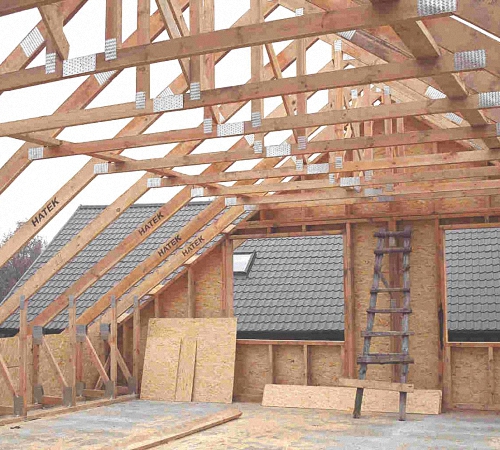
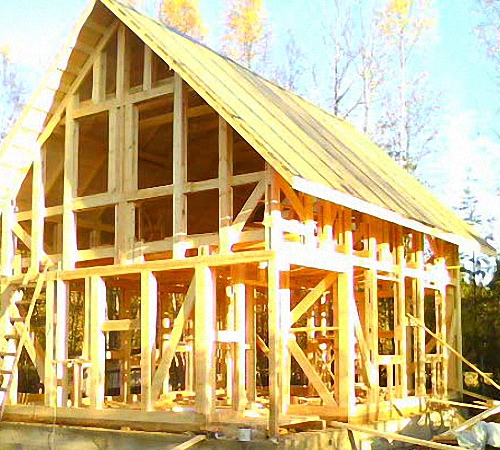
Mansard roof in a private house - photo under construction
To build, for example, a slate roof of this type, you will need:
- wood - bars (15, 12, 10), unedged boards, boards 40-50mm by 150mm;
- nails - 80 and slate;
- wire - annealed (3-4mm) and for stretch marks;
- slate;
- insulation;
- hydrobarrier.
Tools for building a mansard roof, most likely, do not even have to buy:
- roulette;
- axe;
- a hammer;
- construction stapler;
- plumb;
- hacksaw.
The slope of the roof provides precipitation, but takes the height of the room. That is, the smaller the angle of inclination, the larger the area of \u200b\u200bthe room itself will come out. Partially useful attic area is also reduced due to roof insulation. Read what exist and how to properly stack them.
Mansard roof construction technology
The technology for erecting a mansard roof has some subtleties:
− the thickness of the rafters must be more than 250 mm. This is necessary for comfortable laying of an insulating layer of 20 cm. The rafters can be made from glued laminated timber;
- for thermal insulation it is better to use foamed polystyrene or glass - they retain their properties even with increasing humidity;
- between the heat-insulating layer and the roof, it is necessary to install ventilation in accordance with all the rules - with exhaust hoods and air ducts, so that the air circulates freely under the surface of the building;
In order for the roof to turn out to be of high quality and reliable, it must have excellent ventilation, thermal insulation, and a high-quality truss structure made of treated wood.
- the inner side of the thermal insulation needs a vapor barrier layer over the entire surface;
- a layer of hydro-, if necessary, sound insulation is laid out under the roof from the outside of the rafters;
- wood for the entire structure must be treated with special means from microorganisms and fire, according to the requirements of SNiP;

- if the mansard roof is installed in windy areas, it is worth reducing its angle of inclination;
- if the house is in a quiet, windless place, you need to increase the angle of inclination;
- such roofs are covered with ceramic tiles or slate. Metal, due to its low thermal insulation properties, is not recommended;
- for thermal insulation it is necessary to use non-combustible materials;
- the mansard roof provides for the presence of a ladder.
The external staircase will not take up the area of the house, but it will be possible to get into the attic only from the street. Internal - much more convenient, but takes up space in the house. To solve this problem, you can install a ceiling ladder on a hinged joint or a screw structure. And how, according to GOST, to pick up on the second floor, read our instructions.
Phased construction of a mansard roof
Before building a roof, you must:
- Conduct an examination of the building to identify the maximum load for walls and foundations.
- Develop an attic project.
- Obtain permits:
- from city authorities to construction and reconstruction;
- expert opinion about the house;
- permission from all owners.

Rafters of a broken mansard roof - scheme
After designing the roof and the preparatory process, you can start building:
- We lay and fasten the Mauerlat along the perimeter of the house - a bar 100 by 100.
- Installing the frame. The supports of the truss structure will serve as frame racks. For its device, a beam with a section similar to the section of the longitudinal beams is taken. Vertical racks are placed along the edges of the building and attached to the longitudinal beams with the help of corners and self-tapping screws. We make a jumper on top of each rack.
- We mount the remaining arches. Between the two arches formed at the previous stage of installation, we stretch the cord strictly horizontally. The remaining arches are installed with a guideline for the cord and a step for the rafters. We connect the arches with stamped corners or nail plates as jumpers.
- Let's move on to the rafters. We cut their upper ends at a certain angle. On the bases of the bars we cut out grooves for mounting on the Mauerlat. The rafters are fixed to the base structure. Then, according to the template, we cut the upper rafters and also install them in their places. Also check out more details for the attic.
- We mount the crate with boards or plywood sheets.
- We lay a layer of vapor and thermal insulation. Layers are installed from the inside of the rafters. We stuff the crate over the insulation.
- From the outside of the rafters we mount a layer of waterproofing.
- The last step will be the installation of roofing from the selected material. The roof layer is mounted on top of the waterproofing.
- Do not forget about ventilation windows, as well as window openings. Of course, the window can only be installed in the gables, but two windows are unlikely to provide sufficient lighting.
How much will it cost to build a mansard roof
Consider the prices for materials for a mansard roof, given that the construction will be done independently.
The price of insulation (mineral wool) depends on the density per cubic meter and the base:
- on fiberglass - 1400-2500 rubles. per cubic meter;
- on basalt fiber - 1100-2000 rubles. per cubic meter;
- on jute fiber - 10-16 rubles. per running metre.
Roofing materials do not differ much in price:
- shingles - about 340 rubles. per square;
- metal tile - about 250 rubles. per square.
Calculations of the final cost of the building are made on the basis of the area of the mansard roof.
Video
About the construction of a mansard roof with your own hands on the video. About the technology itself clearly and some useful tips.
A mansard roof is an ideal solution for expanding the area of \u200b\u200bthe house. With the support of several people and armed with the knowledge of building a building, you can quickly build a functional and reliable mansard roof for many years of use.
Modern people try to use the area of their home as efficiently as possible. Therefore, the proposal to equip additional space under the roof is always met with enthusiasm. It is much easier to plan the construction of an attic at the stage of building a house, but you can make an additional superstructure above the old building.
How to make an attic on an old house
The presence of an attic not only increases the living space, but also gives the building a colorful look.
The attic turns a country house into a fabulous building
An old house can be updated by building a superstructure in accordance with existing standards.
The attic superstructure begins with calculations of the strength of the old house
First you need to decide whether the existing foundation and walls can withstand the load of the attic floor and the new roof. If they have a sufficient margin of safety, then you can start remodeling the house. Otherwise, they should be strengthened.
Old brick walls sometimes seem strong, but with additional stress, cracks may appear in the mortar over time. Therefore, it is necessary to immediately consider their condition, and, if necessary, tie them with a rigid belt. This is done as follows:
- metal poles with a section of 10x10 cm are inserted into the foundation with the lower edge, and connected with the armored belt of the first floor with the upper edge. Installed around the perimeter of the house every 2 meters;
- metal fittings with a cross section of 12 mm are placed in strakes and tie the house along the walls: from the bottom of the window every 2 meters up;
- a metal mesh with a cell size of 2x2 cm is laid on top of the reinforcement, which, after completion of all work, is covered with plaster.
Strengthening the foundation is carried out by tying with a reinforcing belt from all sides.
If the old foundation cannot withstand the attic, then it must be sheathed with reinforcement
Having decided on the strengthening of the building, you can proceed to the choice of the project of the future superstructure. It should look harmonious against the background of other buildings and match the style of the whole house.
The type of mansard roof will determine the calculation of the dimensions of the inner upper room and the necessary materials for construction
There are several types of attics:
- single-level with a gable roof - low ceilings with a small living space;
A single-level attic with a gable roof is the simplest type of superstructure for small buildings
- single-level with a sloping gable roof - increased interior space, but serious costs and time for construction;
A single-level attic with a broken gable roof is usually built on a brick house
- single-level with cantilever extensions - a complex structure that allows you to get even more area, since the attic frame extends beyond the building, and the windows are installed vertically;
A single-level attic with cantilever extensions allows you to get a lot of internal space by increasing the upper structure
- multi-level with mixed roof support - used in the construction of a new house, built only by specialists.
A multi-level attic with a mixed roof support on old houses is usually not installed due to the complexity and large amount of work.
Video: converting half of the old roof into an attic - an easy way
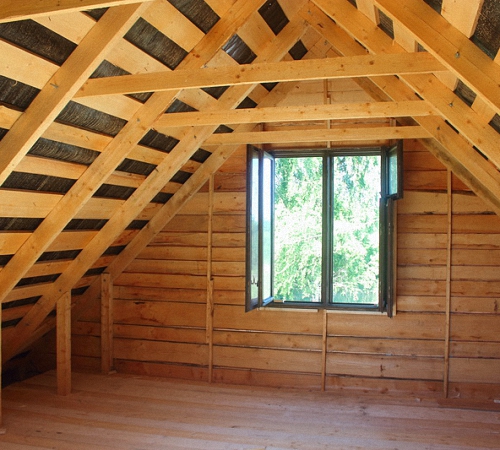
Alteration of the roof under the attic is a relatively cheap way to increase living space. In a private house, a pitched roof is usually placed, so you can make an additional spacious and bright room with your own hands.
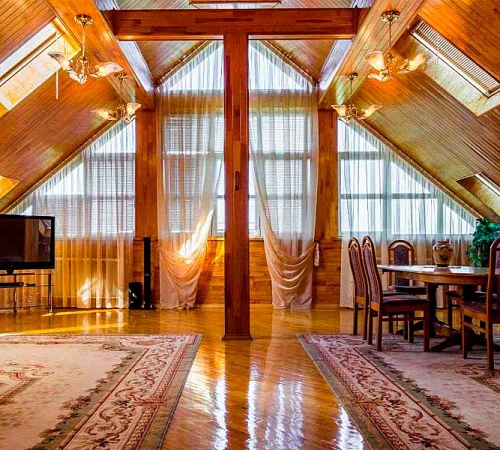
Internal wood paneling makes the attic warm and bright
And if the house is large enough in length, then the attic can turn into a real floor: with several rooms and even a balcony.
A large attic allows you to divide the area into different residential areas
Advantages of creating an attic:
- the possibility of arranging one or more new living rooms;
An attic with low ceilings under a gable roof is most conveniently furnished with low sunbeds
- low costs compared to the construction of a full-fledged floor or a side extension to the house;
- renovation of the exterior of the building;
A house with an attic under construction always attracts the eyes of passers-by and is interested in the final result.
- the opportunity to observe a beautiful view from the attic window.
A lot of sunlight comes through the windows in the attic, illuminating the room all day
However, this solution also has certain disadvantages that must also be taken into account:
- the need for insulation and soundproofing of the ceiling and a new roof, the installation of several double-glazed windows;
- the difficulty of conducting additional heating and lighting in the upper part of the old house - you will have to combine it with home wiring or use an autonomous connection;
To heat the attic with access to the balcony, you can use a potbelly stove
- layout of a part of the home space under the stairs leading to the attic;
The stairs leading to the attic must be fenced for safety.
- the need to purchase special furniture for a sloping roof or purchase squat models: low cabinets, sofas and tables.
Low furniture is best suited for attic interiors
The presence of sloping walls makes the room unusual and romantic, but with this decision you will have to take a more responsible approach to design development. You can make furniture for an inclined superstructure yourself or assemble a single complex from existing multi-level models, painting everything in one color.
Furniture that repeats the slope of the attic can be made independently
So, the main disadvantage of converting an attic into an attic is the need to invest, but it's worth it.
Building an attic will cost much less than creating an additional floor, regardless of what materials will be used to build the walls. Indeed, to create them, you will need the main material, insulation and decoration, while for the attic superstructure you only need roofing insulation and a new truss system.
The superstructure is made in a symmetrical or asymmetrical shape. Internal walls are designed both inclined and vertical.
Having studied the schemes of single-level attics with different types of roofs, it is easier to make a choice when planning
Alteration of the attic into an attic does not require the dismantling of all existing structures. But you need to make sure that the ceiling is reliable: check its condition, reinforce it with wooden or metal beams, sheathe it with a new board. Then it will be able to withstand the weight of furniture and people.
For frequent climbing to the attic, you will need to make a comfortable staircase, provide for the installation of ventilation, natural and artificial lighting, and perform interior decoration - all this will create a cozy and comfortable room.
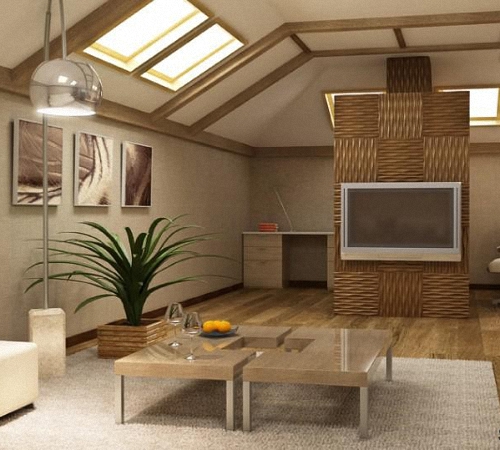
The sloping roof superstructure, decorated in light colors, visually enlarges the space, while splashes of color add brightness to the interior.
When building an attic floor, the following conditions must be met:
- rafters are made of glued timber with a thickness of at least 250 mm so that the required amount of insulation can be laid;
- foamed polystyrene is used for insulation due to its low weight and high thermal insulation characteristics;
- a gap is left between the thermal insulation and the roofing material to provide natural ventilation;
- a hydro- and sound-proof layer must be laid.
Alteration of the roof under the attic do it yourself
During the construction of a house, there is usually not enough money, so many refuse to build a second floor. Or another situation may arise when an old one-story house of a small area is purchased along with the site. In both cases, there is an affordable option for increasing the place to live - do-it-yourself restructuring of the attic space into an attic.
Create a project
Before starting work, you need to draw up a plan and develop a project with accurate drawings. The correct calculation will allow you to get a cozy, durable and reliable room. You can perform all the calculations yourself or entrust it to specialists.
You can draw a plan and develop a draft design yourself by studying various options on the Internet
Strengthening the walls and foundation may be necessary in the event of a complete replacement of the rafters. If the roof is partially redone, then reinforcement may be needed only for overlapping. You also need to immediately decide what types of windows will be used in the attic: the reinforcement in the truss system will depend on this.
The location of all windows in the attic roof must be thought out in advance and this data entered into the project plan
truss system
Rafters can be layered or hanging. The former rest on the inner walls of the house or additional supports, and the latter on the outer walls.
In the attic, layered and hanging rafters are used.
Hanging rafters are best suited for the attic.
An attic with hanging rafters looks prettier and wins in the size of the internal area
The attic usually occupies the entire space of the attic, and its walls are combined with the outer ones.
The best option for creating an attic is a layered truss system.
The rafter system consists of different load-bearing bars. To understand the structure of the entire structure and build it correctly, you need to understand the purpose and operation of its individual elements.
The image of the individual elements of the truss system helps to understand the structure of the entire structure
Refurbishment of the premises
With a sufficient height of the attic, the truss system does not need to be redone. It is enough to inspect the old rafters, identify possible flaws and eliminate them.
If the truss system is in good condition, you can proceed to the arrangement of the floor. Insulation is first laid between the lags, after which the surface is sheathed with ordinary boards or sheets of OSB, chipboard.
The floor in the attic is insulated and covered with boards
Before laying the insulation, all necessary communications are mounted between the rafters, places are cut in the roof for installing windows. carried out before warming.
All wires and pipes of communications must be placed in special corrugations
Care must be taken to create natural ventilation of the under-roof space through the vents so that moisture does not accumulate inside the room.
Roof insulation
It is necessary to insulate the roof correctly and efficiently - the microclimate under the roof will depend on this. Typically, mineral wool, polystyrene foam or sprayed polyurethane foam is used as insulation.
A thick layer of heat insulator is tightly laid and fixed between the rafters so that there are no gaps or gaps anywhere. On the upper part of the roof - between the roof and the insulation - waterproofing is mounted, then heat-insulating material is laid from the side of the room. Then from the inside the insulation is covered with a vapor barrier film.
For better ventilation, a small distance is left between the roofing material and the insulation: this is how air circulates through the holes in the eaves and ridge. If the roof is covered with corrugated sheets, then the thickness of the gap should be 25 mm, if with flat material, then it should be increased to 50 mm.
When creating attic thermal insulation, it is necessary to strictly observe the sequence of layers
When planning an ascent to the attic, you need to take care of the convenience and safety of movement. Therefore, the ladder is usually mounted inside the house. It is constructed from wood or metal: it can be either a screw or a marching structure.
The staircase to the attic can be of different types and designs, which allows it to fit into any interior.
An opening is cut in the ceiling of the first floor, which is reinforced along the perimeter with metal or wooden strapping.
The design of the stairs to the attic must be durable, reliable, safe and beautiful.
Interior decoration
For wall cladding, in most cases, gypsum boards are used, the seams between them are plastered. Wallpaper is glued on top or decorative plaster is applied. An alternative option is lining or natural wood.
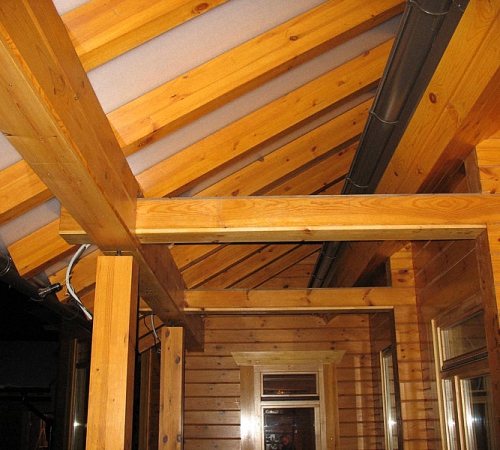
If some rafters protrude through the walls into the attic, then they can be designed as decorative elements and even used as a horizontal bar for hanging a hammock, swing, chandelier and other fixtures.
The design of the visible parts of the rafters in the interior of the attic is an interesting and creative business.
It is not recommended to use heavy finishing materials in the attic, as they increase the load on the walls, ceiling and foundation of the building.
There are many options for interior decoration of the attic, but it is advisable to use only light materials.
To cover the floor, you can use a laminate or linoleum, and it is better to refuse tiles or porcelain stoneware.
Roof of the attic floor
The roof of a residential superstructure should consist of the following layers (in order - from the street to the interior):

Video: why and how to properly lay layers on the roof of the attic
Mansard roof calculations for a house
Determination of the total weight of the roof
To calculate the total weight of roofing materials, it is necessary to multiply the specific gravity of one square meter of coverage by the total area of the attic roof. To get the weight of one square meter, you need to add up the specific gravity of all the materials that make up the roofing cake, and multiply it by the safety factor (1.1).
If the thickness of the lathing is 25 mm, then its specific gravity is 15 kg / m 2, a 10 cm thick insulation has a specific gravity of 10 kg / m 2, and ondulin roofing material has a weight of 3 kg / m 2. It turns out: (15 + 10 + 3) x1.1 \u003d 30.8 kg / m 2.
According to existing standards, the load on the ceiling in a residential building should not exceed 50 kg / m 2.
Roof area determination
To calculate the surface of a sloping roof, you need to break it into simple shapes (square, rectangle, trapezium, etc.) and determine their area, and then add everything up. To determine the surface of a gable roof, it is necessary to multiply the length by the width, multiply the resulting value by two.
Table: determination of the attic roof area
When calculating the angle of inclination, the climatic zone in which the house is located is taken into account, and that it is convenient to move in the attic in full growth
It is also necessary to calculate the slope of the roof. Usually the angle is 45–60 degrees, but when determining it, one must take into account the climatic zone in which the house is located, the type of attic construction, snow, wind loads, and the architectural design of the house.
The greater the angle of inclination of the roof, the less will be the load on the truss system, but the consumption of materials will increase.
Calculation of the truss system
When choosing a truss system, you can stop at the following options:
- hanging rafters;
- oblique type;
- skating run;
- combined design.
If the length of the roof is more than 4.5 m, then support runs and struts can be used for reinforcement. With a length of more than 7 meters, a ridge beam is installed.
For wooden rafters, a bar with a thickness of at least 70 mm is used. The step of their installation should be 50 cm.
On a large area, it is better to fix a metal truss system: due to the increase in the distance between the rafters, the absence of spacers and struts, the weight of such a structure will be less than that of a wooden one, and the strength will increase significantly.
If the attic area is large, then it is better to install metal rafters
Calculation of the required amount of materials
To carry out the calculation, you need to know the following parameters:
- width, thickness and pitch of the rafters;
- distance from the edge of the roof to the rafters;
- the size of the boards for the crate and the step between them;
- size, type of roofing material and overlap between its sheets;
- type of steam, hydro and thermal insulation material.
The roof is divided into simple shapes and the required amount of each of the materials is determined. For this, simple mathematical formulas are used.
The results obtained are converted into standard values: for wood - in cubic meters, for roofing materials, steam, hydro and thermal insulation - in square meters. And you can go to the store.
Common Mistakes
Most often, with self-calculation, errors are obtained during the determination of the required amount of insulation. If the climatic conditions are severe, then its volume will have to be increased, otherwise it will not be possible to create comfortable living conditions in the attic. The insulation is laid on the floor of the house, the walls of the gable and the slopes of the roof. But everywhere the thickness of the insulation can be different.
Video: calculation of a mansard roof with diagrams and loads
The attic floor allows you to get additional living space and gives the private house a modern attractive appearance. It is not difficult to create an attic with your own hands, you just need to draw up a project correctly, perform calculations and carry out high-quality installation of all materials. And the result will please the owners for a long time.
Read also...
- Education of the USSR: prerequisites, stages, significance When the USSR was created
- Education of the USSR: briefly about everything What led to the formation of the USSR
- Socialist-Revolutionary Party: who are they? Their goals and program. Political parties at the beginning of the 20th century Socialist-Revolutionaries party program table briefly
- Vitaprost rectal suppositories: how to use the drug correctly You can take Vitaprost without a doctor's prescription


