Do-it-yourself burning machine. Pocket cnc - machine for burning. Various models of homemade appliances
CNC wood burning with nichrome thread with simple control via computer or laptop
Ease of use
To you NO special training required or learn complex programs for expensive production equipment. To burn a picture, simply load the BMP image into the control program, and press START. The nichrome CNC burner with nichrome thread will do the rest of the process on its own. For best quality You can pre-process the photo in Photoshop.
To do this, you do not need to own Photoshop - we give video tutorials on preparing a photo.
It is not difficult to assemble, for this we recorded detailed lessons which is provided with all materials. In order to make sure now that it is not difficult to install, see the plot below. Lisa completed the assembly in 35 minutes and edited her photo for another 10 minutes.
With our equipment even schoolchildren and girls work. We have made the management as simple as possible and does not require special knowledge.
The whole process is maximally automated. You do not need a special separate room - you can burn portraits on a tree right at home. When burning out, a slight smell of wood appears, which does not cause discomfort.
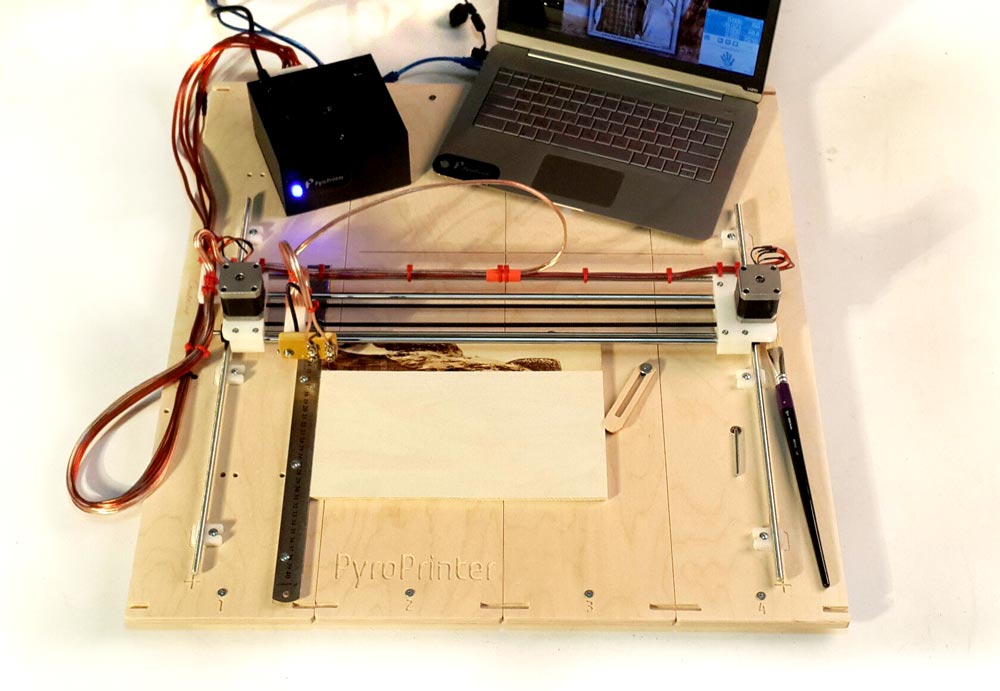
Characteristics of CNC burner with nichrome thread for wood:
The same name program for management.
The machine automatically turns on before the start of applying the picture and turns itself off at the end, regulates the incandescence of the burning head.
The drawing is raster (line by line), shades are created due to speeds. For each shade, the pyroprinter selects desired speed, therefore, it moves along the dark elements of the picture at a reduced speed, and the light ones at an increased speed.
Without additional self-adjustment, the machine works with wooden surfaces from 4 to 10 mm.
The device is equipped with a non-contact sensor that will monitor non-standard situations and, if they occur, will be turned off. This reduces the risk of fire to zero.
Specifications:
- Working field size: 42 x 40 cm (easy to increase to 90 x 40 cm)*
- Power consumption: 150W
- Power supply 110 V/220 V (switch on the back of the unit)
- Supported files: bmp, jpg, tiff, gif
- Table in working position: 75 x 75 cm
- Cartons in transport position: 75 x 16 x 20 cm
- Speed (depends on the darkness of the picture):
| Plywood format | Burn time |
| A4 (21*30cm) | 1.5-2.5 hours |
| A3 (30*40cm) | 3-4.5 hours |
| A2 (60*40cm) | 6.5-7.5 hours |
| panel (90*40 cm) | 8.5-10 hours |
- The software runs on Windows XP, 7, 8, 10 (all updates are free, can be installed on any number of computers)
- Connection is via USB port
* - to increase the working field, it is necessary to replace a pair of M8 studs with meter-long studs (sold in construction stores and fastener stores, the cost is 50-70 rubles. a piece). We do not put long hairpins in the box because they do not fit into the shipping container. When sent as a second place, they were often bent, which made the studs unusable.
Dimensions
The unfolded table, which is assembled from the drawer, is 75x75 cm.

Fits easily into trunk or backseat car

Burner with nichrome thread
Each piece of equipment is sent in a plywood box that transforms into a table. For assembly, you will need about twenty minutes and a simple screwdriver (or screwdriver).
We give video instructions for assembling and setting up hardware on a computer. Among our clients there were girls who easily coped with self-assembly.
Consumables and maintenance
You do not need any complex and expensive maintenance. All you need:
- Every 5-7 plywood, it is necessary to change the sting from nichrome wire. It is made from nichrome wire. The cost of 1 pc. about 3 rubles. The wire for its manufacture is sold here or in online electronics stores.
- Periodically it is important to lubricate the guides with oil to sewing machines(cost 50-80 rubles per oiler).
Easy start business at home
All you need to get started:
- Equipment
- PC or laptop with Windows (XP, 7, 8, 10)
- Plywood
- Electric jigsaw
- Sandpaper
PyroPrinter is the pride of our engineers
It took us two years and the work of 5 engineers to develop it. We have done hundreds of tests and burned thousands of images, making it as easy as possible to control the device before we finished developing this nichrome burner. All this so that every time you make a board you get an image High Quality. Such products practically do not differ from the work of an artist who can work on a painting for a week. The pyroprinter will create a high quality A4 in 2 hours.
Such a business is becoming popular in Germany, Ukraine, Kazakhstan, Russia and a number of European countries. Already more than 25 people from Russia, the CIS and Europe have bought a CNC nichrome burner to create their home business and successfully make paintings to order.
What is included?
- Controller
- Hairpins (2 pcs.)
- Controlled nichrome burner (carriage)
- Plywood blanks (2 pcs.)
- tassel
- Sandpaper
- Ruler for removing carbon deposits
- Liners for the ruler for different thicknesses (2 pcs.)
- Workpiece holders (2 pcs.)
- A set of spare tips and wire (nichrome and tungsten alloy made in Germany)
- Plywood box-table
Weight about 9.0 kg. transport container dimensions: 75*18*20 cm
Electronic materials:
- Licensed Pyroprinter software (all updates are free, installable on any number of operating systems)
- Video:
- assembly and configuration, first run
- photo processing (photographic style burning)
- photo processing (hand-drawn effect)
- how to find clients quickly
- change of burning tip
- preparing a solution for pre-treatment plywood
- Instructions and master classes:
- Internet promotion (website, vk, instagram, etc.)
- for plywood preparation, mortar treatment
- at work officially
- for machine maintenance
Support:
1. If you are afraid that you will not cope - do not worry. Our technical support will help you if something goes wrong.
2. If there are problems installing the program, our engineer can install it via Teamviewer remotely.
According to the author, his imagination has always been excited by the miracles that can be created with your own machine for laser engraving. All attempts to lay a paw on such equipment ended in failure, which could not but upset ...
However, being an active and creative nature (that is, a real Mozgochin), he solved this problem simply - he made his own (albeit small) CNC machine. We will talk about this project in our article.

Despite the very small working area, the main advantage of the design is its simplicity and low cost. In turn, it means ease of repetition in a home workshop.
When working on the project, the author adhered to the principle of maximum efficiency, that is, individual electronic components, the manufacture of which would require unnecessary time, were purchased ready-made. However, these parts are quite easy to find and order via the Internet (and for the most advanced, make it yourself).
The author is completely satisfied with the result obtained, even though there are opportunities for further improvement and modernization of the design. Of course, small size and low power impose their limitations. However, the author has quite successfully established the production of paper stamps, plates for marking domestic plants, and the like. Of course, the machine will not fit into your pocket, but compared to other tools and equipment, it can still be called "pocket".

A few words about security. The project used a red laser with a power of about 200 milliwatts. Of course, it is not enough to cut wooden block in one fell swoop, but going blind forever is easier than ever. Never, under any circumstances, aim the laser at your eyes. Remember that even the reflected beam poses a danger to vision!
Let's get started...
Step 1. Gathering the Parts
Most of the details of any Mozgochin can be found in their personal bins of the Motherland. I think that aluminum profiles, snot and sticks, fasteners, MDF boards and wires can be found in any home workshop. Most of the electronics purchased by the author in ready-made in Internet shops and on E-bay.
 Arduino and all
 We will need:
- Arduino is the heart of the design. As you understand, she will be responsible for controlling stepper motors.
- Stepper motor control boards. The author used Easydrive boards, however, you can use any of their analogues or make boards yourself, incl. and from the Brainkit set (of course, when it goes into circulation).
- 2 (two) unused DVD drives.
- Laser power control circuit.
- Housing for a laser LED (again, you can buy it in the Internet - stores or make it yourself).
- Bolts, nuts, and other necessary little things.
Step 2. An autopsy will show ... Kurochim disassemble DVD drives
Everything we need from the dead DVD drives - these are blocks of stepper motors and one laser diode.
The very first pancake turned out to be a lump when the author discovered that in the devices chosen for preparation, the base was not metal, but plastic, which would greatly complicate the work. I had to choose new applicants among the residents of the pantry ...
 The one plastic frame far left...
 > The disassembly itself is not particularly difficult and is generally the same for DVD drives of any brand.
First, unscrew the 4 screws that hold the bottom plate of the case and remove it. Under it, you will find two boards, which also need to be removed by unscrewing the screws that secure them.
 Removed lid...
 In principle, boards are useless for you (unless you are familiar with smd-wiring), but you can use other drive parts in your projects. For example, a tiny motor is placed under the boards near one of the case walls. direct current worth saving. In the same time, asynchronous motor the main drive of the disk without the use of a special controller is quite difficult to even get to move.
Attention! Be careful with cables - one of them is responsible for controlling the stepper motor and positioning the laser head.

Now unscrew the screws securing the stepper motor module and remove it from the drive housing. In principle, this is exactly what we need for further work. Finally, carefully remove the focusing lenses from the optical module - we will need them later. try do not damage the laser diode, without it our whole construction will turn into banal CNC plotter.
Mechanical contenders

On the net you can read the ads: “I will sell (buy) a laser CNC burner!” It is perceived as an opportunity to open a business. Included with the CNC burner with nichrome thread (an alloy of nickel and chromium), there must be a laptop, a CNC unit and a thread from this alloy. How to decide?
Which one to give preference?
The main advantage of a CNC laser burning machine (it is also called a CNC pyrograph, and the burning process on it is pyrography) is the highest accuracy. Drawing on wood and leather is applied with dots. Thus, they write texts, badges and apply images that have clearly marked boundaries, create drawings. They even make wedding invitations on leather and a board with a burnt photo of the newlyweds and the text of the invitation.
Among the disadvantages of laser-type burners:
- the impossibility of obtaining adequate halftones, the shadows on the face are obtained due to the fact that the density of black dots decreases, and this is noticeable from a short distance;
- very low speed (the device burns 10 image pixels per second), it will take 10 hours to get a 20x20 cm image;
- editing the image (enlarging the photo), we get a mosaic of squares on the burnt surface of the material;
- the brightness of the glow from the laser has a negative effect on vision (you can only work in specialized glasses, selected for the type of glow of this laser);
- a minus in the work is the tar of trees that gets into the picture when burned; you can make additional airflow, but a lot of noise is generated and it is difficult to talk about comfortable work;
- the complexity of combing the preparation of the board. Those who work with wood reduce the intensity of the wood texture with a soda solution. After that, the workpiece must be washed and dried well. And if it is plywood, it can swell around the edges from moisture.
Therefore, many craftsmen reject the CNC laser burner, and stop their choice on the CNC nichrome burner.
Wire burner and its advantages
If you burn it with nichrome (wire or the so-called thread from this material), then there are such “pluses”:
- “live” images are obtained, where there are shadows, penumbra and shades. Halftones are achieved when the temperature changes (the nichrome thread is heated more or less, while simultaneously adjusting the contact time of the wire tip with the surface;
- really control the saturation of the image on the CNC itself to obtain pictures with different intensities;
- The master burned the same portrait 20x20 cm for about 2 hours, 5 times faster than with a laser machine. And this is a great advantage when burning large format paintings on wood with CNC.
- the workpiece is easier to prepare for work;
- the eyes are not harmed by a bright glow;
- tar does not stand out, which means that airflow is not needed.

The nichrome burning device has a drawback: the need to maintain a stable temperature in the room. But there is a way out - to close the window so that there is no draft. There is a slight smell when burning, the room will have to be ventilated after work is completed.
Another disadvantage is that the nichrome thread in the burners should change after 5-7 pictures. It does not cover costs, so the business will not suffer. 1 sting made of nichrome costs 2-3 rubles.
Therefore, if a decision is made to assemble a burner with your own hands, then it will be with a nichrome thread.
Various models of homemade appliances
On the net, you can really get acquainted with burners that can create a pattern on plywood, metal and even glass, achieving a high photographic similarity of images. It is worth briefly considering several options:
- Homemade laser machine for burning, it is also called a pyroprinter, it can be controlled from a laptop, then an LPT cable is not needed. But in practice, given the high cost, the laser CNC burner is used much less frequently, although it also has its adherents.
- For the simplest option - a laser pen - you will need the following elements:
- laser IR diode (1W output) and optical fiber;
- one type of mechanical pencil;
- a cooling radiator from an unnecessary TV with thermal grease applied to improve thermal conductivity;
- batteries, preferably type 2AA or D;
- eye protection - glasses that filter laser radiation - 750 - 900 nm.

Having disassembled a thin mechanical pencil (it is better to take one with a metal case), you need to cut the fiber along the length of the pencil and insert it into the tip. Secure with epoxy or a drop of glue, attaching to the wire and power. As you can see, there is nothing complicated in this example.
- plywood engraver small size- CNC for wood burning can be created from old 3D printers. This homemade laser the focus is adjusted by the lens, its stroke is enough to focus the light spot (along the height of the material) within 10 mm. And if we take into account the costs of numerical control of the device, then the entire structure, together with drivers and guides, costs around 5,500 rubles.
- You can make a CNC engraving machine from old CD / DVD drives. As an example, we disassemble three DVD drives, leaving the stepper motor and the sliding mechanism on the metal chassis. The control wires must be soldered to the stepper motor (or to the motor contacts or to the cable loop).
Each platform of the X and Y axes is glued to the parts of the engine mechanism. Such a laser CNC burner has 2 movement mechanisms, it does not need vertical movements. In the form of a spindle, an electric motor with 2 screw clamps is used. To control the stepper motor, Easydrivers is included with the Arduino. The laser LED from the previously dismantled DVD-R drive is assigned the role of a tool for pyrography.
- If, however, we assemble CNC for our own needs with our own hands according to the scheme - burning machines with nichrome (it has high heat resistance and is able to heat up to very high temperatures, not subject to corrosion, very elastic); you need to buy wire from this material.

It can be removed from an old laboratory rheostat or an electric stove with a nichrome spiral.
Attention! Choose a nichrome thread, given the diameter, length and grade of the alloy.
The most popular is considered to be a diameter of 0.17 - 0.8 mm, capable of withstanding an incandescent temperature of 1200˚C.
In the photo below: 3 examples of a burnt image, according to the principle - I burn it, let others know what pyrography with machine control is and what the result is.
Continuing the theme of the open source project*. Like all stories begin with words - it was in the evening ... In this situation, everything is a little different. Last year it was designed and assembled (almost on a bet) cnc router printed on a 3d printer. . The machine was assembled, launched, a 5.5 watt laser was hung. After the "game" with the laser, the router itself faded into the background. Started to burn. As you know, the laser works very well with vector graphics, in this regard it can be said that it has no equal, but problems begin with the raster. And here comes into force the human “I want more!”. Without hesitation, the first thing that came to mind was a nichrome burner that caught my eye a couple of years ago. Yes, and financial investments required much less than the cost of the laser itself.
How it works?
The principle of operation can be compared, or rather, tested with a soldering iron at hand. Heating it to the maximum temperature, start to slowly hold on wooden surface, the slower you draw, the darker the burnt surface turns out, if you draw it very quickly, then the surface will not have time to burn out (too short contact with the surface) in the figure you can depict it like this: (the software is built according to this algorithm)
At maximum speeds, the color remains virtually unchanged relative to the surface.
Design and assembly
Initially, the design should not be classical pattern, but after a little thought, I decided to leave the classics all the same, because. it was necessary to test one structural element, namely the X-axis with a carriage. Simply put, how the carriage will behave on two linear bearings. Although the machine does not bear any load during operation, but still two, this is not enough, the Chinese backlash is merciless

In general, except for the "small things" in the design, only 8 printed parts are used, at which the start of the machine is already possible, in general, there are 11 parts per this moment, (mount for arduino, cover with coolers, etc.). Due to its “simplicity” of knots, in theory, the size can be any, in theory, because 8mm shafts are over a meter, I think it’s already not very good. Yes, and initially the machine was planned in such a size that an A3 sheet could easily fit. But due to the fact that, as it turned out later, I didn’t have 500 mm guides for the X axis, since I spent them on the router, but there were 800 mm in the bins. It became a pity to cut, left them as they are, from which the machine grew in size. As it turned out during operation, this is only a huge plus.
The frame is made of an aluminum square profile 20x20 mm around the perimeter, and the "table" is made of the same material 12x12 mm, it's all fastened with rivets. You can also twist it with bolts, but I didn’t bother with unnecessary movements, the rivets perform their task in full

What is good about such a frame, so that the wiring is easily hidden in the pipes, thereby winning the overall appearance


General form:

Electronics:
All this is built on the basis of Arduino UNO + cnc shield 3.0, respectively. Moreover, the shield in my household has the role of a gypsy, pumping from machine to machine ... one for all, a kind of prostitute churn)) (it's corny there is no money to order additionally). Firmware GRBL 1.1. This economy is powered, including the glow of the sting, from a 12-volt power supply 40A (40 is too much, there was simply no other) 20 - 25 amperes, according to preliminary calculations, is quite enough.

Forced cooling of drivers

Software part:
To generate g-code I use the wonderful free program Bmp to GCode converter. What I really liked is that there are black speed tinctures, i.e. experimentally select at what speed the black line is burned without spoiling the surface "without digging into it" and set this value in the program. Thus, I came to the conclusion that the tip glow regulator is essentially not needed, it is enough to set the maximum heat once during assembly and find the minimum black speed. In the future, when burning, if you need to make the photo lighter, then simply increase the speed of the black value, the sting moves faster, hence the "drawn" line is lighter. The maximum glow can be limited by only one parameter - the maximum speed of the carriage and acceleration, in my case maximum speed carriages 16700 mm / s, you can increase the speed by putting a pulley on the motor with a larger diameter. Search experiments are ongoing. After the code file is generated, it can already be pushed into any program that "knows how" to send code to the arduino. I use LaserGrbl, I'm already used to it, it's convenient that it shows the program execution time, you can press pause, and other goodies.
And now the mechanics are assembled, the electronics are connected, the arduino is flashed and configured to the parameters of the mechanics, I put the parameters into the keyboard by guessing my fingers, not knowing what step to take in Y, in general there are a lot of questions and tests ahead in my head.
First burn

Looking at this disgrace, scratching the back of his head with intelligent eyes, it became clear to that goat that it was necessary to change the program settings based on the characteristics of the mechanics. I decided to google a little, delve into the topic. Tons of useless pages on the net, a couple of centuries of YouTube videos that just show how it burns out, without any special voiceovers, in general, I didn’t learn anything from anyone, everything is so beautiful for everyone, but it’s not clear how. I came across a "mysterious" printer, I will not disclose its name, many will understand it, I will only say that I directly confused its price where the left is where the right is. And then I finally thought. The price for it is not small, there is probably some kind of chip, from which such an amount is added, so I did something wrong ...
Looking carefully at the first burnout test, we conclude that the carriage speed is too high, the temperature of the tip is low, and the step between the lines is too large. Change the settings, increase the temperature, burn:

Well, I thought better, but what kind of wild stripes? I understand that the distance between the bands is less where there is more black. But the fact is that over time, carbon deposits appear on the sting, as well as on soldering irons, and when it reaches a critical mass, let's say, the carbon deposits are chipped off, and the temperature of the sting rises sharply, as a result of which a difference in shades appears, while the speed is constant. Here I didn’t have to invent a bicycle, everything was already invented by smart people for me, for whom everything is beautiful and without jambs. Ruler. When approaching the X = 0 coordinate, the sting runs into a metal ruler, literally a centimeter. But there is also little trick, I did not find information about this on the network, I just followed the logic and errors. Option one is NOT correct:

It is not true that when approaching the ruler, the sting that receives some pressure on the surface due to the usual rubber band in my case, you need to "climb" onto the surface of our cleaner, and the thicker it is, the sadder it is, so the ruler should be the cheapest , i.e. the thinnest, but this is not enough, due to the fact that the sting is in a hot state, and nichrome is not quite such a hard material, hitting an acute angle simply bends the stings into a ram's horn. Exit. Sharpen the edge a little:

This can be done with the help of the daughter of a Bulgarian, or by any other means, there is no point in making it super sharp, it’s proven. Just sharpen the corner and the problem is solved.
Let's try next:

The result is literally on the face. And that's it, here it started! Burn all the plywood in the hut!


I won’t upload a lot of photos, because. not everything is perfect yet, tests are ahead, tests and more tests, you need to find its maximum capabilities, thereby increasing the speed. This is not a quick pleasure, the last two scorched photos were printed on average 5 and a half hours each, size 310x410. At the same time, the average speed based on the code is about 50-60% of its capabilities. This is very short, but that's it. The approximate amount of components for assembling this shaitan machine is about 4t.r (later I will give a more accurate amount) Based on whether it will be interesting for you further, the next article will follow, with a completed project, and its final capabilities.
Link to kirviks projects


