Silo pit with your own hands. Simple rules for arranging a compost pit in the country. Compost pit device
To connect plumbing fixtures to the water supply network, a flexible water supply is used. It is in demand when connecting faucets, showers, toilets and other points of water intake, and greatly simplifies the installation process. Flexible piping is also used when installing gas equipment. It differs from similar devices for water in manufacturing technology and special safety requirements.
Characteristics and types
Flexible hose for plumbing is a hose of different lengths, made of non-toxic synthetic rubber. Due to the elasticity and softness of the material, it easily takes the desired position and allows installation in hard-to-reach places. To protect the flexible hose, the upper reinforcing layer is designed in the form of a braid, which is made of the following materials:
- aluminum. Such models withstand no more than +80 ° C and retain functionality for 3 years. In high humidity, aluminum braid is prone to rust.
- Of stainless steel. Thanks to this reinforcing layer, the service life of the flexible water supply is at least 10 years, and the maximum temperature of the transported medium is +95 °C.
- Nylon. Such a braid is used for the manufacture of reinforced models that can withstand temperatures up to +110 ° C and are designed for intensive use for 15 years.
Nut-nut and nut-nipple pairs are used as fasteners, which are made of brass or stainless steel. Devices with different indicators of permissible temperature differ in the color of the braid. Blue ones are used to connect to a pipeline with cold water, and red ones - to hot water.
When choosing a water supply, you need to pay attention to its elasticity, reliability of fasteners and purpose. It is also mandatory to have a certificate that excludes the release of toxic components by rubber during operation.
Features of gas connections
When connecting gas stoves, columns and other types of equipment, flexible connections are also used. Unlike models for water, they are yellow and are not tested for environmental safety. For fixing, end steel or aluminum fittings are used. There are the following types of devices for connecting gas appliances:
- PVC hoses reinforced with polyester thread;
- synthetic rubber with stainless steel braid;
- bellows, made in the form of a corrugated stainless steel tube.

Holding "Santekhkomplekt" offers engineering equipment, fittings, plumbing and fixtures for its connection to communications. The assortment is represented by products and materials of well-known foreign and domestic manufacturers. Discounts apply for bulk purchases, and product quality is confirmed by standard certificates. For information support and assistance, a personal manager is assigned to each client. The ability to arrange delivery within Moscow and to other regions of the Russian Federation allows you to quickly receive the purchased goods without any hassle.
Drainage is a hydro-reclamation measure to remove excess groundwater.
If water does not leave the territory of the site for a long time, soil gleying occurs, if shrubs and trees quickly disappear (wet), it is urgent to take measures and drain the site.

Reasons for waterlogging the soil
There are several reasons for waterlogged soils:
- clay heavy soil structure with poor water permeability;
- an aquiclude in the form of gray-green and red-brown clays is located close to the surface;
- high occurrence of groundwater;
- technogenic factors (construction of roads, pipelines, various facilities) that impede natural drainage;
- violation of the water balance by the construction of irrigation systems;
- the landscape area is located in a lowland, a beam, a hollow. In this case, precipitation and water inflow from higher places play an important role.
What causes excess moisture in the soil
You can see the results of this phenomenon yourself - trees and shrubs are dying. Why is this happening?
- the oxygen content in the soil decreases and the content of carbon dioxide increases, which leads to a violation of the processes of air exchange, water regime and nutrition in the soil;
- oxygen starvation of the root-forming layer occurs, which leads to the death of plant roots;
- the intake of macro and microelements by plants (nitrogen, phosphorus, potassium, etc.) is disrupted, because excess water washes out mobile forms of elements from the soil, and they become inaccessible for assimilation;
- there is an intensive breakdown of proteins and, accordingly, the processes of decay are activated.
Plants can tell at what level groundwater occurs
Take a close look at the flora in your area. The species inhabiting it will tell you at what depth the groundwater layers are located:
- top water - in this place it is best to dig a reservoir;
- at a depth of up to 0.5 m - grow marigold, horsetail, varieties of sedge - blister, holly, fox, Langsdorf reed grass;
- at a depth of 0.5 m to 1 m - meadowsweet, canary grass,;
- from 1 m to 1.5 m - favorable conditions for meadow fescue, bluegrass, mouse pea, rank;
- from 1.5 m - wheatgrass, clover, wormwood, plantain.
What is important to know when planning site drainage
Each group of plants has its own moisture needs:
- with a groundwater depth of 0.5 to 1 m, vegetables and annual flowers can grow on high beds;
- the depth of the water reservoir up to 1.5 m is well tolerated by vegetable crops, cereals, annuals and perennials (flowers), ornamental and fruit and berry shrubs, trees on a dwarf rootstock;
- if groundwater at a depth of more than 2 m, you can grow fruit trees;
- the optimal depth of groundwater for agriculture is from 3.5 m.
Do you need site drainage?
Record your observations at least for a while. You yourself will be able to understand how much drainage is needed.
Maybe it makes sense to simply redirect melt and sediment water along a bypass channel, and not let it flow through your site?
Perhaps it is necessary to design and equip a storm drain and improve the composition of the soil, and will this be enough?
Or is it worth making a drainage system only for fruit and ornamental trees?
The exact answer will be given to you by a specialist, whom we strongly recommend calling. But after reading this article, you will gain some awareness in this matter.
At the end of the technological and production tasks associated with the arrangement of the sewer system in an apartment building, an industrial building, as well as in a private household, it is required to test the system involved using the forced spill method. This task was applied to identify possible defects or improper installation of the entire sewer part involved and the act of testing the internal sewerage systems and drains will be material evidence of work on the acceptance of the facility.

Visual inspection should be accompanied by entering into the act of testing internal sewerage and drain systems according to SNIP, which is currently represented by the current regulation of the appendix of the D series, which corresponds to SP 73.13330.2012 "Internal sanitary systems of the building", recently a new one has been applied updated working version according to SNiP 3.05.01-85.
For any gardener, compost is the best and most affordable fertilizer, because it can be prepared on your own using organic waste.
There are many options for preparing a compost heap, I must say that the fantasy of our summer residents knows no bounds. One of my good friends once said that she does not throw anything away from the site, everything goes into action and feeds the earth.
Passing by the sites, you can see a wide variety of examples of closing a compost heap or pit, a variety of options are used, ranging from wooden boards to furniture parts, fine mesh netting, slate and metal sheets.
In order to competently prepare high-quality compost, it is not enough to dump everything that comes to hand in one place, you need to know some rules, which we will get acquainted with in this article. Experienced gardeners shared their skills in preparing compost, and this material was written based on their experience.
We know that during the summer season, a large amount of organic waste accumulates, which includes food leftovers, weeds and cut grass, which are constantly removed from beds and lawns.
All this waste must be disposed of in one specific place, in a compost heap, which in two to three years will give you a high-quality product in the form of an excellent fertilizer.
Along the way, this will help get rid of unnecessary plant materials, your site will be clean and tidy, the waste will not have to be taken far beyond the garden.
The decomposition of plant waste in a natural way takes about 20 months, but if the process is artificially accelerated, it is possible to achieve a result in three months.

What you need to know about compost
Nutrient fertilizer is able to reach the condition if it is warm and humid. To prepare the place of its "production", to provide a bunch of all the necessary requirements - the main task of the gardener. A sufficient amount of oxygen will allow you to get not a fetid heap of waste, but a real universal fertilizer.
- It is necessary to make sure that the main part of the pile is located above ground level. So the contents will be perfectly warmed up, provided with air. It will be convenient to water and loosen. The depth of the pit should be no more than half a meter, and the surface part up to a meter. In width, the ideal parameters will be: 1.5x2 m.
- If there is a source from which drinking water is used: a well, a well, a spring, a territorial gap of at least 20 m should be taken into account. For greater certainty, if the site slopes, make the pit lower.
- Close up a pile of waste should be away from the house or recreation area, as an unpleasant smell will spoil the air and mood not only for the owners of the site, but also for neighbors. This issue must be approached responsibly, and choose a place that would suit everyone.
- To prevent the pile from drying out, do not place it in a sunny area. Well, if it were in partial shade, then the moisture necessary for the decay process would not evaporate quickly.
- In no case should the pit be close to fruit-bearing trees, this is fraught with their death.
Important! You should not make the bottom of the pit, from any material: slate, iron, film. The compost heap should have an earthen bottom, so moisture from the earth will rise up and the contents will not dry out. For walls, any of the listed materials is suitable.
What can be added to the compost heap
Good, high-quality compost will be obtained by laying the following components in a pile:
- fallen leaves, needles, plant roots and small branches and stems;
- cut grass and weeds;
- manure and litter, the age of which is more than two years;
- peeling vegetables, fruits, berries, peels of any fruits;
- leftover food, coffee and tea;
- hay, straw, sawdust and other small wood waste;
- wood ash;
- paper waste, cardboard.
Important! Grass, which is laid in large quantities, is best sprinkled with soil.
What is contraindicated for a compost pit:
- any objects of inorganic origin made of plastic, polyethylene, metal and synthetics;
- bones;
- stems from potatoes and tomatoes, due to late blight infection;
- large branches and mature seeds of weeds.

Compost heap options
There are a large number of options, and each gardener chooses the most acceptable and effective for himself.
A simple pile of layers of waste
First, decide on a place, and start laying organic matter in layers, alternating it with manure and food waste. After the hill grows a meter, make indentations in it, pour a special liquid into them for the fastest maturation of the compost.
Such preparations are sold in gardening centers and stores; they contain bacteria that, when they enter the organic environment, begin to work and process it.
If you do not forget to loosen the waste, then the compost will ripen in three months. That is, laying a pile in the spring, by the end of the summer you will be with compost.
For those who do not want to make a stationary facility for the production of compost, this is an ideal option. It is desirable that there are several such places, then you can achieve constant replenishment of your site with fertilizer.

A hole dug in the ground
In this case, too, everything is simple. A hole is dug in the soil, the size of which depends on your appetites. Branches, the remains of bark, straw, hay are placed at the bottom, then a layer is laid, consisting of the remains of food and plants. Next is a layer of manure, and a repetition of the vegetable layer.
In such a structure, the temperature will not reach high levels, so the pit is covered with a film. This option is suitable for those who are not in a hurry, as the compost will not ripen soon. But there are also advantages - a simple device and a small area.
Box of bars, slate, boards or metal
This method is used by many gardeners, and is 100% justified. However, the preparation of the box will require small material costs and some effort to equip it.
- First of all, at the site of the future compost pit, the soil is removed, about 50 cm.
- Along the entire perimeter of the recess, bars or pegs should be driven in.
- Next, a fence is made for which any material is suitable: shields, bars, boards, mesh, polycarbonate, metal sheets, slate of any shape. The main thing is that the material does not bend or break under the weight of the waste.
- The height above the soil surface should correspond to one meter. This height will allow you to easily loosen and mix the contents.
- From above, the structure is closed with a film or plywood sheet.

Wooden box with a door
For convenience, you can build a door in the box, at a distance of 50 cm from the ground. This option allows you to choose the finished compost from the bottom, while the top layer settles.
Ease of use, as well as the ability to take the required amount of ready-made fertilizer, are the main advantages of boxes with sliding or lifting doors.
Pit made of concrete or brick
This design is durable, it will require significant costs and labor. A plot for a compost heap is marked out taking into account the impossibility of transferring to another place.
- The soil is selected to a depth of 70-80 cm;
- It is necessary to make formwork around the entire perimeter of the pit;
- After the concrete is mixed, it is poured into the formwork, 10-12 cm thick;
- Wooden formwork is removed as the concrete dries;
- The concrete pit is filled with waste and covered with a film or wooden shield.
Important! It is very important to have two or more sections in each of the proposed facilities. One will serve as a compartment for fresh waste, and the second is intended for last year's compost. Thus, every year you will have a nutrient substrate for plants and soil.
Other Compost Heap Options
The most advanced gardeners, who have the means to significantly facilitate their work, purchase ready-made biocontainers for the production of compost. They use preparations with an accelerated action for the processing of organic matter based on special bacteria: Baikal EM-1, Compostin, Embionic.
Many gardeners breed California worms, these creatures are extraordinarily efficient and each one works like a mini composting plant.

Remember, full-fledged compost requires air, water, heat and clean organic matter. Only with these components you will receive high-quality and free fertilizer.
Before starting the construction of a compost pit in the summer cottage, think about whether you need it and for what purposes. Such a facility performs the functions of recycling household organic waste. A compost pit will also come in handy in order to produce the fertilizer needed by the garden and vegetable garden, in case you are not going to plant green manure on your land to fertilize the soil.
You can, of course, put the waste, along with the remnants of vegetables and fruits, in bags, and then take it to the city garbage containers. But do not do this - it is environmental pollution. If you build on a summer cottage compost pit, you can recycle the vast majority of organic waste into a wonderful nutrient mix for your plants called compost. And waste time is not wasted.
The purpose of the compost pit
Each compost pit has a set of appropriate design features that depend on the needs for which it will be used. If you don't know where to throw your garbage, you may be interested in a nice bonus that you can get in a few years - valuable compost. Then you need to arrange a compost pit using the appropriate scheme.

Obtaining and using compost.
If you want to quickly prepare fertilizer from improvised materials, which can be leaves, mowed grass, manure, then the compost pit will have a different design. There are some requirements that must be followed when equipping a compost pit.
How to equip and use a compost pit?
When choosing a location compost pit try to take into account some pretty important points:
Arrange a pit at a distance of at least 25-30 meters from sources of drinking water - wells, wells, streams or other bodies of water.

In summer cottages with a slope, the pit is located at a level below the well.
Compliance with such precautions is necessary because otherwise the decomposed waste may end up in drinking water, which is dangerous and undesirable.
When building a pit, consider the wind rose so as not to poison yourself and your neighbors with unpleasant odors.
If you place the compost pit in an open sunny area, its contents will overheat. This will stop composting. Therefore, the best option would be to arrange a pit equipment on a site shaded by tree crowns.
The best place for a compost pit is a corner of the land adjacent to a fence or blank wall.
It is also necessary to decide which waste is placed in the compost pit, and which cannot be thrown into it.
Waste that can fill the compost pit
- Raw vegetables, fruits, berries, tea, cereals, coffee, cleaning residues;
- Hay, cut grass and straw;
- foliage;
- Branches, bark of trees, roots of shrubs and trees that need to be crushed a little;
- weeds;
- wood ash;
- needles;
- Napkins, cardboard, paper bags (paper must be natural) - all this is crushed;
- Unpainted wood waste;
- Second year herbivore manure.

How to fill a compost pit in a summer cottage.
What is forbidden to fill the hole?
- Bones;
- Pet experiments because they can have helminth eggs;
- Insect pests and their eggs;
- Plants affected by diseases (tops of tomatoes with late blight, pumpkin and powdery mildew, and others);
- Plants from land plots that have been treated with herbicides;
- Inorganic waste, which can be in the form of plastic, iron, rubber or synthetic fabrics.
All waste that cannot be composted is best incinerated or disposed of in if they are excrement.

Rules for sorting household waste for use in a compost pit.
Organic waste is processed by microorganisms and earthworms. Do not insulate all the walls of the compost pit that are below ground level, because if you dig a hole in the ground at a depth of 50 cm and then enclose it with impervious material, worms and microorganisms will not enter it. In this case, their own accommodation is necessary.
As can be seen from the above, the rules cannot be called complex, but they must be observed.
Set up a compost pit or pile
The most important thing during the construction of the compost pit is the necessary provision of good moisture and looseness in case you want the composting process to be of high quality. There are no specific recommendations on this subject.

Arrangement of a compost pit in a summer cottage.
To keep the compost heap moist, you can water it regularly, or cover it with a film that will create a steamy effect. The friability of the structure of the contents of the compost heap is supported by the fact that it is periodically crushed with a conventional pitchfork, or materials with different densities are laid in layers.
The optimal size of the compost pit
- Width - no more than 1.5 meters;
- Length - up to 2 meters;
- The maximum height is 1.5 meters;
- Deepen into the ground no more than 0.4 meters.
There are several different compost pit designs, which can match the preferences of any owners.
Compost pit with two sections
It takes about 2 years to rot and compost organic waste, unless you use the services of additional effective microorganisms along with those that are present in the soil on your site. In order to make the use of the pit more convenient, a two-section structure is constructed:
- Fresh waste is placed in the first section;
- The second section contains waste that is composted from last year.
Prepared in the second section compost they take it out and lay it out in the beds, where they want to improve and saturate the earth with useful substances. The compost pit can be enclosed on all sides by making it in the form of a box, but use only material that provides free access to air.

Wooden box for arranging a compost pit.
The box can be made from wooden fences, which are nailed with a small distance between them. At the same time, the contents of the pit will not rot and will not smell unpleasant. Such a compost pit can be built independently in just 1-2 days - the duration of work depends on the material chosen for fencing.
Compost pit with free access from the bottom of the structure:
Such a hole will perfectly replace the first option, because it does not require breaking into sections. Protect the pile 30 cm from the ground. Below is the accumulation of finished compost. If necessary, it is easily selected with a shovel and used to fertilize the garden.
The construction of such a pit is very convenient and causes little trouble. Constantly, when the compost is taken from below, the contents of the heap fall below, and occupy the vacated space, in parallel it is saturated with oxygen. No special loosening and throwing is needed.
Compost heap equipment
Not all summer residents like the artificial creation of unnecessary difficulties. The best way out of this situation is to do nothing, in which nothing is dug, fenced, divided. Only a certain place is chosen where organic waste is accumulated, gradually forming a heap.

Food waste for the compost pit.
If desired, this pile is watered with EM preparations, or covered with an opaque film to speed up the composting process. If you have nowhere to hurry, then you should not cover the pile - its contents will overheat on their own, it only takes time.
Use of plastic containers and barrels
Using plastic compost bins is convenient for those who do not spare money and want their compost pit to look presentable. The container is installed in any convenient place, since there is no risk of contamination of drinking water due to the tightness of the container. In addition, the tank has a special ventilation in order to prevent water from stagnating.

Using plastic barrels to make a compost pit.
When using this option, you need to know that it is necessary to use drugs that accelerate the decomposition of organic waste, or to move earthworms into the pit.
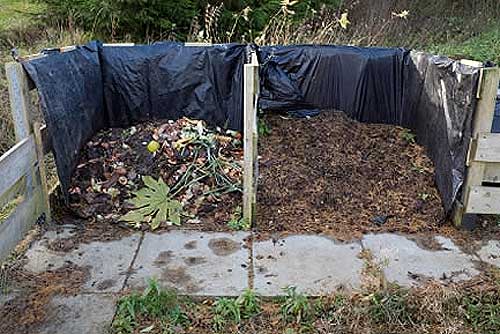
Self-construction of a compost pit
An example is a self-equipped compost pit in one of the summer cottages. If the structure is fenced on all sides, and has a height of one and a half meters, its contents must be shaken periodically, but this is a very inconvenient task. Therefore, it was decided to arrange two piles, or rather, one pile on two sides.
After choosing a good place - the corner of the site near the fence itself, they put organic remains in the corner. It is very good if the alternation of grass, manure and earth is made. At first, before the formation of a heap, a place for it is laid with branches of trees and shrubs.

Building a compost pit with your own hands.
When a heap reaches 1 meter in height, deep holes are made (several pieces), into which an EM preparation is poured (this can be Oksizin, EMochki, Bokashi). On the advice of experts, you can cover the compost heap with an impermeable film - this way it will maintain constant humidity and temperature, but not everyone does it. When covered with a film, the compost will be ready in 2-3 months, and for composting uncovered waste, it takes at least six months to a year.
You can not use EM drugs. California worms or prospector worms will do an excellent job. However, the use of worms has its drawbacks. Worms love heat, so they do not work in the cold months of the year. And it is enough for microorganisms that the temperature in the compost heap rises to only + 4 ° C.
It is necessary to water the pile with water from a hose during dry times. If it is necessary to obtain ready-made compost for transferring it to the beds, you can transfer the upper part of the heap to another place and select the humus that has accumulated at the bottom of the heap. After the humus runs out, waste is thrown back into this place.
When building a compost heap, it occurs to some summer residents to spread a plastic film on the ground, on which they then dump organic waste. They make such a design, believing that in this way there will be no washing out of useful elements into the soil. However, they are wrong, this cannot be done for the following reasons:
When the base of the compost heap is isolated from the ground, conditions are created that cause moisture to quickly evaporate from the heap. At the same time, moisture does not rise from the ground, despite the fact that even on hot days, thanks to a natural mechanism, moisture must rise from the depths of the earth upwards using special capillaries.
If the pile is isolated from the ground, this prevents the humus from washing out of the compost. Mineral fertilizers are washed out, since trace elements are combined with organic matter and are constantly in the upper soil layer.
But these properties are quite convenient for use in gardens - neither rain nor downpour is terrible. And while limiting the minor leakage that may still occur, pour a 10 cm layer of peat, which perfectly solves these problems: it prevents nutrients from leaking into the ground. Peat also allows groundwater to rise into the heap.
Requirements for a proper compost pit
If after reading the article you still have questions about building a proper compost pit, get advice - do not build it at all. Why?
The labor of dragging grass and other organic waste from one place to another can be considered unnecessary and meaningless work. When composting, carbon dioxide vapors are formed - this is an indispensable plant food, which mediocrely disappears on a heap, simultaneously acting on the nerves of you and your neighbors with an unpleasant smell.

Proper arrangement and use of the compost pit.
You may be called a weirdo, but it's better to lay out organic waste directly on the beds, where it overripes well and does not emit unpleasant odors. In addition, microorganisms will multiply in them right on the beds, earthworms will crawl, which will appreciate such an abundance of work for them. The cut grass can be used as mulch. Chop and lay branches in paths between rows, and scatter peelings from fresh vegetables and fruits in the garden.
This will allow:
- Keep moisture in the beds;
- Feed plants with carbon dioxide;
- Do not allow weeds to germinate in the beds;
- Engage in the preparation of compost in places where it is needed;
- Prevent leaching of humus;
- Reduce the amount of work.
The work proposed above for the implementation of organic and food waste is simple, not requiring additional skills or efforts.
The purpose of a compost pit is to turn household waste into an excellent fertilizer for the soil. That is why compost pits are widely used by summer residents and gardeners: a compost pit solves the problem of organic waste disposal and at the same time improves crop yields.
In order to make a compost pit in the country, you first need to choose the right location:
Do not place the pit in a sunny place, avoid direct sunlight and overdrying;
It is better to equip the pit on a flat surface or hill so that water does not linger in it in rainy weather.
It is quite difficult to say how to make a compost pit correctly, because there are many different device options and each of them has certain advantages.
The simplest compost pit in the country is not even a pit, but a heap. Many summer residents do not bother building any structures, but simply dump the source material into a pile, where the compost ripening process takes place. Often such a pile is covered with a film and enriched with special preparations - bioactivators.

In order to understand how to arrange a compost pit in the country, you need to figure out how the compost ripens. Dry leaves, tree branches, weeds, earth and manure are the main elements for compost formation. All these components impregnate each other, decompose, rot under the influence of air and moisture, and as a result, an excellent fertilizer is obtained.

This whole process takes about two years, which is why the most common design of the compost pit has become a two-section. A two-section compost pit has two compartments. The first compartment is filled with components, left to mature or actively used after two years, and the second is regularly replenished with fresh waste.

Materials for the compost pit
Only decomposing substances are suitable for creating fertilizer, such as:
Any vegetables and fruits, fresh and boiled;
Tea, coffee, compote;
Grass, hay, leaves, weeds;
Tree bark, branches, roots;
wood ash;
Paper products;
wood waste;
Very often, the remains of cooked food are thrown into the compost pit, which is quite acceptable if all the components of the dish are able to be processed, rot, and decompose.
Do not use objects made of plastic, rubber, bone, iron, artificial fabrics for compost.
Making an open compost pit

To arrange such a pit, it is enough to do a few simple operations: dig a hole of the required size (depending on the expected amount of compost) and a depth of about 50 cm. The walls can be lined with roofing material, linoleum or slate. Put branches, foliage, weeds and other plant components at the bottom of the pit, and pour waste on top. All this is covered with grass or a tarpaulin.
Making a closed compost pit

Such a pit is the most complex structure of all possible, as it requires some building skills.
First you need to mark up the future structure and remove the top layer of soil 25 cm thick over the entire area.
Then a hole is dug up to a depth of 50 cm, along the perimeter of which a wooden frame is made. The height of the box should not exceed one meter, otherwise it will be very difficult to get the finished compost. The frame can be mounted on a columnar foundation for strength, but you can not do this. Next, the frame is sheathed with boards. The beam used for the frame should preferably be treated with something to prevent rotting, and the walls of the box themselves should be sheathed with linoleum or rolled roofing material.
From above, the structure must be equipped with a lid with sufficiently large slots to improve air circulation in the box.
You can use the remains of old buildings as walls of the compost pit: foundations and walls.

If you are not satisfied with a do-it-yourself compost pit, you can buy a ready-made composter - a plastic container. The best maturation of the compost in it is achieved by adding preparations for the decomposition of organic matter.

By building such a simple device on your site, you can secure a rich harvest without any financial costs for fertilizers.
Compost can significantly improve the soil, regardless of its type. If it is clayey, it will become more crumbly, but if it is sandy, it will be better to retain moisture. But the price for it is quite high, there will also be costs for the delivery of compost to the site, so people began to make compost pits themselves to fertilize the soil, but at the same time save money. Any home accumulates a large amount of organic waste, so why throw it away if you can equip a hole, and this waste will benefit the soil. In the article, we will consider how to make a compost pit with your own hands in the country and how to properly operate it.
- The size of the pit should be made based on the approximate amount of garbage that can accumulate in a year, and then it will rot for at least one year.
- The process of removing humus and mixing it should not be difficult, so the height of the walls has its limitations.
- The pit can be made both open and closed, one or two sections.
- Weeds and their seeds should not get into the compost.
- Worms should freely penetrate the contents of the compost pit.
- It is necessary to equip a convenient approach so that there are no difficulties with the removal of humus.
- You can put iron on the bottom, which will also benefit the compost over time.
- The smell from the closed compost pit should not seep out.
- The compost pit should not be located in direct sun.
Compost pit technology
How to make a simple compost pit

The device of a compost pit depends on its future purpose, if it is equipped simply for the release of organic waste, then it can be done according to the simplest scheme.
- A hole is dug about 40-60 cm deep and 60-70 cm wide;
- a layer of dry grass, straw is laid on the bottom;
- after each ejection of waste, a layer of grass is again laid on the garbage. This is necessary so that the flies do not get divorced, and there is no unpleasant odor;
- What kind of hole should be made somewhere in a remote part of the site, but not near the neighbors' fences.
Do-it-yourself concreted compost pit

- This is a more labor intensive building. It consists of two equal compartments, one of which is intended for old compost, and the second is used for regular replenishment. This design has a lid that lifts up when necessary to collect fertilizer or discard waste.
- In order for the compost to turn out to be of high quality, it is better not to use weeds for its preparation, they can leave behind harmful seeds in the soil.
- It is necessary to provide access to the closed earthworm composter, otherwise the compost will take much longer to mature.
- In addition, it must be equipped in such a way that it looks like decoration on the site and has a neat appearance. But at the same time, ventilation must be present, so it is not recommended to plant climbing plants with dense foliage.
Stages of work

The process of building such a compost pit is quite laborious.
- It is necessary to completely level and remove the topsoil;
- then a hole breaks out, about 60-80 cm deep. The optimal length is 3m, and the width is 2m;
- then the formwork is built, and the walls are poured with cement mortar or concrete, the thickness of which should be about ten centimeters.
Tip: for the proper construction of a closed-type compost pit, it is necessary to prepare a concrete solution, following all the rules. It seems that there is nothing complicated in this, but in practice it often turns out the opposite. So that there are no problems, and then you do not have to spend a lot of time correcting errors, it is better to do everything right right away.
A concreted compost pit will have all the necessary properties for the timely processing of compost if the proportions of all the components from which the concrete is made for its base are exactly observed.
To create a solution, you will need:
- river sand,
- Gravel,
- Cement,
- Water.
Sequencing:
- first, gravel should be poured into a twenty-liter bucket and shaken very well;
- after that, water is slowly added using a measuring container. If this bucket contains ten liters of water, then the gravel component is 50%, and a ratio of two to one is required. This means that another 10 liters of river sand should be added to a twenty-liter bucket of gravel;

- such a solution should contain as little water as possible in order to avoid the appearance of bubbles in the future. If the composition has a high water content, then after it dries, a large number of voids form.
Tip: Another important point in preparing the mixture for the pit is that you need to mix the solution very thoroughly. This is probably even more important than the exact observance of all proportions, so it is recommended to do this with a concrete mixer, and not manually.
A closed-type compost pit can have one section, but it is better to immediately make it with a two-section one. In the second case, it is more convenient to use, especially if it is decided not to use drugs to increase the rate of compost maturation.
If the rotting process takes place naturally, it will take about two years. Then it is very convenient to use each section separately. The first year you can use one, and when the second year comes, throw away waste in the second part. As long as one compost reaches the desired state, another is used.
Do-it-yourself high compost heap construction

A wooden compost heap is easy to build even without experience in construction. At the same time, it can be made in such a way that it will not interfere with either the summer residents themselves or their neighbors.
- Racks should be installed at the corners of the pit. The base for them is made of pipes, and the part that is above the ground can be made of a bar with a cross section of 10 cm;
- One edge of each bar is sharpened to fit the pipes. It is first recommended to soak all the wooden parts of the structure in a special solution so that they do not succumb to the processes of decomposition and decay;
- Next, the bars are driven into the cut pipes and transverse boards are stuffed onto their above-ground part, which will serve as the walls of the pit;

- fastening boards is best done with self-tapping screws or metal corners, which will provide a more reliable grip;
- finished walls are covered with paint, preferably acrylic.
Of the nuances in this work, it is necessary to take into account:
- the diameter of the pipes must fit the size of the bars;
- the height of the walls usually does not exceed a meter, this is due to the fact that large and tall structures ultimately turn out to be inconvenient to use, as it makes it difficult to dig and extract compost;
- the simplest version of a removable cover is an ordinary sheet of plywood, which is attached to the back wall of the structure with hinges. The compost matures best when the lid is closed, but you still need to open it occasionally to ventilate the fertilizer.
What is suitable for composting and what cannot be put in a pit
So that the fertilizer can ripen in a timely manner and at the same time not lose its beneficial properties for the soil, you should know exactly what is suitable for the compost pit.
You can put:
- raw vegetables, fruits, berries, cereals, straw, grass, hay, ash, foliage, needles, bark, twigs, plant roots, sawdust, shredded paper, herbivore manure.

You cannot put:
- bones, carnivorous pet dung, potato and tomato leaves, any greens that have been treated with pesticides, weed seeds, any synthetic waste, and leaves from infected plants.
Proper compost bin

In order for compost to form successfully, it needs certain conditions:
- moisture;
- warm;
- oxygen.
To create a greenhouse effect, the still unripe compost must be watered (especially in hot and dry summers), and if necessary, covered with a film. For a good reaction, oxygen is also needed, its access is provided by loosening the waste with a pitchfork.
If it is not possible to equip a pit, water it, and so on, then you can simply put organic waste in one place, where compost will form over time. This, of course, is not the best way in terms of aesthetics, but it has a right to exist.
- In order for such a heap to be equal in functionality to a compost pit, special preparations must be added to it.
- You will also need to periodically cover with dark material to speed up the compost ripening process. In a covered pit, compost will be processed within 3-4 months, but if you keep it open, the process will take about six months to a year.
- It is impossible to put polyethylene at the base of the heap, which will block the free access of water and oxygen. If the ground under the compost is covered with synthetic material, then the moisture from the heap will evaporate very quickly, but it will not be able to rise from the ground.
- When laying out the contents for the compost in a pile, it is recommended, if possible, to alternate manure, grass, waste and earth. During extreme heat, you need to water the pile so that the right amount of moisture comes in and the composting processes are not disturbed.
- It is convenient to make two piles side by side or one large one, but on two sides, this is a simplified version of a two-section box. When the compost is ready on one side and can be regularly laid out on beds, waste is thrown out on the other side of the pile.
- When the compost pile reaches a size of about one meter in height, it is advisable to use fertilizers. To do this, several deep holes are made and the solution is poured into them. In the warm season, Californian worms can be added to replace them.

The correct location of the compost pit
Before you equip a compost pit in the country, you need to choose the right site for it:
- From sources of drinking water (wells, wells, etc.), the pit should be located at a distance of at least twenty-five meters;
- If the site is located on a slope, then the pit is equipped below the source of drinking water, this is necessary so that the rotting runoff through the soil could not get into clean water;
- It is necessary to take into account the most frequent direction of the wind in order not to cause significant inconvenience to the neighbors, especially if the pit is not covered with a lid and exudes strong unpleasant odors;
- There should always be free access to the pit, which will provide convenient removal of garbage using buckets or removal of humus using a wheelbarrow.

- The compost pit is made as far as possible from residential buildings. It should be in partial shade, since under the sun's rays all processes occurring in it will slow down.
- The site for the location of such a pit must be flat.
- Do not allow water to stagnate in it - this will interfere with the access of oxygen.
Plastic compost bins

- This method is good for those who can allocate funds for its purchase and want the appearance of their site to be more presentable. It installs absolutely anywhere. But you will have to take into account the presence of an unpleasant odor, because you will need to regularly open the lid to ventilate the contents of the container.
- The constant access of oxygen to the compost is provided by special holes, which are also necessary so that excess moisture does not stagnate.
- The peculiarity of using a plastic container for a compost heap is that it is necessary to use special preparations to speed up the composting process. Earthworms can provide a replacement for drugs if they are specially planted in this container.
To save money and benefit the yard, a compost pit is a great fertilizer solution. It is very simple to equip and operate it, you just need to know a few rules. But at the same time, you will always have ready-made fertilizer for the soil on the site.
Photo of a compost pit


Read also...
- Are there benefits for large families when entering a university List of benefits for large families
- Causes of bleeding during early pregnancy: what to do?
- What to do if a child has a leg pain in the thigh when walking: causes, treatment and folk remedies
- What to do and how to treat watery diarrhea in a child?


