How to properly install OSB on an old wooden floor? Installation of OSB boards - features of laying on a wooden and concrete base We lay an osb board on a concrete floor
A floor made from OSB panels is an excellent base for any finishing layer. Parquet, panels or ceramic tiles can be laid on it. OSB sheets, they are also OSB and OSB boards or sheets. This material has increased mechanical strength and resistance to moisture, which is also characterized by good thermal insulation and sound insulation. The advantages of the chosen solution include relatively simple installation. In this article, we will discuss in detail how to properly lay OSB sheets on the floor.
In what cases are OSB sheets laid on the floor
There is a variety of floor covering materials to choose from, as well as floor smoothing. Traditionally, mineral mixtures are used in residential premises: cement grade 400 with sand or ready-made dry mix. This achieves the reliability and durability of a rough surface on which decorative flooring can be laid.
However, the use of a concrete screed is not always possible, and special solutions with a leveling effect are not cheap. An alternative to both materials is OSB floor board, which provides acceptable tensile strength and is easy to handle. Although, such a solution will also not be cheap. It should be applied under the following conditions.
- The base of the room is well insulated and does not allow pouring concrete.
- The housing is located in a zone with a cold winter climate, which forces the cement-concrete floor to be additionally insulated with an OSB layer or an artificial void created from the crate and insulation.
- Noticeable irregularities (chips, holes) that require alignment before facing with designer materials (linoleum, carpet, etc.);
In favor of OSB is its resistance to rodents and mold, relative immunity to stress and friendliness to all types of finishes.
Not only a concrete floor, but also a wooden flooring, a wooden and metal frame, as well as other types of a sufficiently strong base can act as a base for OSB flooring.
The choice of thickness of OSB sheets when laying on the floor
Manufacturers offer material in standard sizes, but there are limitations. So, the size range in length is 244-280 cm, and in width from 60 to 250 cm. From the point of view of installing the floor, the thickness of the slab, which varies from 6 to 24 mm, is the most important parameter that affects the reliability and durability of the coating. The greater the thickness, the higher the load that the OSB board can withstand. But as this increases, the height of the room will also decrease, so it's important to balance strength and floor elevation. In addition to the above, with an increase in this size of the slab, the cost of repairs increases.
Many years of experience in use and calculations show that for installation as subfloors on a crate, it is necessary to choose the thickest sheets that are available in production - 22-24 mm.
With direct attachment to screed or concrete, it all depends on the condition of the cement surface. If, it is without significant irregularities and defects, then 10 mm panels are sufficient, otherwise, the acceptable thickness of the plates increases to 18 millimeters.
When the OSV surface is conceived as a front surface, 22 mm sheets will be needed. Since they will be the best thermal insulation and slightly deform under loads, which will allow the paint and varnish finish to remain monolithic and durable. This information is more clearly presented in the table below.
| Conditions for the production of work | Recommended minimum thickness of OSB sheets in millimeters | |
| Rough OSB floor (covered on top with a layer of decorative material, for example, laminate) | Top coat (simply varnished or painted) | |
| Lathing of beams or log | 22 | 24 |
| Plank surface with finished sanding | 18 | 22 |
| Wavy boardwalk | 22 | 24 |
| Old concrete screed with significant defects | 18 | 22 |
| Surface poured with self-levelling compound, prefabricated concrete slab with smooth surface | 10 | 22 |
The structural data of the material is also important. The OSB-3 quality plate is used, no less. Joints can be straight or grooved. In the latter version, the joints will be additionally strengthened.
How to lay OSB sheets on the floor
The technology for mounting OSB panels on a horizontal surface is quite simple to perform and even a non-professional can handle it. The basic principle when laying floors from any material is to create a solid, even surface. When repairing floors using OSB boards, three options for laying them are most often used:
- direct fastening to a cement-concrete screed;
- on the floor from old wooden boards;
- installation using a crate made of wooden logs.
All three possible methods have some nuances that must be taken into account during the production of work.
Laying OSB on a floor with a concrete surface
The method is widely used in apartments of multi-storey buildings - where the base will not absorb dampness and excess moisture. This will keep the wood chip structure in its original form for a long time. The purpose of this method is to create a perfectly flat surface for decorative cladding and insulation of stone slabs.
The cement-concrete screed must be perfectly leveled before starting work. Permissible residual roughness, cracks and local potholes.

The process of laying OSB sheets on a concrete floor is performed in the following sequence:
- The first step is to clean the working area well. You can use a regular vacuum cleaner for this. The sheets will sit on the adhesive and the dust-free surface will give a high degree of adhesion.
- After that, the cleaned substrate should be covered with a primer composition. This will help the glue stick better. In addition, the priming process creates a fairly dense film that will prevent the screed from becoming dusty during use.
- Then, start laying OSB on the floor. If necessary, the plates are cut. It is more convenient to do this with a cut-off or circular saw.
- The reverse side of the board is impregnated with a moisture-repellent primer with antiseptic properties and dried.
- An adhesive is applied to the treated surface. It should be chosen only on the basis of rubber. To evenly distribute the mixture, it is convenient to use a notched trowel.
- Additionally, the panels must be fixed with concrete dowels. This is done for guaranteed and safe operation. It is best to hammer dowels around the entire contour of the plate. The distance from the edge should be kept at 5 cm, and the interval at 20-30 cm. With a perfectly aligned and strong screed, it is enough to fix it only at the corners, but this is taking into account the fact that a good adhesive is used.
- Spacers are left between adjacent sheets. Their width should be about 3 mm. A gap of 12 mm also remains around the entire perimeter of the room. Subsequently, they will prevent deformation of the floor surface.
- Finally, thoroughly clean the new surface. The joints are filled with mounting foam or putty if they are subsequently going to apply paint or varnish. After that, the floor should rest and dry. The foam is cut off, the putty is sanded and the cladding can begin.

Adding an insulating substrate between OSB and concrete is undesirable - such actions lead to displacement and deformation of the floors subsequently. The sheets must firmly adhere to the base with the entire surface. Moreover, high-quality rubber glue itself plays the role of an insulating, water-repellent and shock-absorbing substrate.
Sheathing wooden floors with OSB sheets
This method is widely used in old premises where the wooden floor has been preserved in good condition. The boards must be intact, not eaten by fungus and mold, and securely fastened. This method allows you to save on materials, is simple in execution and functional - the old floor will serve as a tolerable barrier to moisture, cold and noise.
The goals that are achieved when installing OSB on wooden boards are their alignment before decorative finishing in the future, the creation of a continuous, seamless surface and the strengthening of subfloors.
It is important to revise the old boardwalk. Ensure the integrity of the waterproofing to be laid under the floors. Replace decayed and rotten spans. Maximize coverage.

- All nails must first be deeply embedded in the board. For this, it is better to use a hammer and a steel bolt. Irregularities and out of condition must be removed with an electric planer until a smooth polished surface is obtained.
- The old floor and the reverse side of the plates should be covered with a protective layer of antiseptic.
- Lay a layer of a vapor barrier membrane under the OSB to prevent condensation on the sheets and their premature aging. Waterproofing is grabbed for convenience with silicone glue, or shot with a construction stapler.
- OSB is laid out and cut, as shown in the diagram, for laying in a diagonal pattern. This will help to avoid the formation of distortions and installation defects. Cut should be those edges of the sheets that will be adjacent to the walls.
- The panels are fixed with wood screws. Screw long hardware (TN 45 or more) in rows that will fall in the middle of the underlying boards. To avoid splitting the wood along the fibers, lightly mix adjacent fasteners in a checkerboard pattern. The distance from the edge of the OSB to the row of self-tapping screws should be kept at 5 cm, the step in the row is 30 cm, and the distance between adjacent rows is approximately 40-65 cm.
- Recesses for self-tapping screws are pre-countersinked to drown them flush. This will prevent subsequent finishing layers from being perforated.
- Expansion joints are filled with foam if the coating was conceived as subfloors. When the OSB will act as a finishing surface, they pass a layer of putty along the joints and holes for hardware.
- The foam is cut off after the final fixation, and the putty is leveled with a grinder.

Laying OSB on logs
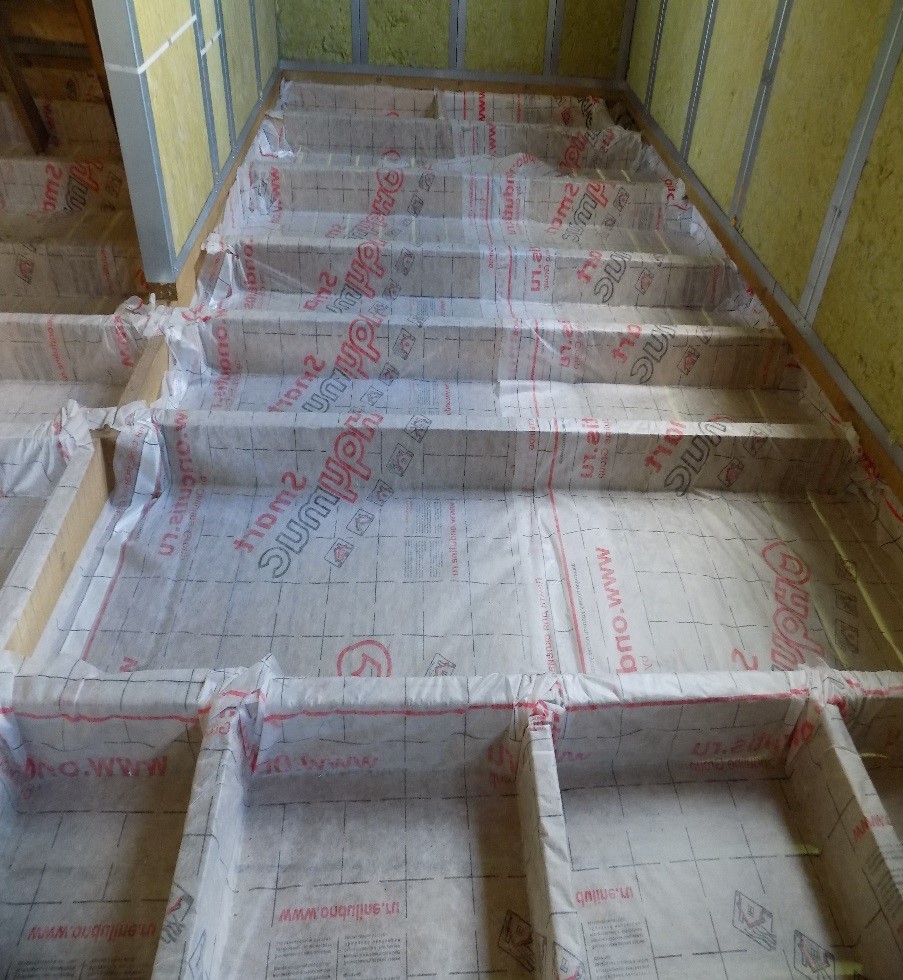
Installing a solid lathing before laying OSB boards on the floor creates a hidden cavity for effective insulation, sound insulation and waterproofing, and tilt-adjustable logs allow you to level and prepare a horizontal plane for laying oriented strand boards.

Theoretically, the full set of structural elements of such a floor consists of:
- bearing log or beams;
- waterproofing lower perforated membrane or film;
- top layer of vapor barrier (perforated membrane);
- insulation block - basalt wool or expanded polystyrene;
- reinforcing crate, which may not be;
- OSB panels.
The technology for creating such a complex structure is actually very simple to perform and can be done by a non-professional. The main difficulty is the installation of a strong supporting frame.

The first step is to install the lag. Rectangular bars are used as load-bearing wooden or polymer elements. The most popular sizes for this purpose are 75x50 or 100x75. The size is selected individually, it depends on the length of the room, the pitch of the crate and the expected load. The main thing is that the insulation layer is flush with the beams.
Prior to installation, it is necessary to prepare the base for the installation of the log. To do this, the entire surface is cleaned of the possible presence of fungus and mold, which in the future can settle on wooden structures and destroy them. Treat the surface with an antiseptic and close up large defects in concrete or wooden foundations. It is allowed to leave the maximum angle of skew of the base at 2-3 degrees.
You need to decide on the direction of laying the lag. In the room it is required to place them perpendicular to the windows, and in the passage corridors - across the movement of residents.
It is more convenient to maintain the distance between the rows of laid beams according to the dimensions of the insulating elements and a multiple of the dimensions of the OSB panels, which is about 40 centimeters. If it is planned to use tiles, then the space is reduced to 30 centimeters.
You can proceed with the installation and fixing of the log - set the level of the two most remote beams from opposite sides of the room. Pull strings between them. All remaining elements will align to this plane.

On a reinforced concrete base, the logs are fixed and adjusted in various ways: on self-tapping screws, anchors, metal corners, using a polymer structure. The most reliable and functional way is to fasten it to the anchor. Such a scheme is durable and the bars are easy to adjust in level with the help of threads and locknuts.
 Installation of cross braces.
 Logs are attached to a wooden crate with wood screws or metal corners, and their level is regulated by substrates. At the very end of the work, transverse struts are installed, they are attached to the places where the edges of the OSB sheets are supposed to fall.
The assembled frame is treated with a primer, and underground communication is carried out in the space between its elements. The finished structure is a reliable support (the average design withstand load is 5 tons per 1 m 2.). Now you can lay the next layers on it.
The second step is the creation of a vapor barrier. The main purpose of this material is to protect the insulation from condensation. The layer laid under the insulation will be its waterproofing from external moisture, and the layer from the side of the room will be a vapor barrier.


There are a great many varieties of materials produced for this purpose: polyethylene film, foil isol, antioxidant insulator, vapor-permeable membrane. When using budget sealed films, it will be necessary to create high-quality ventilation in the house, and the membranes must be laid correctly. The rough side should be directed outward from the insulation.
The rolls are overlapped, and the joints are soldered with a building hair dryer and rolled or glued with bituminous tape for tightness.
Step three - laying insulation. The function performed by this element is clear from its name. For proper placement between the frame elements, the insulation must be cut with a small margin for future shrinkage, then the cold will not have paths between the lags in the insulating layer.
As thermal insulation of the floor, three common materials are used:
- Mineral wool,
- advantages: environmentally friendly, easy to fit, does not burn, reliably isolates the room from moisture;

- disadvantages: afraid of moisture, not cheap, requires good waterproofing.
- Styrofoam,
- advantages: the best insulator, not afraid of moisture, does not require waterproofing;

- disadvantages: expensive, fire hazardous, requires good ventilation in the room, fixed on mounting foam.
- Expanded clay,
- advantages: affordable, does not require laying the inner layer of the vapor barrier, absorbs excess moisture, non-toxic, non-flammable;
- disadvantages: poor heat insulator.
After laying the insulation, another inner layer of waterproofing is added, provided that mineral wool was used.
Step four - laying OSB sheets. Installation should be carried out by analogy with fastening oriented strand panels to a wooden floor. Previously, the lower surface of the plates must be primed, the sheets themselves must be cut and laid on logs. OSB elements should be oriented so that they lie with their long side across the wooden frame. The main thing is that the edge of the board never sags, if this happens, then it is necessary to add a safety element of the crate.

You can see this process visually in this video:
Operation of OSB floors
The resulting wooden surface gives ample freedom for further imagination in decorative flooring. It must be covered with layers of traditional material, which is used for laying on floors. The facing coating applied over the OSB panels will be a protection for the chipboard structure.

It is impossible to arrange a warm floor under OSB boards. The high temperature will contribute to the intense evaporation of the heated formaldehydes that hold the fibers together. This will make the atmosphere in the rooms toxic. At the same time, the good insulating properties of wood will prevent heat from entering the house, which will lead to a waste of electricity.
With careful adherence to the technology of work, the OSB board will serve for a long time, the atmosphere in the house will remain healthy, and its climate will be cozy and comfortable.
OSB boards are a relatively new building material that is widely used in construction and repair work. One way to use it is as a floor covering. Due to its properties, such a coating has high strength and low weight, it is moisture resistant and has a low price, all this explains the growing popularity of this building material. In order for an OSB-covered floor to have a long service life, the fixing of the material must be carried out correctly.
OSB board is an inexpensive, high-quality material for flooring. It is durable, waterproof and lightweight.
Features of choice
Now on the market there is a large selection of OSB, which differ in their properties and characteristics.
In order to make the right choice, you must follow the following recommendations:
- The highest quality is considered to be the products of Canadian and European manufacturers, it is produced using modern technologies and meets the E1 standard (environmental safety);
- it is best if OSB-3 is laid (fastened) on the floor;
- on concrete pavement, it is necessary to use slabs up to 10 mm thick; for wooden pavement, their thickness depends on the distance between the joists.
The size of a standard OSB board is 2440x1220 mm, so the required number of them is calculated based on the location so that a minimum of waste is obtained. Using a circular saw, it is easy to cut the required size; it is not recommended to use an electric jigsaw for this, since it is not always possible to obtain an even cut with it.
OSB laying on concrete floor
If your room has a concrete floor, then fixing OSB as a flooring material is a great solution.
After OSB is laid on the concrete floor, finishing materials can be installed: tiles, linoleum, laminate, parquet board.
The main functions of OSB on a concrete floor:

When calculating the number of slabs, it should be taken into account that the losses when cutting the slab are 7-10%.
- leveling an imperfect floor surface, which usually has bumps, height differences and other defects;
- reliable sound insulation, which is ensured by the multilayer structure of the material, which allows you to absorb various noises well;
- waterproofing and floor insulation. This material has a natural base, high heat-saving characteristics and moisture resistance.
If there are significant irregularities in the concrete pavement, then the OSB-plate is fastened not immediately to the floor, but to wooden blocks that play the role of a lag.
To ensure maximum rigidity and resistance to deformation, it is better to use OSB-plates with a thickness of 8-10 mm, laid in two layers. It is necessary to lay the layers with an offset, they are attached to each other with the help of spiral nails or glue.
If the concrete floor is even, then you can lay the OSB directly on it, in which case one layer will be enough, it is fastened with self-tapping screws or dowels. Although the material is moisture resistant, there is partial absorption of moisture, and it expands slightly. To compensate for possible expansion or contraction, it is necessary to provide expansion gaps between the plates up to 3 mm in size.
Processing material

OSB boards can be used as an independent floor covering, or as a base for laminate, linoleum or parquet.
This coating can also be used independently, for this it is stripped, and then several layers of varnish are applied to it.
If the laying of roll materials is carried out, then it is necessary to ensure a smooth transition at the joints, the plates take a minimum thickness. They try to make gaps from the side of the wall, they are treated with an elastic sealant.
To cover the floor with tiles, the base must be completely fixed, so OSB must be laid especially carefully. The tile is placed on a special adhesive, which ensures a reliable connection of ceramics and wood.
OSB or OSB (oriented strand board) is a relatively new building material that has become a successful alternative to plywood and chipboard. The role of OSB in frame construction is great, with the insulation of standard houses. Especially often, with the help of OSB, floor surfaces are formed and leveled. Today we will talk about how to do this correctly.
Types of OSB boards and their characteristics
OSB - boards consisting of several layers of wood chips pressed and glued with waterproof resins. Its gluing is carried out in 3 layers. In the outer layers, the chips are laid along the length of the panel, and inside - perpendicularly. This arrangement gives the OSB strength, allows you to firmly hold the fasteners.
The following types of OSB are used in construction:
- OSB-2 - panels with low moisture resistance. They are used only for interior work in dry rooms.
- OSB-3 is a versatile material. Withstands high humidity both indoors and outdoors. A large margin of safety allows it to be widely used in construction.
- OSB-4 - the most durable and moisture resistant plates. They are used to form load-bearing structures in conditions of high humidity.
For the construction and leveling of floors, OSB-3 sheets are usually used, which perfectly withstand the load from furniture, equipment, and the movement of people.
When leveling small floor defects, it is enough to use OSB boards with a thickness of 10 mm. Surfaces with significant bumps and potholes will require a material of 10-15 mm. If it is necessary to create a floor on logs, then the thickness of the OSB boards used should be at least 15-25 mm.
Wood-based boards such as plywood and OSB are widely used for subflooring under the finish coat. Let's compare these two materials in the following article: .
OSB boards are used as an even and solid base for various modern coatings - parquet, tile, linoleum, laminate, carpet. The main functions of oriented strand board are:
- Creating a floor surface. OSB is a popular material for creating a subfloor on logs. In this case, the flooring of the slabs can be carried out both on the upper side of the log and on the lower side.
- Surface leveling. Installing OSB on a wooden or concrete floor will help create a completely flat surface suitable for laying a finishing coat.
- Floor insulation. OSB board is 90% natural wood chips with high thermal insulation properties. Accordingly, the OSB floor does not allow heat to escape and keeps it indoors.
- Noise isolation. The multi-layer dense structure of the OSB reliably absorbs any kind of noise.
Consider several popular technologies for laying OSB on different bases.
Installation of OSB boards on a concrete floor (cement screed)
Let's start with the simplest situation - leveling the concrete base with OSB slabs. Work is carried out according to this scheme.
Debris is swept from the concrete base, dust is removed with a vacuum cleaner. The surface must be absolutely clean to ensure adhesion of the mounting adhesive. The base is covered with a primer. This also contributes to better adhesion of the adhesive to the base. In addition, the primer creates a dense film on the surface, which does not allow the screed to “dust” during operation.
OSB is laid out on the surface, if necessary, trimming is performed with an electric jigsaw or a circular saw. On the wrong side of the OSB, a rubber-based parquet adhesive is applied, using a notched trowel for uniform application. Glue the sheets to the concrete base.
Additionally, OSB is fixed with driven dowels. For guaranteed retention, the dowels are hammered around the perimeter every 20-30 cm. If the floor is even, the installation is carried out in a dry living room, then it is enough to fix the dowels at the corners of each slab (subject to the mandatory use of high-quality glue!).
When laying between the plates, expansion joints with a thickness of 3 mm are left. Along the perimeter of the room, between the OSB and the wall, the seam should be 12 mm. These gaps are necessary to compensate for temperature and humidity expansions (bulges) of the OSB during operation.
At the last stage of work, the OSB base is cleaned of dust and debris. The seams between the wall and the slabs are filled with mounting foam. Its drying time is 3-4 hours. Excess dry foam that protrudes beyond the surface is cut off with a sharp knife.

Installation of OSB boards on boardwalk
Laying OSB on an old wooden floor helps to level the surface and prepare it for the installation of the finish coat. Installation is carried out in this way:
- To begin with, with the help of a level or a rule, the localization of irregularities (bulges, depressions) of the boardwalk is determined.
- Boards that “walk” or rise too high above the general level are attracted to the joists with dowels, sinking them into the material. In some cases, to eliminate the creaking and unsteadiness of the boards, the floor has to be sorted out with the replacement (repair) of the lag.
- They clean the influxes of paint from the flooring, bloating and protrusions are washed with a grinder or emery cloth.
- OSB boards are laid out on the floor, with the seams of each next row shifted. Cross-shaped joints should not be! Dilatation gaps are provided (between the plates - 3 mm, along the perimeter of the walls - 12 mm).
- Holes are drilled in the plates. Their diameter should match the diameter of the wood screws that were selected to fix the OSB to the floor. Holes are drilled along the perimeter of the plates every 20-30 cm, countersinking is performed under the caps of the self-tapping screws.
- Self-tapping wood screws attract the OSB to the floor. The recommended length of self-tapping screws is at least 45 mm.
- If you want to make the floor more durable, mount the second layer of OSB. The seams of the overlying and underlying layers should be laid with an offset of 20-30 cm.
- Deformation gaps near the walls are filled with mounting foam, which is cut off after drying.
This completes the process.

Laying OSB on logs on a concrete base
In the presence of a concrete base (for example, floor slabs), the installation of a log and sheathing them with OSB sheets allows you to create a flat floor without the use of wet leveling screeds. And also to fit insulating, moisture and noise insulating materials into the structure.
Consider the technology of creating an OSB floor on logs on an existing concrete base. Logs (wooden bars) are fixed to the concrete floor with dowels or anchors.
The wider the distance between the lags, the thicker the OSB boards used. If the pitch is 40 mm, then the minimum OSB thickness is 15-18 mm, if the pitch is 50 cm - the thickness is 18-22 mm, if 60 cm - 22 mm or more.

Thanks to the lags, space is created between the OSB and the concrete floor. It can be put to good use by laying insulating material. For example, the floors of the first floors are often cold, so a heat insulator can be laid between the joists: mineral wool, polystyrene foam, XPS, etc. If there is a wet basement under the ceiling, the floor structure is supplemented with vapor barrier films or membranes.
OSB boards are laid across the log. The seams between adjacent plates (in width) should go strictly in the middle of the log. During installation, it is recommended to leave expansion gaps (3 mm - between the plates, 12 mm - between the OSB and the wall)
The sheets are fixed to the lags with self-tapping screws or nails (spiral, ring). Step of fasteners: along the perimeter of the sheets - 15 mm, on intermediate (additional) supports - 30 mm. Nails (or self-tapping screws) fixing the plates along the perimeter are placed at a distance of at least 1 cm from the edge (so that the OSB does not crack). Fasteners are selected so that their length is 2.5 times greater than the thickness of the plates used.

How to fasten OSB boards on logs in an ordinary city apartment, see the video:
Creating a subfloor from OSB on logs
Laying OSB on wooden joists is the easiest way to get a durable and reliable subfloor. This technology is especially appropriate with the existing columnar, pile, pile-screw foundation. Work order:
- Logs are mounted on the foundation. The step of the lag should correspond to the thickness of the OSB boards used (the larger the step, the greater the thickness).
- Perform a rough floor roll. To do this, retaining bars are nailed along the lag, OSB boards are laid and fixed on them. The surface facing the ground is covered with waterproofing preparations, for example, bituminous mastic.
- A layer of vapor barrier is laid on top of the OSB.
- Thermal insulation material is laid, for example, foam plastic, mineral wool boards, ecowool, etc.
- Close the insulation with another layer of OSB. Fastening is carried out in the same way as when laying OSB on logs on an existing concrete base (the technology is described in the previous paragraph).
At this point, the work process is considered completed.

OSB processing for different finishes
A strong, hard and even surface makes OSB a universal base for all modern floor finishes. How to cover the floor from OSB? Here are some popular solutions:
- Lacquer or paint. In this case, OSB boards will act as finishing floors, which will only require decorative finishing with paints and varnishes. OSB sheets do not require any additional preparation, it is enough to clean them of dust and apply 2-3 layers of varnish (paint).
- Roll materials - linoleum and carpet. When laying rolled materials, it is necessary to ensure that the joints between OSB boards are flush with the rest of the surface. It is desirable to remove all irregularities with sanding paper. Expansion gaps - fill with elastic sealant.
- Tile(ceramic, vinyl, quartz vinyl, rubber, etc.). In order for the tile to be held on the base of the OSB, it is necessary to ensure its immobility. For this, lags are placed more often than required by the thickness of the sheets. The step between the fastening elements is also reduced. The tiles are glued onto the OSB using a special adhesive suitable for the wood surface and the tile used.
- Laminate- topcoat, which is fixed in a "floating" way, without rigid fastening of the lamellas. This coating is quite rigid, so it is not necessary to prepare OSB for it. Minor irregularities that may be at the joints of the plates are leveled by the substrate.
What exactly to choose - it's up to you.

Using OSB makes it possible to inexpensively and quickly level an existing wood or concrete floor. And if necessary, create it from scratch on the logs. The OSB surface will not require expensive finishing, additional leveling, coating with moisture-resistant compounds. This is an excellent choice for those who want to create a quality floor with minimal effort.
Ceramic tile on wood flooring is the ideal solution for very damp environments such as bathrooms and kitchens. But what if the base is a wooden floor, and, moreover, it is not mounted on a reinforced concrete slab? But, as practice shows, it is possible, but then is it possible to lay tiles on GVL or on OSB plywood. And the answer is simple and definitely positive, because it is these materials that have high technical performance.
For technical reasons, laying tiles on a wooden floor is undesirable or impractical. A wooden floor is prone to permanent deformations during its service life. Each board relative to the next one can make small movements, which will lead to cracking of the adhesive layer and damage to the ceramic coating itself. In this article, we will look at how to properly lay tiles on GVL and plywood, and at the same time, so that the coating is durable and reliable.
Wood, as a natural material, is prone to constant expansion and contraction. Moreover, this happens in all directions. In addition, it is prone to decay and debate, leading to its destruction during operation with a lack of ventilation and a constantly humid environment. But even these factors do not confuse people before the desire to lay ceramic tiles on a wooden base. But then on such a floor, in general, nothing waterproof can be put. But do not despair, because ceramic tiles can be laid on plywood, just like on a reinforced concrete base, if you follow the technology and properly prepare the surface. Today, there are several ways to lay tiles on a wooden floor. But the most common is laying tiles on a GVL floor or laying tiles on OSB. Because these two materials have excellent strength and elasticity parameters. But before laying the tile, you should familiarize yourself with the correct technology for leveling the surface.

Floor preparation
Today, there are many technologies for laying tiles on a wooden floor, each of which has its pros and cons. Although, the laying process is in any case the same and standard, a thin layer of adhesive is spread with a notched trowel and the tiles are glued to it according to the level. Preparation of a wooden floor for tiles can be done in two ways:
- dry;
- wet.
But regardless of how the surface for mounting the tile is leveled, there are common operations in the preparation process. These include:
Everything, after carrying out all the above manipulations, the draft base can be declared ready for further work.
Leveling the zero plane of the floor with OSB plywood
Is it possible to lay tiles on osby? Yes, but certain conditions must be met. One of the most reliable ways to level the floor for laying ceramic tiles on a wooden base is OSB plywood. It is a plate of oriented and pressed glued chips. This material has sufficient strength and is able to withstand heavy bending loads. Sheets with a thickness of 12 and 20 mm are widely used. The advantages of the plate should be attributed first of all:
- High fire resistance. The stove is impregnated with a special composition that does not burn well, and in the absence of a catalyst it is not combustible at all.
- OSB board repels water well. Due to the strong and solid impregnation, moisture cannot be absorbed into the material, thereby preserving what is under it from it. Ceramic tile on OSB will lie firmly and not warp, which is commonly seen on shock-absorbing surfaces.
So. We return to the technology of how to lay tiles on a wooden floor in the bathroom. OSB slabs can be laid directly on floors, but the distance between them should not exceed 50 cm. The slabs can be laid not only on logs and floors. In the case of careful processing and complete prevention of the rough plank floor, they can be laid directly on the old boards.

It is important to know that it is better to use already aged, but very strong floorboards, because they are already less prone to drying out and deformation when temperature and humidity change.
At this stage, the maximum alignment of the base is carried out by laying plastic substrates in the necessary places. As a leveling of the floor for fixing OSB boards, shingles can be made in places where it is required to raise the level. Plus, some distance between the draft boards and slabs will be a passage for ventilation of both the boards themselves and the OSB sheets. In addition, to improve ventilation, it is recommended to drill holes in the boards with a uniform pitch. This condition allows you to confidently answer the question of whether it is possible to lay tiles on an OSB slab.
The technology of laying tiles on OSB slabs requires a solid foundation, so the slabs must be laid in two layers. Moreover, each top should overlap the bottom by 50% with a shift in both directions. This arrangement of sheets will provide the required floor strength in all respects:
- will withstand point loads well;
- the base will perfectly withstand the forces generated over a large area.
A double layer of OSB plywood will provide a solid surface for laying ceramic tiles, while not hindering the free movement of the subfloor boards.
Important to remember! In order to lay a tile on an OSB slab with high quality, it is necessary to ensure its possibility for thermal expansion. Therefore, a certain distance (3-4 mm) should be retreated between the sheets to provide the plates with a free opportunity to change their geometric dimensions under the influence of temperatures. This space must be filled with a shock-absorbing compound; a sealant is well suited for this. In the same way, the distance should be retreated from all walls around the perimeter.

After fastening the plates with self-tapping screws, you can proceed to the process of installing the tile itself. But at the same time, for laying tiles on a wooden floor, you will need not a simple cement-sand adhesive, but a two-component adhesive composition, which, when solidified, has some elasticity, which will ensure that the ceramics are firmly attached to the OSB floor.

For greater reliability and durability of wood flooring, the surface should be highly permeable before tiling, and allowed to dry well. Video by
Leveling the floor by screeding on OSB plywood
If you want to level the base from significant differences in level, then the above described technology for laying tiles on a wooden floor will be the ideal solution. But to perform the screed, you will have to live through a layer of waterproofing. It can be an ordinary polyethylene film with a thickness of at least 150 microns. In order to lay tiles on a wooden floor with high quality and mold did not form under the base of the screed, the film must be laid with an overlap of at least 15 cm, followed by mandatory gluing of the seams with strong adhesive tape, and the same overlap must be made on the walls. The thickness of the screed should be between 2.5 and 3.5 cm. Less and more is not recommended.
A thinner layer will become a weak link in the design, a thicker one will become quite cold.
Today, GVL is gaining more and more popularity - gypsum boards with wood fibers as a filler. The resulting material has better properties than conventional drywall:
- More durable due to the reinforcement of the structure with wood fibers. Also, the material acquires elasticity, which cannot be said about drywall.
- Due to the use of all the same natural materials, GVL is an environmentally friendly product.
- Able to stand much longer in humid environments without changing its parameters.

GVL slabs or sheets are available in two variations:
- Single sheets with a thickness of 12 mm, then two layers of plates will be required to lay them on the floor. Laying tiles on GVL will provide you with a solid and reliable foundation for many years to come.
- Double sheets with a lower shift, and along the edges with the formation of a lock for a more durable joining of the elements to each other.
In the case of leveling the floor with GVL, it is also recommended to use strips cut from this material as substrates, attached to the floor with galvanized self-tapping screws. Between sheets it is recommended, as in the case of OSB plywood, to leave a distance of up to 3 mm for temperature compensation. The gap is filled with sealant.
Stages of laying tiles
Laying tiles on GVL slabs can be done using ordinary tile adhesive. In this case, it is recommended to spread the solution with a thin layer with a notched trowel over the entire surface. Each laid tile should be carefully measured with a level, and favorite crosses should be inserted between the tiles in the seam. After installing the tile, grouting can be done with any fugue. .

Laying tiles on a prepared base is no different from the process on a concrete floor, so it starts with markings. Tiles on a wooden floor can be laid both flat and diagonal, but first you need to mark the initial position of the first line. After applying graphic markings and an indicative drawing in the case of using multi-colored tiles, the entire tile should be tried on (laid over the entire area in accordance with the drawing) in order to pre-cut the necessary pieces and
What to do if there is an old wooden floor in the room, which is inappropriate to paint or varnish? If the boards stagger and ? You can resort to a labor-intensive and expensive method - to tear off the old coating, make a new one or lay fresh ones. But there is another, more practical, faster and cheaper solution - laying OSB on a wooden floor.
This method has its own nuances that are taken into account during OSB laying. Looking ahead, it is worth saying that the basis of technology is the correct preparation of the base. Below is a detailed guide, following which will allow you to achieve an excellent result in terms of leveling the surface of an old wooden floor and the subsequent installation of decorative coatings: laminate, linoleum, etc.
Tools and materials for work
The list of necessary devices is minimal:
- crowbar nail puller;
- a hammer;
- perforator, drill, drills;
- screwdriver;
- a large bubble or laser level (with a second tool it will be more convenient to detect irregularities).
Necessary materials:
- OSB board;
- fasteners - hardened self-tapping screws with a length of at least 45 mm;
- washers for screws (their presence is desirable, but not required).
Choosing this method of "resuscitation" of old wooden floors, you need to have an idea about the material used for this purpose in order to choose it correctly. The alignment result directly depends on this.
Characteristics of OSB boards
OSB is a building analogue and chipboard. These slabs are more durable and perfectly adapted for finishing. The material appeared on the market relatively recently. OSB is made from wood chips, which are laid in 3 layers. They are glued together with special resin-based compounds. In this case, the layer in the middle is laid perpendicular to the other 2. Due to this, the resistance of the material to loads is formed.
This parameter is marked with a number. The lower the value, the lower the resistance to stress and the effects of destructive factors such as humidity. For example, index 2 means that the OSB board is not moisture resistant and is not able to withstand intense long-term loads. And the number 4 indicates that the product can be used as an overlap that will not collapse even when exposed to moisture.
The material for laying on the floor is selected on the basis of the mentioned designations in order to form an even rough surface. You should not save on the quality of OSB-plates. This is fraught with the need for laying an additional layer, which is expensive and inconvenient. The best option is OSB 3.
The question often arises: “Do I need a substrate for OSB?”. From a practical point of view, no. Wood itself is an excellent thermal insulation material, and if you consider that it is laid on wooden boards, then a substrate is not needed. But sometimes, to achieve the maximum possible soundproofing effect, it is still used.
Foundation preparation
Properly performed preparatory stage is more than half of the success of floor leveling work. First, a thorough examination of the wooden surface is carried out. This is done using a bubble or laser level. All protruding, as well as loose parts are marked, so it will be easier to strengthen them.
The next step is to securely fix the boards. Some experts recommend doing this with dowels, but a more reliable option would be to pull loose elements with self-tapping screws to the lags. It is necessary to fix the old coating as securely as possible. To do this, you can use several mounts in one area. The result is considered ideal when the “walking” floor fragments are recessed or level with the rest.
Some recommend scraping off the old layer of paint with a grinder. You need to know that this is only necessary in areas where there are obvious swellings of the paintwork. In fact, the presence of old paint is not critical, you can lay plates on it. In this case, it is necessary to remove all large contaminants.
Attention! The main part of the preparatory process is the fixation of the old wooden coating. It is this stage that should be given special attention.
OSB preparation for installation
Before fixing the plates, you must first lay them on the floor in the room. In this case, 3 requirements must be met:
- There should not be straight cross-shaped seams, for which the plates are laid apart with an offset of 50%;
- The gap between the wall and the slabs must be at least 10 mm;
- Plates should not be closely adjacent to each other. The minimum gap between them is 3 mm.
Attention! Slots are needed in order to avoid the “crawling” of the plates on top of each other, the deformation of the decorative floor covering. This is due to the expansion of the material due to changes in humidity.
Laying process
After all the preparatory work has been completed, it remains only to tighten the slabs to the old wood flooring with self-tapping screws and fill the gap between the OSB and the wall with construction foam. After the foam dries, it is cut flush with the flooring.
The plates are fastened with self-tapping screws around the perimeter every 20–30 cm, but this distance can be reduced. Some experts recommend that you prepare the holes first, but with a screwdriver you can quickly and efficiently tighten self-tapping screws without pre-drilling.
Leveling the floor by the proposed method is the simplest, most effective and cheapest. If you follow the instructions, you can do without the help of specialists.
Cost of work
If you decide to entrust the repair to professionals, you need to calculate how much the services will cost. The price of laying OSB on a wooden floor is lower than the cost of installing these plates on logs and concrete. In Moscow, prices for this type of work vary in the range of 150–200 rubles per sq. m. m.
To decide whether to lay the slabs yourself or hire craftsmen, you need to soberly assess your strengths. This will help the following video, which clearly shows the installation process.
Read also...
- Are there benefits for large families when entering a university List of benefits for large families
- Causes of bleeding during early pregnancy: what to do?
- What to do if a child has a leg pain in the thigh when walking: causes, treatment and folk remedies
- What to do and how to treat watery diarrhea in a child?


