You can insulate a corner apartment from the inside. How to insulate a corner apartment from the inside of the room. Nuances of internal installation
Preface. Let's consider in this article why you should insulate a room in corner apartment: causes of cold and freezing of walls in the room. What insulation should be used for work and we will give detailed instructions for thermal insulation of a room in a corner apartment apartment building with your own hands.
The problem of a cold room in an apartment exists for many owners of living space in apartment buildings. This is often due to the location of the apartment - one of the walls of the room is outer wall home or is adjacent to the wall of the cold entrance. If we have already considered the question of how to insulate the entrance wall, then the question of how to insulate a cold room with your own hands remains open.
Why is it necessary to insulate a corner apartment?
Certainly, The best way To get rid of this problem - do not buy a corner apartment in a high-rise building. Determine at the selection stage cold room in an apartment or warm place using simple methods. Firstly, if the owners of the apartment are dressed warmly in winter, then the room is cold. You can also stand in the corridor for a few minutes, and then go into the room and compare the temperature difference, listening to your feelings. If you feel a temperature difference, you should be wary.
If the apartment is in multi-storey building is on the first or top floor, then the cause of cold throughout the apartment can be large heat losses through the basement or attic. You can also deal with this problem quite simply on your own - insulate the floor in the apartment on the first floor, and if your living space is on the top floor of the house, then you should insulate the ceiling in the apartment.
In brick houses common reason cold in the room can be caused by poor-quality masonry of the external walls, which was done by the builders. IN panel houses builders may not properly seal the joints between reinforced concrete panels. There are several simple ways solving the problem of thermal insulation of walls in a corner apartment with your own hands. Let's consider all these methods in more detail.
Methods for insulating a room in a corner apartment
It is believed that external facade insulation with penoplex is more effective. But often this method will not work. For example, the facade of an apartment building is prohibited from changing at the legislative level, or insulating a corner room in an apartment from the outside with foam plastic, penoplex or mineral wool is not economically profitable or is impossible from a technological point of view.
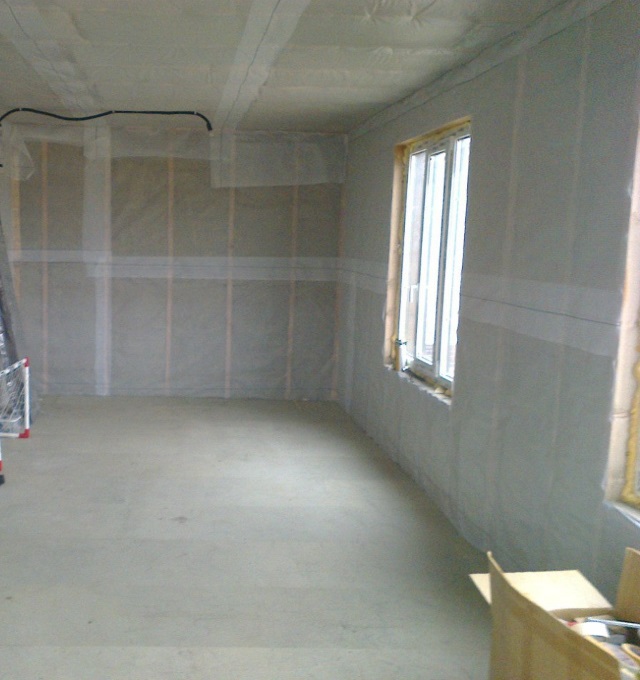
Internal insulation of a corner room with your own hands consists of thermal insulation of all surfaces without exception - the walls of the corner room, ceiling and floor. This method has its drawbacks in the form of rearranging the furniture in the room during the renovation, as well as a significant reduction in living space.
To insulate a corner room in a brick or panel house from the outside you will need scaffolding and tools, and all the work can be done independently. For external thermal insulation, you can use the most inexpensive and popular insulation - polystyrene foam, as well as extruded polystyrene foam or mineral wool. All these materials differ in their characteristics and applications.
How to insulate the walls of a room in a corner apartment
The thickness of the insulation depends on the region of residence, the material of the walls of the house (brick or panels) and can range from 5 to 20 centimeters. In order not to make a mistake in the thickness of the thermal insulation layer, use the calculator for calculating the thickness of insulation for walls online on our website. Don't forget to buy insulation with a small margin to cover the entire wall completely.
How to insulate a room in a corner apartment from the outside

To install thermal insulation, it is necessary to secure the starting profile exactly level. Next, we lay the insulation, applying glue to each sheet of foam plastic or penoplex and pressing it against the wall. For reliability, the slabs can be secured with umbrella dowels. The seams must be made in a checkerboard pattern and thoroughly foamed if there are gaps.
After installation, it is glued to the insulation plaster mesh, a primer is applied and the entire structure is covered with façade putty. We discussed earlier in more detail about insulating the facade with polystyrene foam and how to insulate a house with polystyrene foam from the outside. When insulating a corner room in an apartment from the outside with mineral wool, it is necessary to make a sheathing.
Mineral wool is laid between guides made of wood blocks. The distance between them should be 1-2 centimeters less than the insulation boards for installation stone wool in space Before laying mineral wool, the wall is covered with a moisture-proofing membrane. After laying the mineral wool on the wall, the entire structure is covered with a vapor barrier on the right side and sheathed with PVC panels.
How to insulate a room in a corner apartment from the inside

All of the above methods are good if the apartment is on the first or second floor. But if the apartment is located higher, then we move on to the option of insulating the room from the inside in a corner apartment with our own hands. Today there are many thermal insulation materials and technical solutions for self-insulation corner room in a panel house at minimal cost.
But the first thing to start with is to check the number of sections on the radiator in the room. It is advisable to increase the radiator power by adding several sections. IN simple rooms It is customary to install one section per two sq.m. For corner rooms in apartment buildings the coefficient is higher than for ordinary premises and is 1.3, and in cold regions this coefficient reaches 2.
When installing windows, pay attention Special attention insulation of slopes from the outside. In addition to installing quality metal-plastic windows with double glazing, the window sill should be insulated to prevent air from blowing through it cold air. But in addition to this, it is necessary to insulate the inside wall in the corner room, which is adjacent to the entrance or the outer wall of a brick or panel house.
Insulating a room in a corner apartment with mineral wool

Mineral wool - environmentally friendly insulation, consisting of fibers, a material is produced from rocks by melting them. The characteristics of mineral wool are good: light weight, low thermal conductivity and sound insulation, long term services. Thermal insulation mats are mounted on the wall between guides made of wooden or metal profile for drywall.
Waterproofing mineral wool – important factor, since moistened basalt wool insulation loses its thermal insulation properties. Therefore, before installing the frame, it is necessary to cover the wall with wind and moisture protective film. It is more convenient to make the frame from wooden slats a width equal to the thickness of the thermal insulation and a distance between each other equal to the width of the insulation mats minus 1-2 cm.
After laying the mineral wool, a vapor barrier or superdiffusion membrane is laid, and slats are placed on the guides to create an air gap. This is necessary so that moisture evaporates from the surface of the superdiffusion membrane. Next, drywall is placed on the slats, OSB boards or plywood. It is better to work with mineral wool wearing glasses, gloves and a respirator.
Insulating a room in a corner apartment with foam plastic
Foam insulation is more common due to the availability of polystyrene foam and the ease of its installation. The main characteristics of polystyrene foam are lightness, low thermal conductivity and ease of installation. For residential premises, you can buy expanded polystyrene, which during production has added substances that prevent the foam from igniting.
Before laying the insulation boards on the leveled wall, apply liquid waterproofing. Tile adhesive is applied to the foam sheets with a comb trowel, and then the sheet is pressed against the wall. After covering the entire area of the wall, a mounting mesh is glued on top and putty is applied to it. After the putty has dried on the wall, you can paint the surface or cover it with vinyl wallpaper.
But when insulating a room in a corner apartment with penoplex, polystyrene foam or other moisture-proof material, for example, foil penofol, there is a risk of mold and mildew appearing between the insulation and the wall. Since the wall in a brick or panel house stops breathing and is constantly in a cold circuit (heat access to the wall will be blocked by a layer of insulation).
It is up to you to decide which insulation to choose for a room in a corner apartment in a panel house. It is only important to read the video instructions on this topic and make an accurate calculation required thickness insulation.
Uninsulated corner apartments are valued cheaper, simply because they are cold. There are two adjacent walls in contact with the street, and between them a corner that freezes from the inside.... - horror for residents. There may be two such rooms in a corner apartment.
Insulation from the inside is not the best option solving the problems of the corner apartment, but sometimes only he remains. This method can also be used to solve main problem corner apartment - cold.
First of all, it is advisable to weigh the pros and cons. External insulation of a corner apartment will not be cheap.
But even the internal ones cannot be called a pleasant waste - it is expensive, there is many times more hassle, and doubts will remain about the correctness of the actions.
Outside or inside?
But if these arguments are still not interesting, then it remains to consider how to properly insulate a corner apartment from the inside, so as not to spread dampness and mold inside the room and not cause other troubles...

First choose insulation and plan
To insulate a corner apartment from the inside, you need to choose insulation. IN in this case The only acceptable option is extruded polystyrene foam. It does not allow steam to pass through and does not accumulate water. And if it is tightly glued to the wall, it will isolate the wall from steam, and condensation inside the room will not occur. 
You need to be wary of recommendations to use any other insulation for insulation from the inside, protecting it simply with plastic film. The insulation will still pick up water and the wall will be wet. In any case, the risk is very high, since there is no ventilation.
The thickness of the insulation should be sufficient - from 8 cm for moderate climates.
Prepare walls, dismantle
As a rule, in a corner apartment, even on walls without windows there are heating devices, pipeline. All heating needs to be redone - moved away from the wall by the thickness of the insulation and finishing.
You will have to dismantle the sockets, seal the niches, and extend the wires to the overhead sockets above the insulation. Or dismantle all electrical wiring and re-lay it on top of the finish.
The walls are cleared of old decoration and weak plaster. The surfaces adjacent to them are also cleared of all finishing by 10 cm - the insulation will be glued there.
On the wall with a window, the window sill is removed and the slopes are cleaned. Naturally, the windows must first be replaced with insulated modern ones for both internal and external insulation.
Next, the walls need to be leveled using cement mixture so that the insulation sheet is completely adjacent to them anywhere. And if the walls are not level, then you will have to apply thick layer plaster, which will probably negate all the savings from insulation from the inside in a corner apartment...
Laying insulation
Before applying insulation, the walls must be dry, smooth, primed, and the temperature must not be lower than + 5 degrees. Any deep penetration primer will do, even without antifungal additives.
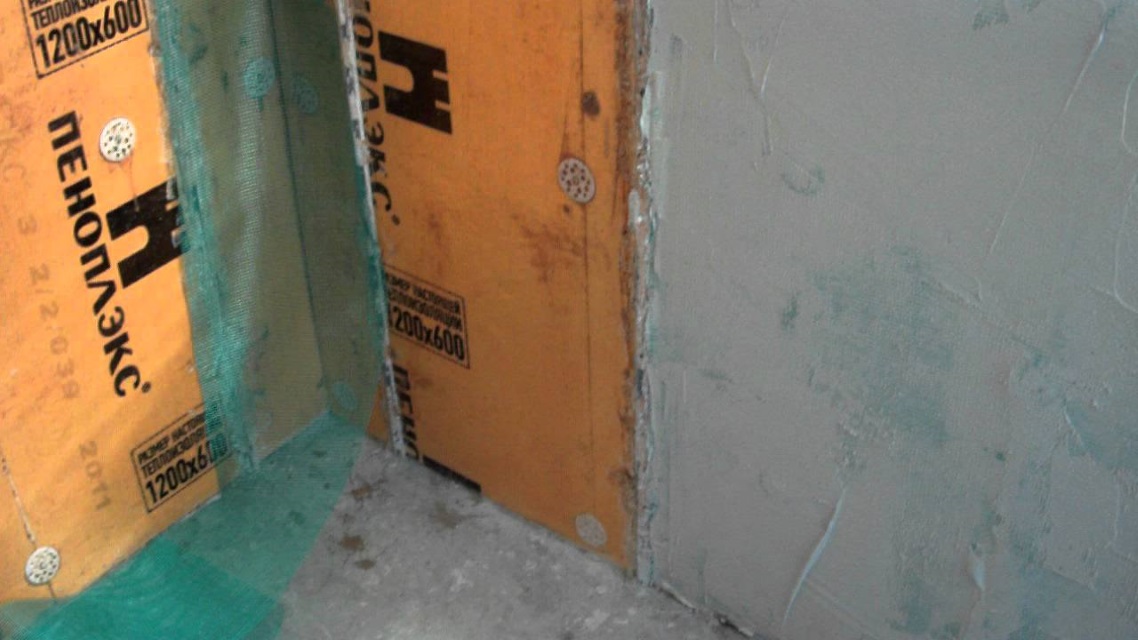
Purchase adhesive for polystyrene foam on concrete and extruded polystyrene foam of sufficient thickness, with a tongue and groove along the edges of the sheets. For gluing joints, sealing seams, cracks, you need a sealant, or better yet, polyurethane-based foaming adhesive in a can. 
Concrete adhesive is prepared in accordance with the instructions, applied to a sheet of expanded polystyrene in an even layer using a notched trowel, then the sheet is glued with pressure to the wall. They start from the floor itself, while glue is also applied to the floor and other adjacent structures so that there are no gaps left with the insulation.
Sealant is applied to the seams between the insulation sheets. The ligation of seams in rows is observed. In a freezing corner, you don’t have to re-bandage the seams, but it’s better to apply the insulation of one wall to the insulation of another end-to-end with polyurethane glue - this will result in a thicker layer at the corner.
Fastening with dowels for internal insulation is an unacceptable action. The continuity of the insulation-vapor barrier cannot be violated. All cracks are sealed with particles of polystyrene foam itself and polyurethane glue. Polyurethane foam is not allowed, as it is saturated with water.

Finishing for internal thermal insulation

The next stage is finishing the insulation. Purchase fiberglass plaster mesh with a density of 160 g per square meter. and higher, cell no more than 5 mm, alkali-resistant (ask for reinforcement of insulation). Then the glue is applied to insulation with a thickness of 3 mm, and the mesh is embedded into it in strips. It enhances all corners. On slopes, special corners with an attached mesh are used. The mesh is smoothed with a layer of glue. 
Any plaster finish is applied on top. But it is better to stick plasterboard sheets with a thickness of 20 mm or more. Expanded polystyrene indoors must be hidden behind a fire barrier with a flame resistance of at least 30 minutes.
Also, the polystyrene foam should not come into contact with wiring or hot piping. These systems will have to be protected at the stage of gluing the insulation with barriers made of mineral wool with a thickness of at least 50 mm, closed on the side of the room with a vapor barrier on the sealant.

In general, there is a lot of work and costs to be done. Insulation from the inside of a corner apartment cannot be called simple. But, despite everything, the cold walls will be hidden behind a durable warm layer. In the corner apartment it will become “an order of magnitude” warmer in winter... But all that remains is to think again about the correctness of the external insulation...
Regardless of the material from which the house is built, be it wood or brick, you can often encounter such a problem as freezing of the corners.
The reason for this is not only the laws of nature, but also the mistakes of builders. The fact is that any corner is a kind of bridge of cold.
If during the construction of a house the builders saved on insulation or mortar in brickwork, then the cold will penetrate into the home through the voids.
IN winter time As a result of the temperature difference between indoors and outdoors, condensation may occur in the corners. This is what causes mold and cold to occur.
The first thing that comes to mind when deciding to solve the problem of freezing corners is additional insulation home from the inside. But this is far from the best option.
The internal insulation of a house shifts the “dew point” inward, resulting in winter period the walls become damp, which means their untimely destruction.
As a result of such insulation, freezing of corners can only intensify. Therefore, the only correct solution is insulation from the outside.
Thermal insulation of house corners from outside
Due to their high thermal conductivity, corners are the most vulnerable part of any home. And the reason for this may be poor sealing of seams, poor insulation, or the presence of voids in the concrete.
Reliable sealing of seams and insulation of the outside walls of the house will help improve the situation.
The modern market offers many first-class insulation materials. For example, in the so-called “warm” plaster, foam granules are used instead of sand.
It is not only several times lighter than a regular solution, but also perfectly allows steam to pass through, allowing the walls to “breathe” and prevent the formation of condensation. The insulating effect of “warm” plaster can be compared to brickwork.
But this is far from the only way to insulate a house from the outside. Recently, so-called “liquid” thermal insulation has appeared on the market, which is produced by various manufacturers under different brands.
Such insulation is especially relevant for such difficult parts of the house as freezing corners. The composition of insulating solutions includes special microspheres filled with air.
They perfectly insulate heat inside the house. Also, the composition of suspensions for facade insulation includes acrylic polymers or synthetic rubber, paint, as well as anti-corrosion and anti-fungal components.
Thanks to their composition, “liquid” solutions for home insulation are lightweight, stable, flexible and waterproof.
However, for all their technical perfection, liquid formulations cannot compare with such traditional heat-insulating materials, such as polystyrene foam, mineral wool, polystyrene foam and polyurethane foam.
Thermal insulation of the corners of the house from the inside
As mentioned above, ideal solution problems with freezing corners is to insulate the house from the outside.
This is easy for owners of a private home. But what to do if the corners freeze in the apartment? multi-storey building? In this case, you will have to turn to the help of construction climbers.
 If you can’t afford it, you can find a way out and insulate the corners from the inside with your own hands, getting a pretty good result.
First of all, you should remove the wallpaper and repair the cracks. But even if they are not there, this does not mean that the wall is monolithic. Tap it with a hammer. If there are voids, the sound will come out dull.
The plaster over possible cavities is removed and the wall is thoroughly dried. To prevent mold from occurring in the future, the corner must be treated with antifungal compounds.
Sometimes you have to use acid to remove mold. blowtorch or even cutting off part of the wall.
Voids and cracks are filled with liquid polystyrene foam or construction foam. They do not absorb moisture at all and are resistant to biological factors such as mold, fungi and rot.
The foam adheres perfectly to all types of surfaces and materials and does not lose its qualities at sub-zero temperatures.
This treatment will protect the walls from further moisture ingress. After drying, the remaining foam is cut off and cleaned, and the walls are covered with plaster and wallpapered again.
To protect yourself from dampness, insulating a corner from the inside is best done in the warm and dry season.
Do not fill voids with tow or mineral wool, as these are very porous materials that easily absorb moisture.
Other solutions for thermal insulation of corners
The problem of freezing corners can be solved at the stage of building a house or during the renovation process. According to architects, to avoid freezing, the corners should be beveled or rounded.
Beveling corners from the inside can reduce the temperature difference between the walls and the corner itself by a third.
A similar role is played by pilasters installed outside. Other interesting design solutions can also insulate corners. For example, you can install it on the ceiling plasterboard box with incandescent lamps.
Such corner illumination will additionally warm the air, preventing the accumulation of moisture and condensation.
When buying a new home, you can resort to the services of companies that, using special equipment, will help you check the thermal insulation of your home and identify possible heat leaks, if any.
This will help determine what mistakes of builders need to be corrected, and will protect future homeowners from all sorts of problems associated with an uncomfortable microclimate in the house.
Want more information on the topic? Check out these articles:
 One of the most important stages construction and finishing of the house - ...
 Insulating an apartment is troublesome, but very useful procedure, which allows you to improve the microclimate in your home, create comfort and coziness. The need for this measure arises if the heating networks do not cope with their task, or when the configuration of the room contributes to an increase in heat loss. For example, corner apartments that have an additional window, but in return receive a cold corner that constantly gets wet or becomes covered with a crust of ice. The recommended SNiP increase in temperature by 2° or an increase in the number of sections in heating radiators does not give the desired effect, requiring more effective methods. Let's figure out together how to insulate a wall in a corner apartment from the inside and what needs to be done for this.
What does "corner apartment" mean?
Corner apartments are located in the end areas of residential buildings. One or two rooms in such apartments have two adjacent walls bordering the street. The layout of such apartments is no different from the configuration of all the others in the house, only an additional window and a heating radiator appear, and such an addition is not found in all corner rooms. To compensate for heat loss through the enclosing structures resulting from an increase in the area of external walls, an increase in internal temperature by 2° is provided, which is ensured by increasing the standard number of radiator battery sections. In practice, this is achieved either by having a battery installed under additional window rooms, or installing a radiator bigger size(number of sections).
These measures rarely have the intended effect, since they are designed to solve the problems of a conventional premises and do not take into account many of the influencing factors that exist in reality:
- The outer wall is located on the windward side of the house;
- Deterioration of heating networks, non-compliance of heating mode with regulatory requirements;
- Errors and shortcomings made during the construction of a house.
These factors are often present all together, significantly changing the temperature in the apartment in the worst side. The cold surface of the walls begins to get wet due to the active formation of condensation, and the apartment becomes cold and uncomfortable. Such situations occur quite often and require appropriate measures to be taken.
Wall freezing is a common occurrence in corner apartments
Methods for insulating an apartment
Insulation consists of installing on external walls special material - heat insulator. There are two methods of insulation:
- External (external). Experts unanimously believe that this method is the only correct one. The heat insulator is installed on the outside of the walls, which are separated from contact with outside cold air. As a result, the heating circuit of the room begins to operate in nominal mode, the surface temperature of the enclosing structures returns to normal, and the formation of condensation stops.
- Internal. A forced option used when it is impossible to provide external insulation. The insulator is installed with inside walls The volume of the room decreases (slightly), and it becomes necessary to install a durable protective layer on top of the heat insulator. The main disadvantage of this method is the exclusion of walls from the thermal contour of the room. From now on, they perform only the functions of an external mechanical barrier, without participating in the heat conservation of the apartment.
External insulation has a lot of advantages:
- The work is carried out outside without creating any inconvenience for living.
- The surface of the walls remains intact, the interior of the room does not change, there is no need for cladding or finishing.
- The microclimate of the room improves, a feeling of coziness and comfort appears.
The disadvantage of external insulation is the difficulty of carrying out work outside, the reasons for which may be:
- The apartment is located on one of the top floors;
- The facade of the building has architectural value, as a result of which the installation of any materials is excluded;
- There are any technical or decorative objects installed on the wall;
- The building is located close to other buildings or structures;
- Work can only be carried out during the warm season.
Internal insulation is almost completely devoid of these shortcomings; no permit is required to carry out the work; work can be done at any time of the year. And, nevertheless, experts prefer external insulation. The reason for this is the presence of water vapor in the internal air of the apartment. It is gradually absorbed into the outer walls, passes through them and evaporates from the outside. This process occurs constantly in any living space. Installing an insulator from the outside does not stop it, you just need to properly organize the progress of the work. With internal insulation, water vapor is trapped inside the apartment, which has a sharply negative effect on the microclimate. Appear high humidity, feeling of stuffiness, lack of comfort.
It is important! The solution to the problem is to install a high-quality ventilation system, removing internal air saturated with water vapor.
The choice of internal insulation is usually due to the inability to work outside. Exterior work requires a permit, which is not easy to obtain. In addition, to install the heat insulator you will have to involve industrial climbers, which will be quite expensive.
 External thermal insulation more preferable, but associated with higher costs
Therefore, most apartment owners choose a more affordable and simpler option - internal insulation. The method allows you to get a positive result; it is only important to correctly understand the physical essence of the process and organize it in the right way.
Types of insulation
There are many insulation materials available on the market. Let's consider the most popular insulation materials in detail.
Mineral wool
One of the most successful options is stone (basalt) wool. Usually, when we talk about mineral wool, we mean stone wool, although the term refers to a wide group of materials, which include slag wool, glass wool and other types of similar insulators. Basalt wool more convenient to use, has a successful set of operational and technical characteristics. It does not burn, does not emit harmful substances and is not subject to rotting. Available in different forms– from roll to more rigid slab. The disadvantage of mineral wool is its ability to absorb water, which makes installation somewhat difficult and requires additional operations.
 Mineral wool slabs are one of the popular insulation materials for walls and other surfaces.
Styrofoam
This insulation is a confident leader among all other types in popularity. The reason for this is the low price of the material, light weight, ease of installation and processing. The material is resistant to water, has stable dimensions and plate geometry, and is impenetrable to water vapor. For internal insulation, this is the most preferable option, budget-friendly and not time-consuming.
 Polyfoam is suitable for both internal and external insulation
Penoplex
From a chemical point of view, this material is a complete analogue of polystyrene foam - both of them are variants of expanded polystyrene. But unlike polystyrene foam, which is polystyrene foam granules combined during heat treatment, penoplex (extruded polystyrene foam) is a monolithic material, hardened foam. It is stronger and heavier than polystyrene foam and has a higher price.
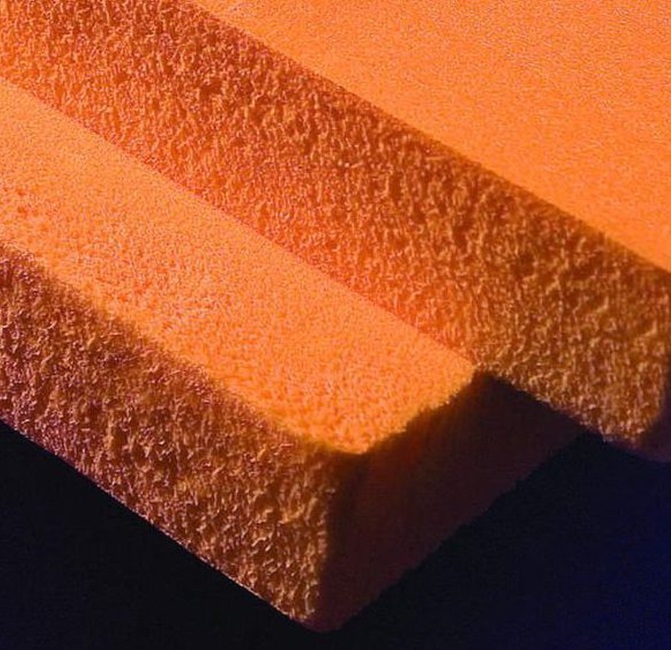 Penoplex does not crumble during processing and is completely resistant to moisture or water vapor.
Polyurethane foam
A specific heat insulator, sold in liquid form and applied by spraying onto the surface to be treated. In air, the material foams and hardens, resulting in a sealed layer resembling polyurethane foam. Polyurethane foam is ideal for insulating walls with complex geometry, the presence of small defects or protruding parts. The price of the material is quite high, and special equipment is used for application. These factors somewhat limit the use, although the performance qualities of the insulator are very high. It is completely impervious to moisture, sealed and perfectly covers the surface without cracks or gaps.
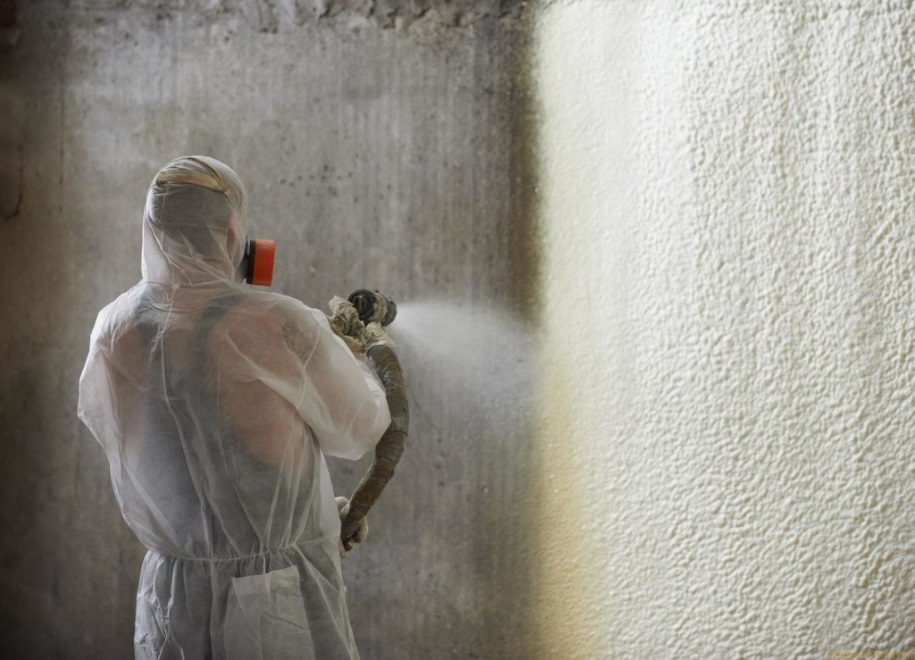 Wall insulation with sprayed polyurethane foam
There are other materials that can be used for internal insulation. It is inappropriate to list them all, since they are noticeably inferior to the named types in terms of operational and technical specifications or are expensive.
It is important! When choosing a material, it is necessary to take into account an important parameter - vapor permeability. For internal insulation, it is important to properly cut off the wall from any contact with internal air, otherwise it will begin to get wet. If a non-vapor-permeable material is used, install it tightly enough and without gaps on the surface.
Permeable types of heat insulators require the installation of a vapor barrier film, which increases the number of installation operations and requires additional costs. Permeable types of insulation include mineral wool and polystyrene foam; penoplex or polyurethane foam are impermeable to steam or water.
Carrying out work
The insulation process consists of installing a dense layer of heat insulation on the entire surface of the external walls. A feature of insulation is the need to install protective and decorative sheathing on top of the insulation, which requires the creation of a supporting structure - sheathing. It consists of a series of strips forming a vertical plane located at a distance from the wall equal to the thickness of the heat insulator. It fits tightly between the sheathing strips, forming a continuous layer with no gaps or gaps.
Insulation of corner apartments requires the installation of thermal insulation on two adjacent walls, which increases the consumption of sheathing, insulation and vapor barrier. In addition, it increases overall volume works It will be necessary to efficiently and hermetically insulate the junction of the two walls.
Procedure:
- Surface preparation. All foreign objects, hanging lamps, brackets, flower beds, etc. are removed from the wall.
- The walls are marked and the attachment points for the sheathing strips are determined. The markings should take into account the width of the insulation and the sheathing strips, so that the heat insulator does not have to be adjusted later.
- Installation of sheathing. Are used wooden blocks or metal guides for drywall. Installation of metal elements is more convenient and allows you to obtain an exact distance from the wall corresponding to the thickness of the insulation. Wherein metal parts capable of creating so-called cold bridges, forming pockets of condensation. Wooden planks do not form cold bridges, but require great precision in installation.
- Installation of vapor barrier. This item is only necessary when using mineral wool. The vapor barrier is an ordinary polyethylene film (you can take a standard sleeve). Installation is carried out in horizontal stripes. The first row is from below, the next one overlaps at least 10 cm above it - and so on until full coverage wall area. The joints of the film must be taped with construction tape. Installation is carried out on top of the sheathing strips, the film is crumpled around them and fits tightly to the wall.
- Installation of heat insulator. Plates (or cut pieces) of material are tightly inserted between the sheathing strips. You should keep a can of polyurethane foam on hand to immediately fill cracks or gaps if they appear. Some experts recommend covering polyurethane foam all edges of the insulation to seal even the smallest cracks.
- A second layer of waterproofing is installed on top of the heat insulator. For impermeable materials, a polyethylene film is suitable, but for mineral wool it is better to use a vapor-waterproofing membrane. It has the ability to pass water vapor in one direction. When installing, you must carefully ensure that the material allows steam to escape from inside the resulting cocoon. This will ensure that the insulator dries out if water gets into it in any way.
- After this, a layer of protection is attached to the surface of the sheathing planks. Actually, the sheathing is installed precisely so that there is supporting structure for installation of sheathing. Commonly used sheet materials- plywood, plasterboard or similar. Some owners prefer lining or Wall panels. The choice is determined by the capabilities and preferences of the owner.
 Stage of installation of waterproofing for internal wall insulation
One option for installing a protective layer is to apply plaster. The work involves the use of wet solutions and requires some time to dry, but the result is quite decent, masking the work performed the best way. If you plan to use plaster, you can do without lathing. The insulation is tightly installed on the wall using an adhesive composition, after which a fiberglass reinforcement mesh is attached to the surface and a layer of plaster is applied. This option is best used if penoplex is used as insulation. The ability to refuse installation of sheathing allows you to use enough thin insulation, maintaining the volume of the room. Work in the area of radiators and risers of the heating system is simplified, it becomes easier insulation window opening.
 The use of warm plaster is one of the effective ways reducing heat loss
After installing the casing, finishing. All work is carried out indoors, so it does not depend on the time of year or the weather outside. No permits are required for internal insulation; these actions do not constitute redevelopment or even reconstruction of residential premises.
Insulating a room in a panel house
In panel houses, the main problem areas are interpanel joints. Insulation will not be effective enough if the joint is not first sealed, which requires opening it as much as possible along the entire length of the wall. Typically, slab joints are sealed with tow, plaster or plaster. The gap must be opened as much as possible using a spatula or narrow chisel. Remove old tow, filler or other material. Then you need to inspect the resulting gap and determine its depth. The best option The joint will be filled with polyurethane foam. This is not difficult, is done quickly enough and allows you to effectively seal the joint.
It is important! After the foam has hardened, the parts protruding from the crack are carefully cut off with a knife to form even angle. Further work are produced according to general technology insulation.
Insulating a room in a brick house
The brickwork is well tied at the corner joints and has no gaps with access to the outside. This allows you to carry out work without preliminary insulation of the connection of planes. In this case, the properties of the material require hydrophobization before installing the heat insulator. For this Brick wall, subject to insulation, is cleared of the layer of plaster over the entire area. After this, the surface is covered with a layer of water repellent using a brush or roller. It is necessary to use deep penetration material for interior work. Some types require application in several layers, as described in the instructions on the package. After the composition has dried, a heat insulator is installed on the surface of the walls using conventional technology.
Video: how to insulate a wall in an apartment
Insulation of corner apartments is a forced measure, dictated by mistakes made during the construction or design of housing. The owner’s main task is to install a heat insulator tightly and airtight, completely cutting off the external walls from contact with the internal atmosphere of the apartment. Any crack will form an area that will constantly get wet and gradually saturate the entire area of the wall, which sooner or later will lead to its destruction. Accuracy and thoroughness when performing work will allow you to obtain a high-quality and effective result, changing the thermal conditions in the room and increasing comfort for residents.
With the onset of winter cold, many private and suburban properties made of brick and concrete become completely unsuitable not only for permanent residence, but even for traditional weekends or holidays. But many would like to relax away from the noisy metropolis, gain energy and strength for the upcoming everyday life. And only the inadequacy of the houses prevents this from happening.
Such a problem will never arise if you take care in advance about preparing and insulating your home for the winter season.
To prevent warm air from escaping in cold weather country house, owners can use an intelligent control system or, at the design stage, think about building a “thermos house” that retains precious heat, or carry out a complex of insulation work - both external and external. High-quality and scrupulous execution, the use of modern thermal insulation materials guarantee insulation of the walls from the inside at the proper level and the creation of a comfortable, and most importantly, healthy microclimate in all rooms.
Particular attention when performing thermal insulation works You should pay attention to insulating the corners of the house, otherwise you will have to face problems in the future with their freezing and a decrease in the air temperature in the house.
Reasons for freezing corners in the house
Among the most common reasons for freezing of the corners of wooden and brick houses, there are two main ones: construction defects and the laws of physics.
It is known that each corner of a building represents a so-called geometric bridge of cold. Using insufficient quantities mortar, poor quality and voids in concrete will sooner or later lead to freezing of the corner space in the house. And thanks to the condensation that forms on the bridge due to the huge difference between street and room temperature, mold and moisture appear when low temperatures turning into ice crystals. It seems that a completely logical solution to this problem would be to lay thermal insulation material along the entire perimeter of the room. However, such thermal insulation equally insulates the wall surface not only from cold, but also from heat.
 insulation work plan
  insulating the wall from the inside using polyurethane foam
  wall insulation scheme wooden house
 insulation of walls from inside a wooden house
Widespread insulation can worsen an already deplorable situation, because the dew point will move to the inner surface of the wall, which will lead to its complete freezing. The thermal insulation layer in this case will only hold back the flow warm air indoors, preventing contact with the wall and increasing the formation of moisture on it. After some time, the thermal insulation material will first become unusable, then the wall will begin to collapse and the cold bridge will increase.
Corners in the house freeze: what to do?
The problem of insulating walls from the inside, and subsequently freezing of corners, can be solved with the help of thermal insulation of the facade, reliable insulation of internal surfaces and high-quality sealing of seams.
Internal wall insulation
Insulation of walls from the inside is used in rare cases (when there is a ban from the authorities of the locality on replacing the facade of the house or there is an elevator shaft behind the wall, unheated room or a deformation beam between houses; this form of insulation can also be included in the initial project, for example, additional insulation in frame or wooden houses). Internal wall insulation most often does not lead to the desired results. Therefore, if you nevertheless decide to insulate the walls from the inside, then you need to do it correctly, following the technology and using the materials intended for this. Materials for internal insulation are selected with the lowest vapor permeability and moisture absorption in order to avoid condensation closer to the inner edge of the wall. It is desirable that when installing the insulation there are no seams or joints.
Such common materials as: mineral wool, cork covering, warm plaster, drywall (it is used only on final stage works) etc.
 insulation of walls with penoplex inside the house
  thermal insulation with penofol
So, how to insulate walls from the inside? We recommend using the following materials:
1) Polyurethane foam (you will need to use formwork, fill the wall in parts, and then install it as an insulating layer plastic film, then build an additional one, which is already plastered).
2) Expanded polystyrene or penoplex (the joints of the sheets must be coated with sealant, they should be secured with a uniform small layer of mortar)
3) Construction of a second internal wall with air gap and a layer of insulation (it is possible to use underfloor heating elements, but this method will require high costs and will significantly reduce usable area premises).
External insulation
To insulate walls from the inside, you can use “warm” plaster, containing tiny polystyrene foam granules instead of regular sand. " Warm plaster» is distinguished by visual lightness, good speed of application and setting, high level vapor permeability and excellent thermal insulation properties: a layer of 50 mm of plaster is equivalent to double brick masonry. All these obvious advantages guarantee normal condensation and a healthy microclimate in the house.
Excellent thermal insulation characteristics, specialized liquid products - suspensions based on synthetic rubber or acrylic polymers - also have anti-corrosion and anti-fungal effects. Applying several layers of such insulation to wood, concrete and successfully replaces a 10 cm layer of mineral wool. Externally resembling paint, the suspension also effectively reflects thermal radiation. Outer side The walls are first treated with mortar using a roller, and then covered with a finishing coating.
Worthy alternative option The walls will be insulated using thermal panels.
Insulation of corners
Technology of the process of insulation of corners of brick, concrete and wooden houses To avoid freezing, it includes several actions:
- First of all, the walls are cleaned of plaster, wallpaper and other decorative coatings. If cracks cannot be identified visually, then the surface is tapped with a hammer: if voids are detected, the sound will be dull. We prepare all freezing corners, joints between floors, open cracks in concrete by making grooves with a cross-section of no more than 20x20 mm, and detect other defects that can lead to freezing. The corner is thoroughly dried.
- If mold is present, the surface is treated with antifungal compounds. If the mold damage is extensive, it is recommended to use a blowtorch or carefully mill the surface.
- Treatment of identified voids with a special thermal insulation material, For example, liquid foam or, which guarantees the appearance of moisture on inner surface walls
- The remaining foam is removed from the wall. The corner is plastered.
The best time to insulate the walls from the inside of a building is the warm season, otherwise it will be quite difficult to get rid of mold on the walls and dampness in the room.
How to prevent corners in the house from freezing?
To prevent corners from freezing, it is enough to resort to some architectural changes. For example, round or bevel corners in a house. You can significantly insulate the walls inside using pilasters on the outer corners of the building. To prevent the appearance of condensation, you can use non-standard and interesting design solutions: under the ceiling in the corner, fix a plasterboard box with decorative lighting from traditional incandescent lamps. The outgoing light flux will not only illuminate the room, but also heat the surrounding air, thereby preventing the appearance of moisture and mold.
If your house is made of logs, then at the time of its construction you should carefully fasten the crown logs in the corners with a cut lock using thermal insulation materials. Such measures will reliably protect the wooden house from freezing corners.