The scheme of how to make a palm tree from plastic bottles. Making palm trees from plastic bottles
Plastic bottles are a great material for developing creativity. A huge number of crafts organically fit into landscape design adjoining territories. This passion also performs a noble function, preventing clogging environment non-degradable waste. There are many ways to make a palm tree from plastic bottles. The proposed options will help to build a real masterpiece, which will become a worthy element of decorating the site.
First option
A real palm tree has an impressive size. To make a plant close to the original, a lot of plastic bottles will be required. Therefore, it is better to distribute the task of collecting containers in advance among the immediate environment. Brown and green containers are designed for a classic palm tree. Extraordinary and extravagant personalities can experiment with plastic bottles blue color or other non-traditional shades for palm trees.
Advice! Palm long time will retain their original attractiveness if plastic bottles are pre-soaked in warm soapy water and carefully remove the remnants of labels and adhesive solution.

Materials needed for work:
- plastic container;
- scissors and stationery knife;
- wide tape;
- thick wire for leaves;
- metal rod for the barrel.

The aesthetics of the craft will provide bottles of the same volume. For a large plant, containers of 2 liters are optimally suited, a medium-sized plant can be made from a one and a half liter container. Bottles of 0.5 liters are appropriate for a dwarf specimen.
Do-it-yourself palm tree from plastic bottles is assembled in stages:
- initially make out branches for a lush crown;
- then collect the trunk;
- at the end, the structure is connected together and securely fixed to the surface.
Let's take a look at how to make a crown step by step:


The number of branches at the top may vary, but aesthetic appearance palm trees is achieved with a minimum of 5-7 lush leaves.

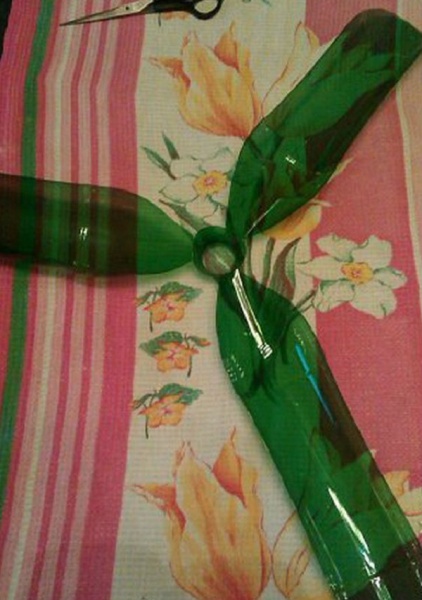
When the preparation of the crown is over, they proceed to the assembly of the palm tree trunk. It will also require almost the entire plastic bottle, with the exception of the bottom. The container is cut lengthwise into 5 equal fragments, as shown in the photo:

Palm blanks are strung on a rod, each new level comes with offset. The result should be something like this:

Advice! To connect together the crown and trunk of a palm tree, at the top metal fittings details are welded where you can thread a wire with leaves. This is the most reliable way fixation. Small light leaves are fixed with tape.


Heavy construction is preferable to make a solid foundation. There are several options for installing palm trees from plastic bottles:
- the trunk can be fixed on a metal platform, which is subsequently buried in the ground;
- reinforcement is buried half a meter into the ground and concreted;
- lighter products can be covered with brick chips with further compaction of the soil around the palm trunk.

Second option
The following method of forming a palm tree from plastic bottles with step by step algorithm actions.
Work begins with the laborious process of assembling the barrel:
- Need a third part plastic containers cut off from the side of the neck.
- All blanks are cut into 8 parts, leaving intact small plot near the base.
- In order for the palm trunk to have a scaly surface, each segment is bent outwards.
- Reduce Waste plastic bottles the use of the lower part of the container will help. To do this, at the bottom with a hot knife, you need to make a hole of a suitable diameter. Otherwise, the process of forming blanks is identical to the algorithm described above.

Palm leaves can also be made in other shapes. The crown will be presented in the form of wide foliage resembling a fan. For it, you can use plastic containers of green and yellow.
Comment! The splendor of the crown directly depends on the number of leaves from the bottles, and their width - on the size of the containers.
It is better to make the crown of a tall palm tree from a 5-liter container; for a medium-sized plant, 1.5-liter containers will be enough. Cutting the leaves of the fan is quite simple:
- on a plastic container, the bottom is removed;
- the bottle is cut lengthwise into 3 parts;
- each segment is rounded at the end;
- the petals are cut with a fringe on both sides, in the middle there remains a narrow untouched strip about 1.5 cm wide;
- splendor is achieved by bending the fringe in different directions.
In conclusion, the elements strung on the cable and fittings are fastened together.


Third option
Another way involves creating a palm tree using the bottoms of plastic bottles. It should be noted that much more will be required for such a copy of the container.
Crown design step by step:
- On each bottom, it is necessary to make a hole that corresponds in diameter to the prepared base. The work is done with a hot knife or drill.
- Blanks from green bottles are strung on a hard cable.
- The edges of the wire are secured with caps to keep the parts in place.

Every gardener dreams of making his garden well-groomed and beautiful. But it is much easier to cope with the task of landscaping than with its decoration, because garden decor is not cheap and does not always look appropriate. Yes, and why the extra spending, if the material for original crafts lies right at your fingertips. In this article we will tell you how to make a real masterpiece out of a plastic bottle and what you need in order to make a truly exotic decoration for the garden - a palm tree.
Crafts for giving, what you need to create a palm tree
A plastic bottle is a practical and multifunctional thing with which you can turn your garden into a "decorative museum". Anyone who says that this is “garbage and bad taste” simply has not seen really good DIY garden crafts. Hand-made is not only fashionable, but also in demand, because what is done with one's own hands is valued many times higher than factory items.
Really inexpensive and available materials a lot for country crafts. But among them, plastic bottles are leading in terms of practicality, durability and unpretentiousness.
Decorative elements for the garden, made of plastic bottles, not only attract admiring glances with their non-triviality, but also have an unlimited shelf life - they are not afraid of either snow or heat.
Did you know? The plastic container maintains temperature range from -40 °C to +200 °C.
In addition, plastic bottles are like plasticine in the hands of a sculptor - malleable, elastic, and allows you to do almost everything with you.
In order to make a palm tree from bottles, you will need:

- plastic bottles of several colors;
- sharp knife (clerical or construction) and scissors;
- adhesive tape and / or construction glue;
- barrel base (metal pin or hollow plastic tube);
- strong rope;
- wire.
Instructions for making leaves
At first glance, it may seem that making a tree from plastic bottles with your own hands is very difficult. But if you act in stages, it turns out that it is not only easy, but also very exciting.
First of all, let's start making the crown of a palm tree. Take a plastic bottle and cut off the bottom, about 1/3 the length of the bottle. The bottom will no longer be useful, and the part with the neck will become a blank for foliage. Palm leaves can be of two types: fluffy and tulip-shaped. In the first case, using a clerical knife or scissors, we make longitudinal cuts towards the neck, without cutting 3-4 cm to it. The width of the strips can be arbitrary, but the crown of small leaves looks most spectacular.
 The second version of the leaves is made in the following way: the blank is cut into four equal parts (cuts towards the neck of the bottle); we bend each of the parts and with the help of scissors we give the shape of a needle-shaped, figured sheet.
How to make a palm tree from bottles, the first or second way - Decide for yourself, it's a matter of taste. finished leaves will need to be collected in a branch. To do this, take a rope or cable and alternately string all the workpieces in one direction so that the neck enters the cavity of the previous bottle. About 5-7 finished blanks will take one branch of a palm tree. Be sure to screw the cork onto the neck of the first “sheet” - this is necessary to fix the rope. Remember to leave a long edge so that you can collect all the branches together later.
Important! If you have a child, and the palm tree will be within his reach, then the edges of the slices of plastic bottles should be melted so that the baby does not get hurt.
How to create a trunk for a palm tree
Getting Started next step making palm trees from plastic bottles - stem assembly.
The trunk of a palm tree can also be made in several ways, and here are some of the best ones:

Did you know? One of the palm-record holders is decorative tree, the trunk of which reaches 4.5 m in height.
Connection of the trunk and crown of an evergreen tree
The final step in assembling your craft will be the connection of the finished parts: branches and trunk. This is a very important and crucial part, because the stability of the entire structure depends on how correctly everything is done. We will tell you how to make a tree from plastic bottles safe and reliable.
Here the rest of the inventory will come to the rescue: adhesive tape, construction glue and wire.
 To begin with, we connect the left edges of the rope on which the leaves were strung into a bundle and wrap them with tape. If additional fixation is needed, we tie the branches of the leaves with wire, wrapping it around the bases of the necks. The resulting bundle is connected to the tree trunk with glue (or construction foam). If necessary, at the junction, we make a few more skeins of tape.
School of practical people. Master class making a beautiful and beautiful palm tree with your own hands from plastic bottles.
New technologies and innovations bring a lot of good things to people's lives, make it easier and more beautiful. But with this new thing, something bad comes into our lives.
A plastic bottle is an example of the above. This thing was developed in 1941. The plastic bottle has conquered the whole world. It is very popular for a number of its positive qualities:
- cheap material
- very technical
- ease of operation,
- can be reused at home.
Unfortunately, the plastic bottle also brought bad moments:
- the period of decomposition in natural conditions is more than 100 years,
- during decomposition and combustion, dangerous and harmful substances are released.
Over the past summer season, our family has accumulated a lot of plastic bottles. In the fall, they began to think about where to throw them away, how to take them to a landfill. The youngest daughter came up with a brilliant idea to leave plastic bottles at home and make something beautiful and original.
Everyone liked the idea of the daughter. On the Internet, we reviewed a lot of crafts. We settled on the idea of making a palm tree.
Stage #1
Collect as many plastic bottles as possible. The color is green (from under the Sprite). The color is dark brown (from under Kvass or Beer). A huge amount is needed. Immediately ask for help from neighbors and friends. You will certainly be helped in difficult endeavors.
Stage #2
Think carefully about what height and size your palm trees will be, how many palm trees will be, where you will install.
We, personally, to begin with, make one tall palm tree.

Stage 3
We tear off all stickers and product labels. Rinse dirty plastic bottles gently in hot water.
Stage 4
Sorting plastic bottles. So it will be easier and more comfortable to work. We start with brown bottles. Set aside the green ones, let them not interfere. We will use them later.
Stage number 5
Let's start making a powerful and reliable trunk. We take plastic brown bottles. Carefully cut off the bottoms of the bottles. Then we take a drill with a nozzle. We make holes in the center of the bottoms on a hard surface. We take armature. We string the blanks on the reinforcement one by one.


Stage #6
We bring green bottles from the warehouse. From them we will make the leaves of our exotic palm tree. For this procedure, we need sharp scissors and a knife. Carefully cut off the bottom of the plastic bottle. Throw away. Cut the rest into long strips.


Stage number 7
We mount and securely fix the workpieces on iron fittings. The length of the fittings depends on the number of bottles and the size of the palm tree.


Stage #9
Final stage. We securely install all structural elements. Iron fittings are securely fastened to each other. We invited a welder neighbor. Five minutes of work. There she is. Our beautiful palm. Reliably mount finished structure. Pour cement mortar into the pit, install a palm tree, fix it with twine.
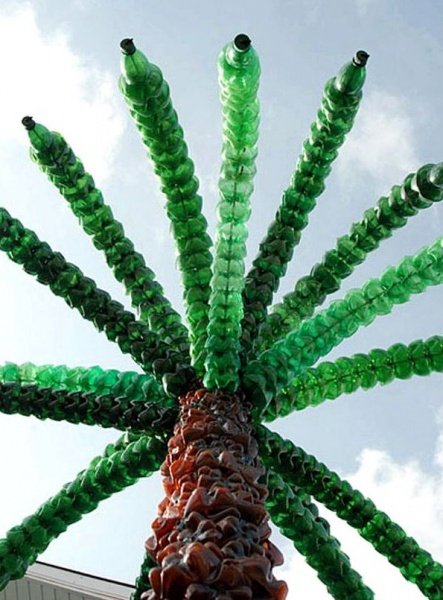
Our family decided that three gorgeous palm trees will soon grow in front of our house. We have the Bahamas all year round. See photo No. 8. Our palm trees delight all neighbors, make them stop all pedestrians and drivers, take pictures of beauty and tell friends about a miracle!!!

In this article, we want to talk about how to successfully combine love for the tropics, creativity and unnecessary plastic bottles.
The palm tree is an undeniable symbol of summer and relaxation. But it’s expensive to go to living palm trees, and a piece of such a wonderful sunny mood want to purchase. However, why buy a palm tree if you can make it yourself? Yes, and using items that are easy to find in any home - plastic bottles.
How to make a palm tree from plastic bottles in stages?
- Let's start by cutting palm leaves. To do this, divide the plastic green bottle into two parts, the top one will come in handy.
- Now strips are cut from this upper part. Treat the surface lengthwise. The shape of the bottle does not matter - any will do.

- After cutting, the resulting bottles attached to the cable
IMPORTANT: The cable diameter must be between 12 and 14 millimeters.


- And now you can start making the trunk. For them, plastic bottles with a capacity of about 2.5 liters of brown color are useful.

- Along the bottles make cuts so that the stripes are wide

- The bottom is removed


- Prepare a sheet of metal, the thickness of which should be more than 0.5 centimeters. Two rods need to be welded to this sheet about 25 centimeters long. One of them should be at an angle of 90 degrees to the sheet, and the other under a smaller one.


- Put metal tubes on the rods. The diameter is desirable within 20 millimeters. As for the height, it depends on what height of the palm you want to see.


- At the ends of the rods, metal bushings must be welded. It is in them that palm leaves from bottles will be planted.

IMPORTANT: It is better to bend the wires on which improvised leaves are mounted.


- As soon as the leaves were collected, you can proceed to the trunk


Diagram of a palm tree from plastic bottles
- For clarity, you can see in the diagram how to form the trunk of the future tree from plastic bottles. Fix an iron rod in the ground, and then string bottles on it. Cut the bottom off the bottles


- For green bottles intended for leaves, the bottom is also cut off. Further each of the bottles is cut into 3 or 4 parts. Each part, in turn, is made in the form of a fringe.

- As soon as a few green bottles are designed in the way indicated in the diagram, you can start assembling the crown
IMPORTANT: It is recommended to make cuts in the shape of crosses on the brown bottle - so the green bottles will be better attached. For better fastening you can also wire together composite crowns inside a brown bottle.


- Now top with a crown attached to the trunk as shown in the diagram

How many plastic bottles do you need to make a palm tree?
There are plastic bottles in every home, but how many do you need for a palm tree? For trunk save 10-15 pieces of brown material, or even more.
Pay attention to displacement: so, for crafts from 15 bottles, it is recommended to purchase a two-liter material, but for smaller palm trees - bottles of 10 - you can stock up on one and a half liter bottles.
As for the leaves, then it is better to take larger bottles for them - palm leaves are quite long. On average, at least 7 bottles are needed for one palm tree.

How to make palm leaves from plastic bottles?
- If you want to get wide leaves resembling a fan, cut off the bottom first. Then make cuts in the bottle so that three parts are formed. It is recommended to use not only green bottles, but also yellow ones - this way the palm tree will look more natural
IMPORTANT: Bring the incisions about half a finger to the neckline.
- Each of the incisions is rounded and tapers towards the base in such a way as to resemble leaves
- Now you need unfold all leaves outward
- The leaves are cut in such a way that a fringe is obtained. Fringe is needed on both sides of each leaf. The middle, of course, should remain intact - 1.5 centimeters is enough. To create splendor, it is recommended to bend each clove according to the following principle - one down, the second evenly, and the third up

How to make a palm tree trunk from plastic bottles?
- First of all, cut off about 1/3 of the bottle- namely the bottom
- 8 petals are cut from the remaining bottle. You need to step back from the lid half a finger
- Turn each segment inside out.
IMPORTANT: You can also use a cut-off third of the bottle to save material. However, you will have to make a hole in it for this. You can use a knife, pre-heated on the stove, for such purposes.


How to assemble a palm tree from plastic bottles?
As a stem, which will serve as a support for the palm tree, it is best to use metal-plastic pipe. Its diameter should be 20 millimeters. But there are no restrictions on the height.
- Start assembly from the bottom. And for the bottom, select the largest details, for the top - the smallest. They are assembled using the glass-to-glass method.
- The petals should turn at this time. in a checkerboard pattern
- The bottom is best fixed with a double narrow adhesive tape- He connects very well. However, you can also use glue.
- But 30 centimeters before the top of the stem, you need to finish collecting the trunk and start collecting foliage. And also use a checkerboard pattern
- Once the build is complete, bury rebar 30 centimeters into the ground. In this case, 40 centimeters should remain on the surface. And put on this armature already finished pipe with palm


Options for palm trees from plastic bottles
Palm trees from plastic bottles can look different. But it's better to see once, so we bring to your attention a selection of photos with similar artificial trees.


Palm bonsai from plastic bottles
- To make such a palm tree cut off the top and bottom of the bottle


- From the resulting green plastic material cut into small strips, and from them - leaves
IMPORTANT: The strips should be about a centimeter wide.


- Each of the leaf pieces is necessary pierce


- You should also prepare the wire for the branches- it should be from 0.2 to 0.5 millimeters in diameter

- Now cut 30-50 centimeters of wire and fold it in half. Thread the first sheet and twist the ends 2 or 3 times - this is how it is fixed

- The first rectangle is the top sheet. Place the rest on either side of it.


IMPORTANT: Retreat from each pair of leaves should be 3-4 millimeters, and then you need to twist the wire.
- As soon as the weaving of the branch is completed, twist the ends. In general, for a palm tree, you need to stock up on 15 branches. Let the top ones contain the most a large number of leaves, and the lower ones are smaller

- The palm tree will consist of two tiers. Branches should intertwine with each other, creating a common trunk

- Now let's build the foundation.. A pot is not very suitable - it is best to fix the palm tree on the island. For its manufacture, a soap dish, a saucer, a vessel is useful - anything that has an oblong shape. The container is covered with cling film, and then filled with liquid alabaster

- Put the palm tree in a bowl and wait 10 minutes- during this time, hardening will occur. Then only take out the platform How to make a big palm tree from plastic bottles?
- First of all, stock up on plenty of bottles. Cut them in half, and form teeth on the part of the cut.
- Further in the ground a metal pin is attached. You can use a strong wire as an alternative
IMPORTANT: Be sure to ensure that the pin is firmly attached to the ground.
- bottle blanks put on a pin. It is advisable to go around them in order to create a natural effect.
- From green bottles cut the leaves, after removing the bottom from the bottles
- Connect all the elements in general design . They can be fastened with bundles or welding.


How to make a small palm tree from plastic bottles?
For a similar little palm tree for the room need only 3 brown bottles and one for leaves with a capacity of 0.6 liters.
- So, cut each of the brown bottles into 4 equal pieces. And on the cut of each of the parts cuts need to be made in the form of triangles in centimeter
- Peel back those cuts
- Now divide the green bottle into 3 parts, the largest of which will be the one with a neck - 9 centimeters
- Collect the trunk from the part that consists of the bottom. Glue other components of the trunk into it

As you can see, you can arrange your own tropics in any strip of our vast country, and at any time of the year. The material is very accessible, and a little time will be spent. In addition, such a palm tree is perfect for those who do not have time to take care of living plants.
Video: Master class for making sprawling palm trees from bottles
What gardener doesn't want an exotic palm tree to adorn him? household plot?
The first stage is preparatory. In order to design such original item decoration was successful, you should have everything you need at hand for this. The main material from which the tree will be made is green and brown plastic bottles. We will use green bottles to create the leaves of the evergreen, brown ones for the trunk. The amount of plastic containers determines the size of your tree, i.e. the more bottles, the taller and more lush the tree, you will get the most lush leaves using a 2-liter container. Before proceeding to mastery, all bottles must be cleaned of paper stickers and labels.
As an auxiliary tool for mastery, you need to prepare:
- stationery knife
- sharp scissors
- wide adhesive tape
- a metal base with rods, which will later play the role of a trunk
- a rope with which you will tie the base of the leaves on a palm tree.
The next step is the manufacture of the product itself.
Remember that in order for the tree to look aesthetically pleasing and beautiful, all bottles must be the same size and diameter. In the manufacture, we will use two colors - brown and green, so if your green bottles are “various in size”, then a smaller container can be attached to the base of the crown, but as for brown ones, vessels of the same size are needed here.
The production of an exotic tree involves three main stages:
Creation of leaves;
Barrel assembly;
Gathering all the parts and shaping the tree itself.
With a sharp clerical knife, the bottle is cut into two parts, where the upper half will play the role of foliage, and we do not need the lower half. In the upward direction to the neck, with scissors or a knife, the bottle is cut into small longitudinal strips, and this is done with each green bottle. Then such a kind of foliage from half bottles is strung on top of each other, connecting them with a strong tourniquet or rope. A cork is screwed on the last and first bottle, through which a tourniquet is threaded and tied into a knot so that the container fits snugly together. The top of the palm tree should consist of 5-6-7 leaves, therefore, depending on the amount of containers available, you create your tree, controlling the size and splendor.
After the foliage is ready in full, we move on to the trunk. The barrel, as mentioned earlier, is made from brown bottles of a similar diameter, cut off the lower base with a knife, after which wide longitudinal cuts are made towards the neck, there should be 6 such longitudinal fragments. After a similar action has been done with each brown bottle, they are fixed to each other, like green vessels, only the plastic barrel must now be put on a metal rod in an upright position.
At the upper base of the trunk, the foliage is fixed, evenly distributing it on all sides. With the help of adhesive tape and a tourniquet, the leaves are attached to the trunk. Our tree is ready, it remains only to find a place for it in your garden.
Let's move on to the installation. Ideally, this is a welded metal platform, in the absence of this, immersion in the ground by 40-50 cm. For the durability of your skill, it would be good to compact the tree installation site with soil or concrete.
Such evergreen tree African savannah will turn your backyard into a real oasis!


